Page 10 of 444
1. Engine hood (P. 8-6)
2. Windshield wiper and washer switch(P. 2-26)
3. Windshield (P. 8-22)
4. Windows (P. 2-47)
5. Door locks, keyfob (if so equipped) ,
keys (P. 3-3, 3-6, 3-2)
6. Mirrors (P. 3-15)
7. Tire pressure (P. 8-33)
8. Flat tire (P. 6-3)
9. Tire chains (P. 8-40)
10. Headlight and turn signal switch
(P. 2-28); Replacing bulbs (P. 8-29)
11. Fog light switch (if so equipped)
(P. 2-32)
See the page number indicated in paren-
theses for operating details.
LII0052
EXTERIOR FRONT
Illustrated table of contents0-3
Page 14 of 444
15. Electronic locking rear differential(E-Lock) system switch
(if so equipped) (P.2-35)
Heated seat switch (if so equipped)
(P. 2-33)
Rear sonar switch (if so equipped)
(P. 2-37)
Vehicle Dynamic Control (VDC) OFF
switch (P. 2-34)
16. Shift selector (P. 5-13, 5-18)
17. 4WD shift switch (if so equipped)
(P. 5-26)
18. Climate controls (P. 4-17, P.4-25)
19. Hazard warning flasher switch (P. 6-3)
20. Ignition switch (P. 5-10)
21. Tilt steering wheel control
(if so equipped) (P. 3-13)
22. Cargo lamp switch (P. 2-32)
23. Clutch interlock (clutch start) switch
(if so equipped) (P. 2-36)/Hill descent
control switch (if so equipped)
(P. 2-34)
24. Outside mirror controls (if so equipped)
(P. 3-17)
Illustrated table of contents
0-7
Page 17 of 444
Warninglight Name Page
or
Anti-lock Braking
System (ABS)
warning light 2-15
Automatic transmis-
sion check warning
light2-15
Automatic transmis-
sion oil temperature
warning light (if so
equipped)2-15
Automatic transmis-
sion park warning
light
(
model)2-15
or
Brake warning light 2-16
Warning
light Name Page
Charge warning
light 2-16
Door open warning
light2-17
Engine oil pressure
warning light2-17
4WD warning light
(
model)2-17
Low fuel warning
light 2-18
Low tire pressure
warning light2-18
Low windshield-
washer fluid warning
light (if so equipped)2-19
Seat belt warning
light and chime
2-19
Warning
light Name Page
Supplemental air
bag warning light 2-20
Indicator
light Name Page
Automatic transmis-
sion position indica-
tor light (if so
equipped) 2-20
Cruise main switch
indicator light (if so
equipped)
2-20
Cruise set switch
indicator light (if so
equipped)2-20
WARNING/INDICATOR LIGHTS
0-10Illustrated table of contents
Page 18 of 444
Indicatorlight Name Page
Electronic locking
rear differential
(E-Lock) system on
indicator light (if so
equipped) 2-20
4WD shift indicator
light (
model)
2-21
Front passenger air
bag status light
2-21
High beam indicator
light (blue)2-21
Hill descent control
system on indicator
light (if so equipped)2-34
Malfunction Indica-
tor Light (MIL)
2-21
Overdrive off indica-
tor light (A/T models
only)2-22
Indicator
light Name Page
Security indicator
light (if so equipped) 2-22
Slip indicator light
for models with
ABLS2-22
Slip indicator light
for models with
VDC2-22
Transfer 4LO posi-
tion indicator light
(
model)2-22
Turn signal/hazard
indicator lights
2-23
Vehicle Dynamic
Control (VDC) OFF
indicator light2-23
Illustrated table of contents0-11
Page 21 of 444

WARNING
●Do not ride in a moving vehicle when
the seatback is reclined. This can be
dangerous. The shoulder belt will not
be against your body. In an accident,
you could be thrown into it and receive
neck or other serious injuries. You
could also slide under the lap belt and
receive serious internal injuries. ●
For the most effective protection when
the vehicle is in motion, the seat should
be upright. Always sit well back in the
seat with both feet on the floor and
adjust the seat properly. See “Precau-
tions on seat belt usage” later in this
section.
● After adjustment, gently rock in the seat
to make sure it is securely locked.
● Do not leave children unattended inside
the vehicle. They could unknowingly ac-
tivate switches or controls. Unattended
children could become involved in seri-
ous accidents. ●
The seatback should not be reclined
any more than needed for comfort. Seat
belts are most effective when the pas-
senger sits well back and straight up in
the seat. If the seatback is reclined, the
risk of sliding under the lap belt and
being injured is increased.
CAUTION
When adjusting the seat positions, be
sure not to contact any moving parts to
avoid possible injuries and/or damage.
FRONT MANUAL SEAT
ADJUSTMENT (if so equipped)ARS1152
SEATS
1-2Safety—Seats, seat belts and supplemental restraint system
Page 22 of 444
Forward and backward
Pull the lever up and hold it while you slide the
seat forward or backward to the desired position.
Release the lever to lock the seat in position.
Reclining
To recline the seatback, pull the lever up and lean
back. To bring the seatback forward, pull the lever
up and lean your body forward. Release the lever
to lock the seatback in position.
The reclining feature allows adjustment of the
seatback for occupants of different sizes for
added comfort and to help obtain proper seat
belt fit. See “Precautions on seat belt usage” later
in this section. Also, the seatback can be reclined
to allow occupants to rest when the vehicle is
stopped and the transmission is in P (Park) or N
(Neutral) position with the parking brake fully
applied.
Seat lifter (if so equipped for driver’s
seat)
Turn either dial to adjust the angle and height of
the seat cushion to the desired position.
WRS0175WRS0176WRS0131
Safety—Seats, seat belts and supplemental restraint system1-3
Page 26 of 444
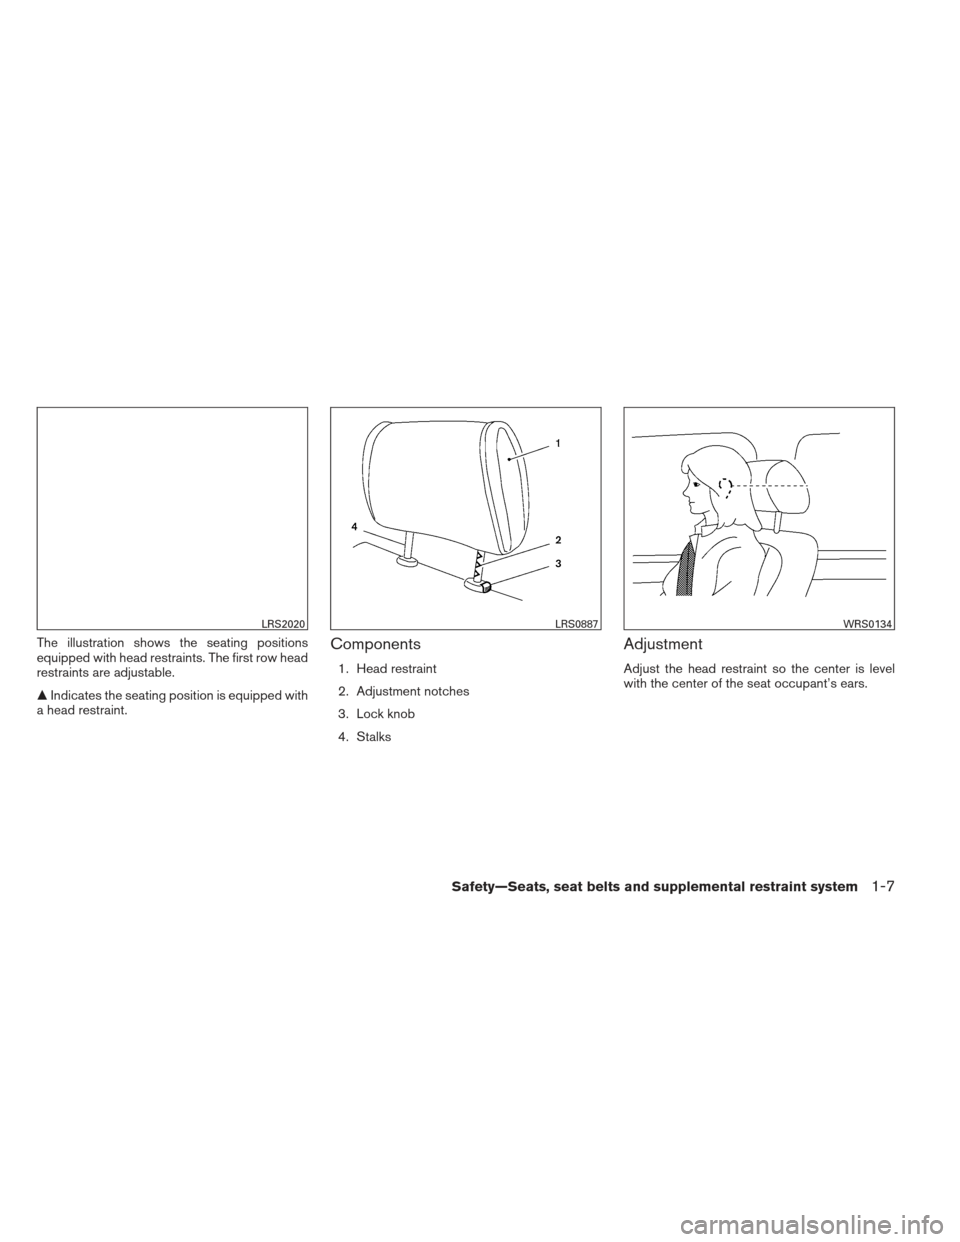
The illustration shows the seating positions
equipped with head restraints. The first row head
restraints are adjustable.
�Indicates the seating position is equipped with
a head restraint.Components
1. Head restraint
2. Adjustment notches
3. Lock knob
4. Stalks
Adjustment
Adjust the head restraint so the center is level
with the center of the seat occupant’s ears.
LRS2020LRS0887WRS0134
Safety—Seats, seat belts and supplemental restraint system1-7
Page 27 of 444
To raise the head restraint, pull it up.To lower, push and hold the lock knob and push
the head restraint down.Removal
Use the following procedure to remove the ad-
justable head restraints.
1. Pull the head restraint up to the highest position.
2. Push and hold the lock knob.
3. Remove the head restraint from the seat.
4. Store the head restraint properly so it is not loose in the vehicle.
5. Reinstall and properly adjust the head re- straint before an occupant uses the seating
position.
LRS0888LRS0889LRS0890
1-8Safety—Seats, seat belts and supplemental restraint system

2. Windshield wiper and washer switch(P. 2-26)
3. Windshield (P. 8-22)
4. Windows (P. 2-47)
5. Door locks, keyfob (if so equipped) ,
keys (P. 3-3, 3-6, 3-2)
6. Mirrors (P. 3-15")
 system switch
(if so equipped) (P.2-35)
Heated seat switch (if so equipped)
(P. 2-33)
Rear sonar switch (if so equipped)
(P. 2-37)
Vehicle Dynamic Cont")

warning light 2-15
Automatic transmis-
sion check warning
light2-15
Automatic transmis-
sion oil temperature
warning light (if so
equipped)2-15")
 system on
indicator light (if so
equipped) 2-20
4WD shift indicator
light (
model)
2-21
Front passenger air
bag status light
2-21")