Page 18 of 489

1 Safety—Seats, seat belts and
supplemental restraint system
Seats ............................................1-2
Front power seat adjustment . . ...................1-3
2nd row captain’s chair adjustment
(if so equipped) ................................1-4
2nd row bench seat adjustment
(if so equipped) ................................1-5
Armrests ......................................1-7
Head restraints (1st row only) ....................1-7
Head restraints
(2nd row – outboard positions only) . ............1-11
Adjustable headrest ........................... 1-13
Flexible seating ................................ 1-16
3rd row power folding seats (if so equipped) .....1-22
Seat belts ....................................... 1-24
Precautions on seat belt usage ..................1-24
Pregnant women .............................. 1-27
Injured persons ................................ 1-27
Three-point type seat belt with retractor ..........1-27
Seat belt extenders ............................ 1-33
Seat belt maintenance ......................... 1-34
Child safety ...................................... 1-34
Infants ........................................ 1-35
Small children ................................. 1-35Larger children
................................ 1-35
Child restraints ................................... 1-36
Precautions on child restraints ..................1-36
LATCH (Lower Anchors and Tethers for
CHildren) System ............................. 1-38
Rear-facing child restraint installation using
LATCH....................................... 1-42
Rear-facing child restraint installation using
the seat belts . . ............................... 1-44
Forward-facing child restraint installation
using LATCH. . . ............................... 1-47
Forward-facing child restraint installation
using the seat belts ............................ 1-48
Installing top tether strap
(2nd row captain’s chairs or 2nd row bench
seat [if so equipped] ) .......................... 1-52
Installing top tether strap
(3rd row bench seat) ........................... 1-53
Booster seats ................................. 1-53
Supplemental restraint system .....................1-57
Precautions on supplemental restraint
system ....................................... 1-57
Supplemental
air bag warning labels .............1-71
Supplemental air bag warning light ..............1-72
Page 25 of 489
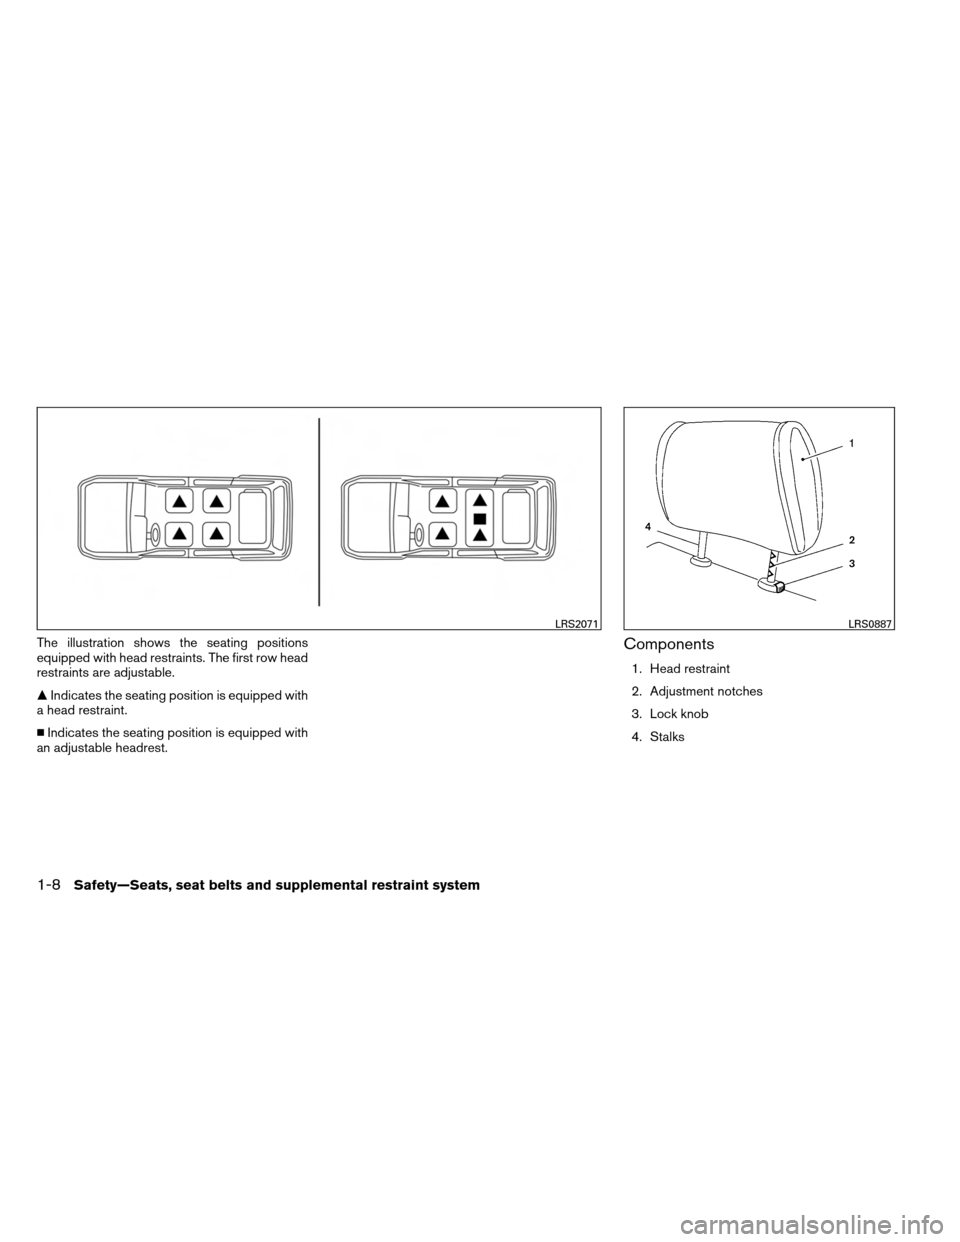
The illustration shows the seating positions
equipped with head restraints. The first row head
restraints are adjustable.
�Indicates the seating position is equipped with
a head restraint.
� Indicates the seating position is equipped with
an adjustable headrest.Components
1. Head restraint
2. Adjustment notches
3. Lock knob
4. Stalks
LRS2071LRS0887
1-8Safety—Seats, seat belts and supplemental restraint system
Page 28 of 489

WARNING
Head restraints supplement the other ve-
hicle safety systems. Th")
Adjust the Active Head Restraints properly as
described in this section.
HEAD RESTRAINTS (2nd row –
outboard positions only)
WARNING
Head restraints supplement the other ve-
hicle safety systems. They may provide
additional protection against injury in cer-
tain rear end collisions. Adjust the head
restraints properly, as specified in this
section. Check the adjustment after
someone else uses the seat. Do not attach
anything to the head restraint stalks. Do
not use the seat if the head restraint has
been removed. If the head restraint was
removed, reinstall and properly adjust the
head restraint before an occupant uses
the seating position. Failure to follow
these instructions can reduce the effec-
tiveness of the head restraints. This may
increase the risk of serious injury or death
in a collision.The illustration shows the seating positions
equipped with head restraints. The second row
head restraints are removable but not adjustable.
�
Indicates the seating position is equipped with
a head restraint.
� Indicates the seating position is equipped with
an adjustable headrest.
LRS2071
Safety—Seats, seat belts and supplemental restraint system1-11
Page 30 of 489

ADJUSTABLE HEADREST
WARNING
The adjustable headrests supplement the
other vehicle safety systems. They may
provide additional protection against in-
jury in certain rear end collisions. Adjust
the headrests properly, as specified in this
section. Check the adjustment after
someone else uses the seat. Do not attach
anything to the adjustable headrest stalks
. Do not use the seat if the adjustable
headrests have been removed. If the
headrest was removed, reinstall and prop-
erly adjust the headrest before an occu-
pant uses the seating position. Failure to
follow these instructions can reduce the
effectiveness of the adjustable headrests.
This may increase the risk of serious injury
or death in a collision.The illustration shows the seating positions
equipped with adjustable headrests. All of the
headrests are adjustable.
�
Indicates the seating position is equipped with
an adjustable headrest.
+ Indicates the seating position is not equipped
with a head restraint or adjustable headrest.
LRS2072
Safety—Seats, seat belts and supplemental restraint system1-13
Page 31 of 489
Components
1. Adjustable headrest
2. Adjustment notches
3. Lock knob
4. Stalks
Adjustment
Adjust the headrest so the center is level with the
center of the seat occupant’s ears.To raise the headrest, pull it up.
LRS0887WRS0134LRS0888
1-14Safety—Seats, seat belts and supplemental restraint system
Page 32 of 489
To lower, push and hold the lock knob and push
the headrest down.Removal
Use the following procedure to remove the ad-
justable headrests.1. Pull the headrest up to the highest position.
2. Push and hold the lock knob.
3. Remove the headrest from the seat.
4. Store the headrest properly so it is not loose in the vehicle.
5. Reinstall and properly adjust the headrest before an occupant uses the seating posi-
tion.
Install
1. Align the headrest stalks with the holes inthe seat. Make sure the headrest is facing
the correct direction. The stalk with the ad-
justment notches
�1must be installed in the
hole with the lock knob
�2.
2. Push and hold the lock knob and push the headrest down.
3. Properly adjust the headrest before an oc- cupant uses the seating position.
LRS0889LRS0890LRS0891
Safety—Seats, seat belts and supplemental restraint system1-15
Page 39 of 489

To return the 3rd row split bench seat to a seating
position, unfold the seatback and push it back
until it latches into position.
WARNING
●When returning the seatbacks, be sure
to attach the rear center seat belt
connector.
● Do not unfasten the rear center seat
belt connector except when folding
down the rear seat.
● When attaching the rear center seat
belt connector, be certain that the seat-
backs are completely secured in the
latched position and the rear center
seat belt connector is completely
secured.
● If the rear center seat belt connector
and the seatbacks are not secured in
the correct position, serious personal
injury may result in an accident or sud-
den stop.
3RD ROW POWER FOLDING
SEATS (if so equipped)
The 3rd row power folding seat controls are
located behind the 2nd row seat (passenger’s
side) on the 3rd row cup holder console
�1.
There are also controls located on the rear quar-
ter trim panel behind the 3rd row seats (passen-
ger’s side)
�2.
Before operating the 3rd row seats: ● Make sure the 2nd row seatback isn’t re-
clined.
● Lower the 3rd row headrest to the full down
position. ●
Disconnect and secure the center seat belt
and tongues into the retractor base. See
“Stowing the 3rd row center seat belt” later
in this section.
– Always reconnect the center seat belt when the seat is returned to the upright
position.
● Make sure that there are no objects on the
seatback cushion.
CAUTION
Make sure the seat(s) is returned to the
full upright position before a passenger
sits in the seat(s) .
When folding or returning the seat(s) to
the upright position, to avoid injury to
yourself and others:
● Make sure that the seat path is clear
before moving the seat.
● Be careful not to allow hands or feet to
get caught or pinched in the seat.
LRS0792
1-22Safety—Seats, seat belts and supplemental restraint system
Page 66 of 489

Refer to all Warnings and Cautions in the “Child
Safety” and “Child Restraint” sections before in-
stalling a child restraint.
Follow these steps to install a forward-facing
child restraint using the vehicle seat belt in the
rear seats or in the front passenger seat:1. If you must install a child restraint in
the front seat, it should be placed in a
forward-facing direction only. Move
the seat to the rearmost position. Child
restraints for infants must be used in the rear-facing direction and, there-
fore, must not be used in the front seat.
2. Position the child restraint on the seat. Al- ways follow the child restraint manufactur-
er’s instructions.
The back of the child restraint should be
secured against the vehicle seatback.
If necessary, adjust or remove the head re-
straint or headrest to obtain the correct child
restraint fit. If the head restraint or headrest
is removed, store it in a secure place. Be
sure to reinstall the head restraint or
headrest when the child restraint is
removed. See “Head restraints” or “Adjust-
able headrest” in this section for head re-
straint or headrest adjustment, removal and
installation information.
If the seating position does not have an
adjustable head restraint or headrest and it
is interfering with the proper child restraint
fit, try another seating position or a different
child restraint. 3. Route the seat belt tongue through the child
restraint and insert it into the buckle until you
hear and feel the latch engage. Be sure to
follow the child restraint manufacturer’s in-
structions for belt routing.
Forward-facing (front passenger seat) – step 1
WRS0699
Forward-facing – step 3
WRS0680
Safety—Seats, seat belts and supplemental restraint system1-49