Page 165 of 413
Touch screen operation
Selecting the item:
Touch an item to select. For example, to select
the “Audio” key, touch the “Audio” key
�1on the
screen. Adjusting the item:
For screens where an item can be adjusted incre-
mentally, such as when adjusting the bass and
treble for the audio system, touch the “+” key�1
or the “�” key�2to adjust the settings of an item.
When there are more items than can be dis-
played on one screen, touch the up arrow
�3to
scroll up the page or touch the down arrow
�4to
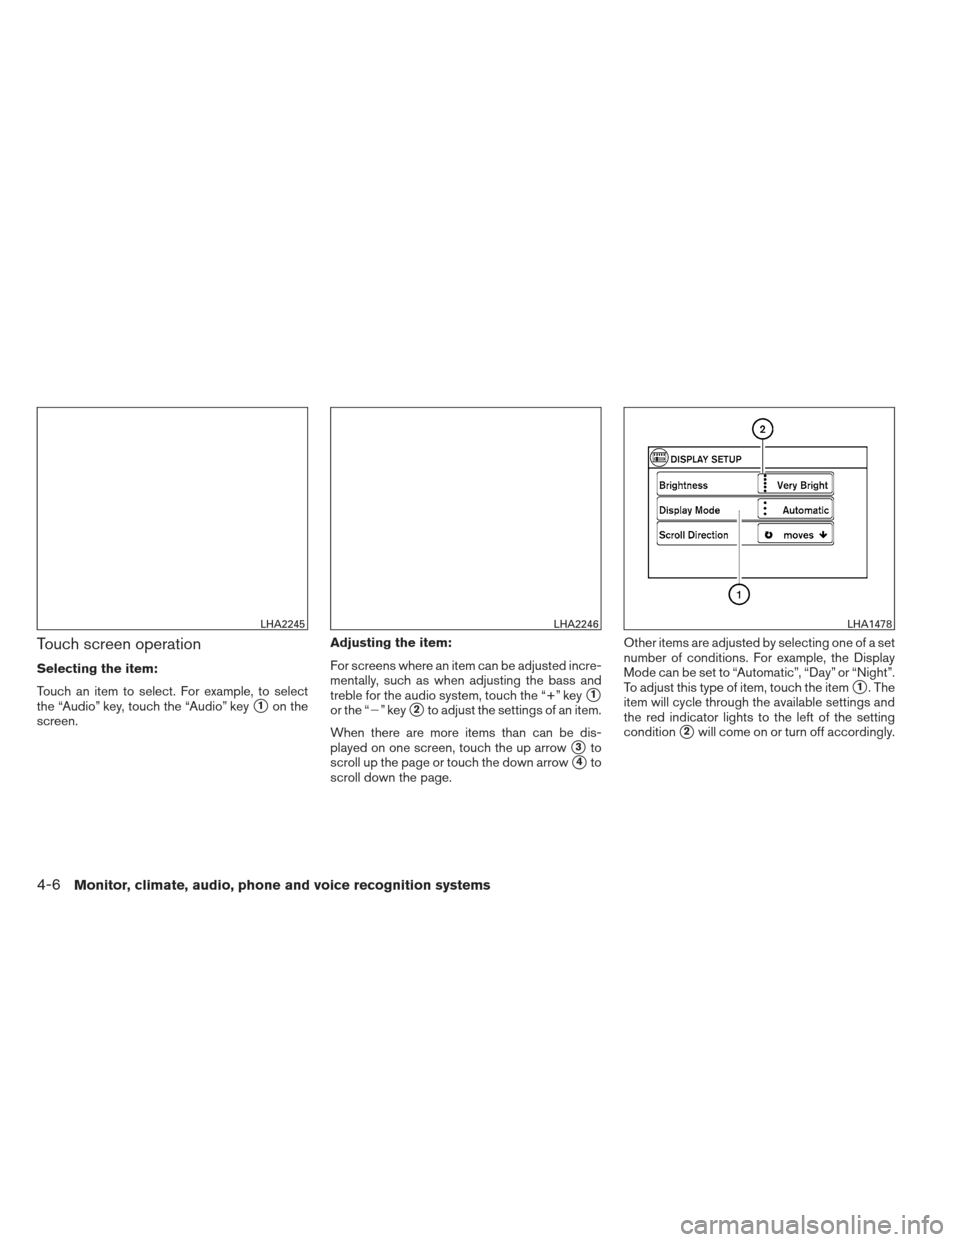
scroll down the page. Other items are adjusted by selecting one of a set
number of conditions. For example, the Display
Mode can be set to “Automatic”, “Day” or “Night”.
To adjust this type of item, touch the item
�1. The
item will cycle through the available settings and
the red indicator lights to the left of the setting
condition
�2will come on or turn off accordingly.
LHA2245LHA2246LHA1478
4-6Monitor, climate, audio, phone and voice recognition systems
Page 166 of 413

Inputting characters:
Touch the letter key
�1.
There are some options available when inputting
characters. ● 123 / ABC:
Changes the available character set to num-
bers.
● Space:
Inserts a space.
● Delete:
Deletes the last inputted character with one
touch. Touch and hold the “Delete” key to
delete all of the characters. ●
OK:
Completes the character input.
Touch screen maintenance
If you clean the display screen, use a dry, soft
cloth. If additional cleaning is necessary, use a
small amount of neutral detergent with a soft
cloth. Never spray the screen with water or de-
tergent. Dampen the cloth first and then wipe the
screen.
HOW TO USE THE BACK BUTTON
Press theBACK button to return to the
previous screen.
HOW TO USE THE MENU BUTTON
For more information about the “POIs Powered
by Google™”, “Google™ Send-To-Car, “Traffic
Information” and “Weather” features, see the
separate Navigation System Owner’s Manual.
For more information about the “Voice Com-
mands” key, see “NISSAN Voice Recognition
System” in this section.
To select and/or adjust several functions, fea-
tures and modes that are available for your ve-
hicle:
1. Press the MENU button.
2. Select the “Settings” key.
LHA2247LHA2253
Monitor, climate, audio, phone and voice recognition systems4-7
Page 167 of 413
3. Select the desired item.
Audio
For audio setup, refer to “Audio system” in this
section.
Navigation
Refer to the separate Navigation System Own-
er’s Manual for information regarding this item.
Phone & Bluetooth
For information regarding the Bluetooth®
Hands-Free Phone System, see “Bluetooth®
Hands-Free Phone System” in this section.For information regarding Bluetooth® audio, see
“Bluetooth® streaming audio with Navigation
System” in this section.
System
Select the “System” key to select and/or adjust
various functions of the system. A screen with
additional options will appear.
LHA2248LHA2249
4-8Monitor, climate, audio, phone and voice recognition systems
Page 168 of 413

Display:
Select the “Display” key to adjust the appearance
of the display. The following settings can be
adjusted:
Brightness
The brightness of the display can be set to Very
Bright, Bright, Default, Dark or Very Dark. Touch
the “Brightness” key to cycle through the options.
Display Mode
The display can be adjusted to fit the level of
lighting in the vehicle. Touch the “Display Mode”
key to cycle through the options. “Day” and“Night” modes are suited for the respective times
of day, while “Automatic” controls the display
automatically.
Scroll Direction
The direction that menus scroll can be adjusted.
Choose either “up” or “down”.
Clock Settings:
Select the “Clock Settings” key to adjust the time
and the appearance of the clock on the display.
The following settings can be adjusted:
Time Format
The clock can be set to 12 hours or 24 hours.
Date Format
Select from five possible formats of displaying
the day, month and year.
LHA1482LHA2250
Monitor, climate, audio, phone and voice recognition systems4-9
Page 169 of 413

Clock Mode
Select the mode for the clock. “Auto” uses the
system’s GPS to automatically maintain the time.
“Manual” allows you to set the clock using the
“Set Clock Manually” key. “Time Zone” maintains
the time based upon the zone selected when
selecting the “Time Zone” key.Set Clock Manually
When this setting is activated, the clock can be
set manually. Touch the “+” or “-” keys to adjust
the hours, minutes, day, month and year up or
down. “Clock Mode” must be set to “Manual” for
this option to be available.
Daylight Savings Time
When this setting is activated, daylight savings
time is on. Touch the “Daylight Savings Time” key
to toggle the setting on or off.
Time Zone
Choose the applicable time zone from the list.Language:
Select the “Language” key to adjust the language
used by the system. The language can be set to
English, Français or Español.
Touchscreen click:
Select the “Touchscreen Click” key to toggle the
touchscreen click feature on or off. When acti-
vated, a click sound will be heard every time a key
on the screen is touched.
System Beeps:
Select the “System Beeps” key to toggle the
system beep tones feature on or off. When acti-
vated, a beep sound will be heard when a pop-up
LHA2251LHA2252
4-10Monitor, climate, audio, phone and voice recognition systems
Page 170 of 413
 is pressed
and held for two seconds.
Reset all settings/memory:
Select the “Reset All Settings/Memory” key to
return all")
message appears on the screen or a button on
the unit (such as the
button) is pressed
and held for two seconds.
Reset all settings/memory:
Select the “Reset All Settings/Memory” key to
return all settings to default and to clear the
memory.
Info
For information about the “Info” key, see the
separate Navigation System Owner’s Manual.
XM
For XM setup, refer to “Audio system” in this
section.
BUTTON
To change the display brightness, press
the
button. Pressing the button again will
change the display to the day or the night display.
If no operation is performed within 5 seconds, the
display will return to the previous display.
Press and hold the
button for more than
two seconds to turn the display off. Press the
button again to turn the display on. When the shift selector is shifted into the R
(Reverse) position, the monitor display shows a
rearward view from the vehicle.
WARNING
●
The system is designed as an aid to the
driver in detecting large stationary ob-
jects to help avoid damaging the ve-
hicle. The system will not detect small
objects below the bumper, and may not
detect objects close to the bumper or
on the ground.
● The RearView Monitor is a convenience
but it is not a substitute for proper back-
ing. Always turn and check that it is safe
to do so before backing up. Always
back up slowly.
● Objects viewed in the RearView Moni-
tor differ from actual distance because
a wide-angle lens is used.
● Make sure that the trunk is securely
closed when backing up.
● Do not put anything on the rearview
camera. The rearview camera is in-
stalled beside the license plate light. ●
When washing the vehicle with high-
pressure water, be sure not to spray it
around the camera. Otherwise, water
may enter the camera unit causing wa-
ter condensation on the lens, a mal-
function, fire or an electric shock.
● Do not strike the camera. It is a preci-
sion instrument. Otherwise, it may mal-
function or cause damage resulting in a
fire or an electric shock.
CAUTION
There is a plastic cover over the camera.
Do not scratch the cover when cleaning
dirt or snow from the cover.
REARVIEW MONITOR (if so
equipped)
Monitor, climate, audio, phone and voice recognition systems4-11
Page 171 of 413

HOW TO READ THE DISPLAYED
LINES
Guiding lines which indicate the vehicle width
and distances to objects with reference to the
vehicle body line
�Aare displayed on the monitor.
Distance guide lines:
Indicate distances from the vehicle body. ● Red line
�1: approx. 1.5 ft (0.5 m)
● Yellow line
�2: approx. 3 ft (1 m)
● Green line
�3: approx. 7 ft (2 m)
● Green line
�4: approx. 10 ft (3 m) Vehicle width guide lines
�5:
Indicate the vehicle width when backing up.
Predicted course lines
�6(Navigation Sys-
tem only):
Indicate the predicted course when backing up.
The predicted course lines will be displayed on
the monitor when the shift selector is in the R
(Reverse) position and the steering wheel is
turned. The predicted course lines will move de-
pending on how much the steering wheel is
turned and will not be displayed while the steer-
ing wheel is in the neutral position.
The vehicle width guide lines and the width of the
predicted course lines are wider than the actual
width and course. The predicted course lines feature can be set to
on or off.
1. Press the CAMERA button.
2. Select the “Show Guidelines” key to toggle the feature on or off.
LHA1196LHA2278
4-12Monitor, climate, audio, phone and voice recognition systems
Page 172 of 413

WARNING
●Always turn and check that it is safe to
do so before backing up. Always back
up slowly.
● Use the displayed lines as a re")
HOW TO PARK WITH PREDICTED
COURSE LINES (Navigation System
only)
WARNING
●Always turn and check that it is safe to
do so before backing up. Always back
up slowly.
● Use the displayed lines as a reference.
The lines are highly affected by the
number of occupants, fuel level, vehicle
position, road conditions and road
grade.
● If the tires are replaced with different
sized tires, the predicted course lines
may be displayed incorrectly.
● On a snow-covered or slippery road,
there may be a difference between the
predicted course line and the actual
course line.
● If the battery is disconnected or be-
comes discharged, the predicted
course lines may be displayed incor-
rectly. If this occurs, please perform the
following procedures:
– Turn the steering wheel from lock to lock while the engine is running. – Drive the vehicle on a straight road
for more than 5 minutes.
● When the steering wheel is turned with
the ignition switch in the ACC position,
the predicted course lines may be dis-
played incorrectly.
● The distance guide line and the vehicle
width line should be used as a refer-
ence only when the vehicle is on a level
paved surface. The distance viewed on
the monitor is for reference only and
may be different than the actual dis-
tance between the vehicle and dis-
played objects.
● When backing up the vehicle up a hill,
objects viewed in the monitor are fur-
ther than they appear. When backing up
the vehicle down a hill, objects viewed
in the monitor are closer than they ap-
pear. Use the inside mirror or glance
over your shoulder to properly judge
distances to other objects.
The vehicle width and predicted course
lines are wider than the actual width and
course. 1. Visually check that the parking space is safe
before parking your vehicle.
2. The rear view of the vehicle is displayed on the screen
�Awhen the shift selector is
moved to the R (Reverse) position.
LHA1197
Monitor, climate, audio, phone and voice recognition systems4-13