Page 103 of 413

NOTE:
Autolight activation sensitivity and the
time delay for autolight shutoff can be ad-
justed. See “Vehicle information display” in
this section.
To turn on the autolight system:1. Turn the headlight switch to the AUTO posi- tion
�1.
2. Turn the ignition switch to ON.
3. The autolight system automatically turns the headlights on and off.
Initially, if the ignition switch is turned OFF and a
door is opened and left open, the headlights
remain ON for a period of time. If another door is
opened while the headlights are on, then the
timer is reset.
To turn the autolight system off, turn the switch to
the OFF,
,orposition. Be sure you do not put anything on top of
the autolight sensor located in the top side
of the instrument panel. The autolight sen-
sor controls the autolight; if it is covered,
the autolight sensor reacts as if it is dark
out and the headlights will illuminate. If
this occurs while parked with the engine
off and the ignition switch placed in the ON
position, your vehicle’s battery could be-
come discharged.
Headlight beam select
�1To select the high beam function, push the
lever forward. The high beam lights come on
and the
light illuminates.
�2Pull the lever back to select the low beam.
�3Pulling and releasing the lever flashes the
headlight high beams on and off.
Battery saver system
If the ignition switch is placed in the OFF position
while the headlight switch is in the
orposition, the headlights will turn off after
a period of time.
LIC2318WIC1438
2-32Instruments and controls
Page 104 of 413

CAUTION
Even though the battery saver feature au-
tomatically turns off the headlights after a
period of time, you should turn the head-
light switch to the OFF position when the
engine is not running to avoid discharging
the vehicle battery.
DAYTIME RUNNING LIGHT SYSTEM
(Canada only)
The headlights automatically illuminate at a re-
duced intensity when the engine is started with
the parking brake released. The daytime running
lights operate with the headlight switch in the
OFF position or in the
position. Turn the
headlight switch to the
position for full
illumination when driving at night.
If the parking brake is applied before the engine is
started, the daytime running lights do not illumi-
nate. The daytime running lights illuminate when
the parking brake is released. The daytime run-
ning lights will remain on until the ignition switch
is placed in the OFF position.
WARNING
When the daytime running light system is
active, tail lights on your vehicle are not
on. It is necessary at dusk to turn on your
headlights. Failure to do so could cause
an accident injuring yourself and others.
INSTRUMENT BRIGHTNESS
CONTROL
Push the “+” button�Ato increase the bright-
ness of instrument panel lights when driving at
night.
Push the “-” button
�Bto decrease the bright-
ness of instrument panel lights when driving at
night.
LIC2305
Instruments and controls2-33
Page 105 of 413

TURN SIGNAL SWITCH
Turn signal
�1Move the lever up or down to signal the
turning direction. When the turn is com-
pleted, the turn signals cancel automatically.
Lane change signal
�2To signal a lane change, move the lever up or
down to the point where the indicator light
begins to flash, but the lever does not latch.
The turn signal will flash three times automati-
cally.
FOG LIGHT SWITCH (if so equipped)
To turn the fog lights on, turn the headlight switch
to the
position, then turn the fog light
switch to the
position.
To turn the fog lights on with the headlight switch in
the AUTO position, the headlights must be on, then
turn the fog light switch to the
position.
To turn the fog lights off, turn the fog light switch
to the OFF position.
The headlights must be on and the low beams
selected for the fog lights to operate. The fog
lights automatically turn off when the high beam
headlights are selected. To sound the horn, push near the horn icon of the
steering wheel.
WARNING
Do not disassemble the horn. Doing so
could affect proper operation of the
supplemental front air bag system. Tam-
pering with the supplemental front air bag
system may result in serious personal
injury.
WIC1439WIC1440LIC2319
HORN
2-34Instruments and controls
Page 109 of 413

CAUTION
●The outlet and plug may be hot during
or immediately after use.
● Only certain power outlets are designed
for use with a cigarette lighter unit. Do
not use any other power outlet for an
accessory lighter. See your NISSAN
dealer for additional information.
● Do not use with accessories that ex-
ceed a 12 volt, 120W (10A) power draw.
● Do not use double adapters or more
than one electrical accessory. ●
Use power outlets with the engine run-
ning to avoid discharging the vehicle
battery.
● Avoid using power outlets when the air
conditioner, headlights or rear window
defroster is on.
● Before inserting or disconnecting a
plug, be sure the electrical accessory
being used is turned OFF.
● Push the plug in as far as it will go. If
good contact is not made, the plug may
overheat or the internal temperature
fuse may open.
● When not in use, be sure to close the
cap. Do not allow water or any other
liquid to contact the outlet.
MAP POCKETSConsole box
LIC2307LIC2308
STORAGE
2-38Instruments and controls
Page 118 of 413
NOTE:
The step lights illuminate when the driver
and passenger doors are opened regard-
less of the interior light switch position.
These lights will turn off automatically after
a period of time while doors are open to
prevent the battery from becoming dis-
charged.
CAUTION
Do not use for extended periods of time
with the engine stopped. This could result
in a discharged battery.
CONSOLE LIGHT
The console light will turn on whenever the park-
ing lights or headlights are illuminated.To turn the rear personal lights on, press the
switch. To turn them off, press the switch again.
LIC2303
Rear personal lights
LIC1083
PERSONAL LIGHTS
Instruments and controls2-47
Page 138 of 413
Releasing the trunk lid
Press thebutton for longer than 0.5 sec-
onds to open the trunk lid. The trunk release
button will not operate when the ignition switch is
in the ON position or when the trunk cancel
switch is in the OFF position. See “Cancel
switch” in this section.
Using the panic alarm
If you are near your vehicle and feel threatened,
you may activate the panic alarm to call attention
by pressing and holding the
button on the
Intelligent Key for longer than 0.5 seconds.
The panic alarm and headlights will stay on for a
period of time. The panic alarm stops when:
● It has run for a period of time, or
● Any button is pressed on the Intelligent Key.
● The request switch on the driver or passen-
ger door has been pushed and the Intelligent
Key is in range of the door handle.
WPD0364WPD0361
Pre-driving checks and adjustments3-15
Page 145 of 413

Using the panic alarm
If you are near your vehicle and feel threatened,
you may activate the panic alarm to call attention
by pressing and holding the
button on the
Intelligent Key for longer than 0.5 seconds.
The panic alarm and headlights will stay on for a
period of time.
The panic alarm stops when: ● It has run for a period of time, or
● Any button is pressed on the Intelligent Key.
Answer back horn feature
If desired, the answer back horn feature can be
deactivated using the Intelligent Key. When de-
activated and the LOCK
button is
pushed the hazard indicator flashes twice and
when the UNLOCK
button is pushed, nei-
ther the hazard indicator nor the horn operates. NOTE:
If you change the answer back horn and
light flash feature with the Intelligent Key,
the vehicle information display screen will
show the current mode after the ignition
switch has been cycled from the OFF to the
ON position. The vehicle information dis-
play screen can also be used to change the
answer back horn mode. See “Answer back
horn” in the “Instruments and controls”
section.
To deactivate:
Press and hold the
andbuttonsfor at least 2 seconds.
The hazard warning lights will flash 3 times to
confirm that the answer back horn feature has
been deactivated.
To activate: Press and hold the
andbuttonsfor at least 2 seconds
once more.
The hazard warning lights will flash once and the
horn will sound once to confirm that the horn
beep feature has been reactivated.
Deactivating the horn beep feature does not si-
lence the horn if the alarm is triggered.
WPD0361WPD0362
3-22Pre-driving checks and adjustments
Page 156 of 413
�1To block glare from the front, swing down the
main sun visor.
�2To block glare from the side, remove the
main sun visor from the center mount and
swing the visor to the side.
�3To extend (if so equipped) the sun visor, slide
in or out as needed.
CAUTION
● Do not store the sun visor before return-
ing the extension to its original
position.
● Do not pull the extension sun visor
forcedly downward.
VANITY MIRRORS
To access the vanity mirror, pull the sun visor
down and flip open the mirror cover. Some vanity
mirrors are illuminated and turn on when the
mirror cover is open.
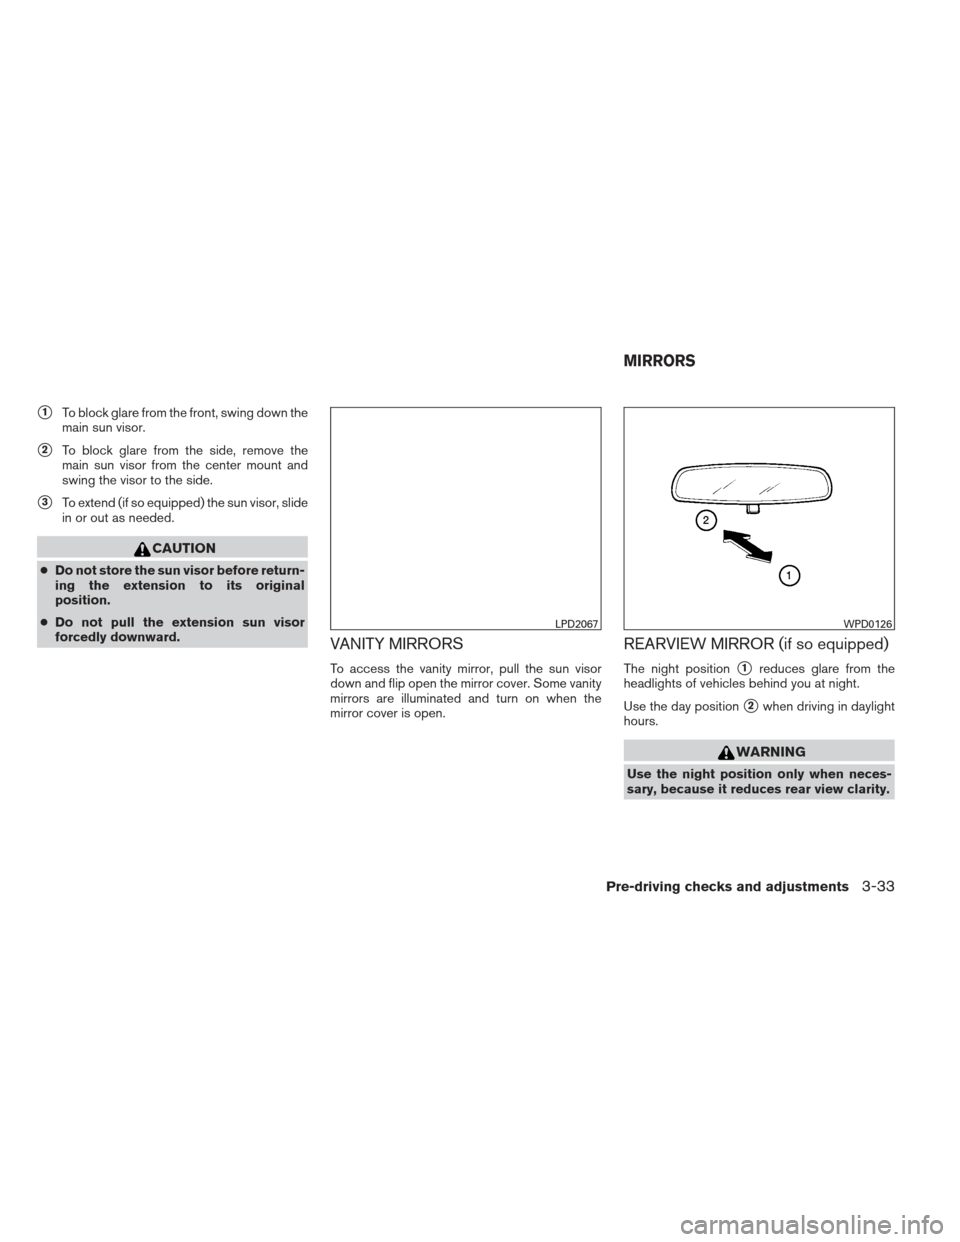
REARVIEW MIRROR (if so equipped)
The night position�1reduces glare from the
headlights of vehicles behind you at night.
Use the day position
�2when driving in daylight
hours.
WARNING
Use the night position only when neces-
sary, because it reduces rear view clarity.
LPD2067WPD0126
MIRRORS
Pre-driving checks and adjustments3-33