Page 11 of 414
1. Rear window and outside mirror(if so equipped) defroster switch
(P. 2-28)
2. Interior trunk lid release (P. 3-18)
3. Trunk lid (P. 3-17)
4. Vehicle loading (P. 9-12)
5. Opener operation (P. 3-17)
6. Replacing bulbs (P. 8-26)
7. Fuel-filler cap, fuel recommendation
(P. 3-19, P. 9-3)
8. Fuel-filler door (P. 3-19)
See the page number indicated in paren-
theses for operating details.
WII0125
EXTERIOR REAR
0-4Illustrated table of contents
Page 12 of 414
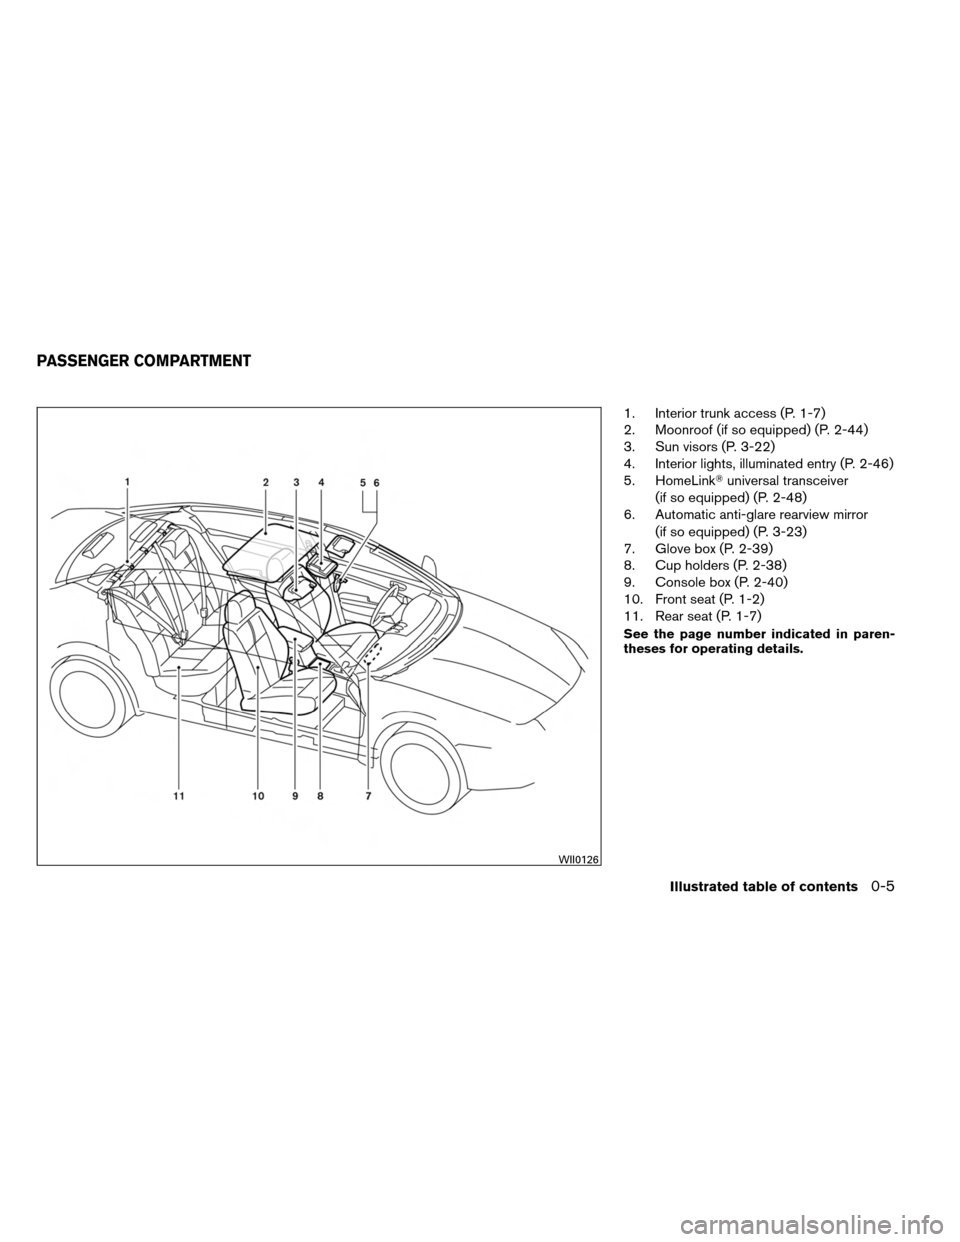
1. Interior trunk access (P. 1-7)
2. Moonroof (if so equipped) (P. 2-44)
3. Sun visors (P. 3-22)
4. Interior lights, illuminated entry (P. 2-46)
5. HomeLink�universal transceiver
(if so equipped) (P. 2-48)
6. Automatic anti-glare rearview mirror
(if so equipped) (P. 3-23)
7. Glove box (P. 2-39)
8. Cup holders (P. 2-38)
9. Console box (P. 2-40)
10. Front seat (P. 1-2)
11. Rear seat (P. 1-7)
See the page number indicated in paren-
theses for operating details.
WII0126
PASSENGER COMPARTMENT
Illustrated table of contents0-5
Page 14 of 414
22. Trunk opener (P. 3-17)Vehicle Dynamic Control (VDC) OFF
switch (P. 2-35)
NISSAN Intelligent Key� port (P. 5-7)
*: Refer to the separate Navigation System Own-
er’s Manual (if so equipped) .
See the page number indicated in paren-
theses for operating details.
Illustrated table of contents0-7
Page 24 of 414

Pull the upper seatback release lever�1to the
uppermost position, folding the seatback for")
Exiting from the rear seat on the
passenger’s side, using the upper
seatback release lever (if so equipped)
Pull the upper seatback release lever�1to the
uppermost position, folding the seatback forward
�2, releasing the seat track.
Slide the entire seat forward to exit from the rear
seat.
To return the seat to a locked position:
Push the upper seatback rearward until the seat-
back and track are locked. Operating tips:
● The seatback and track will not lock until the
seat back is returned rearward.
● The seatback will return to an upright seating
position if the upper seatback release lever
is pulled to the uppermost position.
CAUTION
●When returning the seat to its original
position, confirm that the seat and seat-
back are locked properly.
● Be careful not to pinch your hand or
foot or bump your head when operating
the walk-in seat.
FOLDING REAR SEAT
Interior trunk access
The trunk can be accessed from the passenger
side of the rear seat for loading and unloading, as
shown.
WRS0791
WRS0166
Safety—Seats, seat belts and supplemental restraint system1-7
Page 25 of 414

1. Open the access cover on the rear parcelshelf.
2. Push down on the button on the rear parcel shelf.
3. Fold down the passenger’s side seatback.
To remove or reinstall the seatback release but-
ton access covers, see “Upper tether anchor/key
cylinder covers” in the “Maintenance and do-it-
yourself” section of this manual.
WARNING
● Never allow anyone to ride in the cargo
area or on the rear seat when it is in the
fold-down position. Use of these areas
by passengers without proper restraints
could result in serious injury in an acci-
dent or sudden stop.
● Properly secure all cargo with ropes or
straps to help prevent it from sliding or
shifting. Do not place cargo higher than
the seatbacks. In a sudden stop or col-
lision, unsecured cargo could cause
personal injury. ●
When returning the seatbacks to the
upright position, be certain they are
completely secured in the latched posi-
tion. If they are not completely secured,
passengers may be injured in an acci-
dent or sudden stop.
● Closely supervise children when they
are around cars to prevent them from
playing and becoming locked in the
trunk where they could be seriously in-
jured. Keep the car locked, with the rear
seatback and trunk lid securely latched
when not in use, and prevent children’s
access to car keys.
To fold down the driver’s side of the rear seat,
reach through the opening and pull on the strap
�1located behind the seat.
The rear seats can be locked using the mechani-
cal key to prevent unauthorized access. For more
information on keys, refer to “Keys” in the “Pre-
driving checks and adjustments” section of this
manual.
WRS0745
1-8Safety—Seats, seat belts and supplemental restraint system
Page 72 of 414
Moonroof (if so equipped)......................... 2-44
Automatic moonroof ........................... 2-44
Interior light ...................................... 2-46
Console light (if so equipped) . ..................2-47
Map lights ....................................... 2-48
Trunk light ....................................... 2-48
HomeLink� universal transceiver (if so equipped) .....2-48
Programming HomeLink� .......................2-49Programming HomeLink�
for Canadian
customers and gate openers ....................2-50
Operating the HomeLink� universal
transceiver .................................... 2-51
Programming trouble-diagnosis .................2-51
Clearing the programmed information ............2-51
Reprogramming a single HomeLink� button......2-51
If your vehicle is stolen ......................... 2-52
Page 74 of 414
22. Trunk opener (P. 3-17)Vehicle Dynamic Control (VDC) OFF
switch (P. 2-35)
NISSAN Intelligent Key� port (P. 5-7)
*: Refer to the separate Navigation System Own-
er’s Manual (if so equipped) .
See the page number indicated in paren-
theses for operating details.
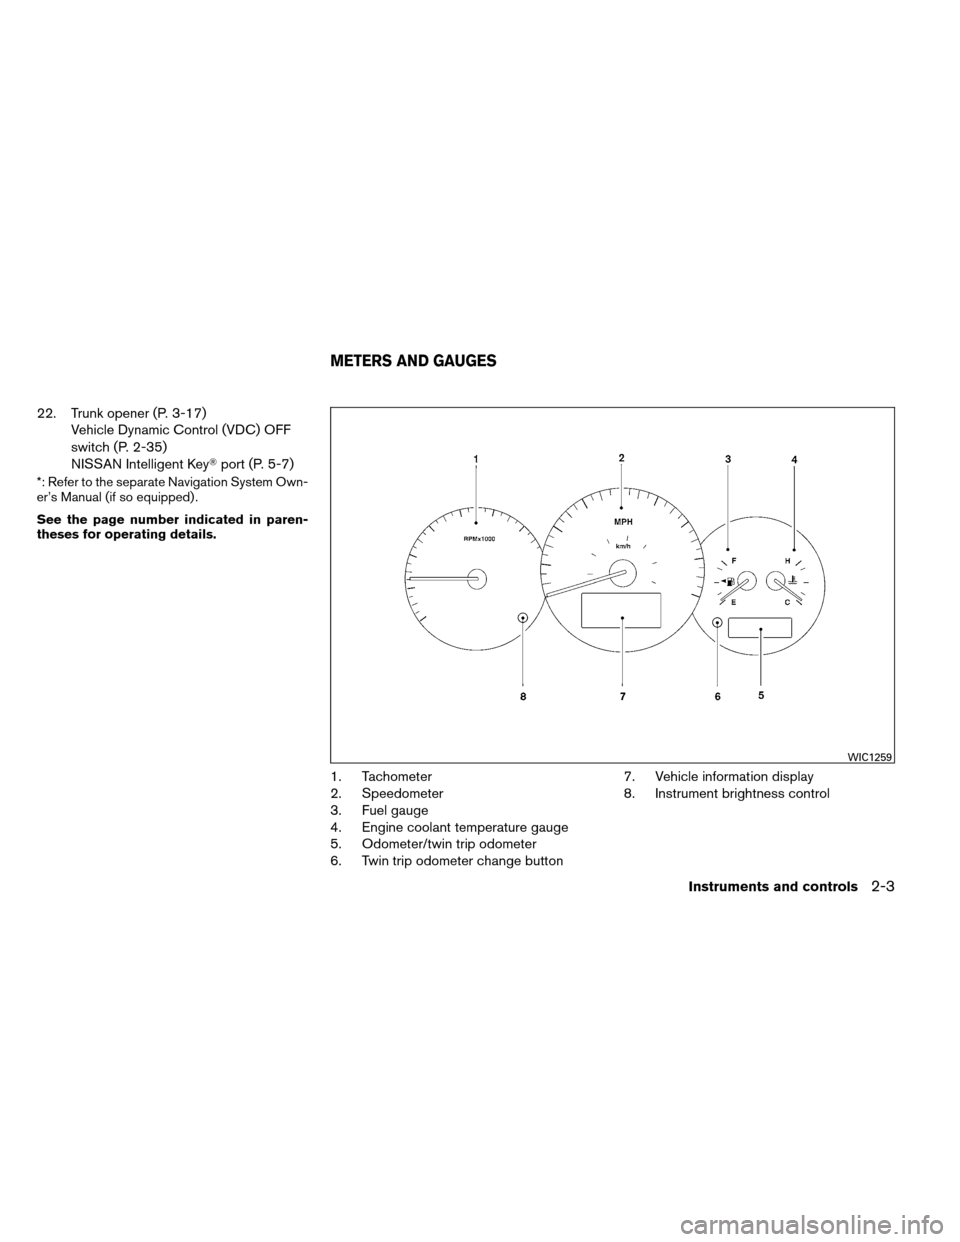
1. Tachometer
2. Speedometer
3. Fuel gauge
4. Engine coolant temperature gauge
5. Odometer/twin trip odometer
6. Twin trip odometer change button 7. Vehicle information display
8. Instrument brightness control
WIC1259
METERS AND GAUGES
Instruments and controls2-3
Page 84 of 414

TPMS malfunction:
If the TPMS is not functioning properly, the low
tire pressure warning light will flash for approxi-
mately 1 minute when the ignition switch is
placed in the ON position. The light will remain on
after the 1 minute. Have the system checked by a
NISSAN dealer. The CHECK TIRE PRESSURE
warning does not appear if the low tire pressure
warning light illuminates to indicate a TPMS mal-
function.
For additional information, see “Tire Pressure
Monitoring System (TPMS)” in the “Starting and
driving” section and “Tire pressure” in the “Main-
tenance and do-it-yourself” section.
WARNING
●If the light does not illuminate with the
ignition switch placed in the ON posi-
tion, have the vehicle checked by a
NISSAN dealer as soon as possible. ●
If the light illuminates while driving,
avoid sudden steering maneuvers or
abrupt braking, reduce vehicle speed,
pull off the road to a safe location and
stop the vehicle as soon as possible.
Driving with under-inflated tires may per-
manently damage the tires and increase
the likelihood of tire failure. Serious ve-
hicle damage could occur and may lead
to an accident and could result in serious
personal injury. Check the tire pressure
for all four tires. Adjust the tire pressure
to the recommended COLD tire pressure
shown on the Tire and Loading Informa-
tion label located in the driver’s door
opening to turn the low tire pressure
warning light OFF. If the light still illumi-
nates while driving after adjusting the
tire pressure, a tire may be flat. If you
have a flat tire, replace it with a spare tire
as soon as possible.
●
When a spare tire is mounted or a wheel
is replaced tire pressure will not be in-
dicated, the TPMS will not function and
the low tire pressure warning light will
flash for approximately 1 minute. The
light will remain on after 1 minute. Con-
tact your NISSAN dealer as soon as
possible for tire replacement and/or
system resetting. ●
Replacing tires with those not originally
specified by NISSAN could affect the
proper operation of the TPMS.
CAUTION
●The TPMS is not a substitute for the
regular tire pressure check. Be sure to
check the tire pressure regularly.
● If the vehicle is being driven at speeds
of less than 16 MPH (25 km/h) , the
TPMS may not operate correctly.
● Be sure to install the specified size of
tires to the 4 wheels correctly.
Master warning light
When the ignition is in the ON position, the master
warning light illuminates if any of the following are
displayed on the vehicle information display.
● No key warning
● Low fuel warning
● Low windshield-washer fluid warning
● Parking brake release warning
● Door/trunk open warning
● Loose fuel cap
● Check tire pressure warning
Instruments and controls2-13
 defroster switch
(P. 2-28)
2. Interior trunk lid release (P. 3-18)
3. Trunk lid (P. 3-17)
4. Vehicle loading (P. 9-12)
5. Opener operation (P. 3-17)
6")
......................... 2-44
Automatic moonroof ........................... 2-44
Interior light ...................................... 2-46
Console light (if so equipped) .")