Page 21 of 414

Operating tips
WARNING
Before driving the vehicle, return the seat-
back to an upright seating position after
manually releasing it. Al")
FRONT POWER SEAT ADJUSTMENT
(if so equipped for driver’s seat)
Operating tips
WARNING
Before driving the vehicle, return the seat-
back to an upright seating position after
manually releasing it. Also, make sure the
seat is locked in place. Failure to do so
may cause the seat to move in a collision
or sudden stop. This may result in damage
to the seat or personal injury.
CAUTION
●Do not operate the power recline switch
when the seatback has been manually
released using the upper seatback re-
lease lever
�1. Doing so can damage
the seat.
● Do not pull on the upper seatback re-
lease lever or the trim to return the
seatback to a normal seating position.
Doing so may damage the seat. ●
The power seat motor has an auto-reset
overload protection circuit. If the motor
stops during operation, wait 30 seconds,
then reactivate the switch.
● Do not operate the power seat switch for a
long period of time when the engine is off.
This will discharge the battery.
WRS0841
1-4Safety—Seats, seat belts and supplemental restraint system
Page 75 of 414
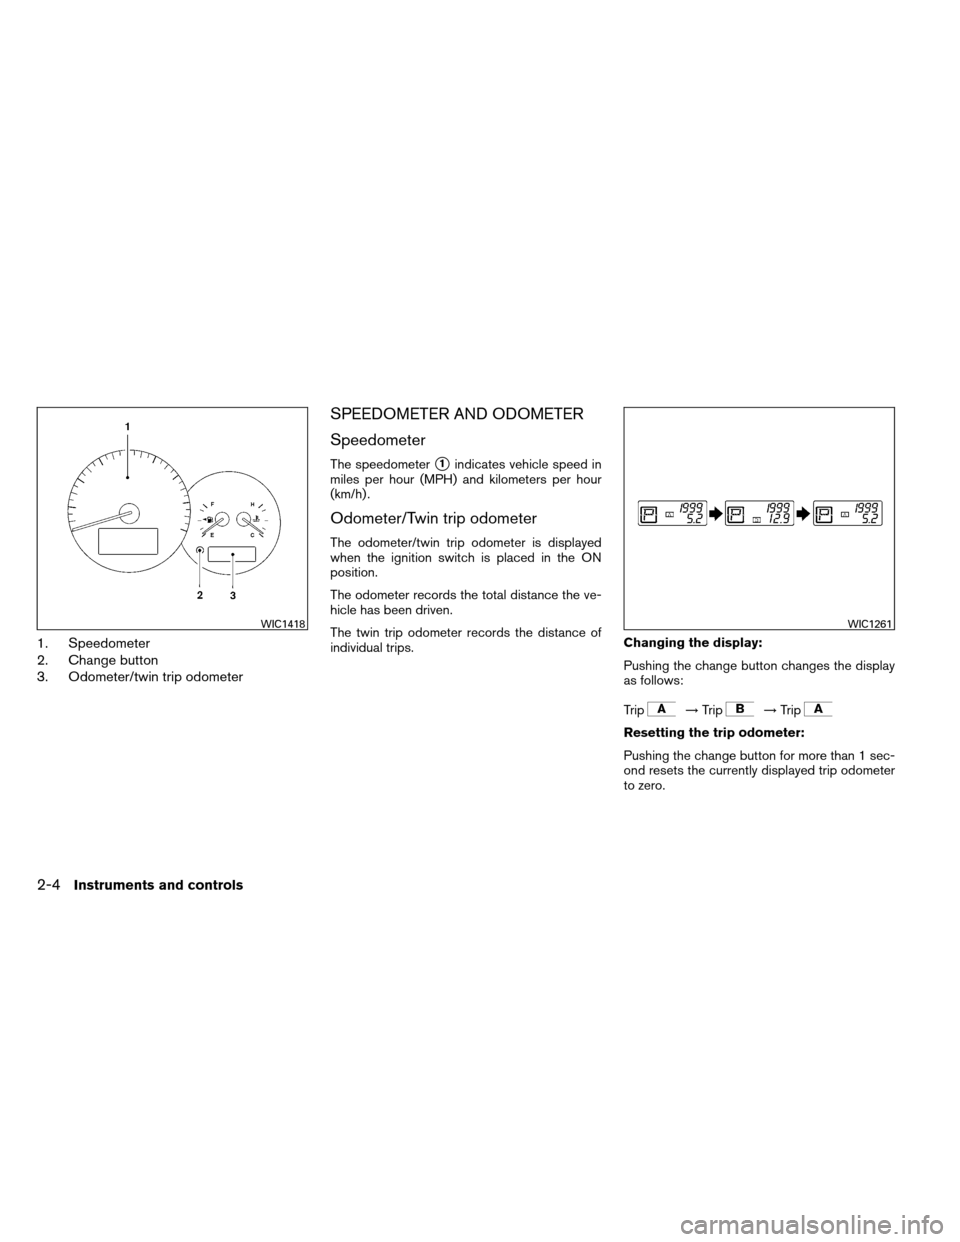
1. Speedometer
2. Change button
3. Odometer/twin trip odometer
SPEEDOMETER AND ODOMETER
Speedometer
The speedometer�1indicates vehicle speed in
miles per hour (MPH) and kilometers per hour
(km/h) .
Odometer/Twin trip odometer
The odometer/twin trip odometer is displayed
when the ignition switch is placed in the ON
position.
The odometer records the total distance the ve-
hicle has been driven.
The twin trip odometer records the distance of
individual trips. Changing the display:
Pushing the change button changes the display
as follows:
Trip
→
Trip→Trip
Resetting the trip odometer:
Pushing the change button for more than 1 sec-
ond resets the currently displayed trip odometer
to zero.
WIC1418WIC1261
2-4Instruments and controls
Page 84 of 414

TPMS malfunction:
If the TPMS is not functioning properly, the low
tire pressure warning light will flash for approxi-
mately 1 minute when the ignition switch is
placed in the ON position. The light will remain on
after the 1 minute. Have the system checked by a
NISSAN dealer. The CHECK TIRE PRESSURE
warning does not appear if the low tire pressure
warning light illuminates to indicate a TPMS mal-
function.
For additional information, see “Tire Pressure
Monitoring System (TPMS)” in the “Starting and
driving” section and “Tire pressure” in the “Main-
tenance and do-it-yourself” section.
WARNING
●If the light does not illuminate with the
ignition switch placed in the ON posi-
tion, have the vehicle checked by a
NISSAN dealer as soon as possible. ●
If the light illuminates while driving,
avoid sudden steering maneuvers or
abrupt braking, reduce vehicle speed,
pull off the road to a safe location and
stop the vehicle as soon as possible.
Driving with under-inflated tires may per-
manently damage the tires and increase
the likelihood of tire failure. Serious ve-
hicle damage could occur and may lead
to an accident and could result in serious
personal injury. Check the tire pressure
for all four tires. Adjust the tire pressure
to the recommended COLD tire pressure
shown on the Tire and Loading Informa-
tion label located in the driver’s door
opening to turn the low tire pressure
warning light OFF. If the light still illumi-
nates while driving after adjusting the
tire pressure, a tire may be flat. If you
have a flat tire, replace it with a spare tire
as soon as possible.
●
When a spare tire is mounted or a wheel
is replaced tire pressure will not be in-
dicated, the TPMS will not function and
the low tire pressure warning light will
flash for approximately 1 minute. The
light will remain on after 1 minute. Con-
tact your NISSAN dealer as soon as
possible for tire replacement and/or
system resetting. ●
Replacing tires with those not originally
specified by NISSAN could affect the
proper operation of the TPMS.
CAUTION
●The TPMS is not a substitute for the
regular tire pressure check. Be sure to
check the tire pressure regularly.
● If the vehicle is being driven at speeds
of less than 16 MPH (25 km/h) , the
TPMS may not operate correctly.
● Be sure to install the specified size of
tires to the 4 wheels correctly.
Master warning light
When the ignition is in the ON position, the master
warning light illuminates if any of the following are
displayed on the vehicle information display.
● No key warning
● Low fuel warning
● Low windshield-washer fluid warning
● Parking brake release warning
● Door/trunk open warning
● Loose fuel cap
● Check tire pressure warning
Instruments and controls2-13
Page 89 of 414
Fuel economy mode
The fuel economy mode can be selected to dis-
play the instant fuel economy since the last reset.Average speed mode
The average speed mode can be selected to
display the average miles per gallon and miles per
hour since the last reset.Time/Miles (km) mode
The time/miles (km) mode can be selected to
show the time and distance driven since the last
reset.
LIC1093LIC1097WIC1266
2-18Instruments and controls
Page 91 of 414
Alert mode
The alert mode allows you to set alerts notifying
you of time to rest or icy conditions.
The time to rest alert lets you know when you
have been traveling for a long time and may need
a break.
The icy alert notifies you that icy driving condi-
tions may exist.Reset mode
The reset mode can be selected in any screen
that allows for preferences to be programmed.
Once the screen is selected, you have the option
to reset the selected distances or time to a new
setting.
Maintenance mode
The maintenance mode allows you to set alerts
for the reminding of maintenance intervals for the
following:
● tires
● oil
● filter
● other
LIC1544LIC1046LIC1545
2-20Instruments and controls
Page 92 of 414

Set a desired interval by pushingto high-
light the maintenance field and pressing
.
The reset mode will open up and allow you to
enter the desired distance.
For additional information, see “Indicators for
maintenance” later in this section.
Options mode
The LANGUAGE/UNIT screen will appear when
selecting the “Language/Unit” key and
pressing
.
Language: English or French
Unit: US — mile, °F, MPG Metric — km, °C, l/km
You can select the language and unit using
the
button and pressing.
The settings are automatically saved when you
exit the menu by pressing the BACK button or
any other mode button. Warning mode
The warning mode can be selected to view any
warnings that may be present. Once the screen is
selected you have the option of skipping the
warning or viewing it in detail.
Warnings can be present for issues such as an
open door or low fuel. For more information about
potential warnings see “Vehicle information dis-
play warnings and indicators” later in this section.
LIC1546LIC1098
Instruments and controls2-21
Page 93 of 414

Indicators for maintenance
1. Engine oil replacement indicatorThis indicator appears when the customer
set distance comes for changing the engine
oil. You can set or reset the distance for
changing the engine oil. See “Maintenance
mode” earlier in this section.
2. Oil filter replacement indicator This indicator appears when the customer
set distance comes for replacing the oil filter.
You can set or reset the distance for replac-
ing the oil filter. See “Maintenance mode”
earlier in this section.
3. Tire replacement indicator This indicator appears when the customer
set distance comes for replacing tires. You
can set or reset the distance for replacing
tires. See “Maintenance mode” earlier in this
section.
WARNING
The tire replacement indicator is not a
substitute for regular tire checks, includ-
ing tire pressure checks. See “Changing
Wheels and Tires” in “Maintenance & Do-
It-Yourself” section. Many factors includ-
ing tire inflation, alignment, driving habits
and road conditions affect tire wear and
when tires should be replaced. Setting the
tire replacement indicator for a certain
driving distance does not mean your tires
will last that long. Use the tire replace-
ment indicator as a guide only and always
perform regular tire checks. Failure to per-
form regular tire checks, including tire
pressure checks could result in tire fail-
ure. Serious vehicle damage could occur
and may lead to a collision, which could
result in serious personal injury or death.
4. “OTHER” indicator This indicator appears when the customer
set distance comes for checking or replac-
ing maintenance items other than the engine
oil, oil filter and tires. Other maintenance
items can include such things as air filter or
tire rotation. You can set or reset the dis-
tance for checking or replacing the items.
See “Maintenance mode” earlier in this sec-
tion. For scheduled maintenance items and
intervals, see your “NISSAN Service and
Maintenance Guide.”
LIC2027
2-22Instruments and controls
Page 102 of 414

CAUTION
Use the headlights with the engine run-
ning to avoid discharging the vehicle
battery.
Autolight system
The autolight system allows the headlights to be
set so they turn on and off automatically. The
autolight system can:● Turn on the headlights, front parking, tail,
license plate and instrument panel lights au-
tomatically when it is dark.
● Turn off all the lights when it is light.
● Keep all the lights on for a period of time after
you place the ignition switch in the OFF
position and all doors are closed. To turn on the autolight system:
1. Place the headlight switch in the AUTO po- sition
�1.
2. Place ignition in the ON position.
3. The autolight system automatically turns the headlights on and off.
Initially, if the ignition switch is placed in the OFF
position and a door is opened and left open, the
headlights remain ON for a period of time. If
another door is opened while the headlights are
on, then the timer is reset.
To turn the autolight system off, turn the switch to
the OFF,
,orposition.LIC1086
Instruments and controls2-31