Page 326 of 706
Features and controls
3-233
3
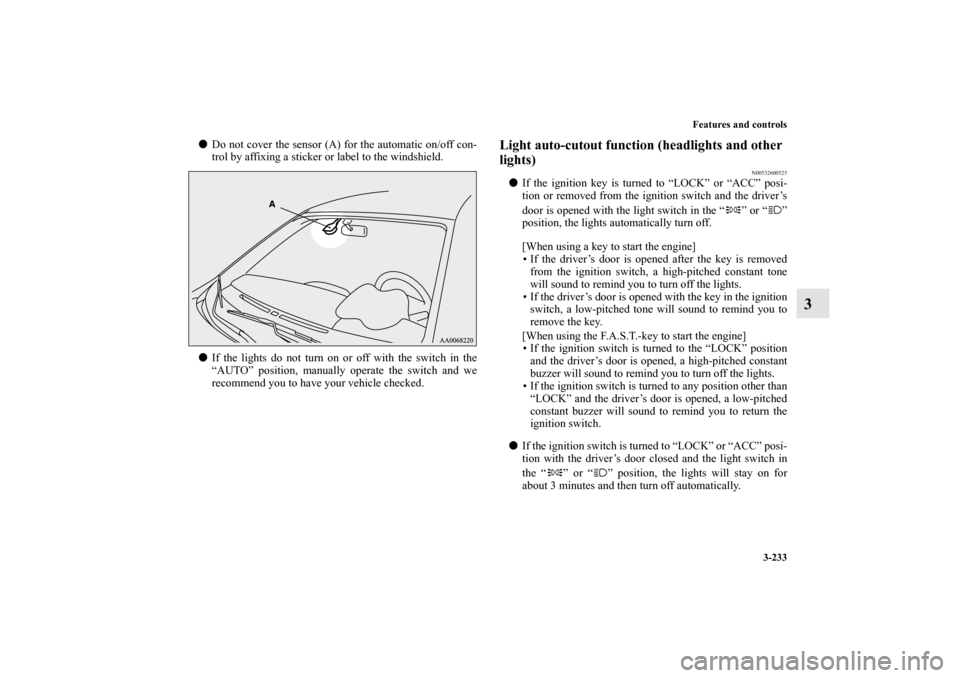
�Do not cover the sensor (A) for the automatic on/off con-
trol by affixing a sticker or label to the windshield.
�If the lights do not turn on or off with the switch in the
“AUTO” position, manually operate the switch and we
recommend you to have your vehicle checked.
Light auto-cutout function (headlights and other
lights)
N00532600525
�If the ignition key is turned to “LOCK” or “ACC” posi-
tion or removed from the ignition switch and the driver’s
door is opened with the light switch in the “ ” or “ ”
position, the lights automatically turn off.
[When using a key to start the engine]
• If the driver’s door is opened after the key is removed
from the ignition switch, a high-pitched constant tone
will sound to remind you to turn off the lights.
• If the driver’s door is opened with the key in the ignition
switch, a low-pitched tone will sound to remind you to
remove the key.
[When using the F.A.S.T.-key to start the engine]
• If the ignition switch is turned to the “LOCK” position
and the driver’s door is opened, a high-pitched constant
buzzer will sound to remind you to turn off the lights.
• If the ignition switch is turned to any position other than
“LOCK” and the driver’s door is opened, a low-pitched
constant buzzer will sound to remind you to return the
ignition switch.
�If the ignition switch is turned to “LOCK” or “ACC” posi-
tion with the driver’s door closed and the light switch in
the “ ” or “ ” position, the lights will stay on for
about 3 minutes and then turn off automatically.
BK0151000US.book 233 ページ 2012年3月29日 木曜日 午後6時8分
Page 328 of 706
Features and controls
3-235
3
Dimmer (high/low beam change)
N00549900155
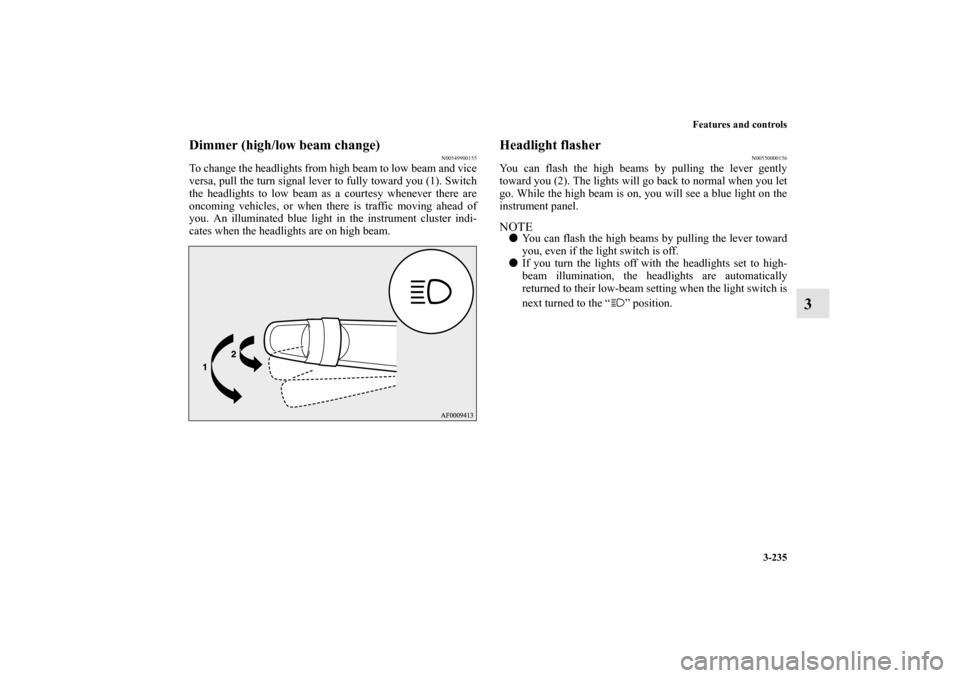
To change the headlights from high beam to low beam and vice
versa, pull the turn signal lever to fully toward you (1). Switch
the headlights to low beam as a courtesy whenever there are
oncoming vehicles, or when there is traffic moving ahead of
you. An illuminated blue light in the instrument cluster indi-
cates when the headlights are on high beam.
Headlight flasher
N00550000156
You can flash the high beams by pulling the lever gently
toward you (2). The lights will go back to normal when you let
go. While the high beam is on, you will see a blue light on the
instrument panel.NOTE�You can flash the high beams by pulling the lever toward
you, even if the light switch is off.
�If you turn the lights off with the headlights set to high-
beam illumination, the headlights are automatically
returned to their low-beam setting when the light switch is
next turned to the “ ” position.
BK0151000US.book 235 ページ 2012年3月29日 木曜日 午後6時8分
Page 329 of 706
3-236 Features and controls
3
Welcome light
N00563200093
This function turns on the front side-marker and parking lights
for about 30 seconds after the UNLOCK button (A) on the
remote control transmitter is pressed when the combination
headlights and dimmer switch is in the “OFF” or “AUTO”
position (for vehicles equipped with the automatic light con-
trol). On vehicles equipped with the automatic light control,
the welcome light function will operate only when it is dark
outside the vehicle.
NOTE�While the welcome light function is operating, perform
one of the following operations to cancel the function.
• Push the LOCK button (B) on the remote control trans-
mitter.
• Turn the combination headlights and dimmer switch to
the “ ” or “ ” position.
• Turn the ignition switch to the “ON” position.
BK0151000US.book 236 ページ 2012年3月29日 木曜日 午後6時8分
Page 330 of 706
Features and controls
3-237
3
�It is possible to modify functions as follows:
• The headlights can be set to come on in the low beam
setting.
• The welcome light function can be deactivated.
For details, consult a Mitsubishi Motors dealer.
On vehicles equipped with a Mitsubishi Multi-Communi-
cation System, screen operations can be used to make the
adjustment.
Refer to the separate owner’s manual for details.
Coming home light
N00547300096
This function turns on the headlights in the low beam setting
for about 30 seconds after the ignition switch is turned to the
“LOCK” position.
1. Turn the combination headlights and dimmer switch to the
“OFF” or “AUTO” position (for vehicles equipped with
the automatic light control).
2. Turn the ignition switch to the “LOCK” position. Also, if
a key was used to start the engine, remove the key from
the ignition switch.
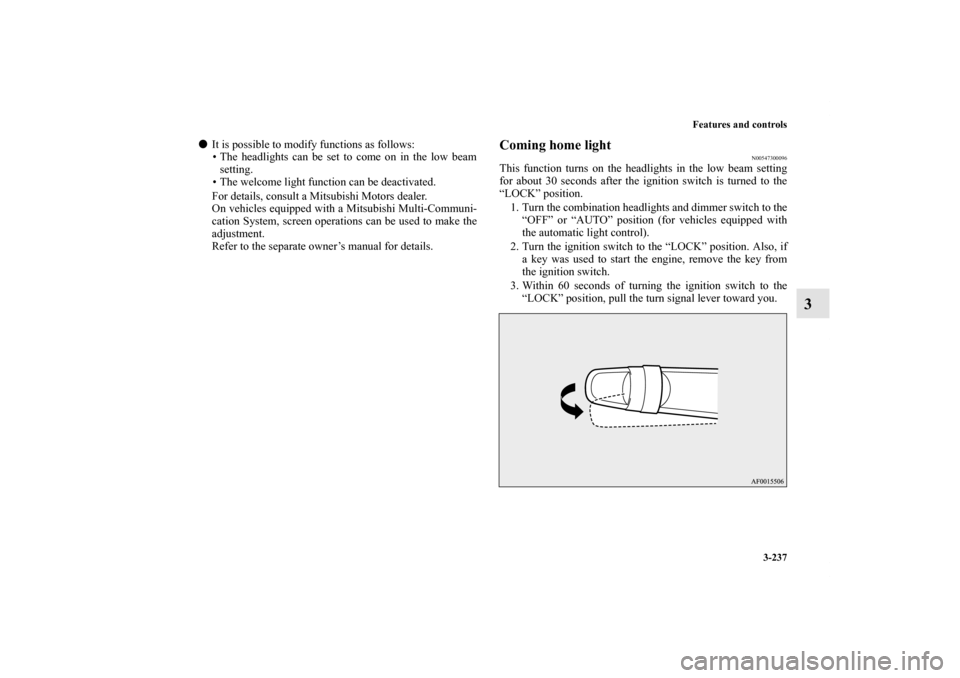
3. Within 60 seconds of turning the ignition switch to the
“LOCK” position, pull the turn signal lever toward you.
BK0151000US.book 237 ページ 2012年3月29日 木曜日 午後6時8分
Page 331 of 706
3-238 Features and controls
3
4. The headlights will come on in the low beam setting for
about 30 seconds. After the headlights go off, the head-
lights can be turned on again in the low beam setting for
about 30 seconds by pulling the turn signal lever toward
you within 60 seconds of turning the ignition switch to the
“LOCK” position. To turn on the headlights again after 60
seconds of turning the ignition switch to the “LOCK”
position, repeat the process from step 1.NOTE�While the coming home light function is operating, per-
form one of the following operations to cancel the func-
tion.
• Pull the turn signal lever toward you.
• Turn the combination headlights and dimmer switch to
the “ ” or “ ” position.
• Turn the ignition switch to the “ON” position.
�It is possible to modify functions as follows:
• The time that the headlights remain on can be changed.
• The coming home light function can be deactivated.
For details, consult a Mitsubishi Motors dealer.
On vehicles equipped with a Mitsubishi Multi-Communi-
cation System, screen operations can be used to make the
adjustment.
Refer to the separate owner’s manual for details.
Headlight leveling switch
(if so equipped)
N00537100062
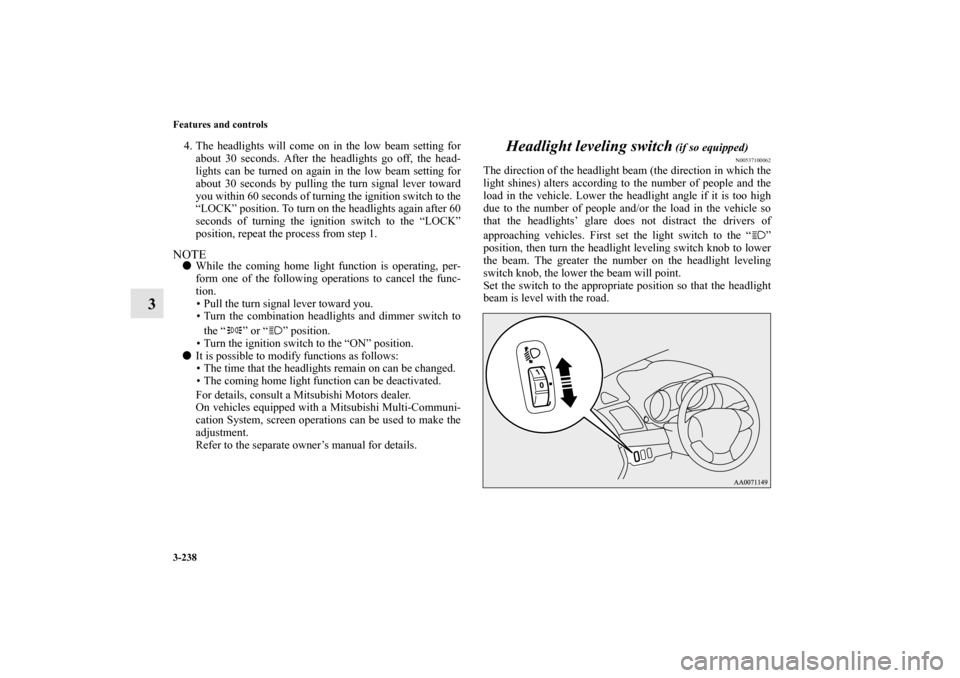
The direction of the headlight beam (the direction in which the
light shines) alters according to the number of people and the
load in the vehicle. Lower the headlight angle if it is too high
due to the number of people and/or the load in the vehicle so
that the headlights’ glare does not distract the drivers of
approaching vehicles. First set the light switch to the “ ”
position, then turn the headlight leveling switch knob to lower
the beam. The greater the number on the headlight leveling
switch knob, the lower the beam will point.
Set the switch to the appropriate position so that the headlight
beam is level with the road.
BK0151000US.book 238 ページ 2012年3月29日 木曜日 午後6時8分
Page 334 of 706
Features and controls
3-241
3 Front fog light switch
(if so equipped)
N00522800407
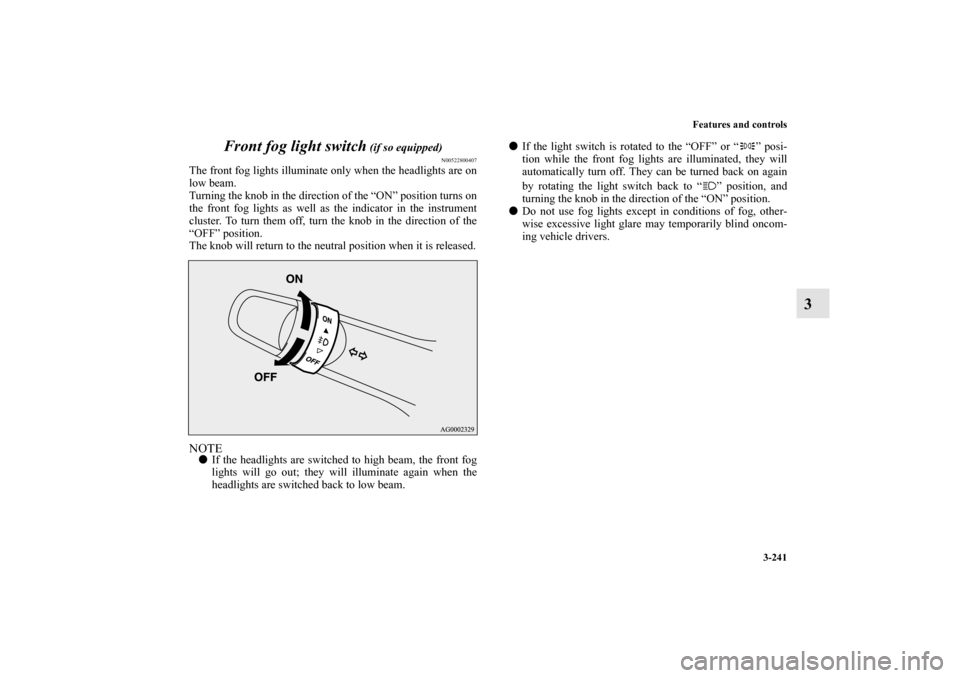
The front fog lights illuminate only when the headlights are on
low beam.
Turning the knob in the direction of the “ON” position turns on
the front fog lights as well as the indicator in the instrument
cluster. To turn them off, turn the knob in the direction of the
“OFF” position.
The knob will return to the neutral position when it is released.NOTE�If the headlights are switched to high beam, the front fog
lights will go out; they will illuminate again when the
headlights are switched back to low beam.�If the light switch is rotated to the “OFF” or “ ” posi-
tion while the front fog lights are illuminated, they will
automatically turn off. They can be turned back on again
by rotating the light switch back to “ ” position, and
turning the knob in the direction of the “ON” position.
�Do not use fog lights except in conditions of fog, other-
wise excessive light glare may temporarily blind oncom-
ing vehicle drivers.
BK0151000US.book 241 ページ 2012年3月29日 木曜日 午後6時8分
Page 403 of 706
4-6 Driving safety
4Safe driving techniques
N00629200078
Even this vehicle’s safety equipment, and your safest driving,
cannot guarantee that you can avoid an accident or injury.
However, if you give extra attention to the following areas, you
can better protect yourself and your passengers:
�Drive defensively. Be aware of traffic, road and weather
conditions. Leave plenty of stopping distance between
your vehicle and the vehicle ahead.
�Before changing lanes, check your mirrors and use your
turn signal light.
�While driving, watch the behavior of other drivers, bicy-
clists, and pedestrians.
�Always obey applicable laws and regulations. Be a polite
and alert driver. Always leave room for unexpected
events, such as sudden braking.
�If you plan to drive in another country, obey their vehicle
registration laws and make sure you will be able to get the
right fuel.
Driving during cold weather
N00629400458
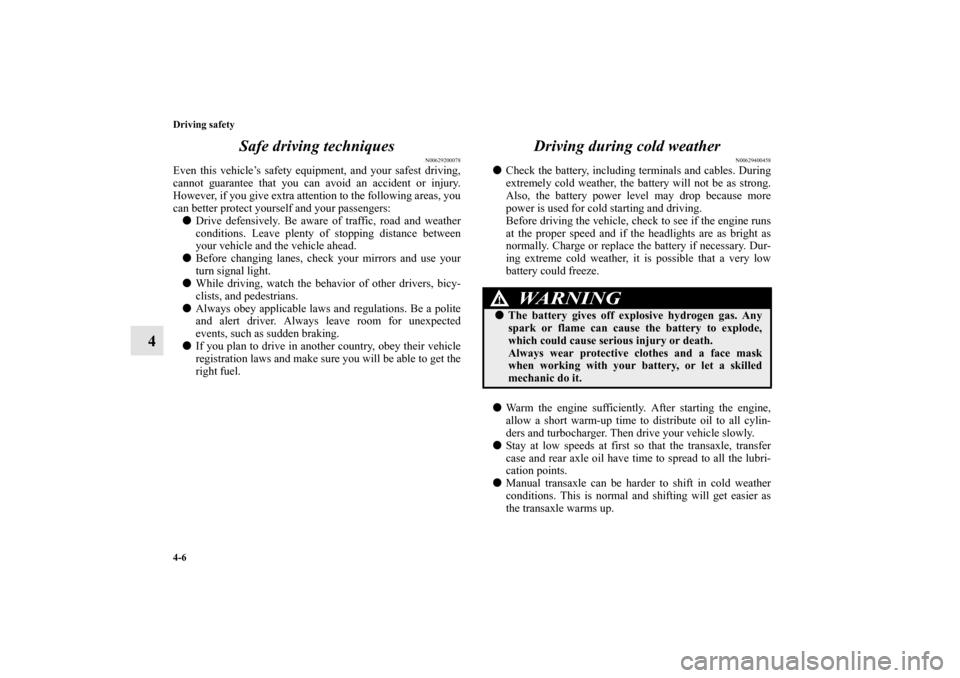
�Check the battery, including terminals and cables. During
extremely cold weather, the battery will not be as strong.
Also, the battery power level may drop because more
power is used for cold starting and driving.
Before driving the vehicle, check to see if the engine runs
at the proper speed and if the headlights are as bright as
normally. Charge or replace the battery if necessary. Dur-
ing extreme cold weather, it is possible that a very low
battery could freeze.
�Warm the engine sufficiently. After starting the engine,
allow a short warm-up time to distribute oil to all cylin-
ders and turbocharger. Then drive your vehicle slowly.
�Stay at low speeds at first so that the transaxle, transfer
case and rear axle oil have time to spread to all the lubri-
cation points.
�Manual transaxle can be harder to shift in cold weather
conditions. This is normal and shifting will get easier as
the transaxle warms up.
WA R N I N G
!�The battery gives off explosive hydrogen gas. Any
spark or flame can cause the battery to explode,
which could cause serious injury or death.
Always wear protective clothes and a face mask
when working with your battery, or let a skilled
mechanic do it.
BK0151000US.book 6 ページ 2012年3月29日 木曜日 午後6時8分
Page 634 of 706
Vehicle care and maintenance
7-53
7
�Some fuses may not be installed on your vehicle, depend-
ing on the vehicle model or specifications.
�The table above shows the main equipment corresponding
to each fuse.
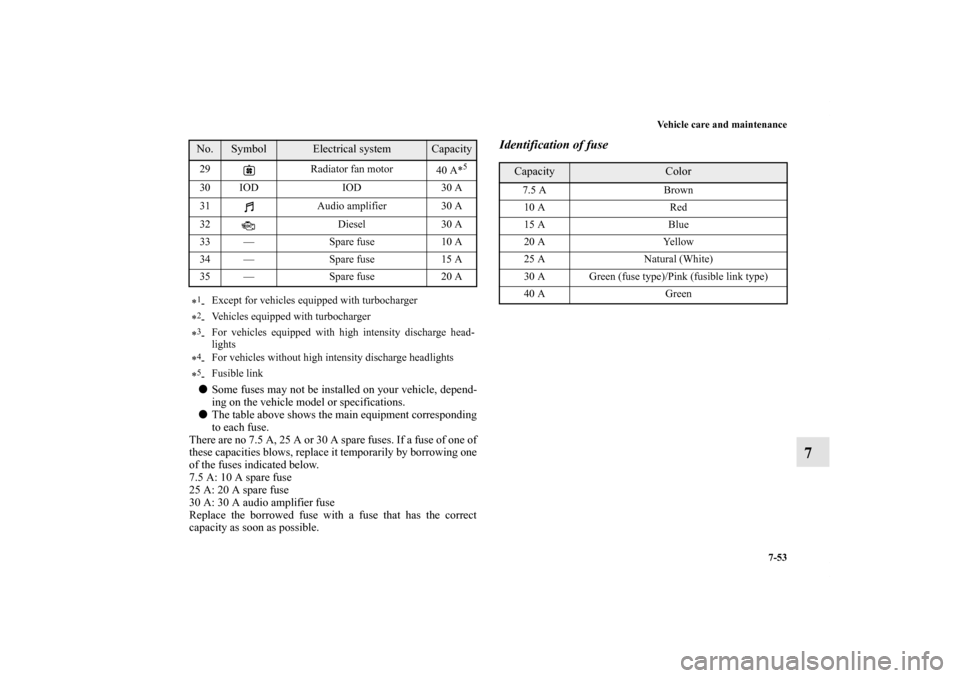
There are no 7.5 A, 25 A or 30 A spare fuses. If a fuse of one of
these capacities blows, replace it temporarily by borrowing one
of the fuses indicated below.
7.5 A: 10 A spare fuse
25 A: 20 A spare fuse
30 A: 30 A audio amplifier fuse
Replace the borrowed fuse with a fuse that has the correct
capacity as soon as possible.
Identification of fuse
29 Radiator fan motor
40 A*
5
30 IOD IOD 30 A
31 Audio amplifier 30 A
32 Diesel 30 A
33 — Spare fuse 10 A
34 — Spare fuse 15 A
35 — Spare fuse 20 A
*1-Except for vehicles equipped with turbocharger
*2-Vehicles equipped with turbocharger
*3-For vehicles equipped with high intensity discharge head-
lights
*4-For vehicles without high intensity discharge headlights
*5-Fusible linkNo.
Symbol
Electrical system
Capacity
Capacity
Color
7.5 A Brown
10 A Red
15 A Blue
20 A Yellow
25 A Natural (White)
30 A Green (fuse type)/Pink (fusible link type)
40 A Green
BK0151000US.book 53 ページ 2012年3月29日 木曜日 午後6時8分