Page 673 of 722
7-74 Vehicle care and maintenance
7
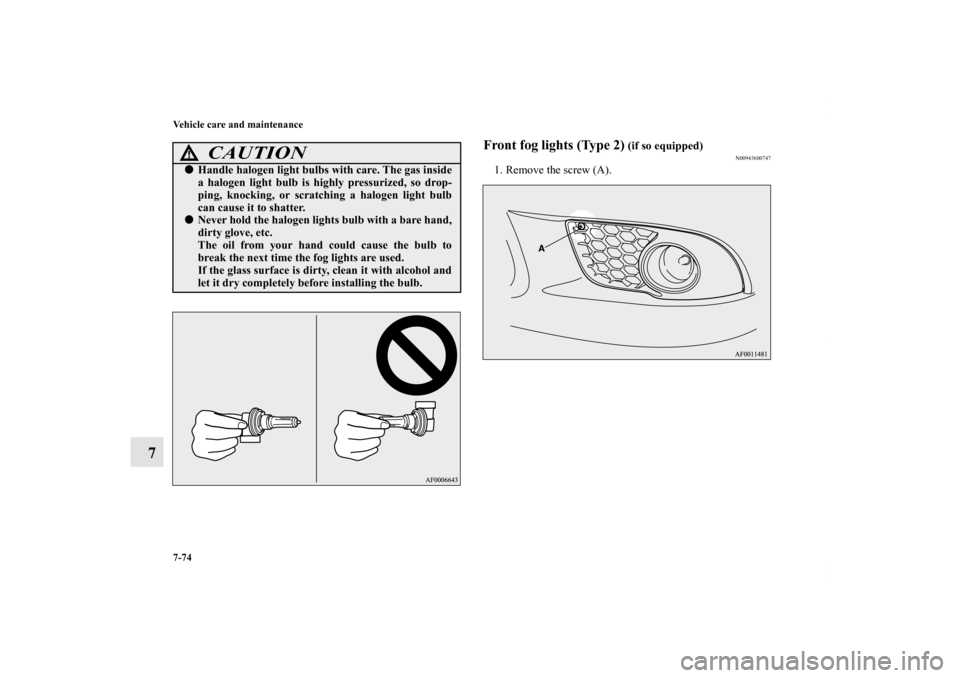
Front fog lights (Type 2)
(if so equipped)
N00943600747
1. Remove the screw (A).
CAUTION
!�Handle halogen light bulbs with care. The gas inside
a halogen light bulb is highly pressurized, so drop-
ping, knocking, or scratching a halogen light bulb
can cause it to shatter.�Never hold the halogen lights bulb with a bare hand,
dirty glove, etc.
The oil from your hand could cause the bulb to
break the next time the fog lights are used.
If the glass surface is dirty, clean it with alcohol and
let it dry completely before installing the bulb.
BK0150800US.book 74 ページ 2012年3月29日 木曜日 午後2時38分
Page 677 of 722
7-78 Vehicle care and maintenance
7
Rear combination lights
N00943700386
Tail and stop lights, rear turn signal lights and rear
side-marker lights1. Remove the screws (A) from the light unit.
CAUTION
!�Handle halogen light bulbs with care. The gas inside
a halogen light bulb is highly pressurized, so drop-
ping, knocking, or scratching a halogen light bulb
can cause it to shatter.�Never hold the halogen lights bulb with a bare hand,
dirty glove, etc.
The oil from your hand could cause the bulb to
break the next time the fog lights are used.
If the glass surface is dirty, clean it with alcohol and
let it dry completely before installing the bulb.
BK0150800US.book 78 ページ 2012年3月29日 木曜日 午後2時38分
Page 680 of 722
Vehicle care and maintenance
7-81
7
Tail lights and back-up lights1. Open the trunk lid.
Remove the clips (A) and remove the cover (B).2. Remove the socket and bulb assemblies by turning them
counterclockwise.
C- Tail light
D- Back-up light
BK0150800US.book 81 ページ 2012年3月29日 木曜日 午後2時38分
Page 683 of 722
7-84 Vehicle care and maintenance
7
Dome light (front)/Reading lights
(if so equipped)
N00944500206
1. Insert a screwdriver into the notch of the light assembly.
Gently pry to remove the lens.NOTE�Wrap a cloth around the tip of the screwdriver to keep
from scratching the lens.2. While holding down the tab (A), pull out the bulb.
3. To install the bulb, perform the removal steps in reverse.
BK0150800US.book 84 ページ 2012年3月29日 木曜日 午後2時38分
Page 684 of 722
Vehicle care and maintenance
7-85
7
NOTE�Before replacing the bulb, put the dome light (front)/read-
ing lights switch into the “OFF” position.
�When mounting the lens, align the tab (B) with the hole
on the vehicle body.
Dome light (rear)
(if so equipped)
N00944100260
1. Insert a screwdriver into the notch of the light assembly
and pry gently to remove the lens.NOTE�Wrap a cloth around the tip of the screwdriver to keep
from scratching the lens.
BK0150800US.book 85 ページ 2012年3月29日 木曜日 午後2時38分
Page 691 of 722

7-92 Vehicle care and maintenance
7
Polishing
N00946100059
If painted surfaces have been severely damaged and lost their
original luster and color tone, polish the surface lightly with a
fine polishing compound. Avoid limiting your polishing to the
damaged surface only; polish a somewhat wider area, moving
the polishing cloth in one direction. After polishing, flush the
compound from the surface and apply a coat of wax to regain a
beautiful luster.Damaged paint
N00946200063
Small cracks and scratches in the paint coat should be touched
up as soon as possible with touch-up paint to prevent corrosion.
Check body areas facing the road or the tires carefully for dam-
age to the paint caused by flying stones, etc. The paint code
number for your vehicle can be found on the vehicle informa-
tion code plate in the engine compartment.
Cleaning plastic parts
N00946300178
Use a sponge or chamois to clean these parts.
If a vehicle wax sticks to a gray or black rough surface of the
bumper, molding or lights, the surface may appear white in
color. In this case, wipe it off using lukewarm water and a soft
cloth or chamois. Chrome parts
N00946400065
To prevent spots and corrosion of chrome parts, wash with
water, dry thoroughly, and apply a nonabrasive automotive
wax. If the chrome is severely damaged or pitted, use a com-
mercially available chrome polish.
�Do not put wax on the areas having black matte
coating because it can cause uneven discoloration,
patches, blurs, etc. If these get wax on them, wipe
the wax off right away with a soft cloth and warm
water.�On vehicles with sunroof, be careful not to apply any
wax on the weatherstrip (black rubber) when wax-
ing the area around the sunroof opening.
If stained with wax, the weatherstrip cannot main-
tain a weatherproof seal with the sunroof.
CAUTION
!
CAUTION
!�Do not use a scrubbing brush or other rough scrub-
ber as these may damage the plastic surface. �Do not use wax containing compounds (polishing
powder) which may damage the plastic surface. �Do not let the plastic parts get soiled with gasoline,
oil, brake fluids, engine oils, greases, paint thinner,
and sulfuric acid (battery electrolyte). These fluids,
etc., may crack, stain or discolor the plastic parts.
If any of these get on the plastic parts, wipe them up
with a soft cloth or chamois and a mild solution of
soap and water. Then rinse them immediately with
water.
BK0150800US.book 92 ページ 2012年3月29日 木曜日 午後2時38分
Page 712 of 722
 1-8
ACD (Active center differential system) 3-133
ACD control mode display 3-135
ACD control mode switch 3-134
ACD warning display 3-135
Active stabilit")
Alphabetical index
1
A
Accessory (installation) 1-8
ACD (Active center differential system) 3-133
ACD control mode display 3-135
ACD control mode switch 3-134
ACD warning display 3-135
Active stability control (ASC) 3-152
ASC OFF display or ASC indicator 3-155
ASC operation display 3-155
Air cleaner filter 7-15
Air conditioning
Automatic air conditioning 5-31
,5-41
Important air conditioning operating tips 5-51
Manual air conditioning 5-12
,5-22
Air purifier 5-52
All-wheel driving operation 3-140
Aluminum wheels 7-93
Antenna
Roof antenna 5-148
Anti-lock braking system 3-148
Warning light / display 3-149,3-150
Arm rest 2-10
Assist grip 3-305Audio
AM/FM electronically tuned radio with CD player 5-52
AM/FM electronically tuned radio with 6 CD autochanger 5-
80
Error codes 5-137
,5-139
Handling of compact discs 5-145
Steering wheel audio remote control switch 5-134
Automatic air conditioning 5-31
,5-41
Auxiliary audio connector (RCA) 5-132
Auxiliary video connector (RCA) 5-132
AWC control fluid 7-20
B
Back-up lights
Bulb capacity 7-54
Replacement 7-81
Ball joint, steering linkage seals and drive shaft boots 7-42
Battery 7-23
Charging system warning light 3-231
Checking battery electrolyte level 7-25
Disconnection and connection 7-26
During cold weather 7-25
Removing and installing the battery upper cover (vehicles
with turbocharger) 7-23
Specification 9-9
Bluetooth 2.0 interface 3-257
Bottle holder 3-304
BK0150800US.book 1 ページ 2012年3月29日 木曜日 午後2時38分
Page 713 of 722

Alphabetical index
2Brake
Anti-lock braking system 3-148
Braking 4-8
Fluid 7-21
,9-10
Hose 7-42
Parking brake 3-78
Parking brake lever stroke 7-38
Pedal 3-144
Pedal free play 7-37
Power brakes 3-145
Service brake 3-144
Brake assist 3-146
Break-in recommendations 3-2
Bulb capacity 7-54
C
California Perchlorate Materials Requirements 1-10
Capacities 9-10
Card holder 3-290
,3-299
Cargo loads 4-14
Catalytic converter 7-3
Certification label 9-5
Charging system warning light 3-231
Chassis number 9-3
Child restraint 2-24
Child safety locks for rear door 3-59
Cleaning
Inside of your vehicle 7-88
Outside of your vehicle 7-90Clutch
Fluid 7-21
,9-10
Pedal free play 7-37
Coat hooks 3-305
Combination headlights and dimmer switch 3-235
Coming home light 3-242
Consumer information 8-2
Continuously variable transmission (CVT) 3-99
Fluid 7-18,9-10
Selector lever operation 3-99
Sports mode 3-107
Coolant (engine) 7-12
,9-10
Cruise control 3-158
Indicator 3-160
Cup holder 3-303
D
Daytime running lights
Bulb capacity 7-54
Replacement 7-62
Defogger (rear window) 3-255
Defrosting or defogging (windshield, door windows) 5-20
,5-
29
,5-39
,5-49
Digital clock 5-149
Dimensions 9-6
Dimmer (high/low beam change) 3-240
Disc brake pads 7-42
BK0150800US.book 2 ページ 2012年3月29日 木曜日 午後2時38分
 from the light unit.
CAUTION")
 and remove the cover (B).2. Remove the socket and bulb assemblies by turning them
counterc")

