Page 132 of 722

Features and controls
3-37
3
2. Install the cover of the ignition switch.
3. Reinsert the emergency key into the F.A.S.T.-key.NOTE�Always install the cover of the ignition switch when not
using the emergency key. Not doing so could cause dam-
age if foreign material such as dust gets into the keyhole
of the ignition switch.Steering wheel lock
To l o c k
Turn the emergency key to the “LOCK” position.
Turn the steering wheel until it is locked.
To u n l o c k
Turn the emergency key to the “ACC” position while moving
the steering wheel slightly.
CAUTION
!�Do not turn the ignition switch to the LOCK posi-
tion while the vehicle is moving. This will cause the
steering wheel to lock, making it impossible to oper-
ate the vehicle. �If the engine is stopped while driving, the power
brake booster will stop functioning and greater
effort for braking will be required. Also, the power
steering system will not function and it will require
greater effort to manually steer the vehicle.�Do not leave the ignition switch in the “ON” position
for a long time when the engine is not running. The
battery will run down.�Do not turn the ignition switch to the “START”
position when the engine is running. It will damage
the starter motor.
CAUTION
!�Remove the emergency key when leaving the vehi-
cle.�If your vehicle needs to be towed, turn the emer-
gency key to the “ACC” position to unlock the steer-
ing wheel.
BK0150800US.book 37 ページ 2012年3月29日 木曜日 午後2時38分
Page 145 of 722

6. Remove the F.A.S.T.-key from the emergency k")
3-50 Features and controls
3
5. Turn the emergency key with F.A.S.T.-key to the “ON”
position. (Perform the following procedure within 30 sec-
onds)
6. Remove the F.A.S.T.-key from the emergency key.
7. With the first valid F.A.S.T.-key, press the UNLOCK but-
ton for 4 to 10 seconds and press the LOCK button during
this time.
8. Release in sequence the LOCK and UNLOCK buttons
within 10 seconds of pressing the LOCK button in step 7.
(Perform the following procedure within 30 seconds)
9. With the second valid F.A.S.T.-key, press the UNLOCK
button for 4 to 10 seconds and press the LOCK button
during this time.
10. Release in sequence the LOCK and UNLOCK buttons
within 10 seconds of pressing the LOCK button in step 9,
and the immobilizer display will blink on the information
screen in the multi-information display. (Perform the fol-
lowing procedure within 60 seconds)
11. Press the LOCK button twice with the blank F.A.S.T.-key
and the immobilizer display will come on for 30 seconds
on the information screen in the multi-information dis-
play.
12. This completes the registration of the F.A.S.T.-key.
NOTE�The indicator light (5) comes on each time a button is
pressed.
�The keyless entry system does not work if the key is in the
ignition switch.
�The F.A.S.T.-key can be used from about 40 feet (12 m)
away. However, this distance may change if your vehicle
is near a TV transmitting tower, a power station, or a radio
station.
�If the UNLOCK button (2) is pressed when all doors are
locked and no doors are opened within about 30 seconds,
the doors will automatically re-lock.
On a vehicle equipped with a Mitsubishi Multi-Communi-
cation System, the functions can be adjusted on the
screen. For details, refer to a separate operation manual.
�If the following conditions are observed after pressing the
buttons on the remote control transmitter, the battery in
the remote control transmitter may need to be replaced.
• The doors cannot be locked or unlocked.
• The trunk lid cannot be opened.
• The panic alarm cannot be operated.
• The indicator light (5) is dim or does not come on.
�If you lose your F.A.S.T.-key, please contact an authorized
Mitsubishi Motors dealer for a replacement.
�If you wish to obtain an additional F.A.S.T.-key, please
contact an authorized Mitsubishi Motors dealer. A maxi-
mum of four F.A.S.T.-key can be programmed for your
vehicle.
BK0150800US.book 50 ページ 2012年3月29日 木曜日 午後2時38分
Page 148 of 722
Features and controls
3-53
3
NOTE�When locking or unlocking with the key, only the driver’s
door will be locked or unlocked.
To lock or unlock all doors, use the power door lock
switches, the keyless entry system, the F.A.S.T-key or the
remote control transmitter of the F.A.S.T.-key.
Refer to “Power door locks” on page 3-56,
“Keyless entry system” on page3-9 and 3-45, and “To
operate using the F.A.S.T.-key” on page3-21.
�In vehicles equipped with the F.A.S.T.-key, the driver’s
door can be locked and unlocked using the emergency
key.
Refer to “Emergency key” on page 3-33.
To lock or unlock the front doors with the keyTurn the key toward the front of the vehicle to lock the door.
After checking that the door is locked, turn the key back to the
center and remove it.1- Insert or remove the key
2- Lock
3- Unlock
BK0150800US.book 53 ページ 2012年3月29日 木曜日 午後2時38分
Page 174 of 722
Features and controls
3-79
3
To release When parking on a hill, apply the parking brake and turn the
front wheels toward the curb on a downhill grade, away from
the curb on an uphill grade.1- Pull the lever up slightly.
2- Push and hold the button at the end of the hand grip.
3- Push the lever downward.
CAUTION
!�Before driving, be sure that the parking brake is
fully released and brake warning light is off.
If you drive without the parking brake fully
released, the warning display will appear on the
information screen in the multi-information display.
If a vehicle is driven without releasing the parking
brake, the brakes will be overheated, resulting in
ineffective braking and possible brake failure.
Warning light
Warning display type 1
Warning display type 2
BK0150800US.book 79 ページ 2012年3月29日 木曜日 午後2時38分
Page 180 of 722
Features and controls
3-85
3
To adjust the mirror positionThe outside rearview mirrors can be adjusted when the ignition
switch is in the “ON” or “ACC” position.
Move the lever (A) to the same side as the mirror you wish to
adjust.
Press the switch (B) to adjust the mirror position. NOTE�After adjusting, return the lever to the “•” (off) position
(C).
To fold the mirrorThe outside mirror can be folded in toward the side window to
prevent damage when parking in tight locations.
L- Left outside mirror adjustment
R- Right outside mirror adjustment
1- Up
2- Down
3- Right
4- Left
BK0150800US.book 85 ページ 2012年3月29日 木曜日 午後2時38分
Page 203 of 722

3-108 Features and controls
3
NOTE�Shift ranges can only be selected in a forward direction
from 1st to 6th. To reverse or park the vehicle, move the
selector lever to the “R” or “P” position.
�To maintain good running performance, the transmission
may refuse to perform an upshift when the selector lever
or sportronic steering wheel paddle shifter is moved to the
“+ (SHIFT UP)” position at certain vehicle speeds. Also,
to prevent over-revving of the engine, the transmission
may refuse to perform a downshift when the shift lever or
sportronic steering wheel paddle shifter is moved to the “-
(SHIFT DOWN)” position at certain vehicle speeds.
When this happens, a buzzer sounds to indicate that a
downshift is not going to take place.
�Move the selector lever gently between the manual and
main gates and between positions in the manual gate. And
do not operate sportronic steering wheel paddle shifter
violently. Excessive force could damage the selector lever
or sportronic steering wheel paddle shifter.
Except for vehicles with manual gateWhile driving with the selector lever in the “D” (DRIVE),
sports mode can be selected by pulling one of the sportronic
steering wheel shifters toward you.
In sports mode, rapid shifting is possible simply by operating
the sportronic steering wheel paddle shifter.
Unlike the manual transaxle, sports mode allows shifting with
the accelerator pedal depressed.NOTE�To return to “D” (DRIVE) operation, pull the sportronic
steering wheel paddle shifter on the + (UP) side for longer
than 2 seconds, or park the vehicle to change the selector
lever position indicator to “D” (DRIVE) and return to “D”
(DRIVE) operation.
�When the sportronic steering wheel paddle shifter is oper-
ated with the selector lever in the “L” (LOW) position,
gear is not shifted because the selectable shift range is
limited.
�By rapidly moving the selector lever or sportronic
steering wheel paddle shifter to the “- (SHIFT
DOWN)” side twice, it is possible to skip one shift
range (i.e., 3rd to 1st or 4th to 2nd). Since sudden
engine braking or acceleration can cause a loss of
traction, downshifts must be made carefully in
accordance with the vehicle’s speed.�On vehicles with a sportronic steering wheel paddle
shifter, shift ranges may not change when the lateral
paddle shifters are operated at the same time.
CAUTION
!
BK0150800US.book 108 ページ 2012年3月29日 木曜日 午後2時38分
Page 220 of 722
Features and controls
3-125
3
Shifting using the gearshift lever
N00540600032
Selecting manual shifting
While the vehicle is stopped or being driven, move the gear-
shift lever from the “D” (DRIVE) position in the main shift
gate toward the driver’s seat to select manual shifting.Shifting up and shifting down
Each time the gearshift lever is pulled rearward, the transmis-
sion shifts up 1 gear.
In addition, each time the gearshift lever is pushed forward, the
transmission shifts down 1 gear.
NOTE�After manual shifting is selected using the gearshift lever,
shifting up and down can also be performed using the
sportronic steering wheel shifters.
SHIFT DOWN
SHIFT UP
BK0150800US.book 125 ページ 2012年3月29日 木曜日 午後2時38分
Page 221 of 722
3-126 Features and controls
3
Returning to “D” range operation
Move the gearshift lever toward the front passenger’s seat to
return to automated shifting.NOTE�When the gearshift lever is moved to the “D” (DRIVE)
position from the manual shift gate, it may automatically
select a gear different from the gear selected during man-
ual shifting depending on vehicle speed or driving condi-
tions.
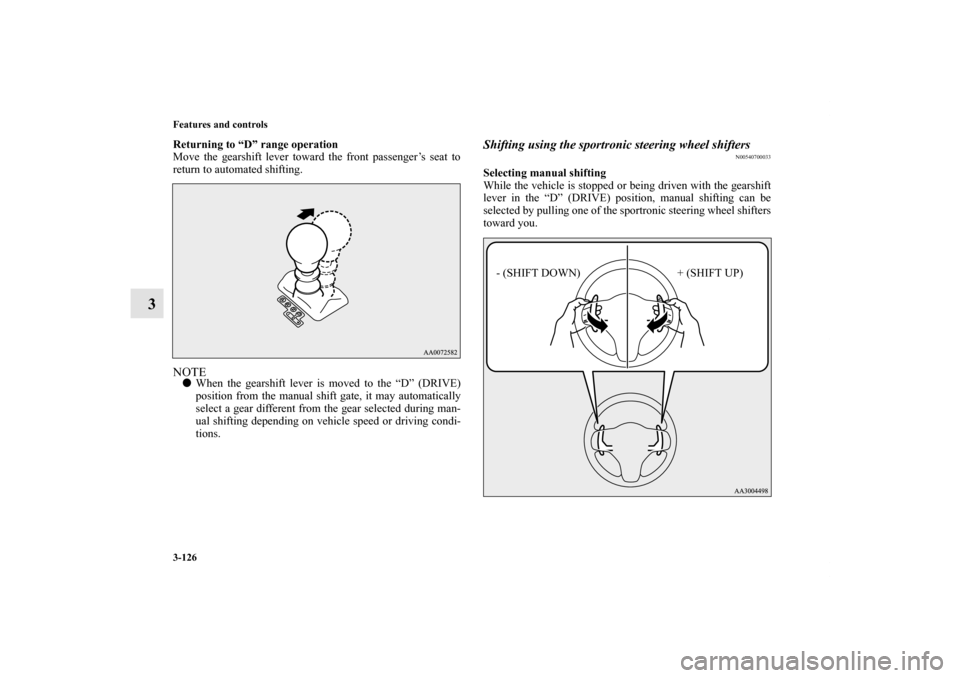
Shifting using the sportronic steering wheel shifters
N00540700033
Selecting manual shifting
While the vehicle is stopped or being driven with the gearshift
lever in the “D” (DRIVE) position, manual shifting can be
selected by pulling one of the sportronic steering wheel shifters
toward you.
- (SHIFT DOWN) + (SHIFT UP)
BK0150800US.book 126 ページ 2012年3月29日 木曜日 午後2時38分


 to the same")