Page 650 of 722

Vehicle care and maintenance
7-51
7
*- Fusible link�Some fuses may not be installed on your vehicle, depend-
ing on the vehicle model or specifications.
�The table above shows the main equipment corresponding
to each fuse.
There are no 7.5 A, 25 A or 30 A spare fuses. If a fuse of one of
these capacities blows, replace it temporarily by borrowing one
of the fuses indicated below.
7.5 A: 10 A spare fuse
25 A: 20 A spare fuse
30 A: 30 A audio amplifier fuse
Replace the borrowed fuse with a fuse that has the correct
capacity as soon as possible.
Identification of fuse
23 Fuel pumpExcept for
vehicles with
turbocharger15 A
Vehicles with
turbocharger20 A
24 Starter 30 A*
25Valve lift con-
trolExcept for
vehicles with
turbocharger40 A*
——Vehicles with
turbocharger—
26 Anti-lock braking system 40 A*
27 Anti-lock braking system 30 A*
28Air conditioning condenser fan
motor30 A*
29 Radiator fan motor 40 A*
30 IOD IOD 30 A
31 Audio amplifier 30 A
32 Diesel 30 A
33 — Spare fuse 10 A
34 — Spare fuse 15 A
35 — Spare fuse 20 ANo.
Symbol
Electrical system
Capacity
Capacity
Color
7.5 A Brown
10 A Red
15 A Blue
20 A Yellow
25 A Natural (White)
30 A Green (fuse type)/Pink (fusible link type)
40 A Green
BK0150800US.book 51 ページ 2012年3月29日 木曜日 午後2時38分
Page 652 of 722
Vehicle care and maintenance
7-53
7
4. Use the fuse location diagrams and the matching tables, to
check the fuse that is related to the problem. If the fuse is
not blown, something else must be causing the problem.
Contact an authorized Mitsubishi Motors dealer or a
repair facility of your choice to have the problem checked.5. Insert a new fuse of the same capacity securely into the
appropriate slot. B- Fuse is OK
C- Blown fuse
CAUTION
!�Never use a fuse with a capacity greater than the one
listed or any substitute, such as wire, foil etc. This
would cause the circuit wiring to heat up and could
cause a fire. �If the replacement fuse blows again after a short
time, have the electrical system checked by an
authorized Mitsubishi Motors dealer or a repair
facility of your choice to find and correct the cause.
BK0150800US.book 53 ページ 2012年3月29日 木曜日 午後2時38分
Page 653 of 722

7-54 Vehicle care and maintenance
7Replacement of light bulbs
N00942900219
Before replacing a bulb, be sure the light is off. Do not touch
the glass part of the new bulb with your bare fingers; the oil
from your skin will stay on the glass and dim or destroy the
bulb when it gets hot.NOTE�If you are unsure of how to carry out the work as required,
it is recommended that these procedures be carried out by
an authorized Mitsubishi Motors dealer or a repair facility
of your choice.
�Be careful not to scratch the vehicle body when removing
a light and lens.
�When it rains, or when the vehicle has been washed, the
inside of the lens sometimes becomes temporarily foggy.
This is the same phenomenon as when window glass mists
up on a humid day, and does not indicate a functional
problem.
When the light is switched on, the heat will remove the
fog. However, if water gathers inside the light, please
have it checked by an authorized Mitsubishi Motors
dealer or a repair facility of your choice.
Bulb capacity
N00943000099
The bulb should only be replaced with a new bulb with the
same rating and type. The type and rating are listed on the base
of the bulb.Outside
N00950300805
[Except for vehicles with high intensity discharge headlights]
CAUTION
!�Bulbs are extremely hot immediately after being
turned off.
When replacing a bulb, wait for it to cool sufficiently
before touching it. You could otherwise be burned.
Description
Wattage
ANSI Trade
No. or Bulb
type
1-Front turn signal
light 21 W WY21W
2-Head light, high
beam60 W9005
HB3Front
BK0150800US.book 54 ページ 2012年3月29日 木曜日 午後2時38分
Page 654 of 722
![MITSUBISHI LANCER 2013 8.G Owners Manual Vehicle care and maintenance
7-55
7
[For vehicles with high intensity discharge headlights]
NOTE�It is not possible to repair or replace only the bulb for the
side turn-signal light.
Check with an aut](/manual-img/19/7456/w960_7456-653.png "MITSUBISHI LANCER 2013 8.G Owners Manual Vehicle care and maintenance
7-55
7
[For vehicles with high intensity discharge headlights]
NOTE�It is not possible to repair or replace only the bulb for the
side turn-signal light.
Check with an aut")
Vehicle care and maintenance
7-55
7
[For vehicles with high intensity discharge headlights]
NOTE�It is not possible to repair or replace only the bulb for the
side turn-signal light.
Check with an authorized Mitsubishi Motors dealer or a
repair facility of your choice when the light needs to be
repaired or replaced.
3-Head light, low beam
(Halogen bulb)51 W9006
HB4
4-Front fog light (if so
equipped)55 W H11
5-Front side-marker
and parking light5 W W5W
6- Side turn signal light 5 W —
Description
Wattage or Candle
power
ANSI Trade
No. or Bulb
type
1-Front turn signal
light 21 W WY21W
2-Daytime running
light27 W
1156
32 cp
3-Head light, low/high
beam (Discharge
bulb)35 W —
4- Front fog light 55 W H11
5-Front side-marker
and parking light5 W WY5W
6- Side turn signal light 5 W —
Description
Wa t t a g e
ANSI Trade
No. or Bulb
type
WA R N I N G
!�Check with an authorized Mitsubishi Motors dealer
or a repair facility of your choice when it is neces-
sary to repair a discharge headlight or to replace the
bulb.
The power circuit, bulb and electrodes generate high
voltages that may cause a severe electrical shock.
BK0150800US.book 55 ページ 2012年3月29日 木曜日 午後2時38分
Page 655 of 722
7-56 Vehicle care and maintenance
7
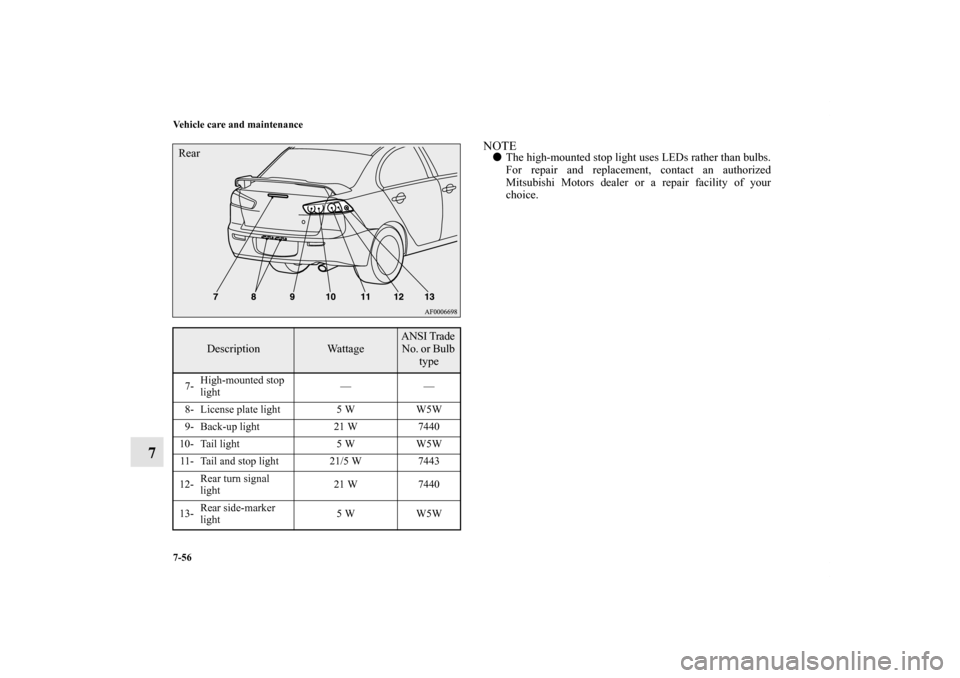
NOTE�The high-mounted stop light uses LEDs rather than bulbs.
For repair and replacement, contact an authorized
Mitsubishi Motors dealer or a repair facility of your
choice.
Description
Wattage
ANSI Trade
No. or Bulb
type
7-High-mounted stop
light——
8- License plate light 5 W W5W
9- Back-up light 21 W 7440
10- Tail light 5 W W5W
11- Tail and stop light 21/5 W 7443
12-Rear turn signal
light21 W 7440
13-Rear side-marker
light5 W W5WRearBK0150800US.book 56 ページ 2012年3月29日 木曜日 午後2時38分
Page 663 of 722
7-64 Vehicle care and maintenance
7
4. Turn the bulb counterclockwise while pressing it and pull
it out of the socket.
5. To install a bulb, perform the removal steps in reverse.
Headlights (low/high beam, for vehicles with high
intensity discharge lights)
N00943100625
Do not attempt to disassemble or repair headlights, and do not
attempt to replace their bulbs.Adjustment of headlight aim
N00943200121
The alignment of the headlights should be checked by an
authorized Mitsubishi Motors dealer or a repair facility of your
choice.
WA R N I N G
!�A high voltage is present in the power circuit and in
the bulbs and bulb terminals. To avoid the risk of an
electric shock, contact an authorized Mitsubishi
dealer whenever repair or replacement is necessary.
BK0150800US.book 64 ページ 2012年3月29日 木曜日 午後2時38分
Page 686 of 722
 away from the center as shown and
remove the light unit. Then remove the bulb by pulling
out.
2. To install the")
Vehicle care and maintenance
7-87
7
Trunk area light
N00944800094
1. Pull both clips (A) away from the center as shown and
remove the light unit. Then remove the bulb by pulling
out.
2. To install the bulb, perform the removal steps in reverse.
Vehicle care precautions
N00945100153
In order to maintain the value of your vehicle, perform regular
maintenance using the proper materials and procedures. Be
sure to use only those materials and procedures that meet your
local environmental pollution control regulations. Choose the
materials you will use carefully, to be sure that they do not con-
tain corrosives. If you are not sure, contact an authorized
Mitsubishi Motors dealer for help in choosing these materials.
CAUTION
!�Cleaning products can be dangerous. Some are poi-
sonous. Others are highly flammable. Some are dan-
gerous if you breathe their fumes in a closed space.
When you use anything in a container to clean your
vehicle, be sure to follow the instructions. Always
open your vehicle doors or windows when you’re
cleaning the inside. Never use the following chemi-
cals to clean your vehicle:
• Gasoline
• Carbon Tetrachloride
• Benzine
• Kerosene
• Naphtha
• Acetone
• Turpentine
• Paint Thinner
• Lacquer Thinner
• Nail Polish Remover
BK0150800US.book 87 ページ 2012年3月29日 木曜日 午後2時38分
Page 695 of 722

N01047100100
This information is provided in compliance with the require-
ments of the National Hi")
8-2 Customer assistance/Reporting Safety Defects
8Consumer information (For vehicles sold in
U.S.A.)
N01047100100
This information is provided in compliance with the require-
ments of the National Highway Traffic Safety Administration,
Department of Transportation. It provides the purchasers
and/or prospective purchasers with information on reporting
safety defects. Uniform tire quality gradingDOT quality grades - All passenger vehicle tires must conform
to Federal Safety Requirements in addition to these grades. The
specific grade rating in each grade category is shown on the
side wall of the tires on your vehicle. Treadwear The treadwear grade is a comparative rating based on the wear
rate of the tire when tested under controlled conditions on a
specified government test course. For example, a tire graded
150 would wear one and one-half (1
1/2) times as well on the
government course as a tire graded 100. The relative perfor-
mance of tires depends upon the actual conditions of their use,
however, and may depart significantly from the norm due to
variations in driving habits, service practices and differences in
road characteristics and climate.
Traction AA, A, B, C The traction grades, from highest to lowest, are AA, A, B and
C. Those grades represent the tire’s ability to stop on wet pave-
ment as measured under controlled conditions on specified
government test surfaces of asphalt and concrete. A tire
marked C may have poor traction performance.
Temperature A, B, CThe temperature grades are A (the highest), B and C, represent-
ing the tire’s resistance to the generation of heat and its ability
to dissipate heat when tested under controlled conditions on a
specified indoor laboratory test wheel. Sustained high tempera-
ture can cause the material of the tire to degenerate and reduce
tire life, and excessive temperature can lead to sudden tire fail-
ure. The grade C corresponds to a level of performance which
all passenger car tires must meet under the Federal Motor Vehi-
cle Safety Standard No. 109. Grades B and A represent higher
levels of performance on the laboratory test wheel than the
minimum required by law.
WA R N I N G
!�The traction grade assigned to this tire is based on
straight-ahead braking traction tests, and does not
include acceleration, cornering, hydroplaning, or
peak traction characteristics.
WA R N I N G
!�The temperature grade for this tire is established for
a tire that is properly inflated and not overloaded.
Excessive speed, underinflation, or excessive load-
ing, either separately or in combination, can cause
heat buildup and possible tire failure.
BK0150800US.book 2 ページ 2012年3月29日 木曜日 午後2時38分