Page 103 of 177
![MITSUBISHI LANCER EVOLUTION 2013 10.G MMCS Manual Setting up Bluetooth Connection 7-34
To play from a Bluetooth AUDIO
When pairing is complete, the Bluetooth
AUDIO can be used.
1 Press the [MODE] key, and touch
[Bluetooth AUDIO]
eng_a662
Bluet MITSUBISHI LANCER EVOLUTION 2013 10.G MMCS Manual Setting up Bluetooth Connection 7-34
To play from a Bluetooth AUDIO
When pairing is complete, the Bluetooth
AUDIO can be used.
1 Press the [MODE] key, and touch
[Bluetooth AUDIO]
eng_a662
Bluet](/manual-img/19/7471/w960_7471-102.png)
Setting up Bluetooth Connection 7-34
To play from a Bluetooth AUDIO
When pairing is complete, the Bluetooth
AUDIO can be used.
1 Press the [MODE] key, and touch
[Bluetooth AUDIO]
eng_a662
Bluetooth AUDIO ScreenThe display screen and operation may differ depending
on the type of Bluetooth AUDIO being connected.
Display example
eng_a663
eng_a664
1) Title
When Bluetooth AUDIO is played, [Bluetooth
AUDIO] is displayed.
2) [ ] Stop
3) [ ]
Touch this button to display the Sub Menu.
4) [
Track], [Track ]
Touch these buttons to move down and up the
tracks.
Touch and hold to rewind or fast-forward a track.
5) [ ] Pause
6) [
] Play
7) Bluetooth Link Indicator
Display : Bluetooth connection complete
Blinking : Bluetooth is connecting
No display : Bluetooth not connected
8) [Pairing]
Displays the Pairing List Screen.
9) [Back]
Deletes the Sub Menu.
10) [Help]
Displays the VR Command List screen.
To pair a Mobile Phone
1 Press the [INFO] key, and touch
[Mobile Phone]
eng_a665
2 If the Mobile Phone is not paired,
[There are no active connections] is
displayed. When [There are no active
connections] disappears, touch [
]
to display the Sub Menu
eng_a666
3 Touch the [Pairing] button
eng_a667
7)
1)
3) 6)
2)5)
4)
8)
9)
10)
��������\b ���\b
��\f�� \
������ ���\b������� �\b �\b
�\f
Page 104 of 177
Setting up Bluetooth Connection 7-35
Audio
4 Touch the [New Device] button
from the Pairing List Screen
Pair the Mobile Phone following the same procedures
as for Bluetooth Audio.
Refer to
“Mobile Phone” (page 10-12) for details on
how to use the “Mobile Phone”.
��������\b ���\b
��\f�� \
������ ��� ������� �\b �\b �
�
Page 106 of 177
Music Server 8-1
Music Server
Music Server
Music Server
The music server can play and record CD
tracks. It is part of the MMCS hard drive device
(HDD).
NOTE
another vehicle's navigation/audio system, and the
HDD itself cannot be replaced.
Tracks that have been recorded to the HDD cannot
be reproduced in another medium (CD-R, MD, etc.)
Display Contents
eng_338
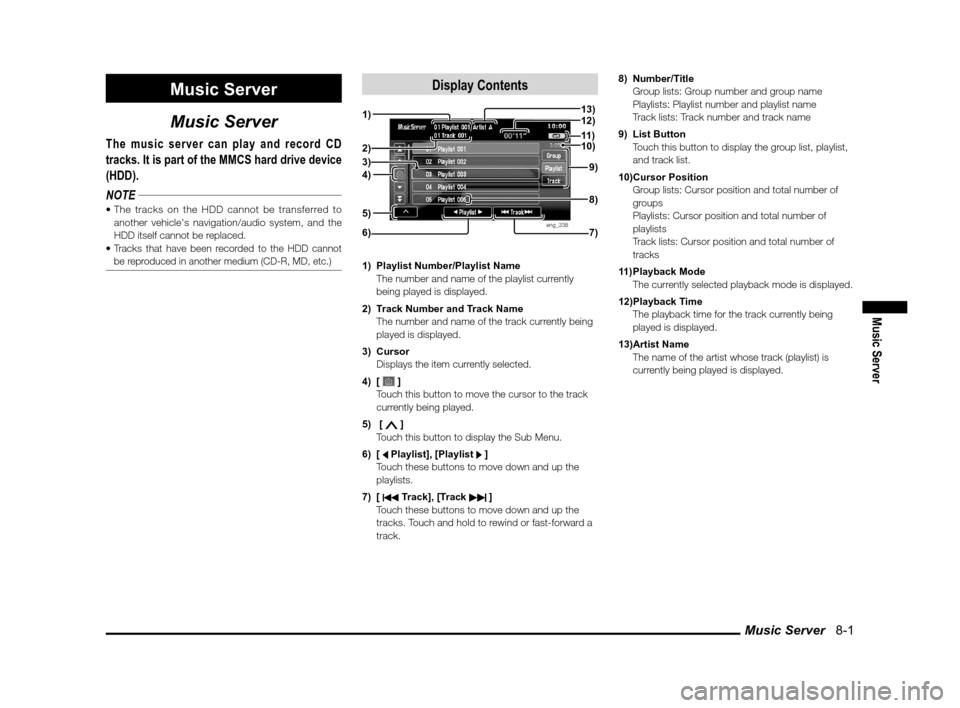
1) Playlist Number/Playlist Name
The number and name of the playlist currently being played is displayed.
2) Track Number and Track Name
The number and name of the track currently being played is displayed.
3) Cursor
Displays the item currently selected.
4) [
]
T
ouch this button to move the cursor to the track
currently being played.
5) [
]
Touch this button to display the Sub Menu.
6) [ Playlist], [Playlist ]
Touch these buttons to move down and up the
playlists.
7) [
Track], [Track ]
Touch these buttons to move down and up the
tracks. Touch and hold to rewind or fast-forward a
track. 8) Number/Title
Group lists: Group number and group name
Playlists: Playlist number and playlist name
Track lists: Track number and track name
9) List Button
Touch this button to display the group list, playlist,
and track list.
10) Cursor Position
Group lists: Cursor position and total number of groups
Playlists: Cursor position and total number of playlists
Track lists: Cursor position and total number of tracks
11) Playback Mode
The currently selected playback mode is displayed.
12) Playback Time
The playback time for the track currently being played is displayed.
13) Artist Name
The name of the artist whose track (playlist) is currently being played is displayed.
4) 2)
1)
3)
6) 7) 8) 9)
10) 11 ) 13)
12)
5)
��������\b ���\b
��\f�� \
������ ��
������� �\b �\b �
�
Page 130 of 177
Watching DVDs 9-1
Visual
Visual
Watching DVDs
If a DVD is inserted into the MMCS, it
automatically switches to DVD playback.
It will display the DVD image if the vehicle is
not moving.
NOTE
displayed, and playback is audio only.
Display Contents
eng_a405
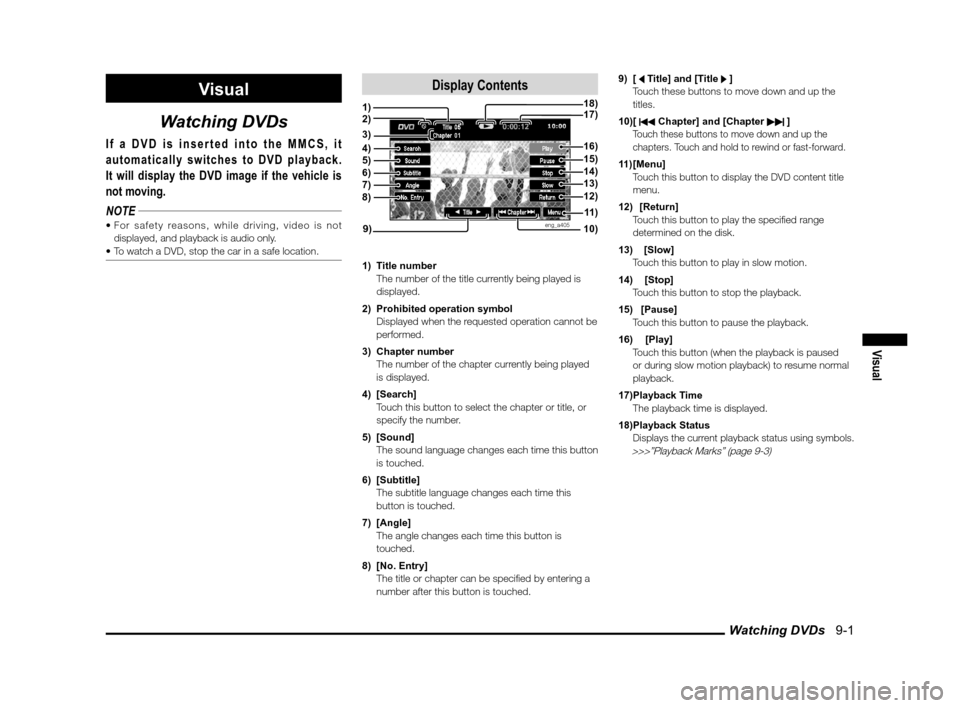
1) Title number
The number of the title currently being played is displayed.
2) Prohibited operation symbol
Displayed when the requested operation cannot be performed.
3) Chapter number
The number of the chapter currently being played is displayed.
4) [Search]
Touch this button to select the chapter or title, or specify the number.
5) [Sound]
The sound language changes each time this button is touched.
6) [Subtitle]
The subtitle language changes each time this button is touched.
7) [Angle]
The angle changes each time this button is touched.
8) [No. Entry]
The title or chapter can be speci� ed by entering a number after this button is touched. 9) [ Title] and [Title ]
Touch these buttons to move down and up the
titles.
10) [
Chapter] and [Chapter ] Touch these buttons to move down and up the chapters. Touch and hold to rewind or fast-forward.
11) [Menu]
Touch this button to display the DVD content title menu.
12) [Return]
Touch this button to play the speci� ed range determined on the disk.
13) [Slow]
Touch this button to play in slow motion.
14) [Stop]
Touch this button to stop the playback.
15) [Pause]
Touch this button to pause the playback.
16) [Play]
Touch this button (when the playback is paused or during slow motion playback) to resume normal
playback.
17) Playback Time
The playback time is displayed.
18) Playback Status
Displays the current playback status using symbols.
>>>”Playback Marks” (page 9-3)
1)
10)
17)18)
9)
4)5)6)7)8)12)
11 )
3)
13)14)15)16)
2)
��������\b ���\b
��\f�� \
������ ��
������� �\b �\b�
�\f
Page 131 of 177
Watching DVDs 9-2
Basic Operations
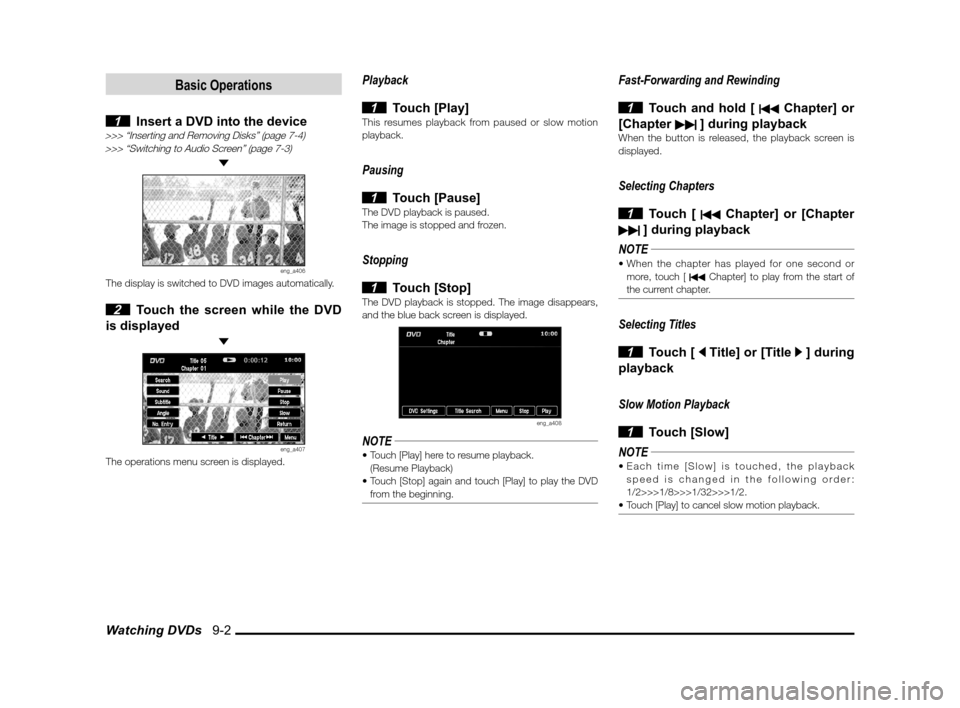
1 Insert a DVD into the device>>> “Inserting and Removing Disks” (page 7-4)>>> “Switching to Audio Screen” (page 7-3)
eng_a406The display is switched to DVD images automatically.
2 Touch the screen while the DVD
is displayed
eng_a407The operations menu screen is displayed.
Playback
1 Touch [Play]This resumes playback from paused or slow motion
playback.
Pausing
1 Touch [Pause]The DVD playback is paused.
The image is stopped and frozen.
Stopping
1 Touch [Stop]The DVD playback is stopped. The image disappears,
and the blue back screen is displayed.
eng_a408
NOTE
(Resume Playback)
from the beginning.
Fast-Forwarding and Rewinding
1 Touch and hold [ Chapter] or
[Chapter
] during playbackWhen the button is released, the playback screen is
displayed.
Selecting Chapters
1 Touch [ Chapter] or [Chapter
] during playback
NOTE
more, touch [ Chapter] to play from the start of
the current chapter.
Selecting Titles
1 Touch [ Title] or [Title ] during
playback
Slow Motion Playback
1 Touch [Slow]
NOTE
speed is changed in the following order:
1/2>>>1/8>>>1/32>>>1/2.
��������\b ���\b
��\f�� \
������ ���������� �\b �\b�
�\f
Page 133 of 177
![MITSUBISHI LANCER EVOLUTION 2013 10.G MMCS Manual Watching DVDs 9-4
Switching AudioWith DVDs on which multiple languages have been
recorded, audio can be switched during playback.
(Multi-Audio)
1 Touch [Sound] in the operations
menu screen
2 MITSUBISHI LANCER EVOLUTION 2013 10.G MMCS Manual Watching DVDs 9-4
Switching AudioWith DVDs on which multiple languages have been
recorded, audio can be switched during playback.
(Multi-Audio)
1 Touch [Sound] in the operations
menu screen
2](/manual-img/19/7471/w960_7471-132.png)
Watching DVDs 9-4
Switching AudioWith DVDs on which multiple languages have been
recorded, audio can be switched during playback.
(Multi-Audio)
1 Touch [Sound] in the operations
menu screen
2 Touch [Sound]
eng_a413
The current sound language is displayed.
NOTE
another whenever [Sound] is touched.
Switching SubtitlesWith disks on which multiple subtitle languages have
been recorded, the subtitles can be switched during
playback. (Multi-Subtitles)
1 Touch [Subtitle] in the operations
menu screen
2 Touch [Subtitle]
eng_a414
The current subtitle language is displayed.
NOTE
language whenever [Subtitle] is touched.
Switching AnglesIf images filmed using multiple cameras have been
recorded on the disk, the camera angles can be
switched during playback. (Multi-Angle)
NOTEicon] in the default settings menu.
>>> “Displaying Angle Marks” (page 9-7)
1 Touch [Angle] in the operations
menu screen
2 Touch [Angle]
eng_a415
The current angle is displayed.
NOTE
whenever [Angle] is touched.
��������\b ���\b
��\f�� \
������ ��\b������� �\b �\b�
�\f
Page 135 of 177
Watching DVDs 9-6
Displaying the Default Settings Menu
After setting the default settings, there is
no need to change the subtitile settings,
etc., each time during DVD playback.
The following settings are possible: menu
language, sound language, subtitle
language, angle mark display, audio
compression (dynamic range control), and
viewing restriction (parental lock).
NOTE[Menu Language], the language speci� ed by the disk
is played if the selected language is not available on
the disk.
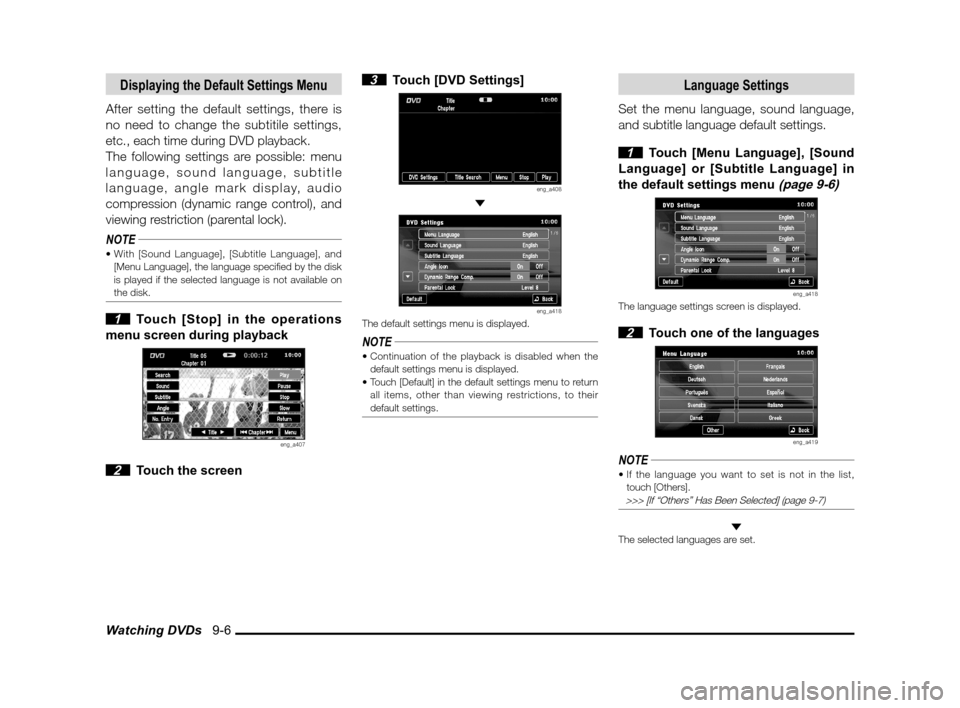
1 Touch [Stop] in the operations
menu screen during playback
eng_a407
2 Touch the screen
3 Touch [DVD Settings]
eng_a408
eng_a418The default settings menu is displayed.
NOTE
default settings menu is displayed.
all items, other than viewing restrictions, to their
default settings.
Language Settings
Set the menu language, sound language,
and subtitle language default settings.
1 Touch [Menu Language], [Sound
Language] or [Subtitle Language] in
the default settings menu
(page 9-6)
eng_a418The language settings screen is displayed.
2 Touch one of the languages
eng_a419
NOTE
touch [Others].
>>> [If “Others” Has Been Selected] (page 9-7)
The selected languages are set.
��������\b ���\b
��\f�� \
������ ���������� �\b �\b��
�
Page 136 of 177
Watching DVDs 9-7
Visual
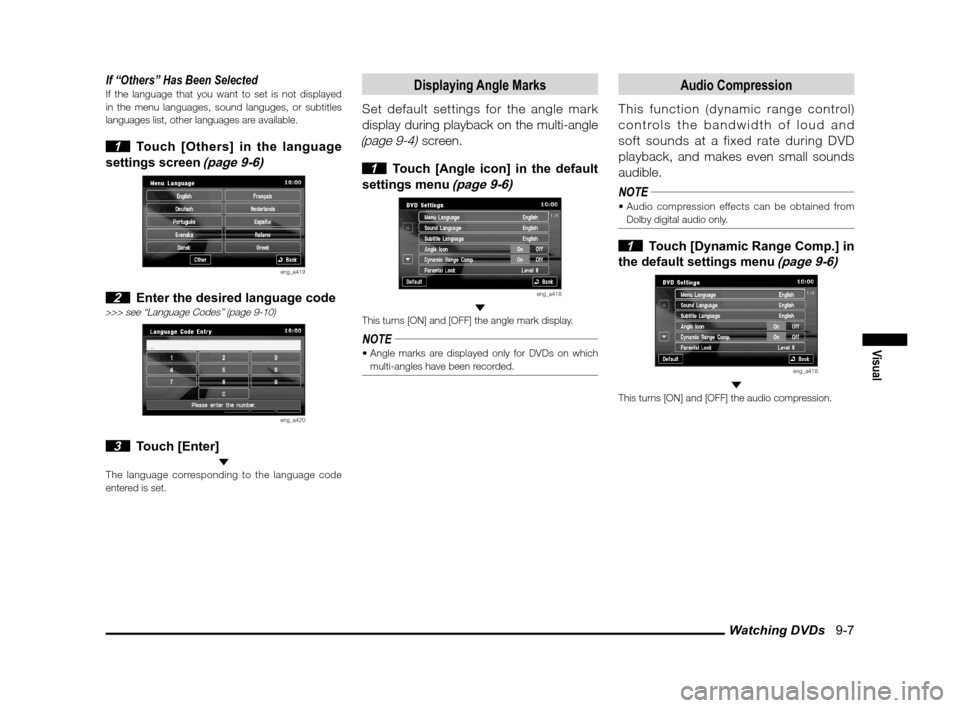
If “Others” Has Been SelectedIf the language that you want to set is not displayed
in the menu languages, sound languges, or subtitles
languages list, other languages are available.
1 Touch [Others] in the language
settings screen
(page 9-6)
eng_a419
2 Enter the desired language code>>> see “Language Codes” (page 9-10)
eng_a420
3 Touch [Enter] The language corresponding to the language code
entered is set.
Displaying Angle Marks
Set default settings for the angle mark
display during playback on the multi-angle
(page 9-4) screen.
1 Touch [Angle icon] in the default
settings menu
(page 9-6)
eng_a418
This turns [ON] and [OFF] the angle mark display.
NOTE
multi-angles have been recorded.
Audio Compression
This function (dynamic range control)
controls the bandwidth of loud and
soft sounds at a fixed rate during DVD
playback, and makes even small sounds
audible.
NOTE
Dolby digital audio only.
1 Touch [Dynamic Range Comp.] in
the default settings menu
(page 9-6)
eng_a418
This turns [ON] and [OFF] the audio compression.
��������\b ���\b
��\f�� \
������ ���������� �\b �\b��
�