2013 MITSUBISHI L200 headlamp
[x] Cancel search: headlampPage 163 of 362

Crossing a stream
4-wheel drive vehicles are not necessarily water-
proof. If the electrical circuits become wet, further
operation of the vehicle will be impossible; there-
fore, avoid crossing streams unless absolutely nec-
essary. If crossing a stream is unavoidable, use the
following procedure: 1.Check depths of a stream and geographical
features before attempting to cross a stream
and ford the stream where the water is as shal-
low as practicable.
2. Set the transfer shift lever to “4L” position
(easy select 4WD), “4LLc” position (super se-
lect 4WD).
3. Drive slowly at a speed of approximately
5 km/h (3 mph) to avoid splashing too much
water.CAUTIONl Never cross a stream where the water is
deep.
Do not change gears while crossing the
stream.
Frequent crossing of streams can adverse-
ly affect the life span of the vehicle; we rec-
ommend you to take the necessary meas-
ures to prepare, inspect, and repair the ve-
hicle.
After crossing a stream, apply the brakes to be sure
they are functioning properly. If the brakes are wet
and not functioning properly, dry them out by driv-
ing slowly while lightly depressing the brake pedal.
Inspect each part of the vehicle carefully.
Inspection and maintenance
following rough road operation E00606700048
After operating the vehicle in rough road condi-
tions, be sure to perform the following inspection
and maintenance procedures:
l Check that the vehicle has not been damaged
by rocks, gravel, etc.
l Carefully wash the vehicle with water.
After washing, drive the vehicle slowly
while lightly depressing the brake pedal in or-
der to dry out the brakes. If the brakes still
do not function properly, we recommend you
to have the brakes checked as soon as possible.
l Remove the insects, dried grass, etc. clog-
ging the radiator core.
l After crossing a stream, be sure to have the
following items inspected at a MITSUBISHI
MOTORS Authorized Service Point and take
the necessary measures. •Check the brake system and, if necessary,
have it serviced.
• Check the engine, transmission, transfer,
and differential oil or grease level and tur-
bidity. If the oil or grease is milky, it indi-
cates water contamination. Replace it
with new oil or grease.
• Grease the propeller shaft.
• Check the inside of the vehicle. If ingress
of water is found, dry the carpet etc.
• Inspect the headlamps. If the headlamp
bulb is flooded with water, we recom-
mend you to have it drained.Cautions on handling of 4-wheel
drive vehicles E00606800368
Tyres and wheels
Since the driving torque can be applied to the 4
wheels, the performance of the vehicle when oper-
ating in 4-wheel drive is greatly affected by the con-
dition of the tyres.
Pay close attention to the tyres.
l Install specified tyres on all wheels. Refer to
“Tyres and wheels” on page 9-17.
l Be sure to fit all 4 tyres and wheels of the
same size and type.
When replacement of any of the tyres or
wheels is necessary, replace all of them.
l All tyres should be rotated whenever the
wear difference between the front and rear
tyres is recognizable.
Good vehicle performance cannot be expected if
there is a difference in wear between tyres. Refer to
“Tyre rotation” on page 8-13.
l Check the tyre inflation pressure regularly.
Starting and driving
4-37
OKTE13E1
4
Page 255 of 362

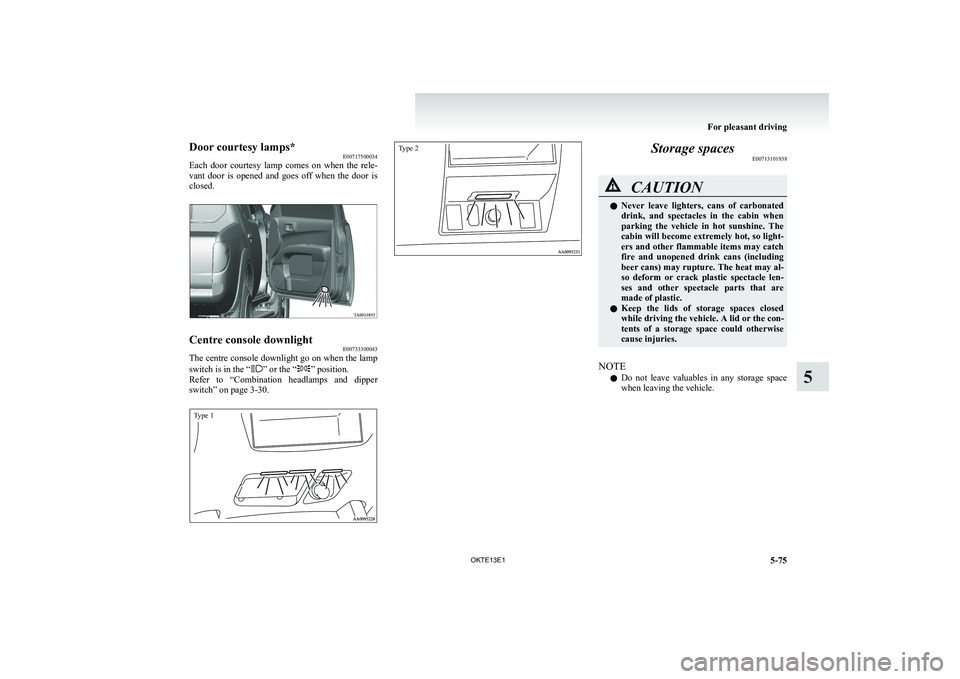
Door courtesy lamps*E00717500034
Each door courtesy lamp comes on when the rele-
vant door is opened and goes off when the door is
closed.Centre console downlight E00733300043
The centre console downlight go on when the lamp
switch is in the “” or the “” position.
Refer to “Combination headlamps and dipper
switch” on page 3-30.
Type 1Type 2
Storage spaces E00713101938CAUTIONlNever leave lighters, cans of carbonated
drink, and spectacles in the cabin when
parking the vehicle in hot sunshine. The
cabin will become extremely hot, so light-
ers and other flammable items may catch
fire and unopened drink cans (including
beer cans) may rupture. The heat may al-
so deform or crack plastic spectacle len-
ses and other spectacle parts that are
made of plastic.
l Keep the lids of storage spaces closed
while driving the vehicle. A lid or the con-
tents of a storage space could otherwise
cause injuries.
NOTE
l Do not leave valuables in any storage space
when leaving the vehicle.
For pleasant driving
5-75
OKTE13E1
5
Page 256 of 362

1- Utility box*
2- Glove box
3- Sunglasses holder*
4- Front console box*
5- Floor console box*
6- Secret box (Club cab)
Glove box E00717601478
NOTE
l When the lamp switch is in the “
”
or
“” position, the glove box lamp illumi-
nates.
Refer to “Combination headlamps and dip-
per switch” on page 3-30.
l The USB input terminal (if so equipped) is lo-
cated in the glove box.
For details, refer to “USB input terminal” on
page 5-67.
Type 1
To open, pull the lever (A).
Type 2
The glove box can be locked and unlocked using
the key.
1- To lock
2- To unlock
3- To open, pull the lever
Front console box* E00733400161
To open, pull up the knob (A).Floor console box* E00723300574
Type 1
To open, raise the lid.
Type 2
Upper and lower boxes are located inside the floor
console box.
For pleasant driving
5-76 OKTE13E1
5
Page 300 of 362

Washer fluidE01000700672
The windscreen washer fluid reservoir is in the en-
gine compartment.
Check the washer fluid level at regular intervals
and add washer fluid to reservoir if necessary.
NOTE
l The washer fluid container serves the wind-
screen and headlamps (if so equipped).
During cold weather
To ensure proper operation of the washers at low
temperatures, use a fluid containing an anti-freez-
ing agent.
Brake fluid E01000900687
To check the fluid level
Check the brake fluid level in the reservoir.
The brake fluid level must be between the “MAX”
and “MIN” marks on the reservoir.
The brake fluid level is monitored by a float. When
the brake fluid level falls below the “MIN” mark,
the brake fluid warning lamp lights up.
The fluid level falls slightly with wear of the brake
pads, but this does not indicate any abnormality.
If the brake fluid level falls markedly in a short
length of time, it indicates leaks from the brake sys-
tem.
If this occurs, we recommend you to have the vehi-
cle checked.
Fluid type
Use brake fluid conforming to DOT3 or DOT4.
The brake fluid is hygroscopic. Too much moisture
in the brake fluid will adversely affect the brake sys-
tem, reducing the brake performance.
In addition, the brake fluid reservoir is equipped
with a special cap to prevent the entrance of air,
and this cap should not be removed.CAUTIONl Take care in handling brake fluid as it is
harmful to the eyes, may irritate your
skin and also damage painted surfaces.
l Use only the specified brake fluid.
Do not mix or add different brands of
brake fluid to prevent chemical reactions.
Do not let any petroleum-based fluid
touch, mix with, or get into the brake fluid.
This will damage the seals.
l Keep the reservoir tank cap closed to pre-
vent the brake fluid from deteriorating ex-
cept maintenance.
l Clean the filler cap before removing and
close the cap securely after maintenance.
Maintenance
8-08 OKTE13E1
8
Page 314 of 362

Engine compartment fuse location tableE01008000583Engine compartment fuse locationFront
No.SymbolElectrical systemCa-
pacity1———2Electric window system40 A3Ignition switch40 A4Air conditioning compres-
sor10 A5Condenser fan motor20 ANo.SymbolElectrical systemCa-
pacity6Headlamp high-beam
(left)10 A7Headlamp high-beam
(right)10 A8Headlamp low beam (left)10 A9Headlamp low beam
(right)10 A10Engine control20 A11Alternator7.5 A12Stop lamps15 A13Horn10 A14Automatic transmission20 A15Hazard warning flasher10 A16Fuel pump15 A17Front fog lamps15 A18Audio amp20 A
l Some fuses may not be installed on your ve-
hicle, depending on the vehicle model or spec-
ifications.
l The table above shows the main equipment
corresponding to each fuse.
Identification of fuse E01008100308CapacityColour7.5 ABrown10 ARed15 ABlue20 AYellow30 AGreen (fuse type)/
Pink (fusible link type)40 AGreen (fusible link type)Fuse replacement E01007800656
1.Before replacing a fuse, always turn off the
electrical circuit concerned and place the ig-
nition switch in the “LOCK” position.
2. Pull the fuse lid (A) to remove it.
3. Remove the fuse puller (B) from the fuse lid
(A).
Maintenance
8-22 OKTE13E1
8 LHD
Page 316 of 362

OutsideE01003302846
FrontType 1
1- Headlamps, high-beam: 60 W (HB3)
2- Headlamps, low beam: 55 W (H11)
3- Front turn-signal lamps: 21 W (PY21W)
4- Position lamps: 5 W (W5W)
5- Front fog lamps*: 55 W (H11)
6- Side turn-signal lamps (on fender)*: 5 W
(WY5W)
7- Side turn-signal lamps (on outside rear-view
mirror)*
Type 21- Headlamps, high/low beam: 60/55 W (H4)
2- Position lamps: 5 W (W5W)
3- Front turn-signal lamps: 21 W (PY21W)
4- Front fog lamps*: 55 W (H11)
5- Side turn-signal lamps (on fender)*: 5 W
(WY5W)
6- Side turn-signal lamps (on outside rear-view
mirror)*
Codes in parentheses indicate bulb types.
NOTE l The side turn-signal lamp (on outside rear-
view mirror) uses an LED instead of a bulb.
For repair and replacement, contact a
MITSUBISHI MOTORS Authorized Service
Point.
RearType 1Type 21- High-mounted stop lamp: 5 W (W5W)
2- Rear turn-signal lamps: 16 W (W16W)
3- Tail and stop lamps: 21/5 W (P21/5W)
4- Reversing lamps: 16 W (W16W)
5- Rear fog lamp (Type 1, Driver’s side only):
21 W (P21W)
6- Rear fog lamp (Type 2, Driver’s side only):
21 W (W21W)
7- Licence plate lamps: 5 W (W5W)
Codes in parentheses indicate bulb types.Inside E01003401518
Single cab
1- Door courtesy lamps*: 3.4 W
2- Room lamp: 8 W
3- Glove box lamp: 1.4 W
4- Centre console downlight: 1.4 W
Maintenance
8-24 OKTE13E1
8
Page 317 of 362

Club cab
1- Door courtesy lamps*: 3.4 W
2- Front room lamp and personal lamps*:
7.5 W
3- Rear room lamp: 8 W
4- Glove box lamp: 1.4 W
5- Centre console downlight: 1.4 W
Double cab
1- Door courtesy lamps*: 3.4 W
2- Front room lamp and personal lamps: 7.5 W
3- Rear room lamp*: 8 W
4- Glove box lamp: 1.4 W
5- Centre console downlight: 1.4 W
Headlamps E01003501375
Type 1 1.Remove the bulb and connector assembly
(A) by turning it anticlockwise.High beamLow beam2. Depress the tab (B) on the harness connector
and pull the harness connector (C) to remove
it.High beamLow beam
3. To install the bulb, perform the removal
steps in reverse.
CAUTIONl Handle halogen lamp bulbs with care.
The gas inside halogen lamp bulbs is high-
ly pressurized, so dropping, knocking, or
scratching a halogen lamp bulb can cause
it to shatter.
l Never hold the halogen lamp bulb with a
bare hand, dirty glove, etc.
The oil from your hand could cause the
bulb to break the next time the head-
lamps are operated.
If the glass surface is dirty, it must be
cleaned with alcohol, paint thinner, etc.,
and refit it after drying it thoroughly.
Maintenance
8-25
OKTE13E1
8
Page 318 of 362

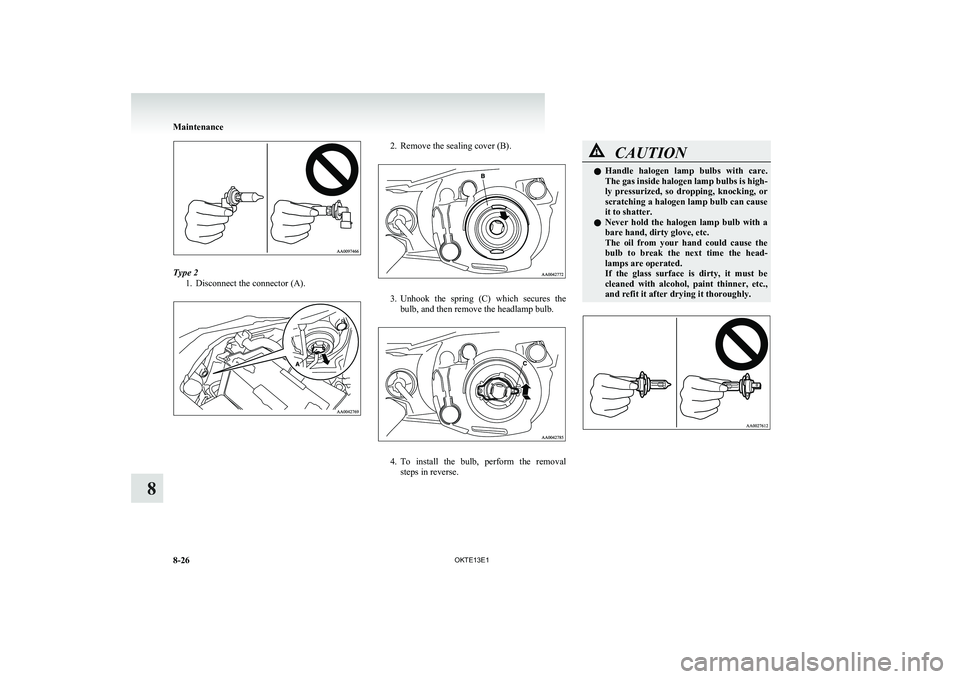
Type 21. Disconnect the connector (A).
2. Remove the sealing cover (B).
3.Unhook the spring (C) which secures the
bulb, and then remove the headlamp bulb.
4. To install the bulb, perform the removal
steps in reverse.
CAUTIONl Handle halogen lamp bulbs with care.
The gas inside halogen lamp bulbs is high-
ly pressurized, so dropping, knocking, or
scratching a halogen lamp bulb can cause
it to shatter.
l Never hold the halogen lamp bulb with a
bare hand, dirty glove, etc.
The oil from your hand could cause the
bulb to break the next time the head-
lamps are operated.
If the glass surface is dirty, it must be
cleaned with alcohol, paint thinner, etc.,
and refit it after drying it thoroughly.
Maintenance
8-26 OKTE13E1
8