Page 227 of 258

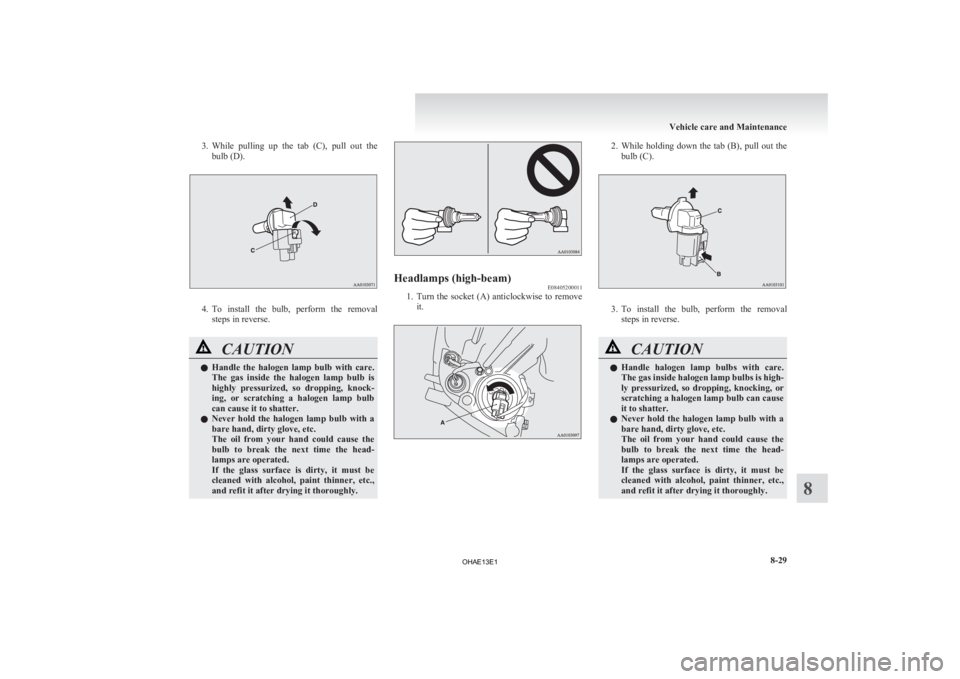
3. While pulling up the tab (C), pull out the
bulb (D). 4. To
install the bulb, perform the removal
steps in reverse. CAUTION
l
Handle
the halogen lamp bulb with care.
The gas inside the halogen lamp bulb is
highly pressurized, so dropping, knock-
ing, or scratching a halogen lamp bulb
can cause it to shatter.
l Never hold the halogen lamp bulb with a
bare hand, dirty glove, etc.
The oil from your hand could cause the
bulb to break the next time the head-
lamps are operated.
If the glass surface is dirty, it must be
cleaned with alcohol, paint thinner, etc.,
and refit it after drying it thoroughly. Headlamps (high-beam)
E08405200011
1. Turn
the socket (A) anticlockwise to remove
it. 2. While
holding down the tab (B), pull out the
bulb (C). 3. To
install the bulb, perform the removal
steps in reverse. CAUTION
l
Handle
halogen lamp bulbs with care.
The gas inside halogen lamp bulbs is high-
ly pressurized, so dropping, knocking, or
scratching a halogen lamp bulb can cause
it to shatter.
l Never hold the halogen lamp bulb with a
bare hand, dirty glove, etc.
The oil from your hand could cause the
bulb to break the next time the head-
lamps are operated.
If the glass surface is dirty, it must be
cleaned with alcohol, paint thinner, etc.,
and refit it after drying it thoroughly. Vehicle care and Maintenance
8-29 8
OHAE13E1
Page 228 of 258
Position lamps
E08405300012
1. Turn the socket (A) anticlockwise to remove
it. 2. Pull the bulb out of the socket.
3. To install the bulb, perform the removal
steps in reverse.
Front turn-signal lamps E08405400013
1. Turn
the socket (A) anticlockwise to remove
it. 2. Pull the bulb out of the socket.
3. To
install the bulb, perform the removal
steps in reverse.
Side turn-signal lamps E08405500014
1. To
remove a side turn-signal lamp, insert a
straight blade (or minus) screwdriver with a
cloth over its tip at the end of the lamp near
the rear of the body and use it to gently lever
the lamp out of the body. *: Front of the vehicleVehicle care and Maintenance
8-30
8 *
OHAE13E1
Page 229 of 258
2. Remove the socket and bulb assemblies by
turning it anticlockwise. 3. Pull the bulb out of the socket.
4. To
install the bulb, perform the removal
steps in reverse.
NOTE l When installing the lamp assembly, push in
the end facing the front of the vehicle first. *: Front of the vehicle
Front fog lamps* / Daytime running
lamps* E08405600015
1. To
create enough work space, turn the steer-
ing wheel all the way in the same direction to
the side you wish to replace.
2. Remove the clips (A) by a screwdriver, then lift the cover (B). 3. Turn
the socket (C or D) anticlockwise to re-
move it. C- Front fog lamp
D- Daytime running lamp
4. While
holding down the tab (E), pull out the
bulb (F).
Front fog lamp Daytime running lamp 5. To
install the bulb, perform the removal
steps in reverse. Vehicle care and Maintenance
8-31 8
OHAE13E1
Page 230 of 258

CAUTION
l
Handle the halogen lamp bulb with care.
The gas inside a halogen lamp bulb is high-
ly pressurized, so dropping, knocking, or
scratching a halogen lamp bulb can cause
it to shatter.
l Never hold the halogen lamp bulb with a
bare hand, dirty glove, etc.
The oil from your hand could cause the
bulb to break the next time the fog lamps
are operated.
If the glass surface is dirty, it must be
cleaned with alcohol, paint thinner, etc.,
and refit it after drying it thoroughly. Rear fog lamp
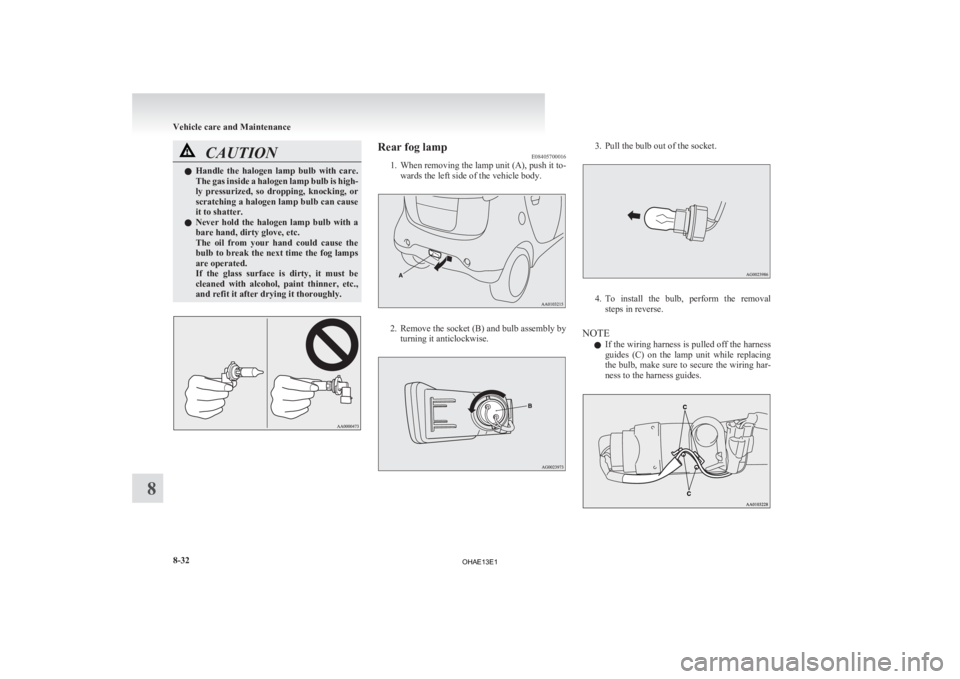
E08405700016
1.
When removing the lamp unit (A), push it to-wards the left side of the vehicle body. 2. Remove
the socket (B) and bulb assembly by
turning it anticlockwise. 3. Pull the bulb out of the socket.
4. To
install the bulb, perform the removal
steps in reverse.
NOTE l If the wiring harness is pulled off the harness
guides (C) on the lamp unit while replacing
the bulb, make sure to secure the wiring har-
ness to the harness guides. Vehicle care and Maintenance
8-32
8
OHAE13E1
Page 231 of 258
l
When installing the lamp unit, first insert the
tab (D) into the groove (E) on the body, and
then push on the lamp unit to fit it into place. Rear combination lamps
E08405800017
1. Open
the tailgate. (Refer to “Tailgate” on
page 2-08.)
2. Remove the screws (A) that hold the lamp unit and remove the lamp unit. 3. Move
the lamp unit towards the rear of the ve-
hicle and remove the pins (B) of the lamp
unit from the vehicle. 4. Turn the socket anticlockwise to remove it.
C- Stop and tail lamp (LED) - cannot be replaced
D- Rear turn-signal lamp
E- Reversing lampNOTE
l The
stop and tail lamps use LEDs rather than
bulbs.
For repair and replacement, we recommend
you to contact a MITSUBISHI MOTORS Au-
thorized Service Point.
5. Pull the bulb out of the socket. 6. To
install the bulb, perform the removal
steps in reverse. Vehicle care and Maintenance
8-33 8
OHAE13E1
Page 232 of 258
High-mounted stop lamp
E08406000016
1. Remove
the mounting screws (A) and re-
move the lamp unit. 2. Turn the socket anticlockwise to remove it. 3. Pull the bulb out of the socket.
4. To
install the bulb, perform the removal
steps in reverse.
NOTE l When installing the lamp unit, make sure not
to bend the washer fluid hose (B). Licence plate lamps
E08405900018
1.
When removing the lamp unit (A), push it to-wards the left side of the vehicle body. 2. Use
a straight blade (or minus) screwdriver
with a cloth over its tip to gently pry up the
tab (B) and remove the lens. Vehicle care and Maintenance
8-34
8
OHAE13E1
Page 245 of 258

A
Accessory (Installation) 04
Accessory socket 6-36
Active stability control (ASC)
5-18
Additional equipment 8-20
Air conditioning Important operation tips for the air condition-
ing 6-09
Air purifier 6-09
Airbag 3-20
Antenna 6-30
Anti-lock brake system (ABS) 5-15 Warning lamp 5-16
Assist grips 6-41
Audio Error codes 6-26
Handling of compact discs 6-29
LW/MW/FM electronic tuning radio with CD
player 6-10
Auxiliary battery 8-12 Specification 9-05
Auxiliary battery charge warning lamp 4-10
BBasic knowledge for charging 1-04
Battery
Auxiliary battery
8-12
Auxiliary battery charge warning lamp 4-10
Discharged battery (Emergency starting) 7-02
Disposal information for used batteries 05
Traction battery 02
Bonnet 8-07
Brake assist system 5-15
Brake Anti-lock brake 5-15
Braking 5-14 Fluid 8-11,9-08
Parking brake 5-03
Warning lamp 4-09
Bulb capacity
8-23C Capacities 9-08
Card holder 6-36,6-39
Cargo loads 5-20
Central door locks 2-06
Charging indicator
4-09
Charging Quick charging 1-12
Regular charging 1-08
Child restraint 3-11
Child-protection rear doors 2-07
Cleaning Exterior of your vehicle 8-03
Interior of your vehicle 8-02
Plastic, vinyl leather, etc. 8-02
Clock 6-31
Cold Cautions and actions to deal with intense
cold 08
Combination headlamps and dipper switch 4-11
Coolant 8-09,9-08
Cruising range 03,9-07
Cruising range indicator 4-03,4-06
Cup holder 6-40
D Daytime running lamps 4-13
Bulb capacity
8-24
Replacement 8-31
Demister (rear window) 4-18
Digital clock 6-31
Dimensions 9-03 Dipper (High/Low beam change) 4-13
Door ajar warning lamp 4-10
Doors
Central door locks 2-06
Child-protection
2-07
Lock and unlock 2-05
Driving the vehicle 5-11
Driving, alcohol and drugs 5-02
E Economical driving 5-02
Electric motor switch
5-07
Electric motor unit Warning lamp 4-10
Electric motor Number 9-02
Specifications 9-05
Electric power steering system (EPS) 5-17
Electric window control 2-09 Driver’s switches 2-09
Lock switch 2-09
Passenger’s switches 2-09
Timer function 2-10
Electronic immobilizer (Anti-theft starting sys-
tem) 2-02
Emergency starting 7-02
Energy level gauge 4-06
Energy usage indicator 4-03
Error codes 6-26
EV charging cable 1-05
Exterior and interior lamp operation 8-19
F Fluid capacities and lubricants 9-08
Fluid
Brake fluid 8-11,9-08
Coolant 8-09 Alphabetical index
1
OHAE13E1
Page:
< prev 1-8 9-16 17-24