2013 MITSUBISHI iMiEV oil
[x] Cancel search: oilPage 217 of 258

NOTE
l Do
not allow the wiper arm to fall onto the
window glass; it could damage the glass. 4. Firmly
insert the retainer (C) into the groove
(D) in the wiper blade.
Refer to the illustration to ensure that the re-
tainers are correctly aligned as you insert
them into the groove. NOTE
l If
a retainer is not supplied with the new wip-
er blade, use the retainer from the old blade. General maintenance
E08403600011
Coolant and oil leakage
Look
under the body of your vehicle to check for
coolant and oil leakage.
Exterior and interior lamp operation
Operate the combination lamp switch to check that
all lamps are functioning properly.
If the lamps do not illuminate, the probable cause
is a blown fuse or defective lamp bulb. Check the
fuses first. If there is no blown fuse, check the
lamp bulbs.
For information regarding the inspection and re-
placement of the fuses and the bulbs, refer to
“Fuses” on page 8-20 and “Replacement of lamp
bulbs” on page 8-23.
If the fuses and bulbs are all OK, we recommend
you to have your vehicle checked and repaired.
Meter, gauge and indicator/warning
lamps operation
Start the electric motor unit and check the opera-
tion of all instruments, gauges and indication and
warning lamps.
If there is anything wrong, we recommend you to
have your vehicle inspected.
Hinges and latches lubrication
Check all latches and hinges, and, if necessary,
have them lubricated. Vehicle care and Maintenance
8-19 8
OHAE13E1
Page 221 of 258

B- Fuse is OK
C- Blown fuse
NOTE l If
any system does not function but the fuse
corresponding to that system is normal, there
may be a fault in the system elsewhere. We
recommend you to have your vehicle checked.
4. Insert a new fuse of the same capacity by us- ing the fuse puller into the same place at the
fuse block. CAUTION
l
If
the newly inserted fuse blows again af-
ter a short time, we recommend you to
have the electrical system checked to find
the cause and rectify it.
l Never use a fuse with a capacity larger
than that specified or any substitute, such
as wire, foil, etc.; doing so will cause the
circuit wiring to heat up and this could
cause fire. Replacement of lamp bulbs
E08404600018
Before
replacing a bulb, ensure the lamp is off. Do
not touch the glass part of the new bulb with your
bare fingers; the skin oil left on the glass will evap-
orate when the bulb gets hot and the vapour will
condense on the reflector and dim the surface. CAUTION
l
Bulbs
are extremely hot immediately af-
ter being turned off.
When replacing a bulb, wait for it to cool
sufficiently before touching it. You could
otherwise be burnt.
NOTE l If
you are unsure of how to carry out the
work as required, we recommend you to con-
sult a specialist.
l Be careful not to scratch the vehicle body
when removing a lamp or lens.
l When it rains or when the vehicle has been
washed, the inside of the lens sometimes be-
comes foggy. This is the same phenomenon
as when window glass mists up on a humid
day, and does not indicate a functional prob-
lem.
When the lamp is switched on, the heat will
remove the fog. However, if water gathers in-
side the lamp, we recommend you to have
the lamp checked.
Bulb capacity E08404700019
When replacing a bulb, use a new bulb with the
same wattage and colour. Vehicle care and Maintenance
8-23 8
OHAE13E1
Page 227 of 258

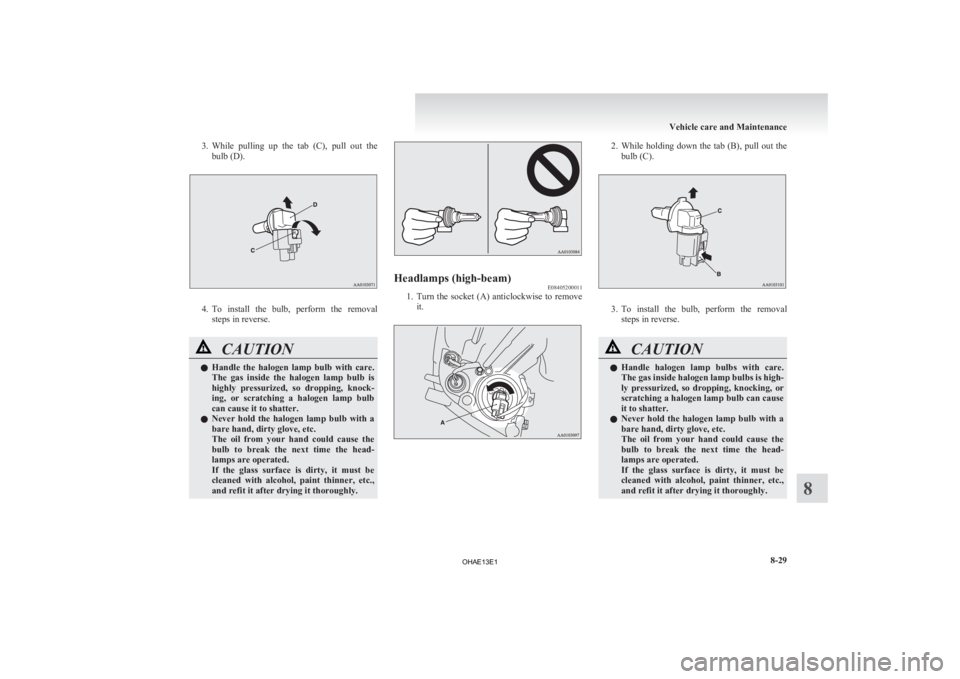
3. While pulling up the tab (C), pull out the
bulb (D). 4. To
install the bulb, perform the removal
steps in reverse. CAUTION
l
Handle
the halogen lamp bulb with care.
The gas inside the halogen lamp bulb is
highly pressurized, so dropping, knock-
ing, or scratching a halogen lamp bulb
can cause it to shatter.
l Never hold the halogen lamp bulb with a
bare hand, dirty glove, etc.
The oil from your hand could cause the
bulb to break the next time the head-
lamps are operated.
If the glass surface is dirty, it must be
cleaned with alcohol, paint thinner, etc.,
and refit it after drying it thoroughly. Headlamps (high-beam)
E08405200011
1. Turn
the socket (A) anticlockwise to remove
it. 2. While
holding down the tab (B), pull out the
bulb (C). 3. To
install the bulb, perform the removal
steps in reverse. CAUTION
l
Handle
halogen lamp bulbs with care.
The gas inside halogen lamp bulbs is high-
ly pressurized, so dropping, knocking, or
scratching a halogen lamp bulb can cause
it to shatter.
l Never hold the halogen lamp bulb with a
bare hand, dirty glove, etc.
The oil from your hand could cause the
bulb to break the next time the head-
lamps are operated.
If the glass surface is dirty, it must be
cleaned with alcohol, paint thinner, etc.,
and refit it after drying it thoroughly. Vehicle care and Maintenance
8-29 8
OHAE13E1
Page 230 of 258

CAUTION
l
Handle the halogen lamp bulb with care.
The gas inside a halogen lamp bulb is high-
ly pressurized, so dropping, knocking, or
scratching a halogen lamp bulb can cause
it to shatter.
l Never hold the halogen lamp bulb with a
bare hand, dirty glove, etc.
The oil from your hand could cause the
bulb to break the next time the fog lamps
are operated.
If the glass surface is dirty, it must be
cleaned with alcohol, paint thinner, etc.,
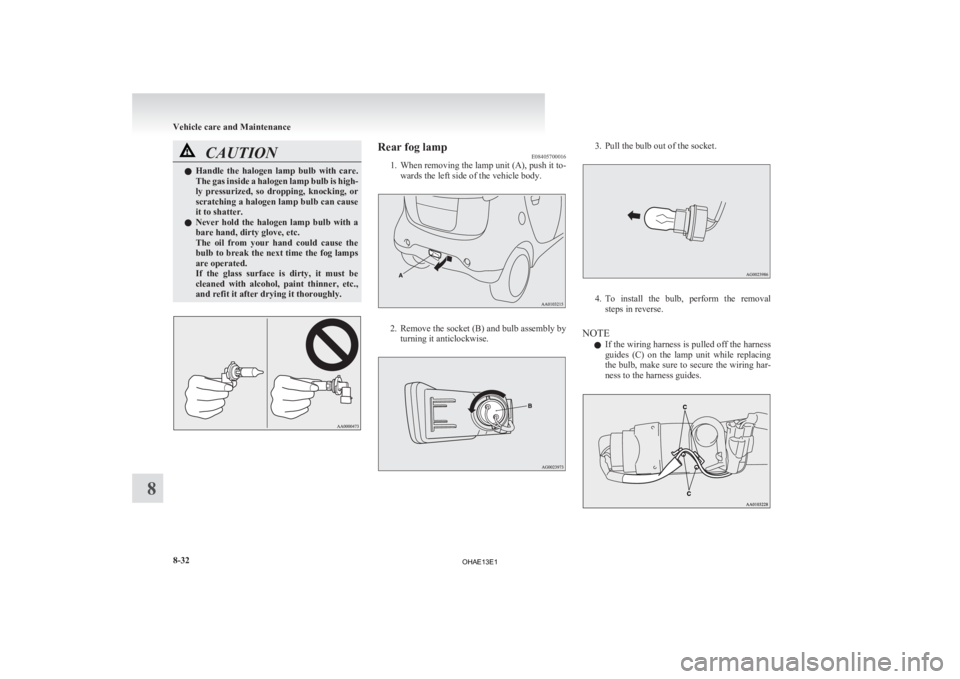
and refit it after drying it thoroughly. Rear fog lamp
E08405700016
1.
When removing the lamp unit (A), push it to-wards the left side of the vehicle body. 2. Remove
the socket (B) and bulb assembly by
turning it anticlockwise. 3. Pull the bulb out of the socket.
4. To
install the bulb, perform the removal
steps in reverse.
NOTE l If the wiring harness is pulled off the harness
guides (C) on the lamp unit while replacing
the bulb, make sure to secure the wiring har-
ness to the harness guides. Vehicle care and Maintenance
8-32
8
OHAE13E1
Page 243 of 258
![MITSUBISHI iMiEV 2013 Owners Manual (in English) No. Item Quantity Lubricants
1 Washer fluid
1.9 litres—2 Brake fluid
As requiredBrake fluid DOT 3 or DOT 43 Hot water heater fluid
LHD
1.9 litres [includes 0.4 litre in the re-
serve tank]
MITSUBISH MITSUBISHI iMiEV 2013 Owners Manual (in English) No. Item Quantity Lubricants
1 Washer fluid
1.9 litres—2 Brake fluid
As requiredBrake fluid DOT 3 or DOT 43 Hot water heater fluid
LHD
1.9 litres [includes 0.4 litre in the re-
serve tank]
MITSUBISH](/manual-img/19/34894/w960_34894-242.png)
No. Item Quantity Lubricants
1 Washer fluid
1.9 litres—2 Brake fluid
As requiredBrake fluid DOT 3 or DOT 43 Hot water heater fluid
LHD
1.9 litres [includes 0.4 litre in the re-
serve tank]
MITSUBISHI MOTORS GENUINE SUPER LONG LIFE COOL-ANT PREMIUM or equivalent * RHD
1.7 litres
[includes 0.4 litre in the re-
serve tank] 4 Coolant
5.1 litres [includes 1.1 litres in the
reserve tank] 5 Transmission oil
0.75 litreMITSUBISHI MOTORS GENUINE ATF SP III6 Refrigerant (air conditioning)
305 - 345 gHFC-134a
* : similar high quality ethylene glycol based non-silicate, non-amine, non-nitrate and non-borate coolant with long life hybrid organic acid technology Specifications
9-09 9
OHAE13E1
Page 246 of 258

Hot water heater fluid 8-09,9-08
Washer fluid 8-11,9-08
For cold and snowy weather 8-20
Front fog lamps Bulb capacity
8-24
Indication lamp 4-09
Replacement 8-31
Switch 4-15
Front room lamp Bulb capacity 8-24
Front seat 3-03
Front turn-signal lamps Bulb capacity 8-24
Replacement 8-30
Fuel Modification/alterations to the electrical sys-
tems 05
Fuses 8-20
Fusible links 8-20
GGauges 4-02,4-08
General maintenance
8-19
General vehicle data 9-03
Genuine parts 05
Glove box 6-39
HHandling of compact discs 6-29
Hazard warning flasher switch 4-15
Hazard warning indication lamps
4-09
Head restraints 3-07
Headlamp levelling switch 4-13
Headlamps Bulb capacity 8-24
Headlamp flasher 4-13
Replacement 8-24,8-28,8-29 Switch 4-11
Heat Cautions and actions to deal with intense
heat 06
Heated mirror 5-07
Heated seats 3-04
High-beam indication lamp
4-09
High-mounted stop lamp Bulb capacity 8-24
Replacement 8-34
Hinges and latches lubrication 8-19
Horn switch 4-19
Hot water heater fluid 8-09,9-08
I i-MiEV 02
Cruising range 03
Main features 02
Traction battery
02
If the vehicle breaks down 7-02
Indication and warning lamps 4-08
Indication lamps 4-09
Inside rear-view mirror 5-05
Inspection and maintenance following rough road
operation 5-12
Instruments 4-02
Intense cold Cautions and actions 08
Intense heat Cautions and actions 06
Interior lamps 6-37
J Jump starting (Emergency starting) 7-02 K Keyless entry system 2-03
Keys 2-02
L Labeling 9-02
Lamp monitor buzzer
4-12
Lamps (headlamps, fog lamp, etc.) auto-cutout func-
tion 4-12
Licence plate lamps Bulb capacity 8-24
Replacement 8-34
Link System 6-33
Low voltage electrical system 9-05
Lubricants 9-08
LW/MW/FM electronic tuning radio with CD play-
er 6-10
M Map lamps 6-37,6-38
Bulb capacity
8-24
Meter illumination control 4-03,4-06
Mirror Inside rear-view mirror 5-05
Outside rear-view mirrors 5-05
Modification/alterations to the electrical sys-
tems 05
O Odometer 4-03,4-04
Oil
Transmission oil 9-08
Operation under adverse driving conditions
7-12
Outside rear-view mirrors 5-05 Alphabetical index
2
OHAE13E1