2013 MINI Countryman Regular
[x] Cancel search: RegularPage 7 of 275

Notes
6
>Federal Emissions Performance Warranty
> California Emission Control System Limited
Warranty
Detailed information about these warranties is
listed in the Service and Warranty Information
Booklet for US models or in the Warranty and
Service Guide Booklet for Canadian models.
Your vehicle has been specifically adapted and
designed to meet the pa rticular operating con-
ditions and homologation requirements in your
country and continental region in order to
deliver the full driving pleasure while the vehicle
is operated under those conditions. If you wish
to operate your vehicle in another country or
region, you may be required to adapt your vehi-
cle to meet different prevailing operating condi-
tions and registration re quirements. You should
also be aware of any a pplicable warranty limita-
tions or exclusions for such country or region. In
such a case, please contact Customer Relations
for further information.
Maintenance
Maintain the vehicle regularly to sustain road
safety, operational reliab ility and the New Vehi-
cle Limited Warranty.
Specifications for required maintenance mea-
sures:
> MINI Maintenance System
> Service and Warranty Information Booklet
for US models
> Warranty and Service Guide Booklet for
Canadian models
If the vehicle is not ma intained according to
these specifications, this could result in serious
damage to the vehicle. Such damage is not cov-
ered by the MINI New Vehicle Limited Warranty.
Data memory
A variety of electronic components in your vehi-
cle include data storage devices, which store
technical information on the condition of your vehicle, events and errors, either temporarily or
permanently. In general,
this technical informa-
tion documents the condition of a component, a
module, a system or the surroundings:
> Operating conditions of system compo-
nents, e.g., fill levels.
> Status messages regarding the vehicle and
of its individual comp onents, such as wheel
rpm/vehicle speed, response delay, lateral
acceleration.
> Malfunctions and defects in the major sys-
tem components, such as the lights and
brakes.
> Responses of the vehicle in special driving
situations, such as the deployment of an air-
bag, the utilization of stability control sys-
tems.
> Environmental conditio ns, such as tempera-
ture.
These data are exclusively of a technical nature
and are used for the detection and correction of
errors, as well as the optimization of vehicle
functions. Motion profiles of traveled routes can
not be deduced from these data. If services are
required, such as repair services, service pro-
cesses, warranty claims an d quality assurance,
then this technical info rmation can be read out
by employees of service departments, including
the manufacturer, from the event and error data
storage devices by usin g special diagnostic
equipment. There, if necessary, you will receive
further information. Afte r remedying an error,
the information in the error memory is deleted
or progressively overwritten.
When using the vehicle, situations are conceiv-
able in which this techni cal data, in conjunction
with other information, su ch as accident reports,
vehicle damage, witness statements, etc. - pos-
sibly with the assistance of an expert - could be
traced to particular individuals. Additional func-
tions that are agreed upon contractually with
the customer, such as vehi cle tracking in case of
emergency, permit the transmission of certain
vehicle data from the vehicle.
00320051004F004C00510048000300280047004C0057004C005200510003
Page 39 of 275

CONTROLSAdjustments
38
Adjustments
Vehicle equipment
In this chapter, all production, country, and
optional equipment that is offered in the model
range is described. Equipment is also described
that is not available because of, for example,
selected options or coun try version. This also
applies to safety relate d functions and systems.
Sitting safely
The ideal sitting position can make a vital contri-
bution to relaxed, fatigu e-free driving. In con-
junction with the safety belts, the head restraints
and the airbags, the seated position has a major
influence on your safety in the event of an acci-
dent. To ensure that th e safety systems operate
with optimal efficiency, we strongly urge you to
observe the instructions contained in the follow-
ing section.
For additional informatio n on transporting chil-
dren safely, refer to page 46.
Airbags
Always maintain an adequate distance
between yourself and the airbags. Always
grip the steering wheel on the rim, with your
hands in the 3 o'clock and 9 o'clock positions, to
minimize the risk of inju ry to the hands or arms
in the event of the airbag being deployed.
No one and nothing should come between the
airbags and the seat occupant.
Do not use the cover of the front airbag on the
front passenger side as a storage area. Ensure
that the front passenger is correctly seated, e.g.
that no feet or legs are propped against the
dashboard. Otherwise, leg injury could result if
the front airbag suddenly deployed.
Make sure that passeng ers keep their heads
away from the side ai rbag and do not lean
against the cover of the head airbag; otherwise
injuries can occur when the airbags are
deployed. < Even if you follow all the instructions, injuries
resulting from contact with airbags cannot be
fully excluded, depending on the circumstances.
The ignition and inflation noise may provoke a
mild hearing loss in extremely sensitive individ-
uals. This effect is usually only temporary.
For airbag locations and
additional information
on airbags, refer to page 81.
Head restraint
A correctly adjusted head restraint reduces the
risk of neck injury in the event of an accident.
Adjust the head restraint in such a way
that its center is at approx. ear level. Oth-
erwise, there is an increased risk of injury in the
event of an accident. <
Head restraints, refer to page 41.
Safety belt
Before every drive, make sure that all occupants
wear their safety belts. Airbags complement the
safety belt as an additional safety device, but
they do not represent a substitute.
Number of safety belts
Never allow more than one person to
wear a single safety belt. Never allow
infants or small children to ride in a passenger's
lap.
Make sure that the belt in the lap area sits low
across the hips and does not press against the
abdomen. The safety belt must not rest against
the throat, run across sh arp edges, pass over
hard or fragile objects or be pinched. Fasten the
safety belt so that it is pulled taut across the lap
and shoulder, fitting the body snugly without
any twists. Otherwise, the belt could slide over
the hips in the event of a frontal collision and
injure the abdomen. Avoid wearing bulky cloth-
ing and regularly pull the belt in the upper-body
area taut; otherwise, its restraining effect could
be impaired. <
00320051004F004C00510048000300280047004C0057004C005200510003
Page 58 of 275

DrivingCONTROLS
57
Deactivating intermittent wipe or rain
sensor
Press the button again, arrow3.
Brief wipe
Press the lever downward once, arrow 2.
Cleaning windshield and headlamps
Pull the lever, arrow 4.
Washer fluid is sprayed onto the windshield and
the wipers are operated briefly.
When the vehicle lighting system is switched on,
the headlamps are cleaned at regular and
appropriate intervals.
In cars equipped with an alarm system, the
headlamps cannot be cleaned when the hood is
open. Do not use the washers when the washer
fluid reservoir is empt y; otherwise, you will
damage the washer pump.
Only use the washers if the hood has been com-
pletely closed; otherwise, the headlamp washer
system
may be damaged. Do not use the wash-
ers if there is any danger that the fluid will freeze
on the windshield. If you do, your vision could be
obscured. For this reason, use antifreeze. <
Window washer nozzles
The window washer nozzles are heated auto-
matically while the engine is running or the igni-
tion is switched on.
Rear window wiper
0Rear wipers parked
1 To switch on intermittent wipe :
Turn the cap to level 1.
Operation is continuous in reverse gear.
The rear wiper does not move if the cap is in
interval stage 1 before the ignition is switched
on.
Cleaning the rear window
2 To clean the rear window during intermit-
tent wipe :
Turn the cap further to level 2 and hold it
there.
3 To clean the rear window when wipers are
parked :
Turn the cap to level 3 and hold it there.
Do not use the washers when the washer
fluid reservoir is empty; otherwise, you will
damage the washer pump. <
Washer fluid
General information
Washer fluid is flammable. Keep it away
from ignition sources, only store it in the
closed, original container, and keep out of reach
of children; otherwise, there is a danger of
injury. Comply with the instructions on the con-
tainer. <
United States: the washer fluid mixture ratio is
regulated by the U.S. EPA and many individual
states; do not exceed the applicable limits on
allowable washer fluid dilution ratios. Follow the
usage instructions on the washer fluid container.
Use MINI Windshield Washer Concentrate or the
equivalent.
Washer fluid reservoir
Only refill washer fl uid that contains anti-
freeze when the engine is cool, to avoid
contact with hot engine parts. Otherwise, fluid
spills constitute a fire hazard and a risk to per-
sonal safety. <
00320051004F004C00510048000300280047004C0057004C005200510003
Page 76 of 275

Technology for driving comfort and safetyCONTROLS
75
Flat Tire Monitor FTM
The concept
The system does not measure the actual infla-
tion pressure in the tires.
The system detects a pressure loss in a tire by
comparing the rotational speeds of the individ-
ual wheels while moving.
In the event of a pressure loss, the diameter and
therefore the rotational speed of the corre-
sponding wheel change. This is detected and
reported as a flat tire.
Functional requirement
The system must have been initialized while the
tire inflation pressure was correct; otherwise,
reliable signaling of a fl at tire is not ensured.
Initialize the system afte r every correction of the
tire inflation pressure and after every tire or
wheel change.
System limitations
Sudden serious tire damage caused by
external influences ca nnot be indicated in
advance. <
A natural, even pressure loss in all four tires can-
not be detected. Therefore, check the tire infla-
tion pressure regularly.
In the following situations, the system could be
delayed or malfunction:
> System has not been initialized
> Driving on snowy or slippery road surface
> Performance-oriented styl e of driving: slip in
the drive wheels, high lateral acceleration
> Snow chains are attached
Status display
The current status of the Flat Tire Monitor can be
displayed on the Control Display, e.g. whether or
not the FTM is active.
1. "Vehicle Info"
2. "Vehicle status" 3.
"Flat Tire Monitor"
The status is displayed.
Initializing the system
The initialization process adopts the set inflation
tire pressures as refere nce values for the detec-
tion of a flat tire. Initia lization is started by con-
firming the inflation pressures.
Do not initialize the system when driving with
snow chains.
1. "Vehicle Info"
2. "Vehicle status"
3. "Reset"
4. Start the engine, but do not start driving.
5. Select "Reset" to start the initialization.
6. Start to drive.
The initialization is completed during driv-
ing, which can be interrupted at any time.
When driving resumes, the initialization is con-
tinued automatically. <
00320051004F004C00510048000300280047004C0057004C005200510003
Page 114 of 275

Things to remember when drivingDRIVING TIPS
113
Rear luggage rack
A special rear-mounted luggage rack is available
as an optional accessory. It does not require a
trailer hitch.
Please comply with the precautions included
with the installation instructions.
Mounting points
MINI Countryman:
MINI Paceman:
The mounting points ar e located under the cov-
ers in the bumper.
Remove the covers , refer to page238.
Loading rear luggage rack
When loading, make su re that you do not
exceed the approved gross vehicle weight and
axle loads.
You can find more information under Weights in
the technical specifications.
Saving fuel
General information
Your vehicle incorporates numerous technolo-
gies for reducing fuel consumption and emis-
sions.
Fuel consumption depends on a number of dif-
ferent factors. Fuel consumption and environ-
mental pollution are affect ed by various actions,
the manner of driving and regular maintenance.
Remove unnecessary cargo
Additional weight increases fuel consumption.
Remove attached part s no longer in use
Attached parts on the ve hicle affect its aerody-
namics and increase fuel consumption.
Closing windows
Open windows increase air resistance and
therefore fuel consumption.
Check tire inflation pressure regularly
Check and, if necessary, correct tire inflation
pressure at least twice a month and before start-
ing on a long trip.
Low inflation pressure increases rolling resis-
tance and thus leads to greater fuel consump-
tion and tire wear.
Drive off immediately
Do not wait for the engine to warm up while the
vehicle remains stationary. Start driving right
away, but at moderate engi ne speeds. This is the
fastest way for the cold engine to reach its oper-
ating temperature.
Think ahead while driving
Avoid unnecessary accelera tion and braking, by
maintaining a suitable di stance to the vehicle
driving ahead.
Looking-ahead and smooth driving reduces fuel
consumption.
00320051004F004C00510048000300280047004C0057004C005200510003
Page 115 of 275

DRIVING TIPSThings to remember when driving
114
Avoid high engine speeds
Use first gear only for driving off. In second and
higher gears, accelerate smoothly to a suitable
engine and road speed. In doing so, avoid high
engine speeds and shift up early.
When you reach your desired traveling speed,
shift to the highest suitable gear and drive at
constant speed.
As a rule: driving at lo w engine speeds lowers
fuel consumption and reduces wear.
Coasting
When approaching a red traffic light, take your
foot off the accelerator and let the car roll to a
stop in the highest gear possible.
On a downhill gradient, take your foot off the
accelerator and let the vehicle coast in a suitable
gear.
Fuel supply is shut off automatically when the
vehicle is coasting.
Switch off the engine during lengthy
stops
Switch off the engine when stopping for lengthy
periods, e.g. at traffic li ghts, railroad crossings or
in traffic jams.
Switch off any features that are not
currently required
Features such as air conditioning, seat heaters
and the rear window defroster require a great
deal of energy and result in greater fuel con-
sumption, especially in city driving and during
Stop & Go operation. For this reason, switch off
these features if they are not really needed.
Have the vehicle serviced
Have your vehicle servic ed regularly to achieve
good economy and a long vehicle life. The man-
ufacturer of your MINI recommends having the
vehicle serviced by a MINI dealer. Also note the
MINI Maintenance System, page 218.
Driving on poor roads
Your MINI with ALL4 drive is at home on any
type of street or road. It combines an all-wheel
drive system with the ad vantages of a normal
passenger car.
Do not drive on unpa ved terrain, as other-
wise the vehicle may be damaged. <
When you are driving on poor roads, there are a
few points which you shou ld strictly observe for
your own safety, for that of your passengers,
and for the safety of the vehicle:
> Familiarize yourself with the vehicle before
beginning to drive and do not take risks
under any circumstances.
> Adapt your speed to road conditions. The
steeper and rougher the road surface is, the
lower the speed should be.
> When driving on very steep uphill or down-
hill grades, make sure in advance that the
engine oil and coolant levels are close to the
maximum mark, refer to page 215.
> While driving, watch carefully for obstacles
such as rocks or holes. Try to avoid these
obstacles whenever possible.
> Make sure that the un dercarriage does not
touch the ground, for example on hilltops
and bumpy roads. The ground clearance of
the vehicle is a maximum of approx. 6.0 in/
15 cm. Please note that the ground clear-
ance can vary depending on loading and the
driving conditions of the vehicle.
> Only drive through road surface water up to
a maximum water depth of 1 ft/30 cm and
only at walking speed ; do not remain sta-
tionary.
> After driving through water at low speed,
lightly press the brake pedal several times to
dry the brakes and to prevent the braking
effect from being reduced by wetness.
00320051004F004C00510048000300280047004C0057004C005200510003
Page 204 of 275

Wheels and tiresMOBILITY
203
Wheels and tires
Vehicle equipment
In this chapter, all production, country, and
optional equipment that is offered in the model
range is described. Equipment is also described
that is not available because of, for example,
selected options or count ry version. This also
applies to safety related functions and systems.
Tire inflation pressures
Information for your safety
It is not merely the tires' service life, but also
driving comfort and, to a great extent, driving
safety that depend on the condition of the tires
and the maintenance of the specified tire pres-
sure.
Checking pressure
Check the tire inflatio n pressure regularly
and correct it, if nece ssary: at least twice a
month and before starting long trips. If you fail
to observe this precaution you may be driving
on tires with incorrect tire pressures, a condition
that can not only compromise your vehicle's
driving stability, but also lead to tire damage and
the risk of an accident. Do not drive with
deflated, i.e. flat tires, except when using run-
flat tires. A flat tire will seriously impair your
vehicle's handling and braking response.
Attempts to drive on a flat tire can lead to loss of
control over the vehicle. <
Check the tire inflation pressures only on cold
tires. This means after a maximum of 1.25 miles/
2 km driving or when the vehicle has been
parked for at least 2 hours. When tires are warm,
the tire inflation pressure is higher. After adjusting the tire inflation pressure,
reinitialize the Flat Tire Monitor, page 75,
or reset the Tire Pressure Monitor, page 78.<
Pressure specifications
The tables below provide all the correct inflation
pressures for the specifie d tire sizes at ambient
temperature.
The tire inflation pressures apply to the
tire sizes approved and the tire brands
recommended by the manufacturer of your
MINI. Your MINI dealer will be glad to advise
you. <
For correct identification of the right tire infla-
tion pressures, observe the following:
> Tire sizes for your vehicle
> Maximum allowable driving speed
Tire inflation pressures for driving up to
100 mph or 160 km/h
For normal driving up to 100 mph or 160 km/h
and to achieve optimum dr iving comfort, adjust
pressures to the respective tire inflation pres-
sures listed on the foll owing pages in the col-
umns for traveling speeds up to a maximum of
100 mph or 160 km/h.
These tire inflation pre ssures can also be found
on the driver's side door pillar when the driver's
door is open.
MINI Countryman:
00320051004F004C00510048000300280047004C0057004C005200510003
Page 216 of 275
Engine compartmentMOBILITY
215
Hood
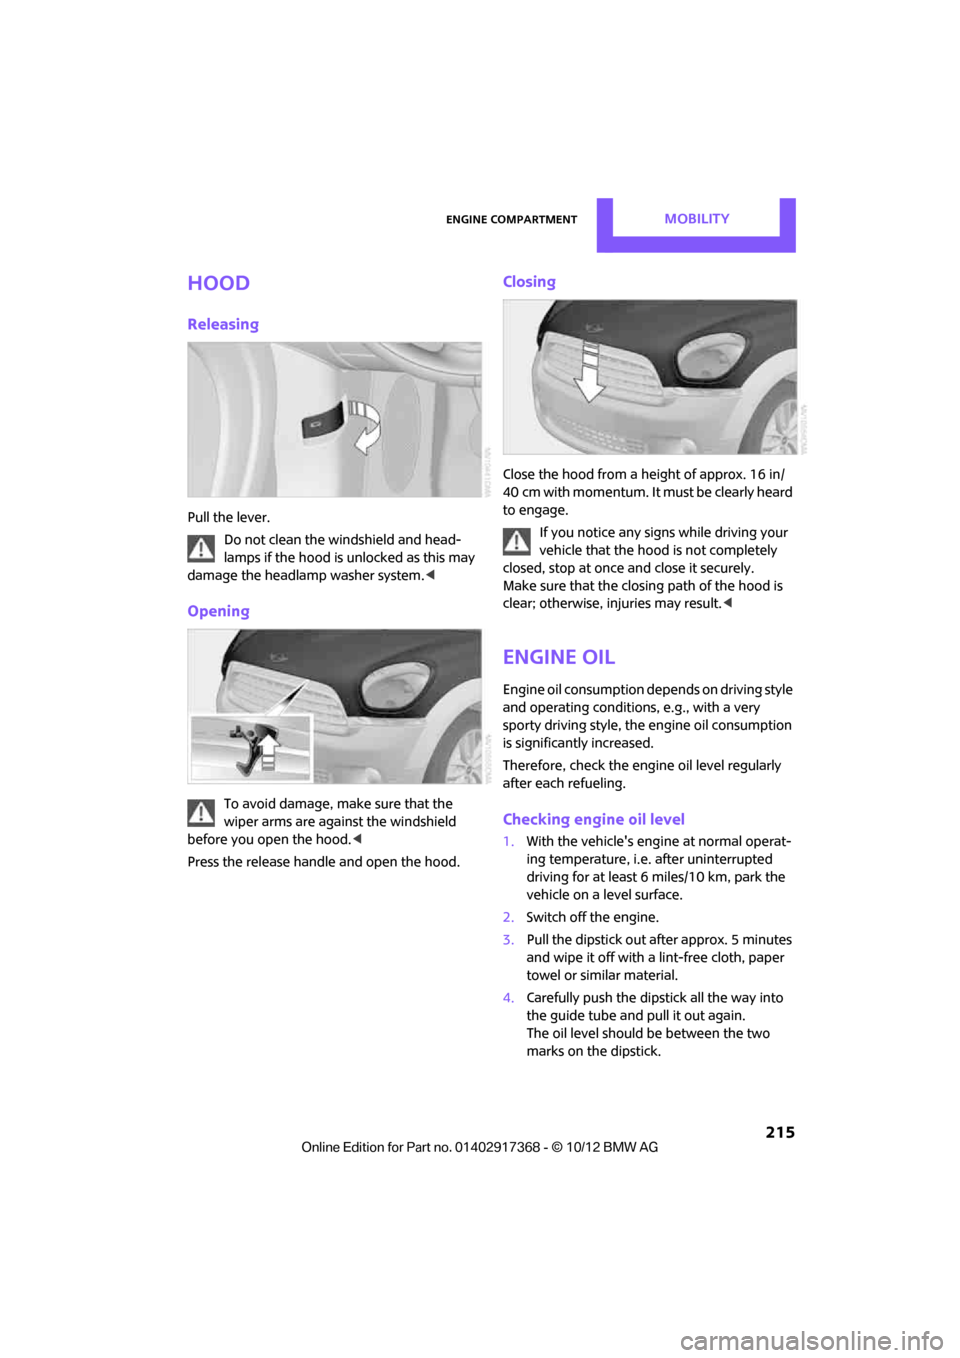
Releasing
Pull the lever.Do not clean the windshield and head-
lamps if the hood is unlocked as this may
damage the headlamp washer system. <
Opening
To avoid damage, make sure that the
wiper arms are against the windshield
before you open the hood. <
Press the release handle and open the hood.
Closing
Close the hood from a height of approx. 16 in/
40 cm with momentum. It must be clearly heard
to engage. If you notice any signs while driving your
vehicle that the hood is not completely
closed, stop at once and close it securely.
Make sure that the closing path of the hood is
clear; otherwise, injuries may result. <
Engine oil
Engine oil consumption depends on driving style
and operating conditions, e.g., with a very
sporty driving style, the engine oil consumption
is significantly increased.
Therefore, check the engine oil level regularly
after each refueling.
Checking engine oil level
1. With the vehicle's engi ne at normal operat-
ing temperature, i.e. after uninterrupted
driving for at least 6 miles/10 km, park the
vehicle on a level surface.
2. Switch off the engine.
3. Pull the dipstick out after approx. 5 minutes
and wipe it off with a lint-free cloth, paper
towel or similar material.
4. Carefully push the dipstick all the way into
the guide tube and pull it out again.
The oil level should be between the two
marks on the dipstick.
00320051004F004C00510048000300280047004C0057004C005200510003