2013 MERCEDES-BENZ SLS-CLASS steering
[x] Cancel search: steeringPage 244 of 286

X
Connect negative terminal =of donor battery Bto earth point ?of your vehicle using
the jumper cable, connecting the jumper cable to donor battery Bfirst.
X Start the engine.
X Before disconnecting the jumper cables, let the engine run for several minutes.
X First, remove the jumper cables from earth point ?and negative terminal =, then from
positive clamp :and positive terminal ;. Each time beginning with your vehicle's battery.
X Slide cover Aof the positive terminal in the opposite direction to the arrow.
X Have the battery checked at a qualified specialist workshop.
i Jump-starting is not considered to be a normal operating condition.
i Jumper cables and further information regarding jump-starting can be obtained at any
qualified specialist workshop. Towing and tow-starting
Important safety notes
If the vehicle can no longer be driven because
of an accident or breakdown, you have the
following options:
R transporting the vehicle
As a rule, you should have the vehicle
transported.
R towing the vehicle with the rear axle raised
Only tow the vehicle with the rear axle
raised in exceptional cases.
R towing the vehicle with a tow rope or tow
bar
Only tow the vehicle in exceptional cases.
The engine must be running if you tow the
vehicle with a tow rope or tow bar. Observe
the following notes. G
WARNING
The rear axle locks when:
R the engine is not running
R the engine stalls while the vehicle is being
towed
R there is a malfunction in the power supply
or the vehicle's electrical system
There is a risk of an accident.
In the event of a breakdown, you should
always have the vehicle transported. G
WARNING
If the brake system or power steering is
malfunctioning and your vehicle is then towed
away, significantly more effort may be
required to steer and brake than is normally
required. There is a risk of an accident.
In such cases, use a tow bar. Before towing,
make sure that the steering moves freely.
! Use the SmartKey instead of the Start/
Stop button when towing the vehicle.
Start the engine and keep it running. Turn
the SmartKey to position 2in the ignition.
Set the transmission to Nusing the E-
SELECT lever. Make sure that you then
leave the SmartKey in position 2.
Check the transmission position in the
instrument cluster.
! Make sure that the electric parking brake
is released. If the electric parking brake is
faulty, visit a qualified specialist workshop.
Mercedes-Benz recommends that you use
an authorized Mercedes-Benz Center for
this purpose.
! When towing, pull away slowly and
smoothly. If the tractive power is too high,
the vehicles could be damaged.
! Only secure the tow rope or tow bar at the
towing eyes. Otherwise, the vehicle could
be damaged. 242
Towing and tow-startingBreakdown assistance
ProCarManuals.com
Page 246 of 286
X
Switch on the hazard warning lamps
(Y page 94).
X Make sure that the SmartKey is in position
2 in the ignition and that the engine is
running throughout the towing procedure.
X Move the transmission to Nwith the E-
SELECT lever. Check the transmission
position in the instrument cluster. Towing a vehicle with both axles on
the ground
When having your vehicle towed, observe the
important safety notes ( Ypage 242).
X Switch on the hazard warning lamps
(Y page 94).
i When towing with the hazard warning
lamps switched on, use the combination
switch as usual to signal a change of
direction. In this case, only the turn signals
for the desired direction flash. When the
combination switch is reset, the hazard
warning lamps start flashing again.
X Insert the SmartKey into the ignition lock
(Y page 113).
X Start the engine and leave the SmartKey in
the ignition.
X Move the transmission to Nwith the E-
SELECT lever.
X Check the transmission position in the
instrument cluster display (Y page 119).
X Leave the engine running during the entire
towing procedure. Transporting the vehicle
The towing eye can be used to pull the vehicle
onto a trailer or transporter for transporting
purposes.
! Only lash the vehicle down by the wheels
or wheel rims, not by parts of the vehicle
such as axle or steering components.
Otherwise, the vehicle could be damaged. X
Start the engine.
X Make sure that the SmartKey is in position
2in the ignition and that the engine is
running during the entire loading operation.
X Move the transmission to Nwith the E-
SELECT lever. Check the transmission
position in the instrument cluster.
As soon as the vehicle is loaded:
X Prevent the vehicle from rolling away by
applying the electric parking brake.
X Shift the transmission to Pwith the button
in the center console.
X Turn the SmartKey to position 0in the
ignition lock and remove the SmartKey
from the ignition lock.
X Secure the vehicle. Fuses
Important safety notes
G
WARNING
Only use fuses approved by Mercedes-Benz
with the specified amperage for the system in
question and do not attempt to repair or
bridge a blown fuse. Using other than
approved fuses or using repaired or bridged
fuses may cause an overload leading to a fire,
and/or cause damage to electrical
components and/or systems. Have the cause
determined and remedied by an authorized
Mercedes-Benz Center.
! Only use fuses that have been approved
for Mercedes-Benz vehicles and which
have the correct fuse rating for the system
concerned. Otherwise, components or
systems could be damaged.
The fuses in your vehicle serve to close down
faulty circuits. If a fuse blows, all the
components on the circuit and their functions
stop operating.
Blown fuses must be replaced with fuses of
the same rating, which you can recognize by
the color and value. The fuse ratings are listed 244
FusesBreakdown assistance
ProCarManuals.com
Page 253 of 286
possible when you come to a road that is
not snow-covered.
R Local regulations may restrict the use of
snow chains. Observe the appropriate
regulations if you wish to mount snow
chains.
R Do not exceed the maximum permissible
speed of 30 mph (50 km/h).
R Snow chains must not be mounted on
emergency spare wheels.
i You may wish to deactivate
ESP ®
(Y page 56) when pulling away with
snow chains installed. You can thereby
allow the wheels to spin in a controlled
manner, achieving an increased driving
force (cutting action). M+S tires
G
WARNING
M+S tires with a tread depth of less than 1
/ 6
inch (4 mm) must be replaced. They are no
longer suitable for winter operation. G
WARNING
If you mount the spare wheel when driving
with M+S tires, bear in mind that driving
stability will be impaired due to unstable
cornering characteristics caused by the
different tire characteristics. Adapt your style
of driving accordingly.
Have the spare wheel replaced by a normal
wheel with an M+S tire at the nearest
Mercedes-Benz Center.
At temperatures below 45 ‡ (+7 †), use all-
season tires or winter tires. Both types of tire
are identified by the M+S marking.
Only winter tires bearing the isnowflake
symbol in addition to the M+S marking
provide the best possible grip in wintry road
conditions. Only these tires will allow driving
safety systems such as ABS and ESP ®
to
function optimally in winter. This is because these tires were specifically developed for
driving in snow.
Use M+S tires of the same make and tread on
all wheels to maintain safe handling
characteristics.
Always observe the maximum permissible
speed specified for the M+S tires you have
mounted.
When you have mounted the M+S tires:
X
Check the tire pressures (Y page 251).
X Restart the tire pressure monitor
(Y page 257). Tire pressure
Tire pressure specifications
G
WARNING
Follow recommended tire inflation pressures.
Do not underinflate tires. Underinflated tires
wear excessively and/or unevenly, adversely
affect handling and fuel economy, and are
more likely to fail from being overheated.
Do not overinflate tires. Overinflated tires can
adversely affect handling and ride comfort,
wear unevenly, increase stopping distance,
and result in sudden deflation (blowout)
because they are more likely to become
punctured or damaged by road debris,
potholes etc.
Do not overload the tires by exceeding the
specified load limit as indicated on the Tire
and Loading Information placard on the
driver's door B-pillar. Overloading the tires
can overheat them, possibly causing a
blowout. Overloading the tires can also result
in handling or steering problems, or brake
failure.
You will find a table of recommended tire
pressures on the Tire and Loading
Information placard on the B-pillar on the
driver's side (Y page 258). You will find a
table of tire pressure for various operating
conditions on the inside of your vehicle's fuel
filler flap. Tire pressure
251Wheels and tires Z
ProCarManuals.com
Page 256 of 286
Overinflation
G
WARNING
Follow recommended tire inflation pressures.
Do not overinflate tires. Overinflated tires can
adversely affect handling and ride comfort,
wear unevenly, increase stopping distance,
and result in sudden deflation (blowout)
because they are more likely to become
punctured or damaged by road debris,
potholes etc.
Overinflated tires may:
R have an adverse effect on handling
characteristics
R wear quickly and unevenly
R be more susceptible to damage
R have an adverse effect on ride comfort
R increase the braking distance
Maximum tire pressure G
WARNING
Never exceed the maximum tire inflation
pressure. Follow recommended tire inflation
pressures.
Do not underinflate tires. Underinflated tires
wear excessively and/or unevenly, adversely
affect handling and fuel economy, and are
more likely to fail from being overheated.
Do not overinflate tires. Overinflated tires can
adversely affect handling and ride comfort,
wear unevenly, increase stopping distance,
and result in sudden deflation (blowout)
because they are more likely to become
punctured or damaged by road debris,
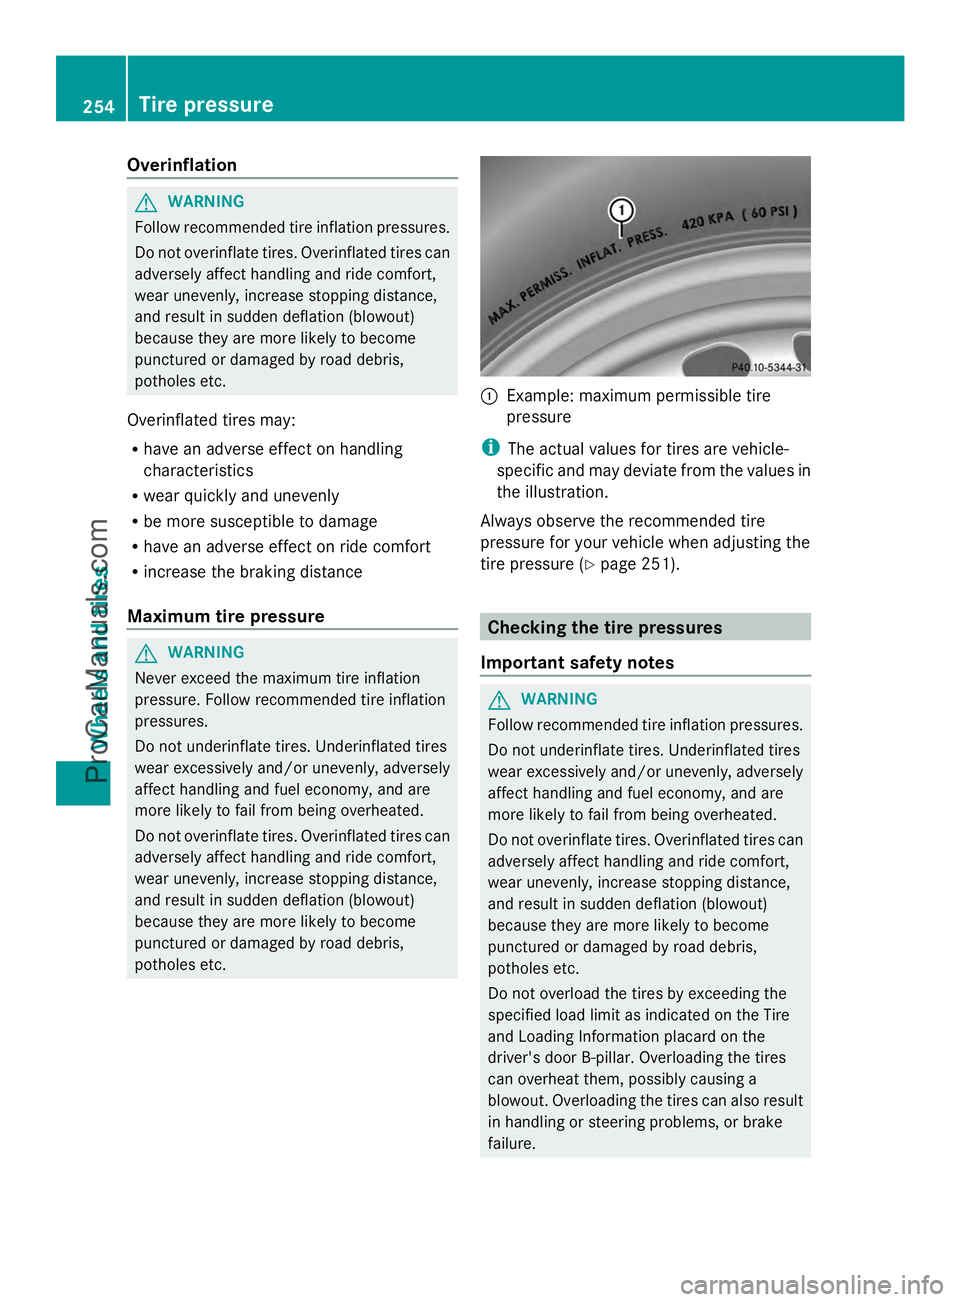
potholes etc. :
Example: maximum permissible tire
pressure
i The actual values for tires are vehicle-
specific and may deviate from the values in
the illustration.
Always observe the recommended tire
pressure for your vehicle when adjusting the
tire pressure (Y page 251). Checking the tire pressures
Important safety notes G
WARNING
Follow recommended tire inflation pressures.
Do not underinflate tires. Underinflated tires
wear excessively and/or unevenly, adversely
affect handling and fuel economy, and are
more likely to fail from being overheated.
Do not overinflate tires. Overinflated tires can
adversely affect handling and ride comfort,
wear unevenly, increase stopping distance,
and result in sudden deflation (blowout)
because they are more likely to become
punctured or damaged by road debris,
potholes etc.
Do not overload the tires by exceeding the
specified load limit as indicated on the Tire
and Loading Information placard on the
driver's door B-pillar. Overloading the tires
can overheat them, possibly causing a
blowout. Overloading the tires can also result
in handling or steering problems, or brake
failure. 254
Tire pressureWheels and tires
ProCarManuals.com
Page 260 of 286
Loading the vehicle
Instruction labels for tires and loads
G
WARNING
Do not overload the tires by exceeding the
specified load limit as indicated on the Tire
and Loading Information placard on the
driver's door B-pillar. Overloading the tires
can overheat them, possibly causing a
blowout. Overloading the tires can also result
in handling or steering problems, or brake
failure.
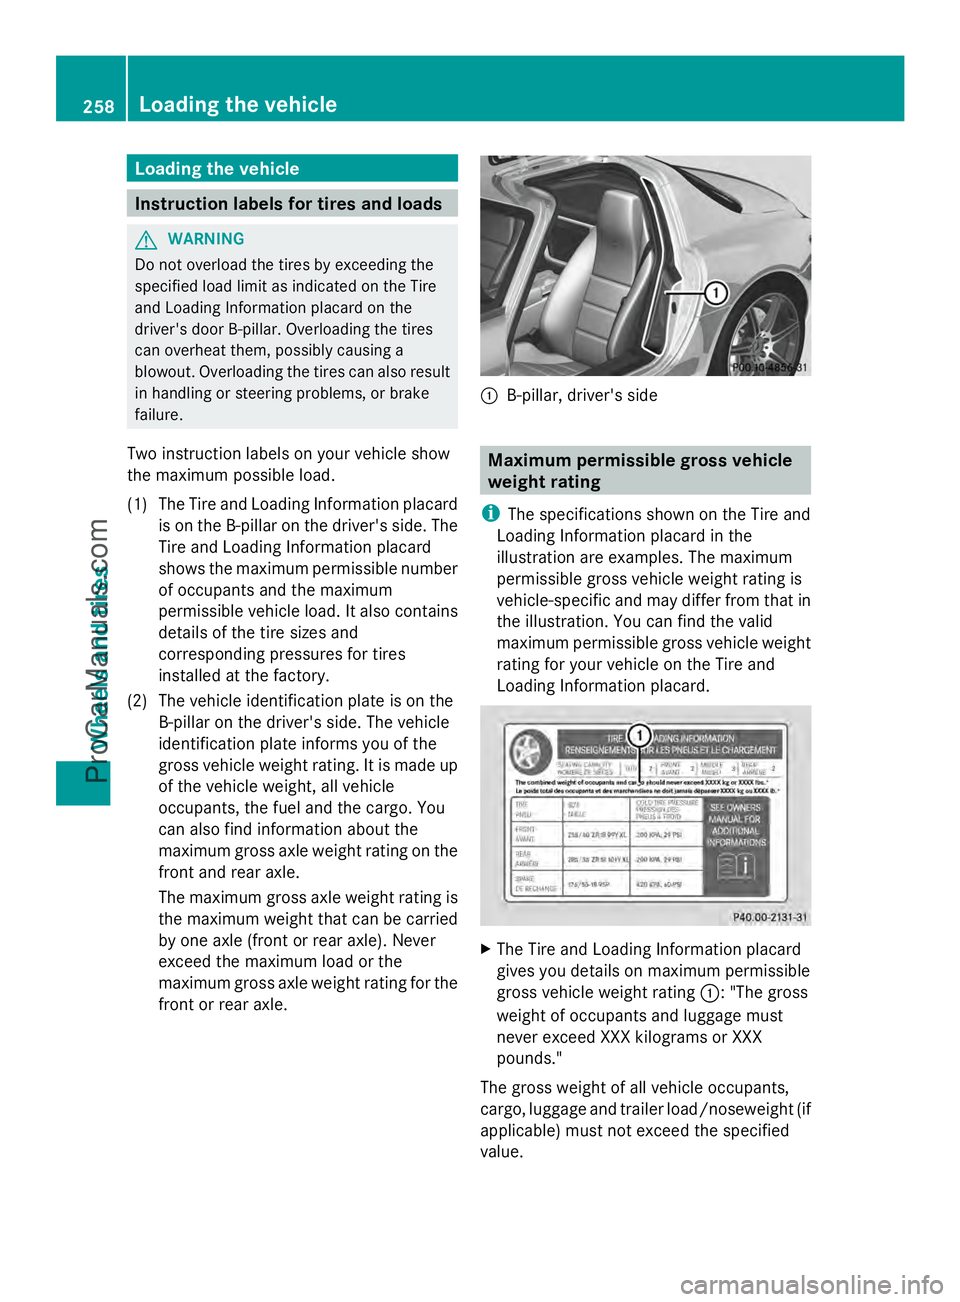
Two instruction labels on your vehicle show
the maximum possible load.
(1) The Tire and Loading Information placard is on the B-pillar on the driver's side. The
Tire and Loading Information placard
shows the maximum permissible number
of occupants and the maximum
permissible vehicle load. It also contains
details of the tire sizes and
corresponding pressures for tires
installed at the factory.
(2) The vehicle identification plate is on the B-pillar on the driver's side. The vehicle
identification plate informs you of the
gross vehicle weight rating. It is made up
of the vehicle weight, all vehicle
occupants, the fuel and the cargo. You
can also find information about the
maximum gross axle weight rating on the
front and rear axle.
The maximum gross axle weight rating is
the maximum weight that can be carried
by one axle (front or rear axle). Never
exceed the maximum load or the
maximum gross axle weight rating for the
front or rear axle. :
B-pillar, driver's side Maximum permissible gross vehicle
weight rating
i The specifications shown on the Tire and
Loading Information placard in the
illustration are examples. The maximum
permissible gross vehicle weight rating is
vehicle-specific and may differ from that in
the illustration. You can find the valid
maximum permissible gross vehicle weight
rating for your vehicle on the Tire and
Loading Information placard. X
The Tire and Loading Information placard
gives you details on maximum permissible
gross vehicle weight rating :: "The gross
weight of occupants and luggage must
never exceed XXX kilograms or XXX
pounds."
The gross weight of all vehicle occupants,
cargo, luggage and trailer load/noseweight (if
applicable) must not exceed the specified
value. 258
Loading the vehicleWheels and tires
ProCarManuals.com
Page 263 of 286
Gross vehicle weight:
the gross weight of
the vehicle, all passengers, cargo and trailer
load/noseweight (if applicable) must not
exceed the permissible gross vehicle weight.
Gross axle weight rating: the maximum
permissible weight that can be carried by one
axle (front or rear axle).
To ensure that your vehicle does not exceed
the maximum permissible values (gross
vehicle weight and maximum gross axle
weight rating), have your loaded vehicle
(including driver, occupants, cargo, and full
trailer load if applicable) weighed on a
suitable vehicle weighbridge. Trailer load/noseweight
The trailer load/noseweight affects the gross
weight of the vehicle. If a trailer is attached,
the trailer load/noseweight is included in the
load along with occupants and luggage. The
trailer load/noseweight is usually
approximately 10% of the gross weight of the
trailer and its load.
Your Mercedes-Benz has been designed
primarily to carry passengers and their
luggage. Mercedes-Benz does not
recommend towing a trailer with your vehicle. Maximum load rating
G
WARNING
Do not overload the tires by exceeding the
specified load limit as indicated on the Tire
and Loading Information placard on the
driver's door B-pillar. Overloading the tires
can overheat them, possibly causing a
blowout. Overloading the tires can also result
in handling or steering problems, or brake
failure. i
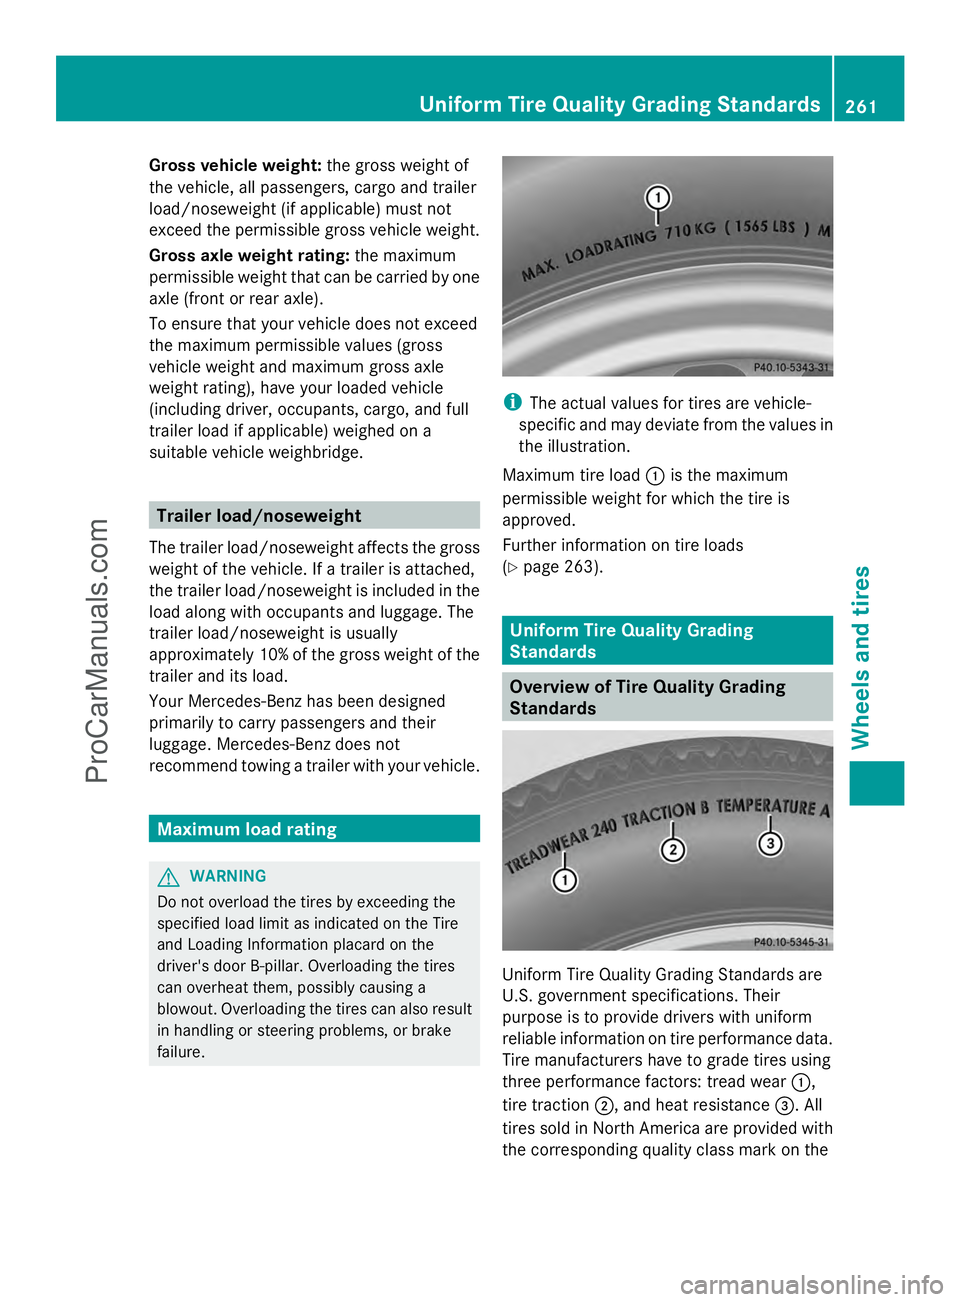
The actual values for tires are vehicle-
specific and may deviate from the values in
the illustration.
Maximum tire load :is the maximum
permissible weight for which the tire is
approved.
Further information on tire loads
(Y page 263). Uniform Tire Quality Grading
Standards
Overview of Tire Quality Grading
Standards
Uniform Tire Quality Grading Standards are
U.S. government specifications. Their
purpose is to provide drivers with uniform
reliable information on tire performance data.
Tire manufacturers have to grade tires using
three performance factors: tread wear
:,
tire traction ;, and heat resistance =. All
tires sold in North America are provided with
the corresponding quality class mark on the Uniform Tire Quality Grading Standards
261Wheels and tires Z
ProCarManuals.com
Page 266 of 286
pressure, to be used only temporarily in an
emergency.
Tire width: tire width:shows the nominal
tire width in millimeters.
Nominal aspect ratio: aspect ratio;is the
ratio between the tire height and tire width
and is shown as a percentage. The aspect
ratio is calculated by dividing the tire width by
the tire height.
Tire code: tire code=specifies the tire type.
"R" represents radial tires; "D" represents
diagonal tires; "B" represents diagonal radial
tires.
Optionally, tires with a maximum speed of
over 149 mph (240 km/h) may have "ZR" in
the size description depending on the
manufacturer (e.g. 245/40 ZR 18).
Rim diameter: rim diameter?is the
diameter of the bead seat, not the diameter
of the rim flange. The rim diameter is
specified in inches (in).
Load bearing index: load bearing indexA
is a numerical code which specifies the
maximum load-bearing capacity of a tire. G
WARNING
The tire load rating must always be at least
half of the GAWR of your vehicle. Otherwise,
sudden tire failure may be the result which
could cause an accident and/or serious injury
to you or others.
Always replace rims and tires with rims and
tires having the same specifications
(designation, manufacturer and type) as
shown on the original part. G
WARNING
Do not overload the tires by exceeding the
specified load limit as indicated on the Tire
and Loading Information placard on the
driver's door B-pillar. Overloading the tires
can overheat them, possibly causing a
blowout. Overloading the tires can also result
in handling or steering problems, or brake
failure. Example:
The load bearing index 91 is equivalent to a
maximum load of 1356 lbs (615 kg) that the
tire can carry. For further information on the
maximum tire load in kilograms and pounds,
see (Y
page 261).
For further information on the load bearing
index, see Load index (Y page 265).
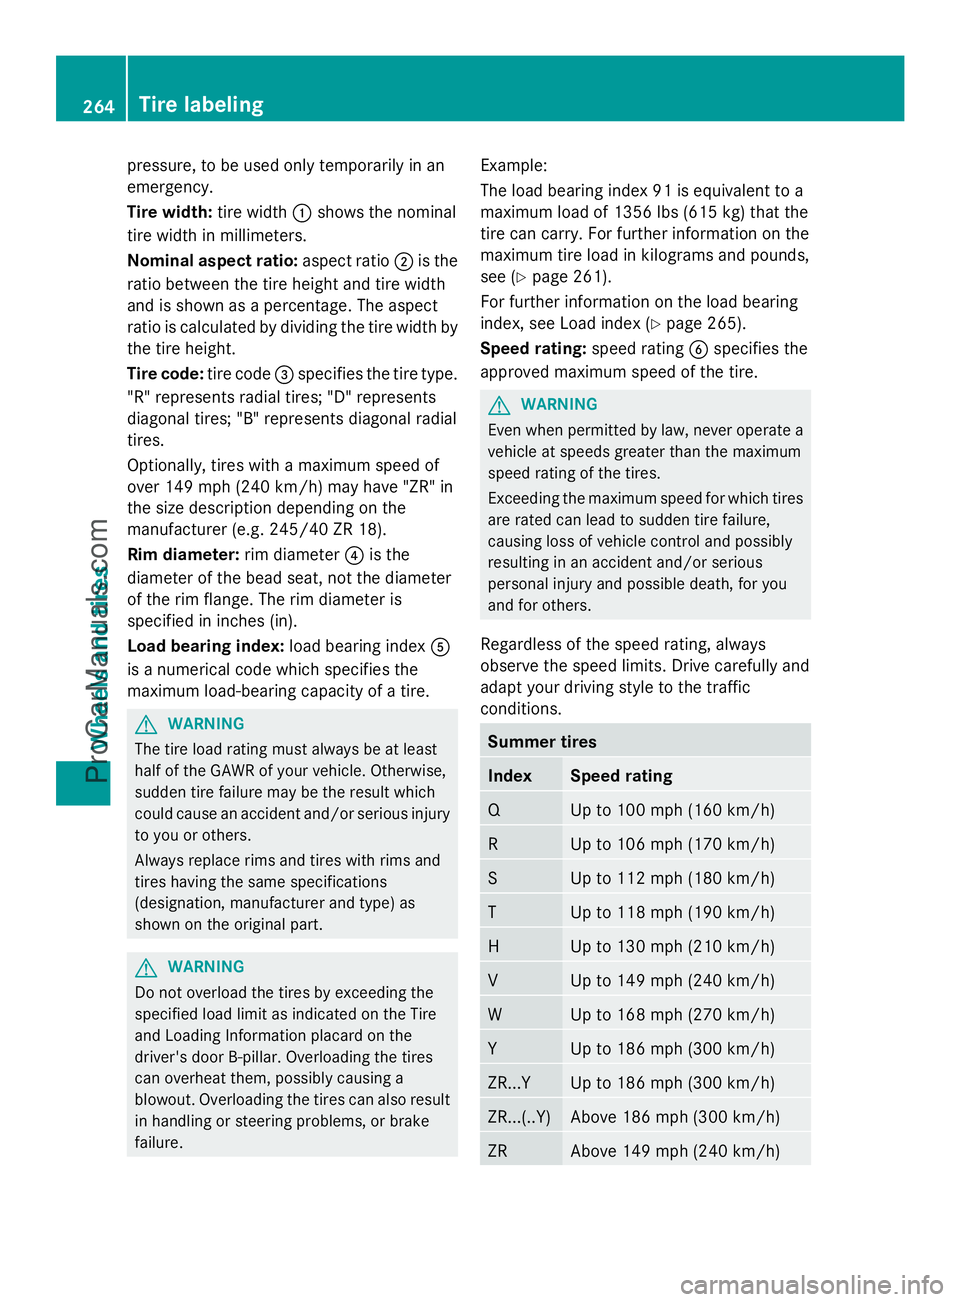
Speed rating: speed ratingBspecifies the
approved maximum speed of the tire. G
WARNING
Even when permitted by law, never operate a
vehicle at speeds greater than the maximum
speed rating of the tires.
Exceeding the maximum speed for which tires
are rated can lead to sudden tire failure,
causing loss of vehicle control and possibly
resulting in an accident and/or serious
personal injury and possible death, for you
and for others.
Regardless of the speed rating, always
observe the speed limits. Drive carefully and
adapt your driving style to the traffic
conditions. Summer tires
Index Speed rating
Q Up to 100 mph (160 km/h)
R Up to 106 mph (170 km/h)
S Up to 112 mph (180 km/h)
T Up to 118 mph (190 km/h)
H Up to 130 mph (210 km/h)
V Up to 149 mph (240 km/h)
W Up to 168 mph (270 km/h)
Y Up to 186 mph (300 km/h)
ZR...Y Up to 186 mph (300 km/h)
ZR...(..Y) Above 186 mph (300 km/h)
ZR Above 149 mph (240 km/h)264
Tire labelingWheels and tires
ProCarManuals.com
Page 279 of 286
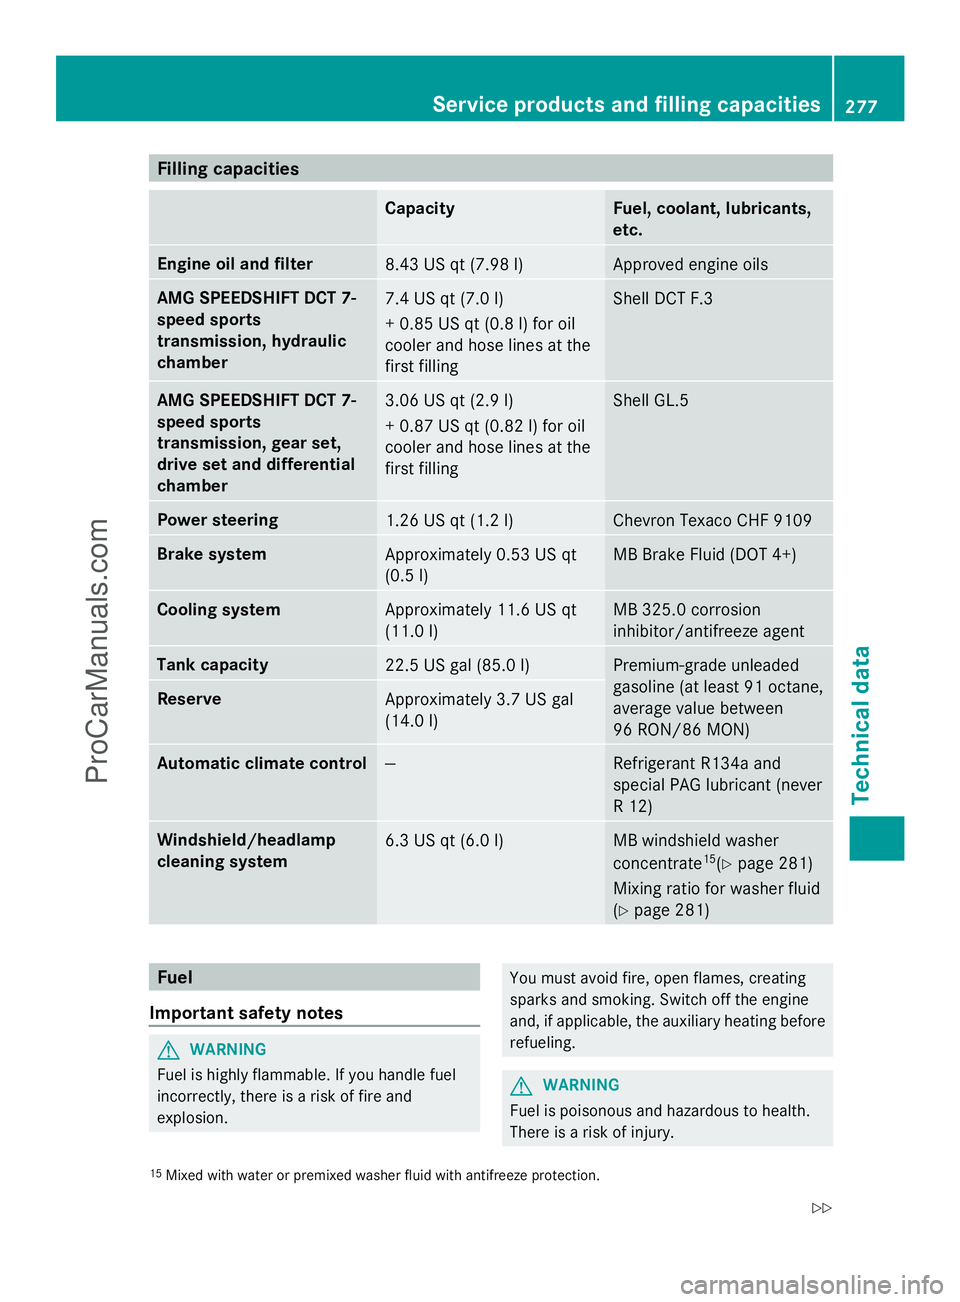
Filling capacities
Capacity Fuel, coolant, lubricants,
etc.
Engine oil and filter
8.43 US qt (7.98 l) Approved engine oils
AMG SPEEDSHIFT DCT 7-
speed sports
transmission, hydraulic
chamber 7.4 US qt (7.0 l)
+ 0.85 US qt (0.8 l) for oil
cooler and hose lines at the
first filling Shell DCT F.3
AMG SPEEDSHIFT DCT 7-
speed sports
transmission, gear set,
drive set and differential
chamber
3.06 US qt (2.9 l)
+ 0.87 US qt (0.82 l) for oil
cooler and hose lines at the
first filling Shell GL.5
Power steering
1.26 US qt (1.2 l) Chevron Texaco CHF 9109
Brake system
Approximately 0.53 US qt
(0.5 l) MB Brake Fluid (DOT 4+)
Cooling system
Approximately 11.6 US qt
(11.0 l) MB 325.0 corrosion
inhibitor/antifreeze agent
Tank capacity
22.5 US gal (85.0 l) Premium-grade unleaded
gasoline (at least 91 octane,
average value between
96 RON/86 MON)
Reserve
Approximately 3.7 US gal
(14.0 l)
Automatic climate control
— Refrigerant R134a and
special PAG lubricant (never
R 12)
Windshield/headlamp
cleaning system
6.3 US qt (6.0 l) MB windshield washer
concentrate
15
(Y page 281)
Mixing ratio for washer fluid
(Y page 281) Fuel
Important safety notes G
WARNING
Fuel is highly flammable. If you handle fuel
incorrectly, there is a risk of fire and
explosion. You must avoid fire, open flames, creating
sparks and smoking. Switch off the engine
and, if applicable, the auxiliary heating before
refueling.
G
WARNING
Fuel is poisonous and hazardous to health.
There is a risk of injury.
15 Mixed with water or premixed washer fluid with antifreeze protection. Service products and filling capacities
277Technical data
Z
ProCarManuals.com