2013 MERCEDES-BENZ SLS-CLASS brake
[x] Cancel search: brakePage 192 of 286
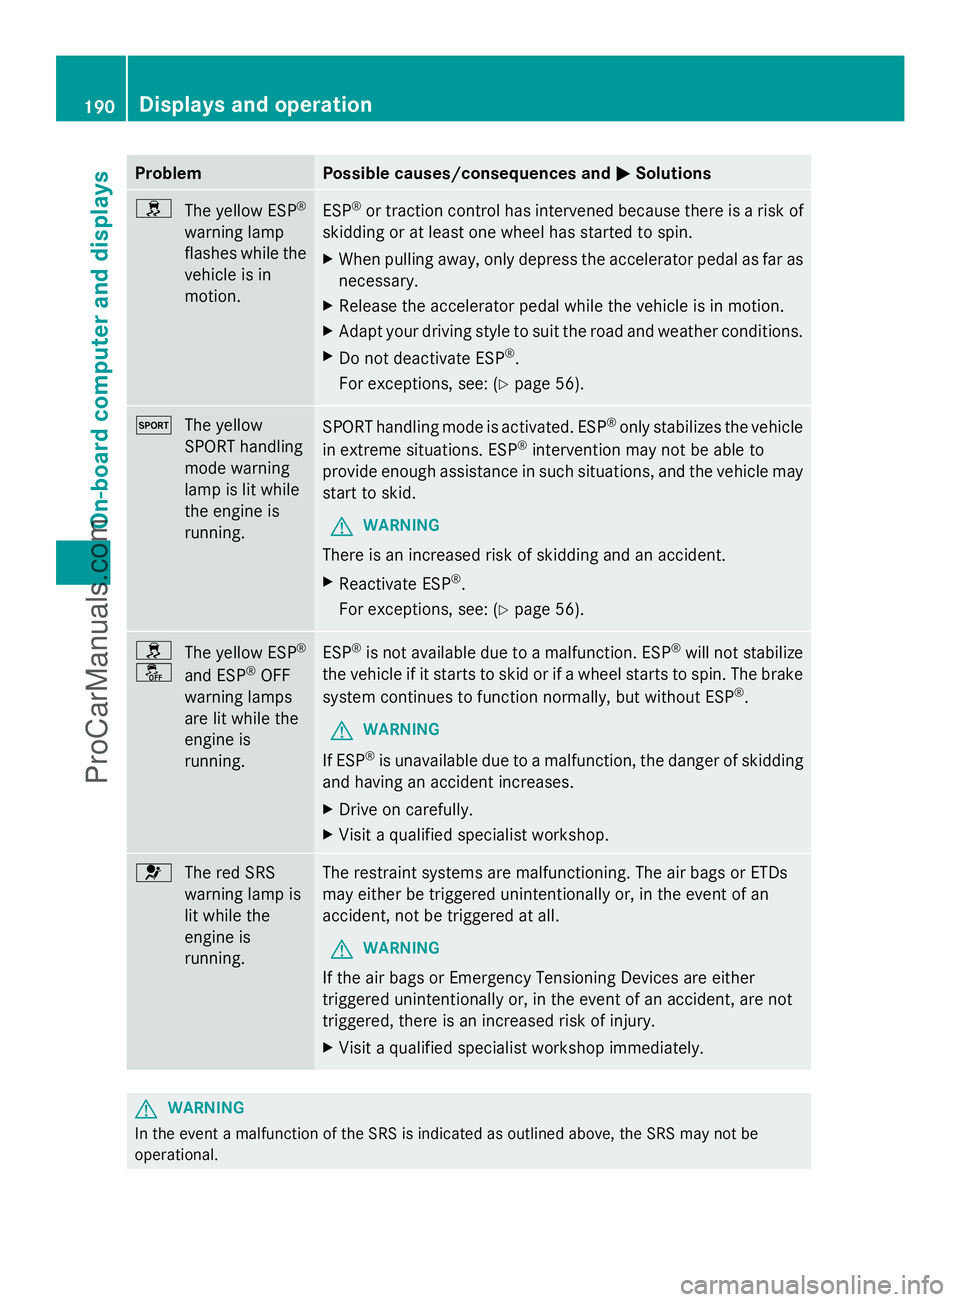
Problem Possible causes/consequences and
M
MSolutions h
The yellow ESP ®
warning lamp
flashes while the
vehicle is in
motion. ESP
®
or traction control has intervened because there is a risk of
skidding or at least one wheel has started to spin.
X When pulling away, only depress the accelerator pedal as far as
necessary.
X Release the accelerator pedal while the vehicle is in motion.
X Adapt your driving style to suit the road and weather conditions.
X Do not deactivate ESP ®
.
For exceptions, see: (Y page 56).M
The yellow
SPORT handling
mode warning
lamp is lit while
the engine is
running. SPORT handling mode is activated. ESP
®
only stabilizes the vehicle
in extreme situations. ESP ®
intervention may not be able to
provide enough assistance in such situations, and the vehicle may
start to skid.
G WARNING
There is an increased risk of skidding and an accident.
X Reactivate ESP ®
.
For exceptions, see: (Y page 56).h
å
The yellow ESP
®
and ESP ®
OFF
warning lamps
are lit while the
engine is
running. ESP
®
is not available due to a malfunction. ESP ®
will not stabilize
the vehicle if it starts to skid or if a wheel starts to spin. The brake
system continues to function normally, but without ESP ®
.
G WARNING
If ESP ®
is unavailable due to a malfunction, the danger of skidding
and having an accident increases.
X Drive on carefully.
X Visit a qualified specialist workshop. 6
The red SRS
warning lamp is
lit while the
engine is
running. The restraint systems are malfunctioning. The air bags or ETDs
may either be triggered unintentionally or, in the event of an
accident, not be triggered at all.
G WARNING
If the air bags or Emergency Tensioning Devices are either
triggered unintentionally or, in the event of an accident, are not
triggered, there is an increased risk of injury.
X Visit a qualified specialist workshop immediately. G
WARNING
In the event a malfunction of the SRS is indicated as outlined above, the SRS may not be
operational. 190
Displays and operationOn-board computer and displays
ProCarManuals.com
Page 221 of 286
Under these or similar conditions, have, for
example, the air filter, engine oil and oil filter
replaced or changed more frequently. Under
arduous operating conditions, the tires must
be checked more often. Further information
can be obtained at a qualified specialist
workshop, e.g. an authorized Mercedes-Benz
Center.
Driving abroad
An extensive Mercedes-Benz Service network
is also available in other countries. You can
obtain further information from any
authorized Mercedes-Benz Center. Care
Notes on care
Regular care of your vehicle is a condition for
retaining the quality in the long term.
Use care products and cleaning agents
recommended and approved by Mercedes-
Benz. G
WARNING
Many cleaning products can be hazardous.
Some are poisonous, others are flammable.
Always follow the instructions on the
particular container. Always open your
vehicle's doors or windows when cleaning the
inside.
Never use fluids or solvents that are not
designed for cleaning your vehicle.
Always lock away cleaning products and keep
them out of reach of children.
! For cleaning your vehicle, do not use any
of the following:
R dry, rough or hard cloths
R abrasive cleaning agents
R solvents
R cleaning agents containing solvents
Do not scrub.
Do not touch the surfaces or protective
films with hard objects, e.g. a ring or ice scraper. You could otherwise scratch or
damage the surfaces and protective film. H
Environmental note
Dispose of empty packaging and cleaning
cloths in an environmentally responsible
manner.
! Do not park the vehicle for an extended
period right after cleaning it, particularly
after having cleaned the wheels with wheel
cleaner. Wheel cleaners could cause
increased corrosion of the brake discs and
brake pads/linings. For this reason, you
should drive for a few minutes after
cleaning. Braking heats the brake discs and
brake pads, thus drying them. The vehicle
can then be parked. Exterior care
Automatic car wash G
WARNING
Braking efficiency is reduced after washing
the vehicle. There is a risk of an accident.
After the vehicle has been washed, brake
carefully while paying attention to the traffic
conditions until full braking power is restored.
You can wash the vehicle in an automatic car
wash from the very start.
If the vehicle is very dirty, pre-wash it before
cleaning it in an automatic car wash.
! Never clean your vehicle in a Touchless
Automatic Car Wash as these use special
cleaning agents. These cleaning agents can
damage the paintwork or plastic parts.
! When washing your vehicle in a tow-
through car wash, use the SmartKey
instead of the Start/Stop button.
Start the engine using the SmartKey.. Move
the transmission to Nwith the E-SELECT
lever. Use the SmartKey to switch the
engine off again and then turn the
SmartKey to position 2. Make sure that you Care
219Maintenance and care Z
ProCarManuals.com
Page 223 of 286
X
Use plenty of water and rinse out the
sponge frequently.
X Rinse the vehicle with clean water and dry
thoroughly with a chamois.
X Do not let the cleaning agent dry on the
paintwork.
Carefully remove all deposits of road salt as
soon as possible when driving in winter.
Power washers G
WARNING
The water jet from a circular jet nozzle (dirt
blasters) can cause invisible exterior damage
to the tires or chassis components.
Components damaged in this way may fail
unexpectedly. There is a risk of an accident.
Do not use power washers with circular jet
nozzles to clean the vehicle. Have damaged
tires or chassis components replaced
immediately.
! Maintain a minimum distance of
11.8 in (30 cm) between the vehicle and the
power washer nozzle. Information about
the correct distance is available from the
equipment manufacturer.
Move the power washer nozzle around
when cleaning your vehicle.
Do not aim directly at any of the following:
R tires
R door gaps, roof gaps, joints, etc.
R electrical components
R battery
R connectors
R lights
R seals
R trim elements
R ventilation slots
Damaged seals or electrical components
can lead to leaks or failures. Cleaning the wheels !
Do not use acidic wheel cleaning products
to remove brake dust. This could damage
wheel bolts and brake components.
! Do not park the vehicle for an extended
period right after cleaning it, particularly
after having cleaned the wheels with wheel
cleaner. Wheel cleaners could cause
increased corrosion of the brake discs and
brake pads/linings. For this reason, you
should drive for a few minutes after
cleaning. Braking heats the brake discs and
brake pads, thus drying them. The vehicle
can then be parked.
Cleaning the paintwork Scratches, corrosive deposits, areas affected
by corrosion and damage caused by
inadequate care cannot always be completely
repaired. In such cases, visit a qualified
specialist workshop, e.g. an authorized
Mercedes-Benz Center.
X
Remove impurities immediately, where
possible, whilst avoiding rubbing too hard.
X Soak insect remains with insect remover
and rinse off the treated areas afterwards.
X Soak bird droppings with water and rinse
off the treated areas afterwards.
X Remove coolant, brake fluid, tree resin,
oils, fuels and greases by rubbing gently
with a cloth soaked in petroleum ether or
lighter fluid.
X Use tar remover to remove tar stains.
X Use silicone remover to remove wax.
! Do not affix:
R stickers
R films
R magnetic plates or similar items
to painted surfaces. You could otherwise
damage the paintwork.
If water no longer forms "beads" on the paint
surface, use the paint care products
recommended and approved by Mercedes- Care
221Maintenance and care Z
ProCarManuals.com
Page 225 of 286
vehicle with a power washer or in a car
wash that uses power washers. Do not use
sharp-edged equipment to remove ice and
snow.
Frequent cleaning reduces the soft top's
resistance to dirt.
To restore this resistance to dirt, clean the
soft top using soft top cleaning agents that
have been recommended and approved by
Mercedes-Benz.
Incorrect cleaning and care, as well as aging,
can cause the soft-top seams to leak. Have
the soft-top seams sealed at a qualified
specialist workshop, e.g. at an authorized
Mercedes-Benz Center.
i Cover the soft top appropriately if you
plan to leave the vehicle outside for a long
period of time.
Cleaning the windows G
WARNING
You could become trapped by the windshield
wipers if they start moving while cleaning the
windshield or wiper blades. There is a risk of
injury.
Always switch off the windscreen wipers and
the ignition before cleaning the windshield or
wiper blades.
! Only fold the windshield wipers away from
the windshield when vertical. Otherwise,
you will damage the hood.
X Clean the inside and outside of the
windows with a damp cloth and a cleaning
agent that is recommended and approved
by Mercedes-Benz.
! Do not use dry cloths, abrasive products,
solvents or cleaning agents containing
solvents to clean the inside of the windows.
Do not use hard objects to clean the insides
of the windows, e.g. an ice scraper or ring.
There is otherwise a risk of damaging the
windows. !
Clean the water drainage channels of the
windshield and the rear window at regular
intervals. Deposits such as leaves, petals
and pollen may under certain
circumstances prevent water from draining
away. This can lead to corrosion damage
and damage to electronic components.
Cleaning wiper blades G
WARNING
You could become trapped by the windshield
wipers if they start moving while cleaning the
windshield or wiper blades. There is a risk of
injury.
Always switch off the windscreen wipers and
the ignition before cleaning the windshield or
wiper blades.
! Only fold the windshield wipers away from
the windshield when vertical. Otherwise,
you will damage the hood.
! Do not pull the wiper blade. Otherwise,
the wiper blade could be damaged.
! Do not clean wiper blades too often and
do not rub them too hard. Otherwise, the
graphite coating could be damaged. This
could cause wiper noise.
X Switch off the engine.
X Remove your foot from the brake pedal.
X Set the windshield wiper to the °
position on the combination switch.
X Press the Start/Stop button repeatedly
until the windshield wipers start.
X When the wiper arms have reached a
vertical position, press the Start/Stop
button.
X Fold the wiper arm away from the
windshield until it engages.
X Set the wiper blade at right angles to the
wiper arm.
X Carefully clean the wiper blades with a
damp cloth.
X Fold the windshield wiper arms back again
before switching on the ignition. Care
223Maintenance and care Z
ProCarManuals.com
Page 231 of 286

X
Remove the jack from the left-hand
stowage space in the trunk to allow the
stowage compartment to be opened.
X Turn fastener ;in the direction of the
arrow.
X Open stowage compartment :.
X Remove the TIREFIT kit, wheel chock,
alignment bolt and gloves. Flat tire
Preparing the vehicle
Your vehicle is equipped with a TIREFIT kit.
X Stop the vehicle on solid, non-slippery and
level ground, as far away as possible from
traffic.
X Switch on the hazard warning lamps.
X Apply the electric parking brake manually
(Y page 129).
X Bring the front wheels into the straight-
ahead position.
X Shift the transmission to Pwith the button
in the center console.
X Switch off the engine.
X Remove the SmartKey from the ignition
lock.
X All occupants must get out of the vehicle.
Make sure that they are not endangered as
they do so.
X Make sure that no one is near the danger
area while a wheel is being changed.
Anyone who is not directly assisting in the
wheel change should, for example, stand
behind the barrier.
X Get out of the vehicle. Pay attention to
traffic conditions when doing so.
X Close the driver's door. TIREFIT kit
Using the TIREFIT kit G
WARNING
TIREFIT is a limited repair device. TIREFIT
cannot be used for cuts or punctures larger
than approximately 0.16 in (4 mm) and tire
damage caused by driving with extremely low
tire inflation pressure, or on a flat tire, or a
damaged wheel.
Do not drive the vehicle under such
circumstances.
Contact the nearest authorized Mercedes-
Benz Center for assistance or call Roadside
Assistance. G
WARNING
Take care not to allow the contents of TIREFIT
to come in contact with hair, eyes or clothing.
TIREFIT is harmful if inhaled, swallowed or
absorbed through the skin - causes skin, eye
and respiratory irritation.
Any contact with eyes or skin should be
flushed immediately with plenty of water.
If clothing comes in contact with TIREFIT,
change clothing as soon as possible.
In case of allergic reaction or rash, consult a
physician immediately. G
WARNING
Keep TIREFIT away from children. If
swallowed, rinse mouth immediately with
plenty of water and drink plenty of water.
Do not induce vomiting.
Consult a doctor immediately.
Keep away from open flame or heat source.
You can use the TIREFIT kit to seal small
punctures, particularly those in the tire tread.
You can use TIREFIT at outside temperatures
down to -40 †. Flat ti
re
229Breakdo wn assis tance Z
ProCarManuals.com
Page 235 of 286

If your vehicle is equipped with a wheel chock,
it can be found in the vehicle tool kit
(Y page 228).
The folding wheel chock is an additional
securing measure to prevent the vehicle from
rolling away, for example when changing a
wheel. X
Fold both plates upwards :.
X Fold out lower plate ;.
X Guide the lugs on the lower plate fully into
the openings in base plate =.Securing the vehicle on level ground
X
On level ground: place chocks or other
suitable items under the front and rear of
the wheel that is diagonally opposite the
wheel you wish to change. Securing the vehicle on slight downhill gradients
X
On downhill gradients: place chocks or
other suitable items in front of the wheels
of the front and rear axle.
Raising the vehicle G
WARNING
When jacking up the vehicle, only use the jack
which has been specifically approved by
Mercedes-Benz for your vehicle.
The jack is designed exclusively for jacking up
the vehicle at the jacking points built into both
sides of the vehicle. The jack saddle must be
placed centrally under the jacking point. The
jack must always be vertical when in use,
especially on inclines or declines.
The jack is intended only for lifting the vehicle
briefly for wheel changes. It is not suited for
performing maintenance work under the
vehicle. To help avoid personal injury, use the
jack only to lift the vehicle during a wheel
change.
Never get beneath the vehicle while it is
supported by the jack. Keep hands and feet
away from the area under the lifted vehicle.
Always lower the vehicle onto sufficient
capacity jackstands before working under the
vehicle.
Always firmly engage the parking brake and
block the wheels with wheel chocks or other
sizable objects before raising the vehicle with
the jack. Do not disengage the parking brake
while the vehicle is raised. Flat tire
233Breakdown assistance
Z
ProCarManuals.com
Page 237 of 286
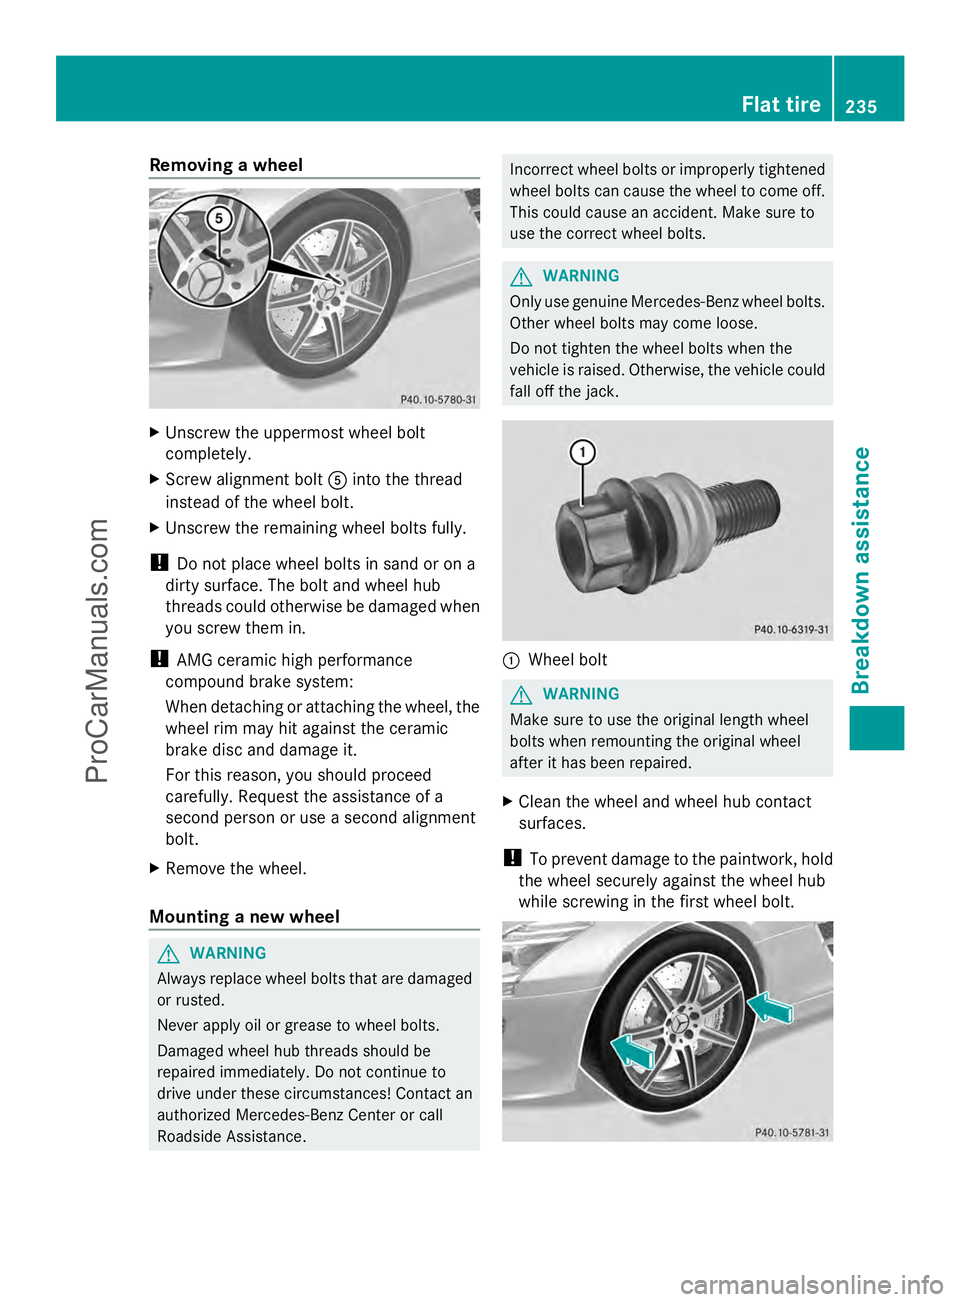
Removing a wheel
X
Unscrew the uppermost wheel bolt
completely.
X Screw alignment bolt Ainto the thread
instead of the wheel bolt.
X Unscrew the remaining wheel bolts fully.
! Do not place wheel bolts in sand or on a
dirty surface. The bolt and wheel hub
threads could otherwise be damaged when
you screw them in.
! AMG ceramic high performance
compound brake system:
When detaching or attaching the wheel, the
wheel rim may hit against the ceramic
brake disc and damage it.
For this reason, you should proceed
carefully. Request the assistance of a
second person or use a second alignment
bolt.
X Remove the wheel.
Mounting a new wheel G
WARNING
Always replace wheel bolts that are damaged
or rusted.
Never apply oil or grease to wheel bolts.
Damaged wheel hub threads should be
repaired immediately. Do not continue to
drive under these circumstances! Contact an
authorized Mercedes-Benz Center or call
Roadside Assistance. Incorrect wheel bolts or improperly tightened
wheel bolts can cause the wheel to come off.
This could cause an accident. Make sure to
use the correct wheel bolts.
G
WARNING
Only use genuine Mercedes-Benz wheel bolts.
Other wheel bolts may come loose.
Do not tighten the wheel bolts when the
vehicle is raised. Otherwise, the vehicle could
fall off the jack. :
Wheel bolt G
WARNING
Make sure to use the original length wheel
bolts when remounting the original wheel
after it has been repaired.
X Clean the wheel and wheel hub contact
surfaces.
! To prevent damage to the paintwork, hold
the wheel securely against the wheel hub
while screwing in the first wheel bolt. Flat tire
235Breakdown assistance Z
ProCarManuals.com
Page 243 of 286
R
Do not start the engine if the battery is frozen. Let the battery thaw first.
R Only jump-start from batteries with a 12 V voltage rating.
R Only use jumper cables which have a sufficient cross-section and insulated terminal clamps.
R If the battery is fully discharged, leave the battery that is being used to jump-start connected
for a few minutes before attempting to start. This charges the battery slightly.
R Make sure that the two vehicles do not touch.
Make sure that:
R the jumper cables are not damaged.
R when the jumper cables are connected to the battery, uninsulated sections of the terminal
clamp do not come into contact with other metal sections.
R the jumper cables cannot come into contact with parts such as the V-belt pulley or the fan.
These parts move when the engine is started and while it is running.
X Press the electric parking brake handle.
X Shift the transmission to Pwith the button in the center console.
X Remove the SmartKey from the ignition lock.
X Switch off all electrical consumers (e.g. radio, blower, etc.).
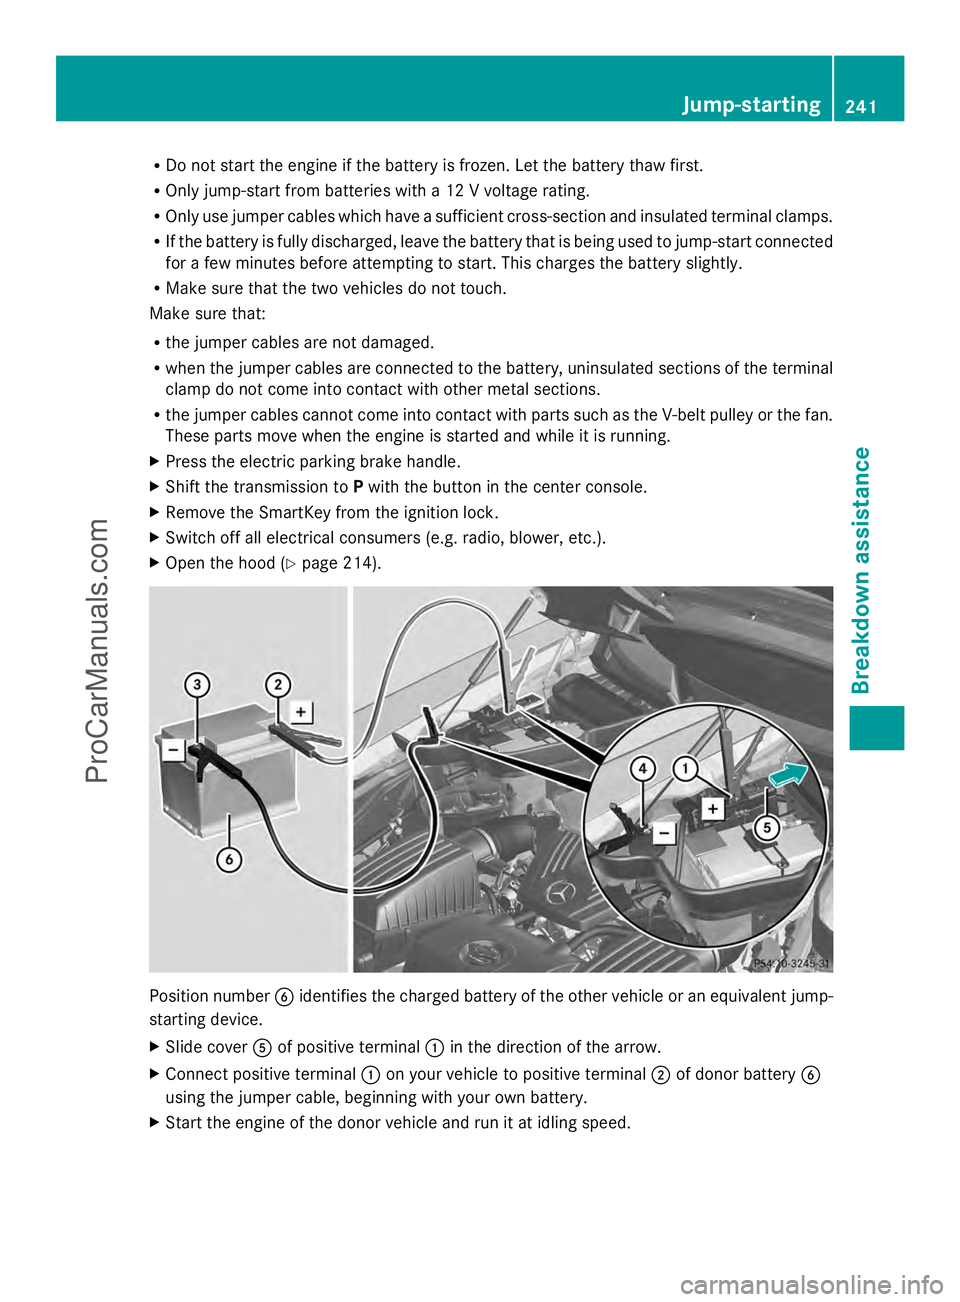
X Open the hood (Y page 214). Position number
Bidentifies the charged battery of the other vehicle or an equivalent jump-
starting device.
X Slide cover Aof positive terminal :in the direction of the arrow.
X Connect positive terminal :on your vehicle to positive terminal ;of donor battery B
using the jumper cable, beginning with your own battery.
X Start the engine of the donor vehicle and run it at idling speed. Jump-starting
241Breakdown assistance Z
ProCarManuals.com