2013 MERCEDES-BENZ SLS-CLASS lights
[x] Cancel search: lightsPage 156 of 286
R
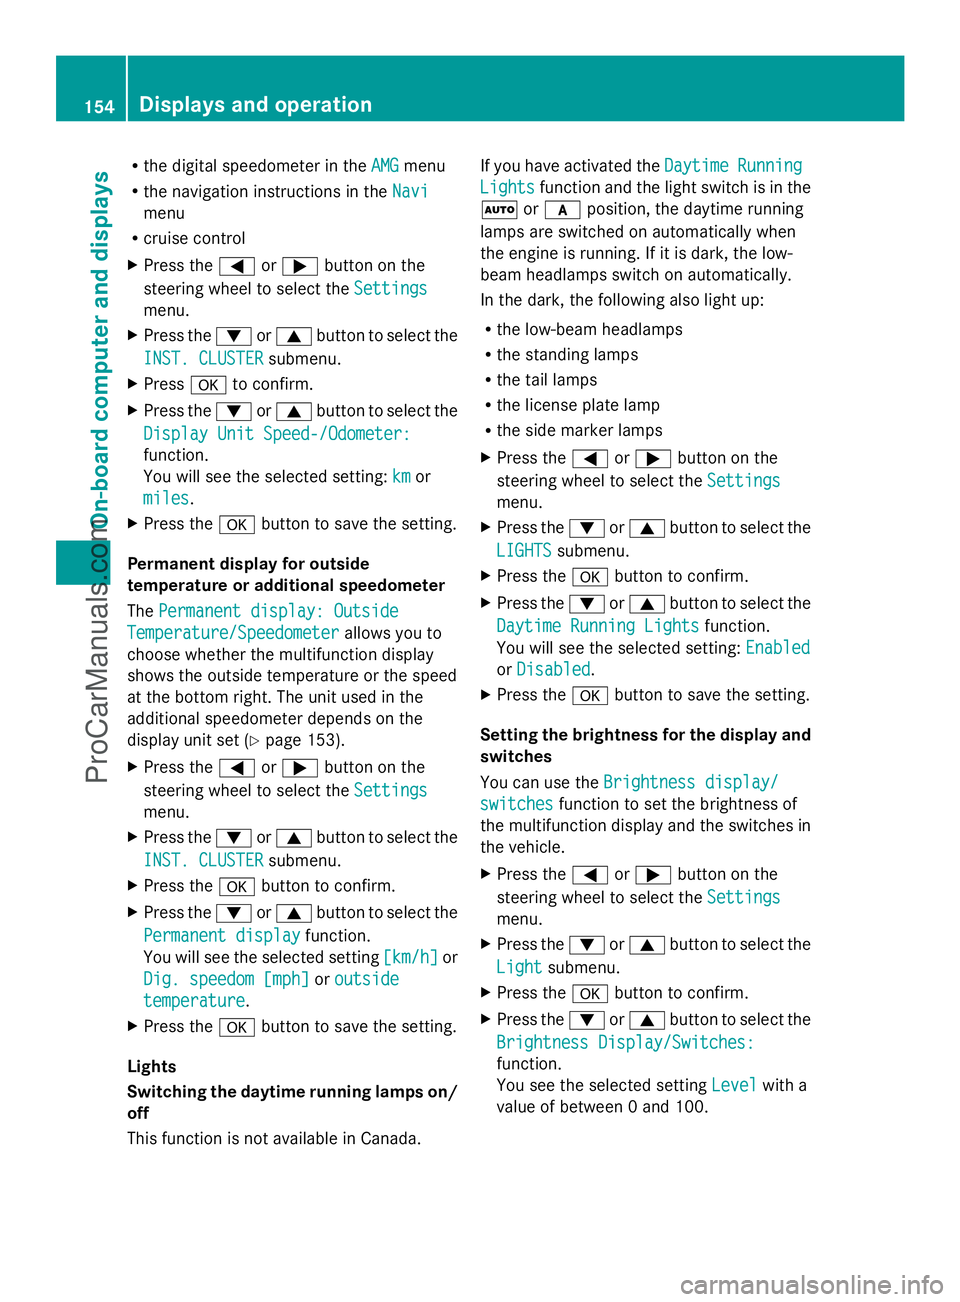
the digital speedometer in the AMG
AMGmenu
R the navigation instructions in the Navi
Navi
menu
R cruise control
X Press the =or; button on the
steering wheel to select the Settings
Settings
menu.
X Press the :or9 button to select the
INST. CLUSTER
INST. CLUSTER submenu.
X Press ato confirm.
X Press the :or9 button to select the
Display Unit Speed-/Odometer:
Display Unit Speed-/Odometer:
function.
You will see the selected setting: km kmor
miles
miles .
X Press the abutton to save the setting.
Permanent display for outside
temperature or additional speedometer
The Permanent display: Outside Permanent display: Outside
Temperature/Speedometer
Temperature/Speedometer allows you to
choose whether the multifunction display
shows the outside temperature or the speed
at the bottom right. The unit used in the
additional speedometer depends on the
display unit set (Y page 153).
X Press the =or; button on the
steering wheel to select the Settings
Settings
menu.
X Press the :or9 button to select the
INST. CLUSTER
INST. CLUSTER submenu.
X Press the abutton to confirm.
X Press the :or9 button to select the
Permanent display
Permanent display function.
You will see the selected setting [km/h]
[km/h]or
Dig. speedom [mph]
Dig. speedom [mph] oroutside
outside
temperature
temperature .
X Press the abutton to save the setting.
Lights
Switching the daytime running lamps on/
off
This function is not available in Canada. If you have activated the
Daytime
Daytime Running Running
Lights
Lights function and the light switch is in the
à orc position, the daytime running
lamps are switched on automatically when
the engine is running. If it is dark, the low-
beam headlamps switch on automatically.
In the dark, the following also light up:
R the low-beam headlamps
R the standing lamps
R the tail lamps
R the license plate lamp
R the side marker lamps
X Press the =or; button on the
steering wheel to select the Settings
Settings
menu.
X Press the :or9 button to select the
LIGHTS LIGHTS submenu.
X Press the abutton to confirm.
X Press the :or9 button to select the
Daytime Running Lights
Daytime Running Lights function.
You will see the selected setting: Enabled
Enabled
or Disabled
Disabled .
X Press the abutton to save the setting.
Setting the brightness for the display and
switches
You can use the Brightness display/ Brightness display/
switches
switches function to set the brightness of
the multifunction display and the switches in
the vehicle.
X Press the =or; button on the
steering wheel to select the Settings Settings
menu.
X Press the :or9 button to select the
Light
Light submenu.
X Press the abutton to confirm.
X Press the :or9 button to select the
Brightness Display/Switches:
Brightness Display/Switches:
function.
You see the selected setting Level Levelwith a
value of between 0 and 100. 154
Displays and operationOn-boa
rdcompu ter and displays
ProCarManuals.com
Page 157 of 286
X
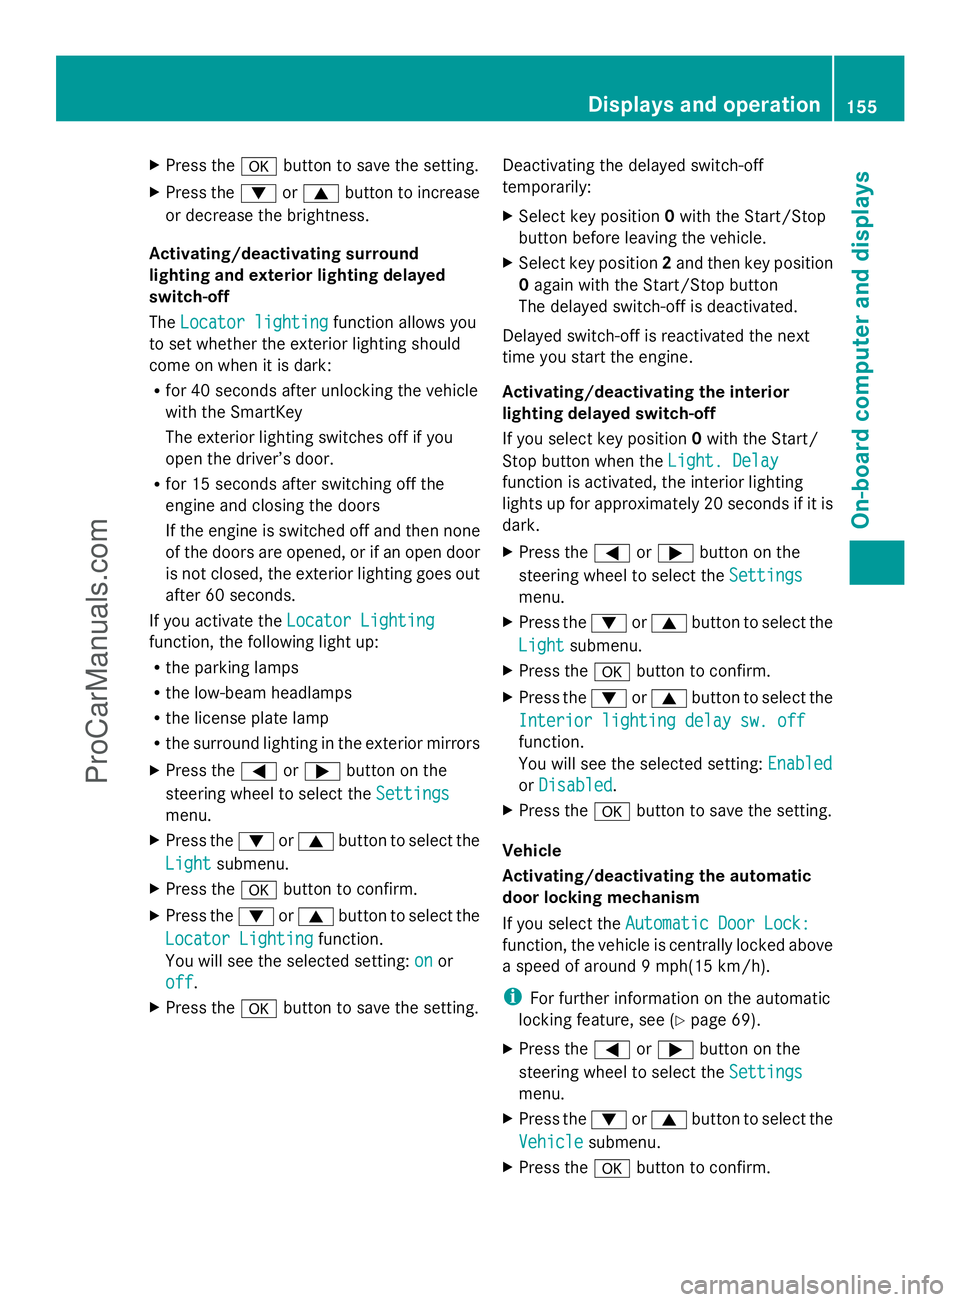
Press the abutton to save the setting.
X Press the :or9 button to increase
or decrease the brightness.
Activating/deactivating surround
lighting and exterior lighting delayed
switch-off
The Locator lighting
Locator lighting function allows you
to set whether the exterior lighting should
come on when it is dark:
R for 40 seconds after unlocking the vehicle
with the SmartKey
The exterior lighting switches off if you
open the driver’s door.
R for 15 seconds after switching off the
engine and closing the doors
If the engine is switched off and then none
of the doors are opened, or if an open door
is not closed, the exterior lighting goes out
after 60 seconds.
If you activate the Locator Lighting
Locator Lighting
function, the following light up:
R the parking lamps
R the low-beam headlamps
R the license plate lamp
R the surround lighting in the exterior mirrors
X Press the =or; button on the
steering wheel to select the Settings
Settings
menu.
X Press the :or9 button to select the
Light
Light submenu.
X Press the abutton to confirm.
X Press the :or9 button to select the
Locator Lighting
Locator Lighting function.
You will see the selected setting: on onor
off
off.
X Press the abutton to save the setting. Deactivating the delayed switch-off
temporarily:
X
Select key position 0with the Start/Stop
button before leaving the vehicle.
X Select key position 2and then key position
0 again with the Start/Stop button
The delayed switch-off is deactivated.
Delayed switch-off is reactivated the next
time you start the engine.
Activating/deactivating the interior
lighting delayed switch-off
If you select key position 0with the Start/
Stop button when the Light. Delay
Light. Delay
function is activated, the interior lighting
lights up for approximately 20 seconds if it is
dark.
X Press the =or; button on the
steering wheel to select the Settings
Settings
menu.
X Press the :or9 button to select the
Light Light submenu.
X Press the abutton to confirm.
X Press the :or9 button to select the
Interior lighting delay sw. off
Interior lighting delay sw. off
function.
You will see the selected setting: Enabled Enabled
or Disabled
Disabled .
X Press the abutton to save the setting.
Vehicle
Activating/deactivating the automatic
door locking mechanism
If you select the Automatic Door Lock: Automatic Door Lock:
function, the vehicle is centrally locked above
a speed of around 9 mph(15 km/h).
i For further information on the automatic
locking feature, see (Y page 69).
X Press the =or; button on the
steering wheel to select the Settings
Settings
menu.
X Press the :or9 button to select the
Vehicle Vehicle submenu.
X Press the abutton to confirm. Displays and operation
155On-board computer and displays Z
ProCarManuals.com
Page 158 of 286
X
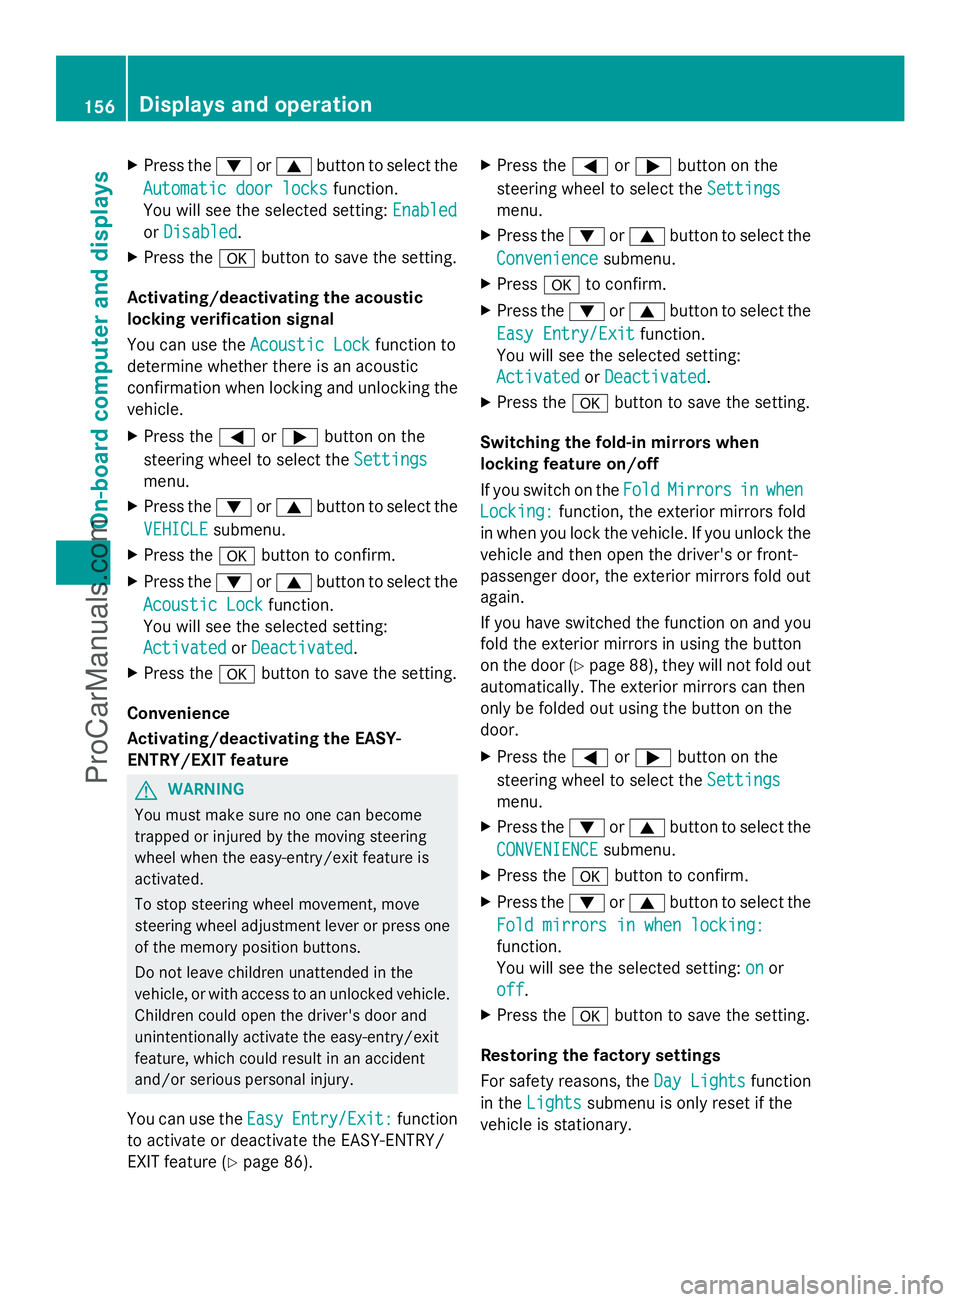
Press the :or9 button to select the
Automatic door locks
Automatic door locks function.
You will see the selected setting: Enabled
Enabled
or Disabled
Disabled .
X Press the abutton to save the setting.
Activating/deactivating the acoustic
locking verification signal
You can use the Acoustic Lock
Acoustic Lock function to
determine whether there is an acoustic
confirmation when locking and unlocking the
vehicle.
X Press the =or; button on the
steering wheel to select the Settings
Settings
menu.
X Press the :or9 button to select the
VEHICLE
VEHICLE submenu.
X Press the abutton to confirm.
X Press the :or9 button to select the
Acoustic Lock
Acoustic Lock function.
You will see the selected setting:
Activated Activated orDeactivated
Deactivated.
X Press the abutton to save the setting.
Convenience
Activating/deactivating the EASY-
ENTRY/EXIT feature G
WARNING
You must make sure no one can become
trapped or injured by the moving steering
wheel when the easy-entry/exit feature is
activated.
To stop steering wheel movement, move
steering wheel adjustment lever or press one
of the memory position buttons.
Do not leave children unattended in the
vehicle, or with access to an unlocked vehicle.
Children could open the driver's door and
unintentionally activate the easy-entry/exit
feature, which could result in an accident
and/or serious personal injury.
You can use the Easy EasyEntry/Exit:
Entry/Exit: function
to activate or deactivate the EASY-ENTRY/
EXIT feature (Y page 86). X
Press the =or; button on the
steering wheel to select the Settings Settings
menu.
X Press the :or9 button to select the
Convenience
Convenience submenu.
X Press ato confirm.
X Press the :or9 button to select the
Easy Entry/Exit
Easy Entry/Exit function.
You will see the selected setting:
Activated Activated orDeactivated
Deactivated.
X Press the abutton to save the setting.
Switching the fold-in mirrors when
locking feature on/off
If you switch on the Fold FoldMirrors
Mirrors in
inwhen
when
Locking:
Locking: function, the exterior mirrors fold
in when you lock the vehicle. If you unlock the
vehicle and then open the driver's or front-
passenger door, the exterior mirrors fold out
again.
If you have switched the function on and you
fold the exterior mirrors in using the button
on the door (Y page 88), they will not fold out
automatically. The exterior mirrors can then
only be folded out using the button on the
door.
X Press the =or; button on the
steering wheel to select the Settings
Settings
menu.
X Press the :or9 button to select the
CONVENIENCE CONVENIENCE submenu.
X Press the abutton to confirm.
X Press the :or9 button to select the
Fold mirrors in when locking:
Fold mirrors in when locking:
function.
You will see the selected setting: on
on or
off off.
X Press the abutton to save the setting.
Restoring the factory settings
For safety reasons, the Day Lights Day Lightsfunction
in the Lights
Lights submenu is only reset if the
vehicle is stationary. 156
Displays and operationOn-board computer and displays
ProCarManuals.com
Page 164 of 286
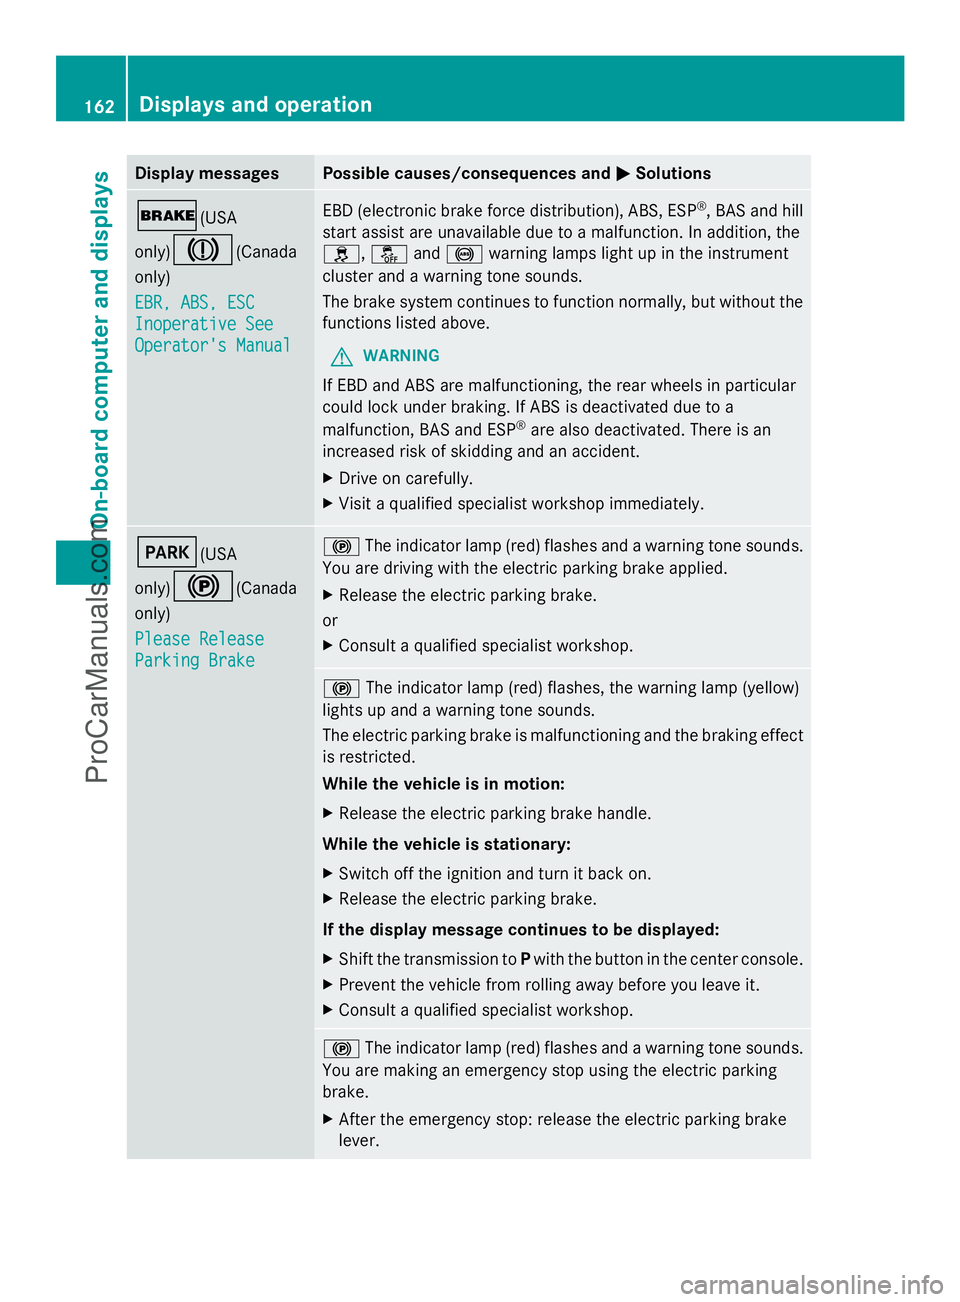
Display messages Possible causes/consequences and
M
MSolutions $(USA
only)
J(Canada
only)
EBR, ABS, ESC EBR, ABS, ESC
Inoperative See Inoperative See
Operator's Manual Operator's Manual EBD (electronic brake force distribution), ABS, ESP
®
, BAS and hill
start assist are unavailable due to a malfunction. In addition, the
h, åand! warning lamps light up in the instrument
cluster and a warning tone sounds.
The brake system continues to function normally, but without the
functions listed above.
G WARNING
If EBD and ABS are malfunctioning, the rear wheels in particular
could lock under braking. If ABS is deactivated due to a
malfunction, BAS and ESP ®
are also deactivated. There is an
increased risk of skidding and an accident.
X Drive on carefully.
X Visit a qualified specialist workshop immediately. F(USA
only)
!(Canada
only)
Please Release Please Release
Parking Brake Parking Brake !
The indicator lamp (red) flashes and a warning tone sounds.
You are driving with the electric parking brake applied.
X Release the electric parking brake.
or
X Consult a qualified specialist workshop. !
The indicator lamp (red) flashes, the warning lamp (yellow)
lights up and a warning tone sounds.
The electric parking brake is malfunctioning and the braking effect
is restricted.
While the vehicle is in motion:
X Release the electric parking brake handle.
While the vehicle is stationary:
X Switch off the ignition and turn it back on.
X Release the electric parking brake.
If the display message continues to be displayed:
X Shift the transmission to Pwith the button in the center console.
X Prevent the vehicle from rolling away before you leave it.
X Consult a qualified specialist workshop. !
The indicator lamp (red) flashes and a warning tone sounds.
You are making an emergency stop using the electric parking
brake.
X After the emergency stop: release the electric parking brake
lever. 162
Displays and operationOn-board compu
ter and displays
ProCarManuals.com
Page 165 of 286
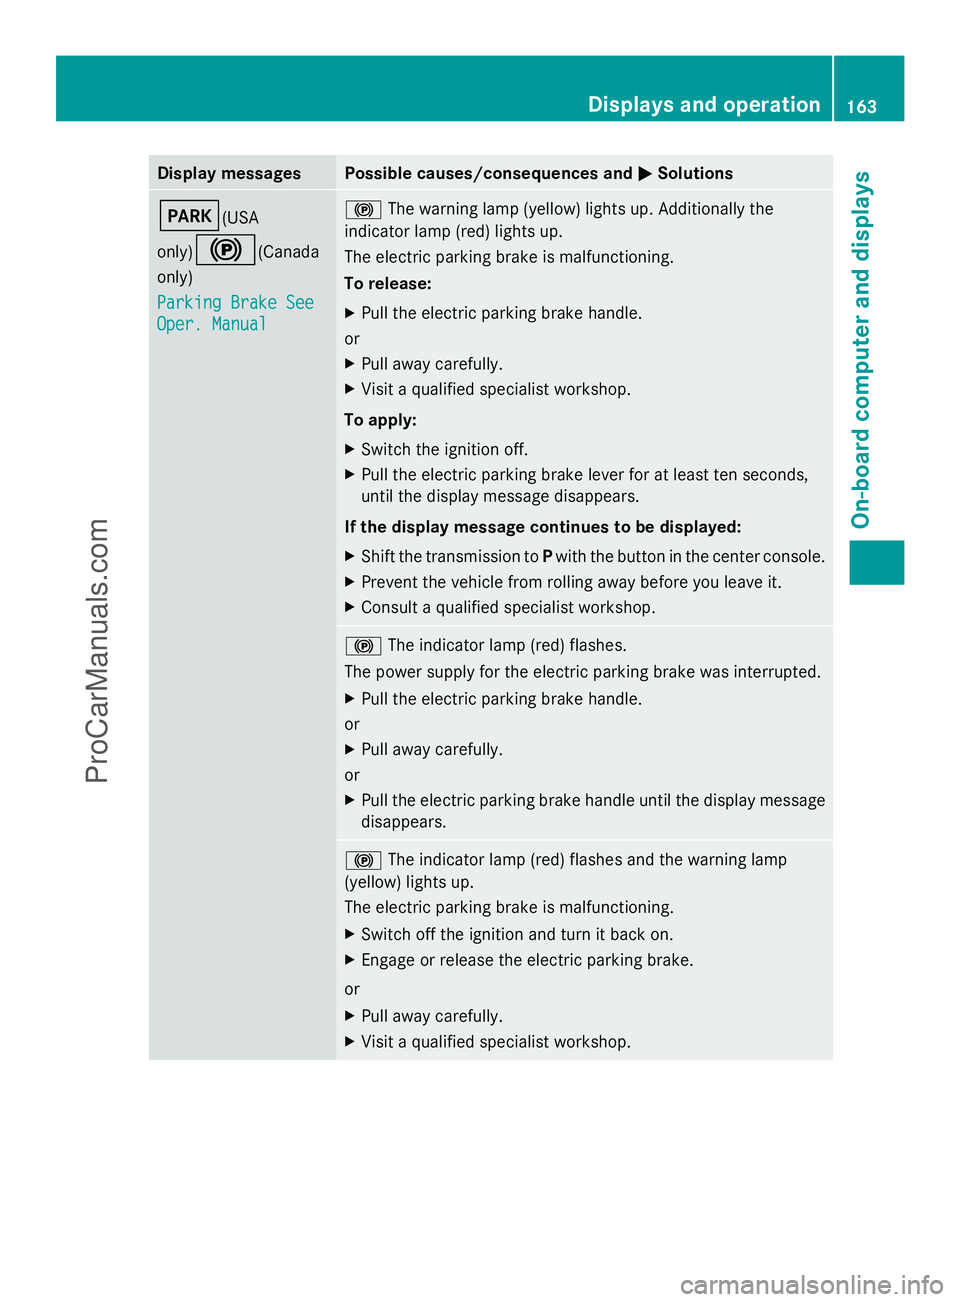
Display messages Possible causes/consequences and
M
MSolutions F(USA
only)
!(Canada
only)
Parking Brake See Parking Brake See
Oper. Manual Oper. Manual !
The warning lamp (yellow) lights up. Additionally the
indicator lamp (red) lights up.
The electric parking brake is malfunctioning.
To release:
X Pull the electric parking brake handle.
or
X Pull away carefully.
X Visit a qualified specialist workshop.
To apply:
X Switch the ignition off.
X Pull the electric parking brake lever for at least ten seconds,
until the display message disappears.
If the display message continues to be displayed:
X Shift the transmission to Pwith the button in the center console.
X Prevent the vehicle from rolling away before you leave it.
X Consult a qualified specialist workshop. !
The indicator lamp (red) flashes.
The power supply for the electric parking brake was interrupted.
X Pull the electric parking brake handle.
or
X Pull away carefully.
or
X Pull the electric parking brake handle until the display message
disappears. !
The indicator lamp (red) flashes and the warning lamp
(yellow) lights up.
The electric parking brake is malfunctioning.
X Switch off the ignition and turn it back on.
X Engage or release the electric parking brake.
or
X Pull away carefully.
X Visit a qualified specialist workshop. Displays and operation
163On-board computer and displays Z
ProCarManuals.com
Page 166 of 286
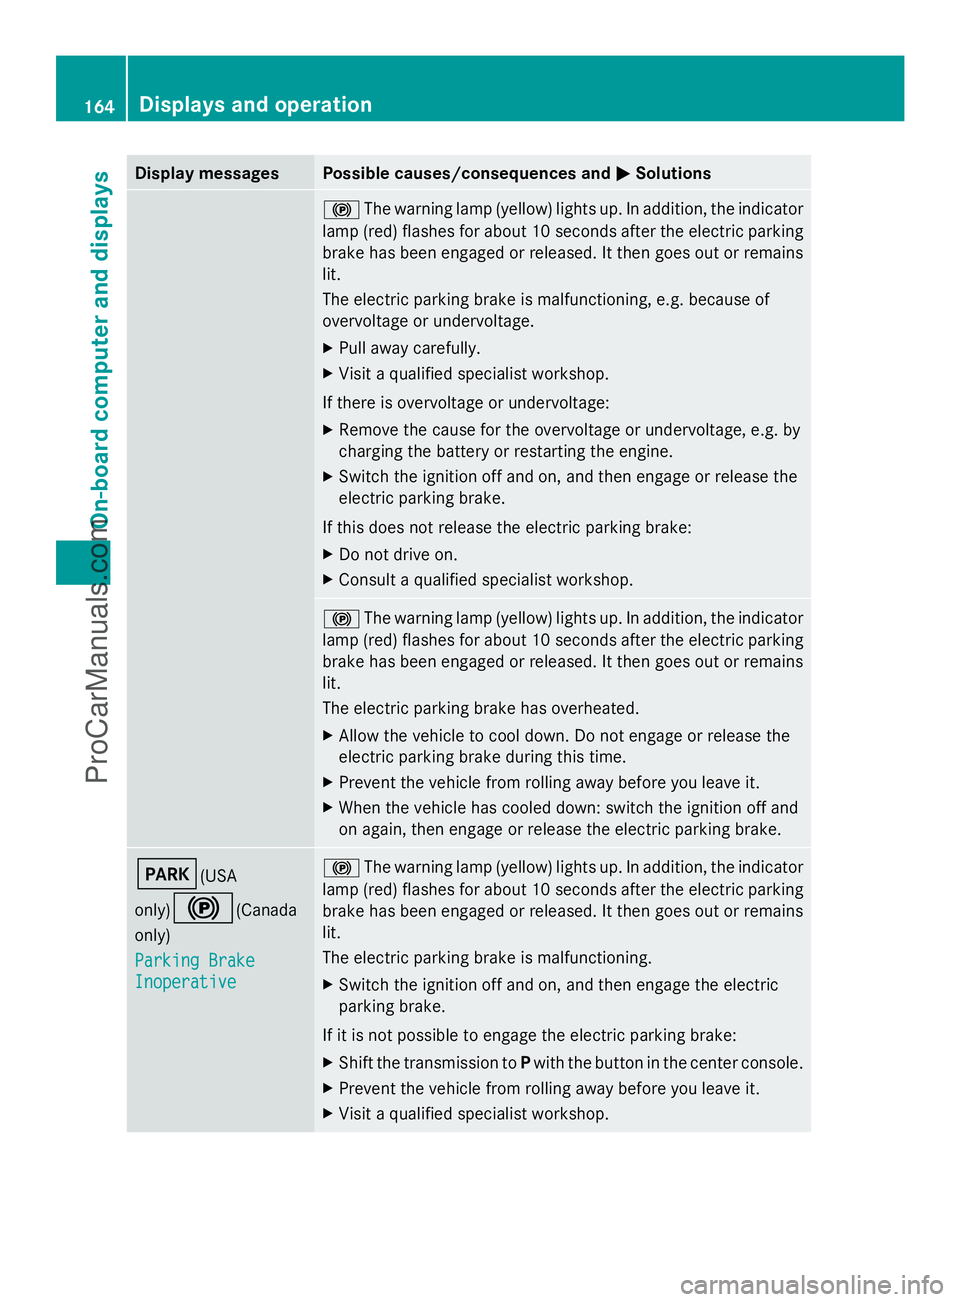
Display messages Possible causes/consequences and
M
MSolutions !
The warning lamp (yellow) lights up. In addition, the indicator
lamp (red) flashes for about 10 seconds after the electric parking
brake has been engaged or released. It then goes out or remains
lit.
The electric parking brake is malfunctioning, e.g. because of
overvoltage or undervoltage.
X Pull away carefully.
X Visit a qualified specialist workshop.
If there is overvoltage or undervoltage:
X Remove the cause for the overvoltage or undervoltage, e.g. by
charging the battery or restarting the engine.
X Switch the ignition off and on, and then engage or release the
electric parking brake.
If this does not release the electric parking brake:
X Do not drive on.
X Consult a qualified specialist workshop. !
The warning lamp (yellow) lights up. In addition, the indicator
lamp (red) flashes for about 10 seconds after the electric parking
brake has been engaged or released. It then goes out or remains
lit.
The electric parking brake has overheated.
X Allow the vehicle to cool down. Do not engage or release the
electric parking brake during this time.
X Prevent the vehicle from rolling away before you leave it.
X When the vehicle has cooled down: switch the ignition off and
on again, then engage or release the electric parking brake. F(USA
only)
!(Canada
only)
Parking Brake Parking Brake
Inoperative Inoperative !
The warning lamp (yellow) lights up. In addition, the indicator
lamp (red) flashes for about 10 seconds after the electric parking
brake has been engaged or released. It then goes out or remains
lit.
The electric parking brake is malfunctioning.
X Switch the ignition off and on, and then engage the electric
parking brake.
If it is not possible to engage the electric parking brake:
X Shift the transmission to Pwith the button in the center console.
X Prevent the vehicle from rolling away before you leave it.
X Visit a qualified specialist workshop. 164
Displays and operationOn-board compu
ter and displays
ProCarManuals.com
Page 167 of 286
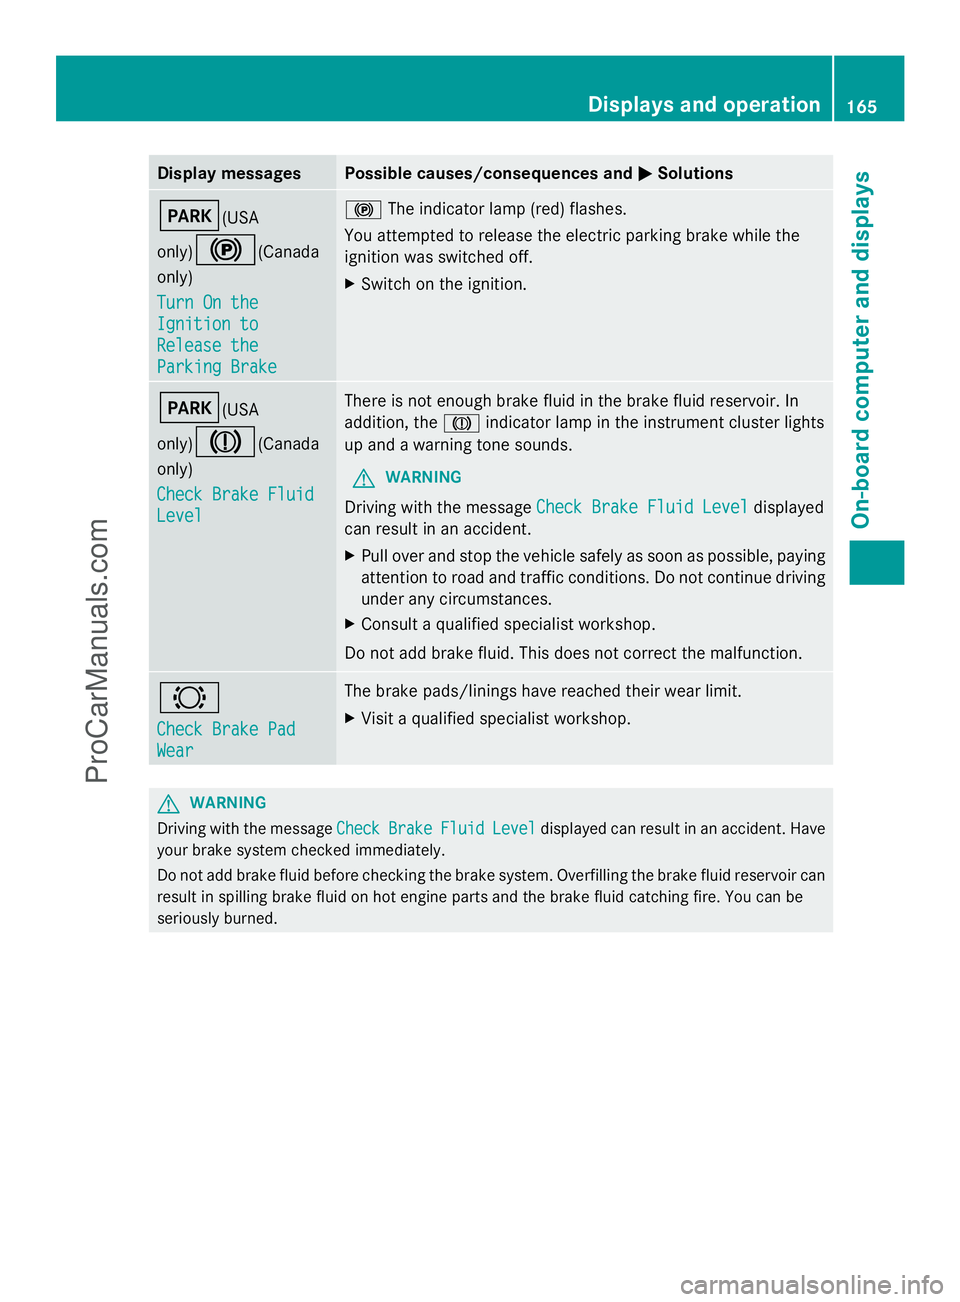
Display messages Possible causes/consequences and
M
MSolutions F(USA
only)
!(Canada
only)
Turn On the Turn On the
Ignition to Ignition to
Release the Release the
Parking Brake Parking Brake !
The indicator lamp (red) flashes.
You attempted to release the electric parking brake while the
ignition was switched off.
X Switch on the ignition. F(USA
only)
J(Canada
only)
Check Brake Fluid Check Brake Fluid
Level Level There is not enough brake fluid in the brake fluid reservoir. In
addition, the
Jindicator lamp in the instrument cluster lights
up and a warning tone sounds.
G WARNING
Driving with the message Check Brake Fluid Level Check Brake Fluid Level displayed
can result in an accident.
X Pull over and stop the vehicle safely as soon as possible, paying
attention to road and traffic conditions. Do not continue driving
under any circumstances.
X Consult a qualified specialist workshop.
Do not add brake fluid. This does not correct the malfunction. #
Check Brake Pad Check Brake Pad
Wear Wear The brake pads/linings have reached their wear limit.
X
Visit a qualified specialist workshop. G
WARNING
Driving with the message Check CheckBrake
BrakeFluid
FluidLevel
Leveldisplayed can result in an accident. Have
your brake system checked immediately.
Do not add brake fluid before checking the brake system. Overfilling the brake fluid reservoir can
result in spilling brake fluid on hot engine parts and the brake fluid catching fire. You can be
seriously burned. Displays and operation
165On-board computer and displays Z
ProCarManuals.com
Page 171 of 286
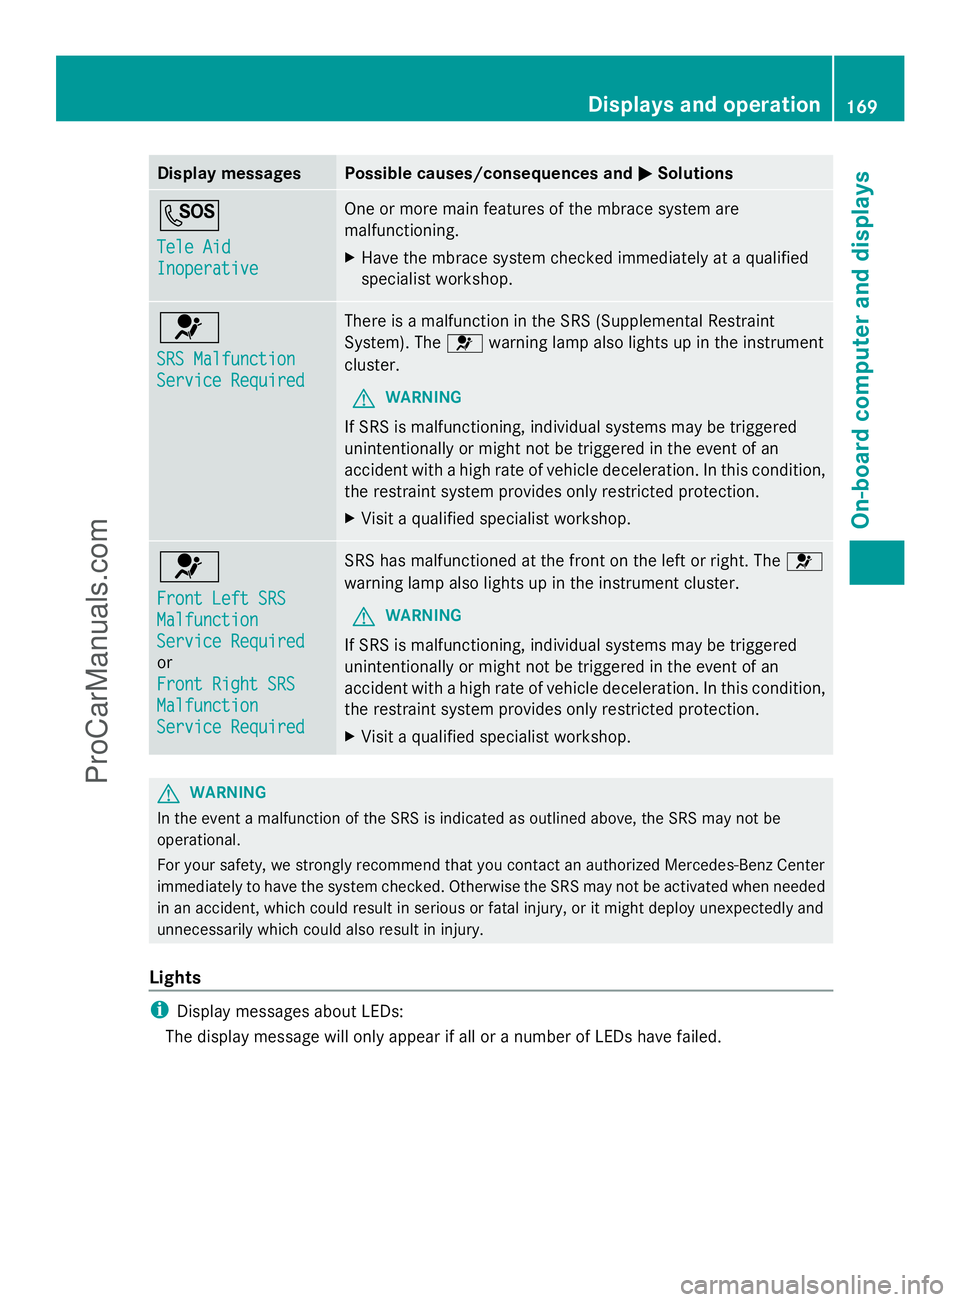
Display messages Possible causes/consequences and
M
MSolutions G
Tele Aid Tele Aid
Inoperative Inoperative One or more main features of the mbrace system are
malfunctioning.
X
Have the mbrace system checked immediately at a qualified
specialist workshop. 6
SRS Malfunction SRS Malfunction
Service Required Service Required There is a malfunction in the SRS (Supplemental Restraint
System). The
6warning lamp also lights up in the instrument
cluster.
G WARNING
If SRS is malfunctioning, individual systems may be triggered
unintentionally or might not be triggered in the event of an
accident with a high rate of vehicle deceleration. In this condition,
the restraint system provides only restricted protection.
X Visit a qualified specialist workshop. 6
Front Left SRS Front Left SRS
Malfunction Malfunction
Service Required Service Required
or
Front Right SRS Front Right SRS
Malfunction Malfunction
Service Required Service Required SRS has malfunctioned at the front on the left or right. The
6
warning lamp also lights up in the instrument cluster.
G WARNING
If SRS is malfunctioning, individual systems may be triggered
unintentionally or might not be triggered in the event of an
accident with a high rate of vehicle deceleration. In this condition,
the restraint system provides only restricted protection.
X Visit a qualified specialist workshop. G
WARNING
In the event a malfunction of the SRS is indicated as outlined above, the SRS may not be
operational.
For your safety, we strongly recommend that you contact an authorized Mercedes-Benz Center
immediately to have the system checked. Otherwise the SRS may not be activated when needed
in an accident, which could result in serious or fatal injury, or it might deploy unexpectedly and
unnecessarily which could also result in injury.
Lights i
Display messages about LEDs:
The display message will only appear if all or a number of LEDs have failed. Displays and operation
169On-board computer and displays Z
ProCarManuals.com