2013 MERCEDES-BENZ SLS-CLASS warning lights
[x] Cancel search: warning lightsPage 109 of 286
Defrosting the windows
Windows fogged up on the inside X
Activate the cooling with air
dehumidification function.
X Activate automatic mode.
X If the windows continue to fog up, activate
the defrosting function.
Windows fogged up on the outside X
Activate the windshield wipers.
X Press the _button repeatedly until the
O orP symbol appears in the
display.
i You should only select this setting until
the windshield is clear again. Rear window defroster
Activating/deactivating G
WARNING
Any accumulation of snow and ice should be
removed from the rear window before driving.
Visibility could otherwise be impaired,
endangering you and others.
The rear window defroster has a high current
draw. You should therefore switch it off as
soon as the rear window is clear. Otherwise,
the rear window defroster switches off
automatically after several minutes.
If the battery voltage is too low, the rear
window defroster may switch off.
X Select SmartKey position 2with the Start/
Stop button.
X Press the ¤button.
The indicator lamp in the ¤button lights
up or goes out. Problems with the rear window
defroster The rear window defroster has deactivated
prematurely or cannot be activated. The on-
board voltage is too low because too many
electrical consumers are switched on.
X
Switch off any consumers that are not
required, e.g. seat heating or interior
lighting.
When the battery is sufficiently charged,
the rear window defroster is activated
again automatically. Activating/deactivating air-
recirculation mode
You can deactivate the flow of fresh air if
unpleasant odors are entering the vehicle
from outside. The air already inside the
vehicle will then be recirculated. G
WARNING
Fogged windows impair visibility,
endangering you and others. If the windows
begin to fog on the inside, switching off the
air recirculation mode immediately should
clear interior window fogging. If interior
window fogging persists, make sure the air
conditioning is activated, or press the ¬
button.
X Select key position 2with the Start/Stop
button.
X To activate: press thegbutton.
The indicator lamp in the gbutton lights
up.
i Air-recirculation mode is activated
automatically at high outside
temperatures. When air-recirculation mode
is activated automatically, the indicator
lamp in the gbutton is not lit.
Outside air is added after about 30
minutes. Operating the climate cont
rol systems
107Climate control Z
ProCarManuals.com
Page 131 of 286
The transmission remains in
Nif:
R the SmartKey is in the ignition lock and
R you use the E-SELECT lever to shift the
transmission to Nbefore switching the
engine off
This still applies if you open the driver's or
front-passenger door.
Further information on transmission
position Nwhen operating with a SmartKey
is available in the "Car wash" section
(Y page 219). Electric parking brake
General notes G
WARNING
If you leave children unsupervised in the
vehicle, they could set it in motion by, for
example:
R releasing the parking brake
R shifting the automatic transmission out of
the parking position P
R starting the engine.
They could also operate the vehicle's
equipment. There is a risk of an accident and
injury.
When leaving the vehicle, always take the
SmartKey with you and lock the vehicle. Never
leave children unsupervised in the vehicle. Applying/releasing manually
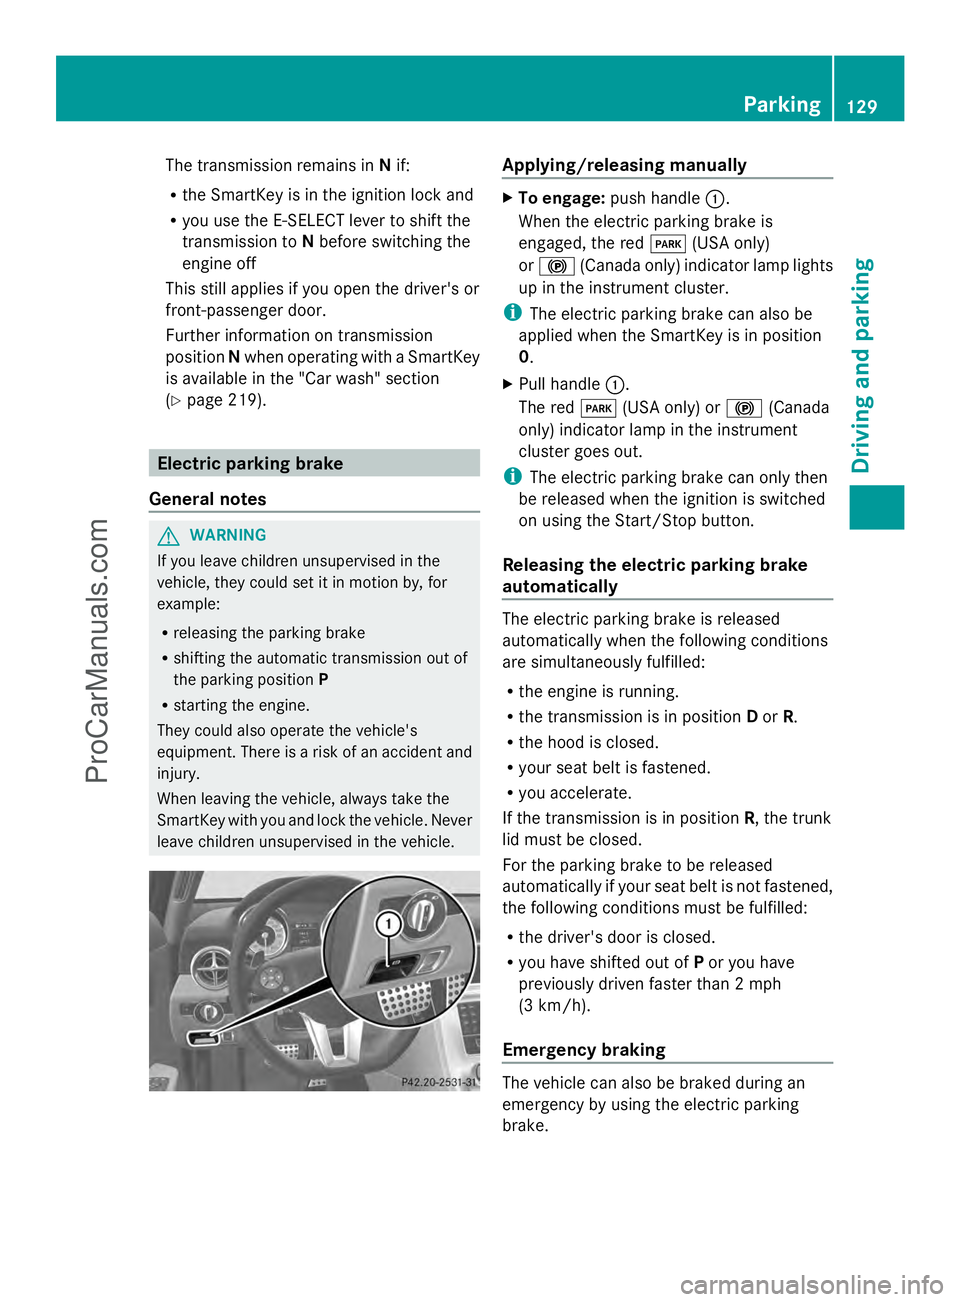
X
To engage: push handle :.
When the electric parking brake is
engaged, the red F(USA only)
or ! (Canada only) indicator lamp lights
up in the instrument cluster.
i The electric parking brake can also be
applied when the SmartKey is in position
0.
X Pull handle :.
The red F(USA only) or !(Canada
only) indicator lamp in the instrument
cluster goes out.
i The electric parking brake can only then
be released when the ignition is switched
on using the Start/Stop button.
Releasing the electric parking brake
automatically The electric parking brake is released
automatically when the following conditions
are simultaneously fulfilled:
R
the engine is running.
R the transmission is in position Dor R.
R the hood is closed.
R your seat belt is fastened.
R you accelerate.
If the transmission is in position R, the trunk
lid must be closed.
For the parking brake to be released
automatically if your seat belt is not fastened,
the following conditions must be fulfilled:
R the driver's door is closed.
R you have shifted out of Por you have
previously driven faster than 2 mph
(3 km/h).
Emergency braking The vehicle can also be braked during an
emergency by using the electric parking
brake. Parking
129Driving and parking Z
ProCarManuals.com
Page 134 of 286
Wet roads
If you have driven for a long time in heavy rain
without braking, there may be a delayed
reaction from the brakes when braking for the
first time. This may also occur after the
vehicle has been washed or driven through
deep water.
You have to depress the brake pedal more
firmly. Maintain a greater distance from the
vehicle in front.
After driving on a wet road or having the
vehicle washed, brake firmly while paying
attention to the traffic conditions. This will
warm up the brake discs, thereby drying them
more quickly and protecting them against
corrosion.
Limited braking performance on salt-
treated roads If you drive on salted roads, a layer of salt
residue may form on the brake discs and
brake pads. This can result in a significantly
longer braking distance.
R Brake occasionally to remove any possible
salt residue. Make sure that you do not
endanger other road users when doing so.
R Carefully depress the brake pedal and the
beginning and end of a journey.
R Maintain a greater distance to the vehicle
ahead.
Servicing the brakes !
If the red brake warning lamp lights up in
the instrument cluster and you hear a
warning tone while the engine is running,
the brake fluid level may be too low.
Observe additional warning messages in
the multifunction display.
The brake fluid level may be too low due to
brake pad wear or leaking brake lines.
Have the brake system checked
immediately. This work should be carried
out at an authorized Mercedes-Benz
Center. !
As the ESP ®
system operates
automatically, the engine and the ignition
must be switched off (the SmartKey must
be in position 0or 1in the ignition lock or
the Start/Stop button must be in position
0 or 1) if:
R the electric parking brake is tested using
a brake dynamometer.
R the vehicle is towed with one axle raised.
Braking triggered automatically by ESP ®
may seriously damage the brake system.
All checks and maintenance work on the
brake system must be carried out at a
qualified specialist workshop. Have this work
carried out at an authorized Mercedes-Benz
Center.
Have the brake pads replaced and the brake
fluid renewed at a qualified specialist
workshop, e.g. an authorized Mercedes-Benz
Center.
If the brake system has only been subject to
moderate loads, you should test the
functionality of your brakes at regular
intervals. To do so, press firmly on the brake
pedal when driving at a high speed. This
improves the grip of the brake pads.
You can find a description of Brake Assist
(BAS) on ( Ypage 55).
Mercedes-Benz recommends that you only
have brake pads/linings installed on your
vehicle which have been approved for
Mercedes-Benz vehicles or which correspond
to an equivalent quality standard. Brake
pads/linings which have not been approved
for Mercedes-Benz vehicles or which are not
of an equivalent quality could affect your
vehicle's operating safety.
Mercedes-Benz recommends that you only
use brake fluid that has been specially
approved for your vehicle by Mercedes-Benz,
or which corresponds to an equivalent quality
standard. Brake fluid which has not been
approved for Mercedes-Benz vehicles or
which is not of an equivalent quality could
affect your vehicle's operating safety. 132
Driving tipsDriving and parking
ProCarManuals.com
Page 138 of 286
vehicle's speed to the last speed stored
after you have finished overtaking.
Making adjustments in 1 mph
increments X
Briefly press the cruise control lever to the
pressure point, up :for a higher speed or
down ;for a lower speed.
The last speed stored is increased or
reduced.
Making adjustments in 10 mph
increments X
Briefly press the cruise control lever
beyond the pressure point, up :for a
higher speed or down ;for a lower speed.
The last speed stored is increased or
reduced.
Deactivating cruise control There are several ways to deactivate cruise
control:
X Briefly press the cruise control lever
forwards =.
or
X Brake.
Cruise control is automatically deactivated if:
R you press the electric parking brake
handle.
R you are driving below 20 mph (30 km/h).
R ESP ®
intervenes or you deactivate ESP ®
.
R you shift the transmission to Nwhile the
vehicle is in motion.
If cruise control is deactivated, you will hear
a warning tone. The "Cruise control off Cruise control off"
message is displayed in the multifunction
display for approximately five seconds.
i The last speed stored is cleared when you
switch off the engine. AMG adaptive sport suspension
system
General notes The electronically controlled damping system
works continuously. This improves driving
safety and ride comfort.
The damping is tuned individually to each
wheel and depends on:
R your driving style, e.g. sporty
R the road surface condition, e.g. bumps
R your individual selection of Sport, Sport +
or Comfort
If you select Comfort or Sport + mode and
restart the engine, the mode reverts to Sport.
i GT model: you can only choose between
Sport and Sport + modes. If you select
Sport + mode and restart the engine, the
mode reverts to Sport. Sport mode
The firmer suspension tuning in Sport mode
ensures even better contact with the road.
Select this mode when employing a sporty
driving style, e.g. on winding country roads.
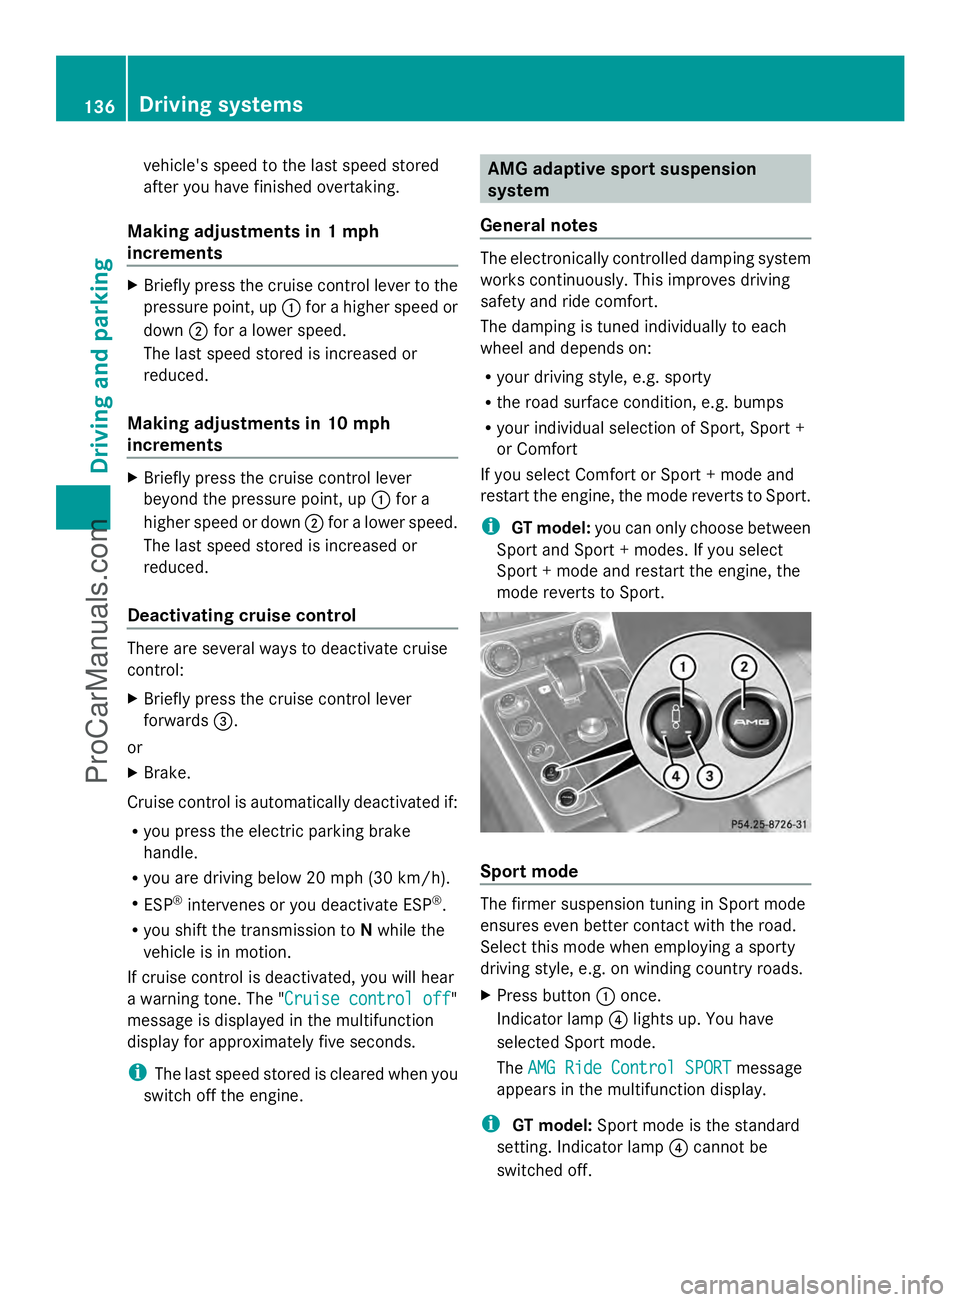
X
Press button :once.
Indicator lamp ?lights up. You have
selected Sport mode.
The AMG Ride Control SPORT AMG Ride Control SPORT message
appears in the multifunction display.
i GT model: Sport mode is the standard
setting. Indicator lamp ?cannot be
switched off. 136
Driving systemsDriving and parking
ProCarManuals.com
Page 141 of 286
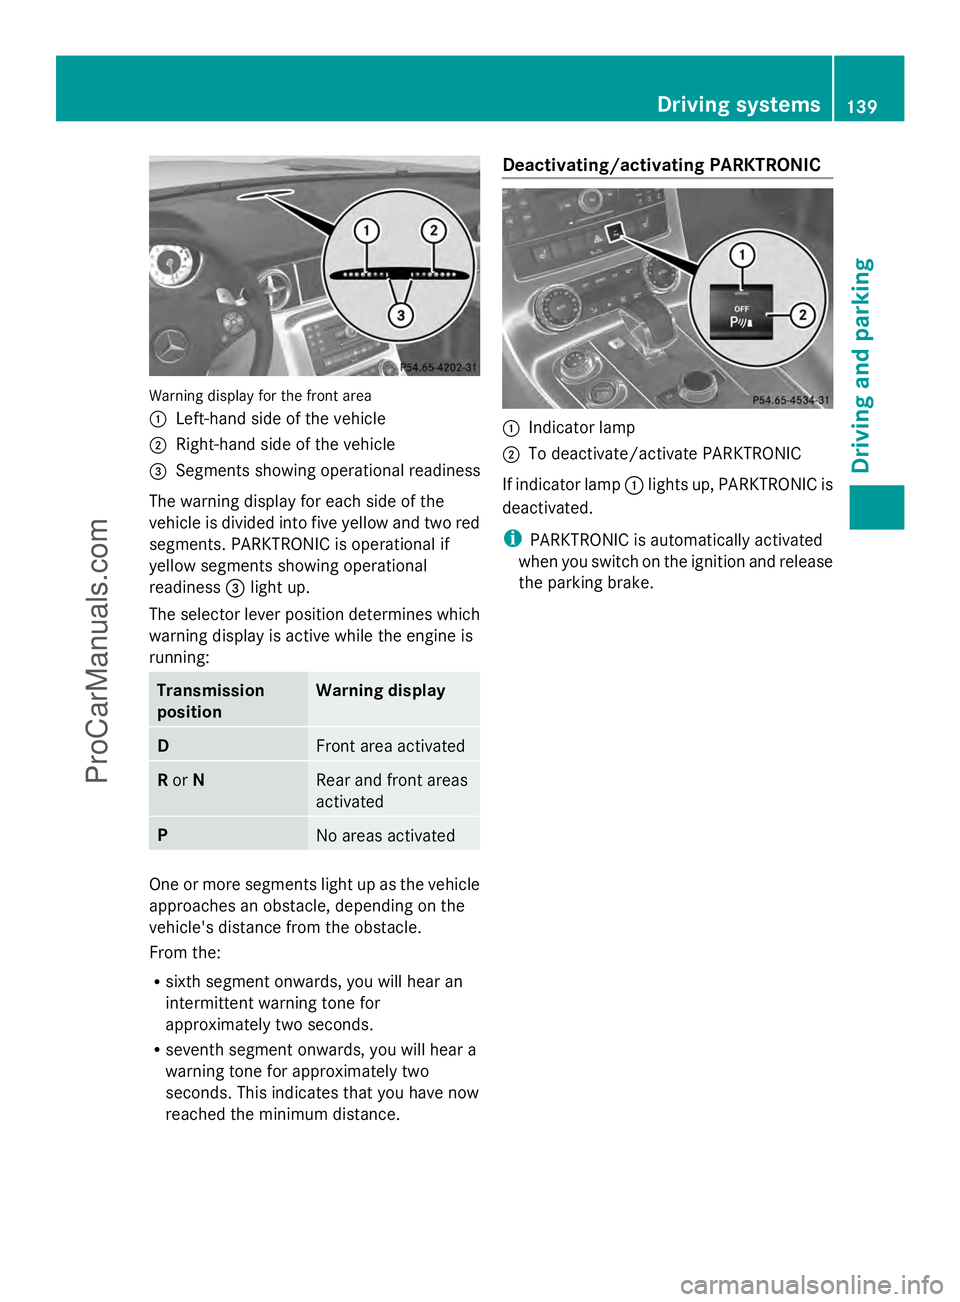
Warning display for the front area
:
Left-hand side of the vehicle
; Right-hand side of the vehicle
= Segments showing operational readiness
The warning display for each side of the
vehicle is divided into five yellow and two red
segments. PARKTRONIC is operational if
yellow segments showing operational
readiness =light up.
The selector lever position determines which
warning display is active while the engine is
running: Transmission
position Warning display
D
Front area activated
R
or N Rear and front areas
activated
P
No areas activated
One or more segments light up as the vehicle
approaches an obstacle, depending on the
vehicle's distance from the obstacle.
From the:
R sixth segment onwards, you will hear an
intermittent warning tone for
approximately two seconds.
R seventh segment onwards, you will hear a
warning tone for approximately two
seconds. This indicates that you have now
reached the minimum distance. Deactivating/activating PARKTRONIC
:
Indicator lamp
; To deactivate/activate PARKTRONIC
If indicator lamp :lights up, PARKTRONIC is
deactivated.
i PARKTRONIC is automatically activated
when you switch on the ignition and release
the parking brake. Driving systems
139Driving and parking Z
ProCarManuals.com
Page 142 of 286

Problems with PARKTRONIC
Problem Possible causes/consequences and
M
MSolutions Only the red segments
in the PARKTRONIC
warning displays are lit.
You also hear a warning
tone for approximately
two seconds.
PARKTRONIC is
deactivated after
approximately
20 seconds, and the
indicator lamp in the
PARKTRONIC button
lights up. PARKTRONIC has malfunctioned and has switched off.
X
If problems persist, have PARKTRONIC checked at a qualified
specialist workshop. Only the red segments
in the PARKTRONIC
warning displays are lit.
PARKTRONIC is
deactivated after
approximately 20
seconds. The PARKTRONIC sensors are dirty or there is interference.
X
Clean the PARKTRONIC sensors (Y page 224).
X Switch the ignition back on. The problem may be caused by an external source of radio or
ultrasound waves.
X
See if PARKTRONIC functions in a different location. Rear view camera
Important safety notes The rear view camera is only an aid. It is not
a replacement for your attention to your
immediate surroundings. You are always
responsible for safe maneuvering and
parking. When maneuvering or parking, make
sure that there are no persons, animals or
objects in the area in which you are
maneuvering.
Under the following circumstances, the rear
view camera will not function, or will function
in a limited manner:
R if the trunk lid is open
R in heavy rain, snow or fog
R at night or in very dark places
R if the camera is exposed to very bright light R
if the area is lit by fluorescent light or LED
lighting (the display may flicker)
R if there is a sudden change in temperature,
e.g. when driving into a heated garage in
winter
R if the camera lens is dirty or obstructed
R if the rear of your vehicle is damaged. In
this event, have the camera position and
setting checked at a qualified specialist
workshop.
General notes Rear view camera
:is an optical parking aid.
It shows the area behind your vehicle in the
COMAND display. 140
Driving systemsDriving and parking
ProCarManuals.com
Page 144 of 286
warranties, and is not permitted by the
FCC. Do not tamper with, alter, or use in
any non-approved way.
Any unauthorized modification to this
device could void the user’s authority to
operate the equipment.
Monitoring range of the sensors In particular, the detection of obstacles can
be impaired if:
R there is dirt on the sensors or anything else
covering the sensors.
R there is poor visibility, e.g. due to fog, heavy
rain or snow.
R a narrow vehicle, e.g. a motorbike or
bicycle, is traveling in front.
R the road has very wide lanes.
R the road has narrow lanes.
R you are not driving in the middle of the lane.
R there are barriers or similar lane borders.
Vehicles in the monitoring range are then not
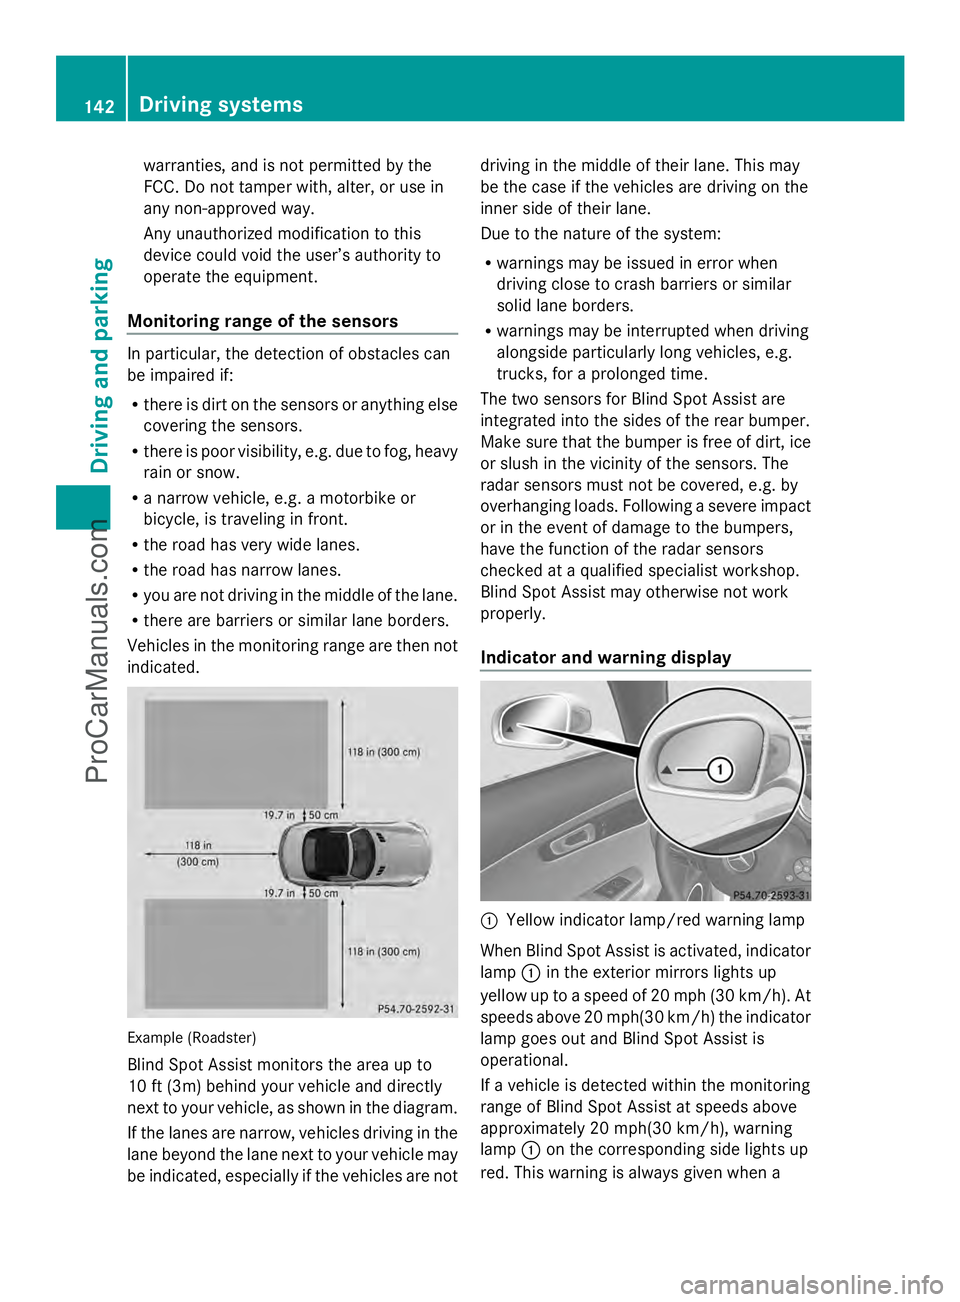
indicated. Example (Roadster)
Blind Spot Assist monitors the area up to
10 ft (3m) behind your vehicle and directly
next to your vehicle, as shown in the diagram.
If the lanes are narrow, vehicles driving in the
lane beyond the lane next to your vehicle may
be indicated, especially if the vehicles are not driving in the middle of their lane. This may
be the case if the vehicles are driving on the
inner side of their lane.
Due to the nature of the system:
R
warnings may be issued in error when
driving close to crash barriers or similar
solid lane borders.
R warnings may be interrupted when driving
alongside particularly long vehicles, e.g.
trucks, for a prolonged time.
The two sensors for Blind Spot Assist are
integrated into the sides of the rear bumper.
Make sure that the bumper is free of dirt, ice
or slush in the vicinity of the sensors. The
radar sensors must not be covered, e.g. by
overhanging loads. Following a severe impact
or in the event of damage to the bumpers,
have the function of the radar sensors
checked at a qualified specialist workshop.
Blind Spot Assist may otherwise not work
properly.
Indicator and warning display :
Yellow indicator lamp/red warning lamp
When Blind Spot Assist is activated, indicator
lamp :in the exterior mirrors lights up
yellow up to a speed of 20 mph (30 km/h). At
speeds above 20 mph(30 km/h) the indicator
lamp goes out and Blind Spot Assist is
operational.
If a vehicle is detected within the monitoring
range of Blind Spot Assist at speeds above
approximately 20 mph(30 km/h), warning
lamp :on the corresponding side lights up
red. This warning is always given when a 142
Driving systemsDriving and parking
ProCarManuals.com
Page 158 of 286
X
Press the :or9 button to select the
Automatic door locks
Automatic door locks function.
You will see the selected setting: Enabled
Enabled
or Disabled
Disabled .
X Press the abutton to save the setting.
Activating/deactivating the acoustic
locking verification signal
You can use the Acoustic Lock
Acoustic Lock function to
determine whether there is an acoustic
confirmation when locking and unlocking the
vehicle.
X Press the =or; button on the
steering wheel to select the Settings
Settings
menu.
X Press the :or9 button to select the
VEHICLE
VEHICLE submenu.
X Press the abutton to confirm.
X Press the :or9 button to select the
Acoustic Lock
Acoustic Lock function.
You will see the selected setting:
Activated Activated orDeactivated
Deactivated.
X Press the abutton to save the setting.
Convenience
Activating/deactivating the EASY-
ENTRY/EXIT feature G
WARNING
You must make sure no one can become
trapped or injured by the moving steering
wheel when the easy-entry/exit feature is
activated.
To stop steering wheel movement, move
steering wheel adjustment lever or press one
of the memory position buttons.
Do not leave children unattended in the
vehicle, or with access to an unlocked vehicle.
Children could open the driver's door and
unintentionally activate the easy-entry/exit
feature, which could result in an accident
and/or serious personal injury.
You can use the Easy EasyEntry/Exit:
Entry/Exit: function
to activate or deactivate the EASY-ENTRY/
EXIT feature (Y page 86). X
Press the =or; button on the
steering wheel to select the Settings Settings
menu.
X Press the :or9 button to select the
Convenience
Convenience submenu.
X Press ato confirm.
X Press the :or9 button to select the
Easy Entry/Exit
Easy Entry/Exit function.
You will see the selected setting:
Activated Activated orDeactivated
Deactivated.
X Press the abutton to save the setting.
Switching the fold-in mirrors when
locking feature on/off
If you switch on the Fold FoldMirrors
Mirrors in
inwhen
when
Locking:
Locking: function, the exterior mirrors fold
in when you lock the vehicle. If you unlock the
vehicle and then open the driver's or front-
passenger door, the exterior mirrors fold out
again.
If you have switched the function on and you
fold the exterior mirrors in using the button
on the door (Y page 88), they will not fold out
automatically. The exterior mirrors can then
only be folded out using the button on the
door.
X Press the =or; button on the
steering wheel to select the Settings
Settings
menu.
X Press the :or9 button to select the
CONVENIENCE CONVENIENCE submenu.
X Press the abutton to confirm.
X Press the :or9 button to select the
Fold mirrors in when locking:
Fold mirrors in when locking:
function.
You will see the selected setting: on
on or
off off.
X Press the abutton to save the setting.
Restoring the factory settings
For safety reasons, the Day Lights Day Lightsfunction
in the Lights
Lights submenu is only reset if the
vehicle is stationary. 156
Displays and operationOn-board computer and displays
ProCarManuals.com