2013 MERCEDES-BENZ SLS-CLASS center console
[x] Cancel search: center consolePage 166 of 286
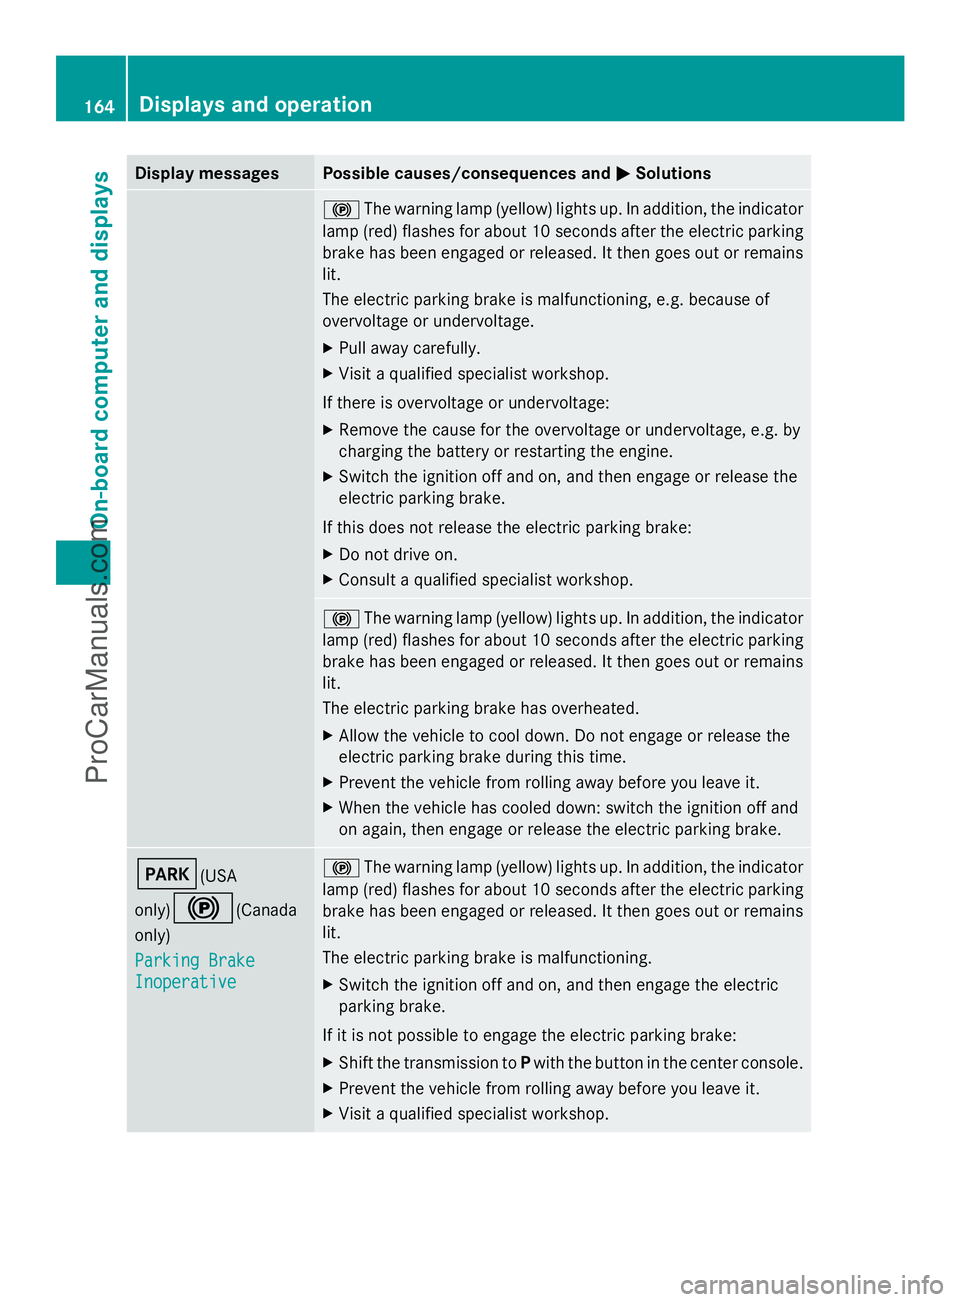
Display messages Possible causes/consequences and
M
MSolutions !
The warning lamp (yellow) lights up. In addition, the indicator
lamp (red) flashes for about 10 seconds after the electric parking
brake has been engaged or released. It then goes out or remains
lit.
The electric parking brake is malfunctioning, e.g. because of
overvoltage or undervoltage.
X Pull away carefully.
X Visit a qualified specialist workshop.
If there is overvoltage or undervoltage:
X Remove the cause for the overvoltage or undervoltage, e.g. by
charging the battery or restarting the engine.
X Switch the ignition off and on, and then engage or release the
electric parking brake.
If this does not release the electric parking brake:
X Do not drive on.
X Consult a qualified specialist workshop. !
The warning lamp (yellow) lights up. In addition, the indicator
lamp (red) flashes for about 10 seconds after the electric parking
brake has been engaged or released. It then goes out or remains
lit.
The electric parking brake has overheated.
X Allow the vehicle to cool down. Do not engage or release the
electric parking brake during this time.
X Prevent the vehicle from rolling away before you leave it.
X When the vehicle has cooled down: switch the ignition off and
on again, then engage or release the electric parking brake. F(USA
only)
!(Canada
only)
Parking Brake Parking Brake
Inoperative Inoperative !
The warning lamp (yellow) lights up. In addition, the indicator
lamp (red) flashes for about 10 seconds after the electric parking
brake has been engaged or released. It then goes out or remains
lit.
The electric parking brake is malfunctioning.
X Switch the ignition off and on, and then engage the electric
parking brake.
If it is not possible to engage the electric parking brake:
X Shift the transmission to Pwith the button in the center console.
X Prevent the vehicle from rolling away before you leave it.
X Visit a qualified specialist workshop. 164
Displays and operationOn-board compu
ter and displays
ProCarManuals.com
Page 185 of 286
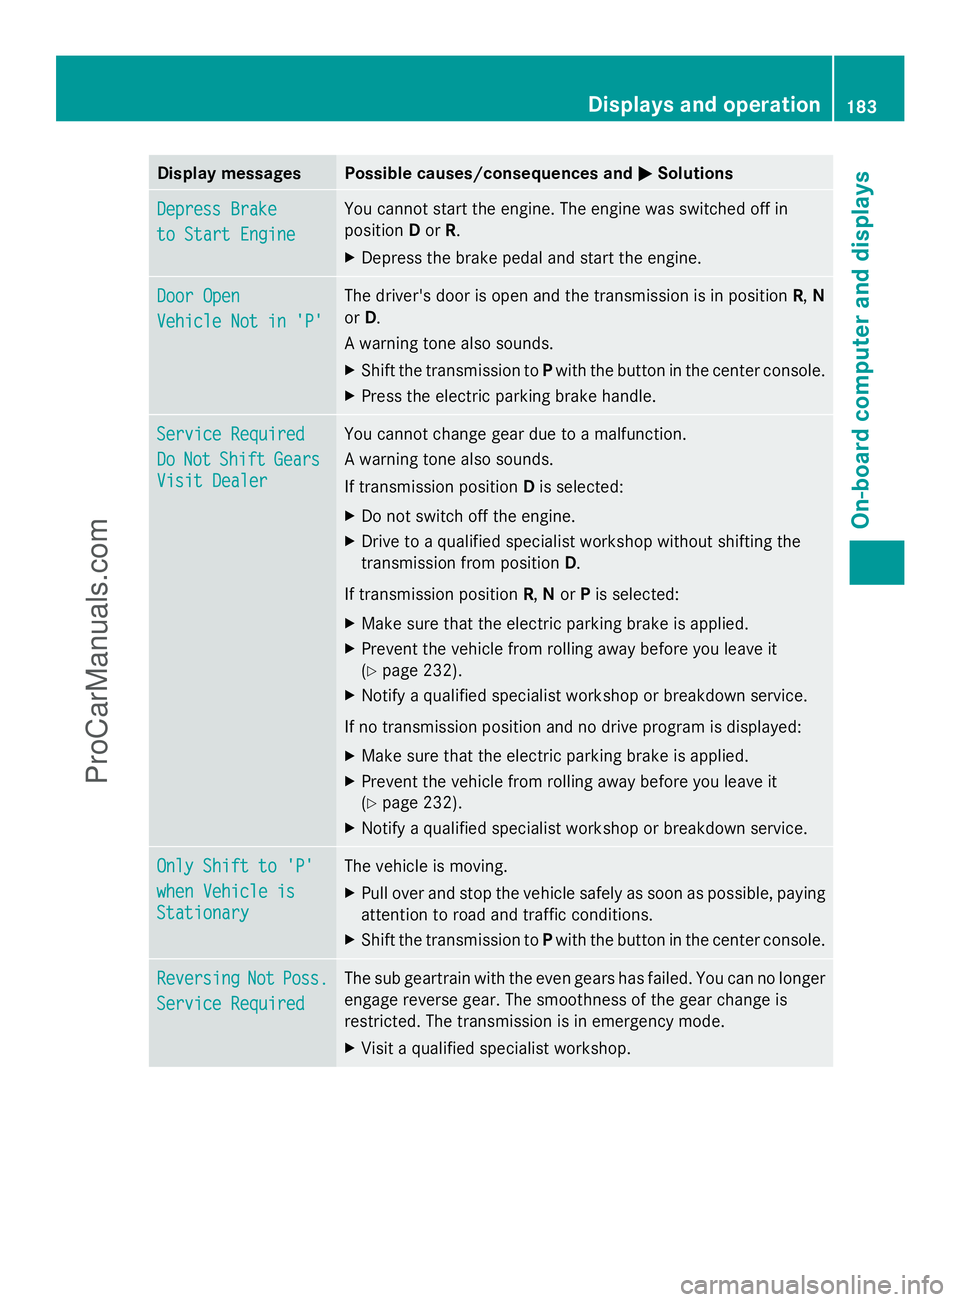
Display messages Possible causes/consequences and
M
MSolutions Depress Brake
Depress Brake
to Start Engine to Start Engine You cannot start the engine. The engine was switched off in
position
Dor R.
X Depress the brake pedal and start the engine. Door Open Door Open
Vehicle Not in 'P' Vehicle Not in 'P' The driver's door is open and the transmission is in position
R,N
or D.
A warning tone also sounds.
X Shift the transmission to Pwith the button in the center console.
X Press the electric parking brake handle. Service Required Service Required
Do Do
Not
Not Shift
Shift Gears
Gears
Visit Dealer
Visit Dealer You cannot change gear due to a malfunction.
A warning tone also sounds.
If transmission position
Dis selected:
X Do not switch off the engine.
X Drive to a qualified specialist workshop without shifting the
transmission from position D.
If transmission position R,Nor Pis selected:
X Make sure that the electric parking brake is applied.
X Prevent the vehicle from rolling away before you leave it
(Y page 232).
X Notify a qualified specialist workshop or breakdown service.
If no transmission position and no drive program is displayed:
X Make sure that the electric parking brake is applied.
X Prevent the vehicle from rolling away before you leave it
(Y page 232).
X Notify a qualified specialist workshop or breakdown service. Only Shift to 'P' Only Shift to 'P'
when Vehicle is when Vehicle is
Stationary Stationary The vehicle is moving.
X
Pull over and stop the vehicle safely as soon as possible, paying
attention to road and traffic conditions.
X Shift the transmission to Pwith the button in the center console. Reversing Reversing
Not
NotPoss.
Poss.
Service Required
Service Required The sub geartrain with the even gears has failed. You can no longer
engage reverse gear. The smoothness of the gear change is
restricted. The transmission is in emergency mode.
X
Visit a qualified specialist workshop. Displays and operation
183On-board computer and displays Z
ProCarManuals.com
Page 199 of 286
iPod
®
or USB device (see the separate
COMAND operating instructions).
i There is a 12 V power socket located in
the glove box.
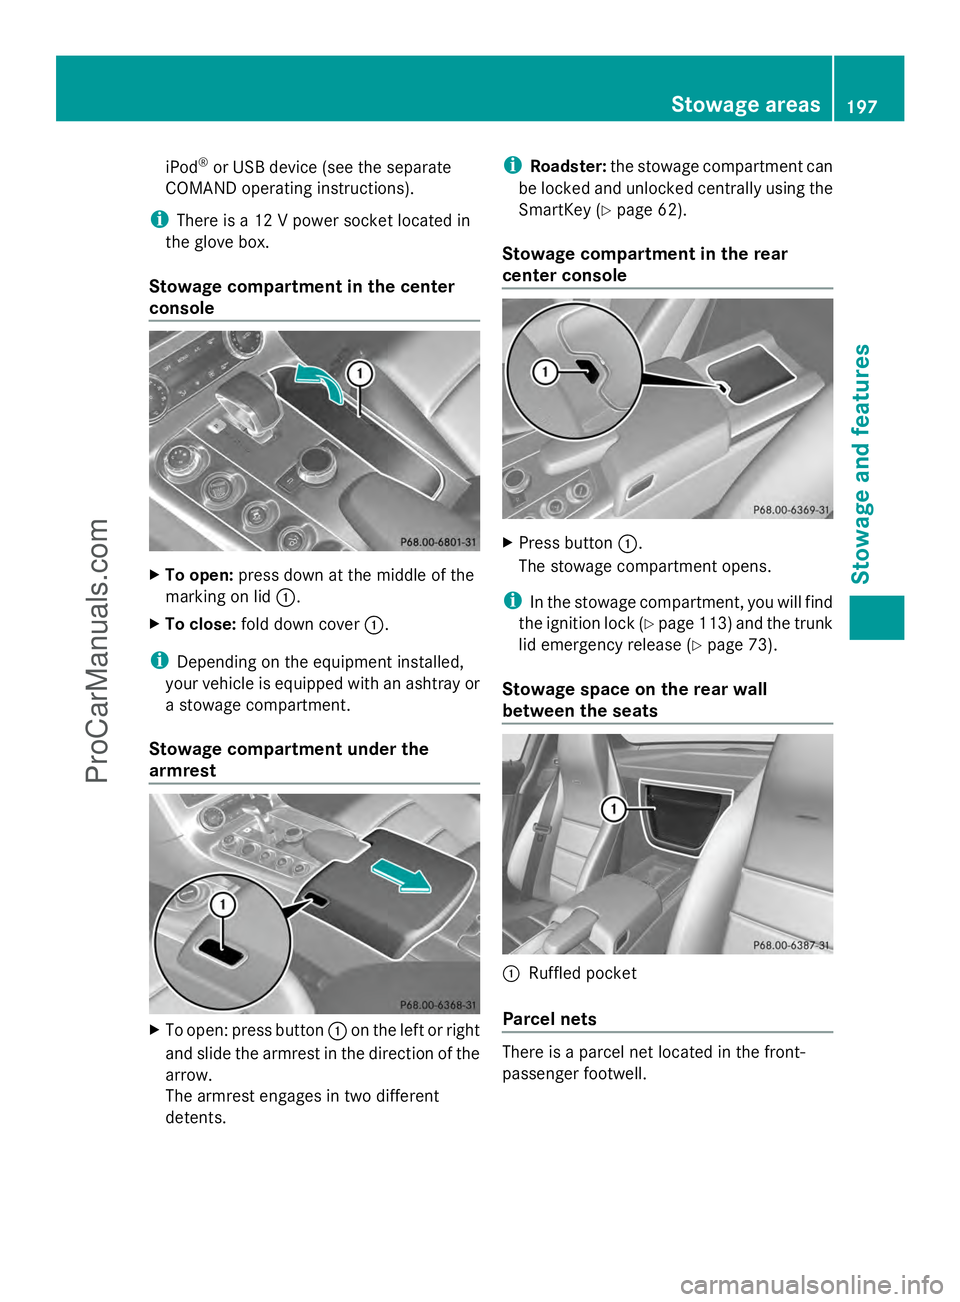
Stowage compartment in the center
console X
To open: press down at the middle of the
marking on lid :.
X To close: fold down cover :.
i Depending on the equipment installed,
your vehicle is equipped with an ashtray or
a stowage compartment.
Stowage compartment under the
armrest X
To open: press button :on the left or right
and slide the armrest in the direction of the
arrow.
The armrest engages in two different
detents. i
Roadster: the stowage compartment can
be locked and unlocked centrally using the
SmartKey (Y page 62).
Stowage compartment in the rear
center console X
Press button :.
The stowage compartment opens.
i In the stowage compartment, you will find
the ignition lock (Y page 113)and the trunk
lid emergency release (Y page 73).
Stowage space on the rear wall
between the seats :
Ruffled pocket
Parcel nets There is a parcel net located in the front-
passenger footwell. Stowage areas
197Stowage an d features Z
ProCarManuals.com
Page 200 of 286
Features
Cup holder
Important safety notes G
WARNING
In order to help prevent spilling liquids on
vehicle occupants and/or vehicle equipment,
only use containers that fit into the cup
holder. Use lids on open containers and do
not fill containers to a height where the
contents, especially hot liquids, could spill
during braking, vehicle maneuvers, or in an
accident. Liquids spilled on vehicle occupants
may cause serious personal injury. Liquids
spilled on vehicle equipment may cause
damage not covered by the Mercedes-Benz
Limited Warranty.
When not in use, keep the cup holder closed.
An open cup holder may cause injury to you
or others when contacted during braking,
vehicle maneuvers, or in an accident.
Keep in mind that objects placed in the cup
holder may come loose during braking,
vehicle maneuvers, or in an accident and be
thrown around in the vehicle interior. Objects
thrown around in the vehicle interior may
cause an accident and/or serious personal
injury.
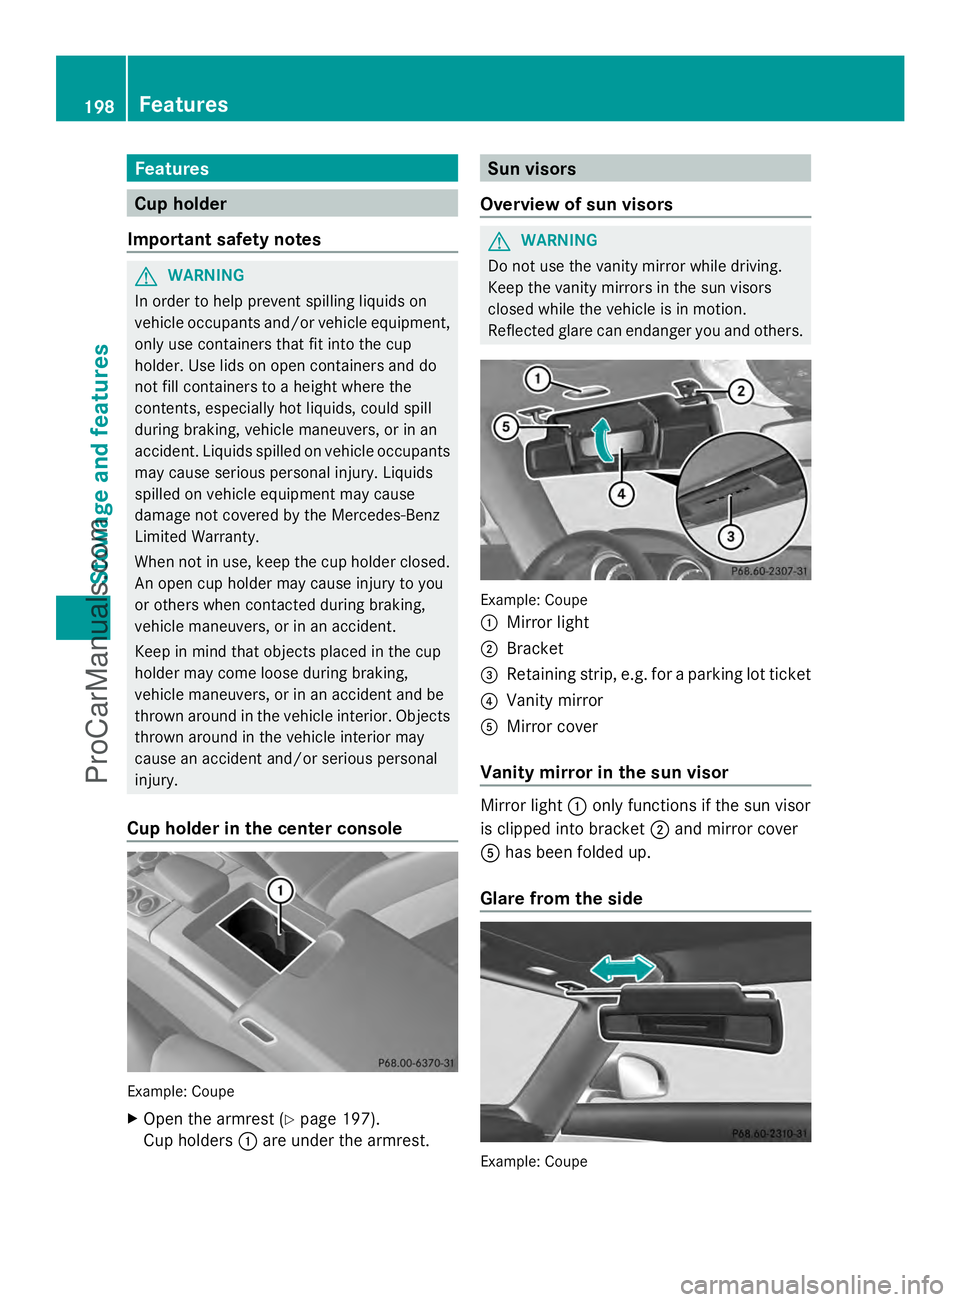
Cup holder in the center console Example: Coupe
X
Open the armrest (Y page 197).
Cup holders :are under the armrest. Sun visors
Overview of sun visors G
WARNING
Do not use the vanity mirror while driving.
Keep the vanity mirrors in the sun visors
closed while the vehicle is in motion.
Reflected glare can endanger you and others. Example: Coupe
:
Mirror light
; Bracket
= Retaining strip, e.g. for a parking lot ticket
? Vanity mirror
A Mirror cover
Vanity mirror in the sun visor Mirror light
:only functions if the sun visor
is clipped into bracket ;and mirror cover
A has been folded up.
Glare from the side Example: Coupe198
FeaturesStowage and featu
res
ProCarManuals.com
Page 202 of 286
Example: Coupe
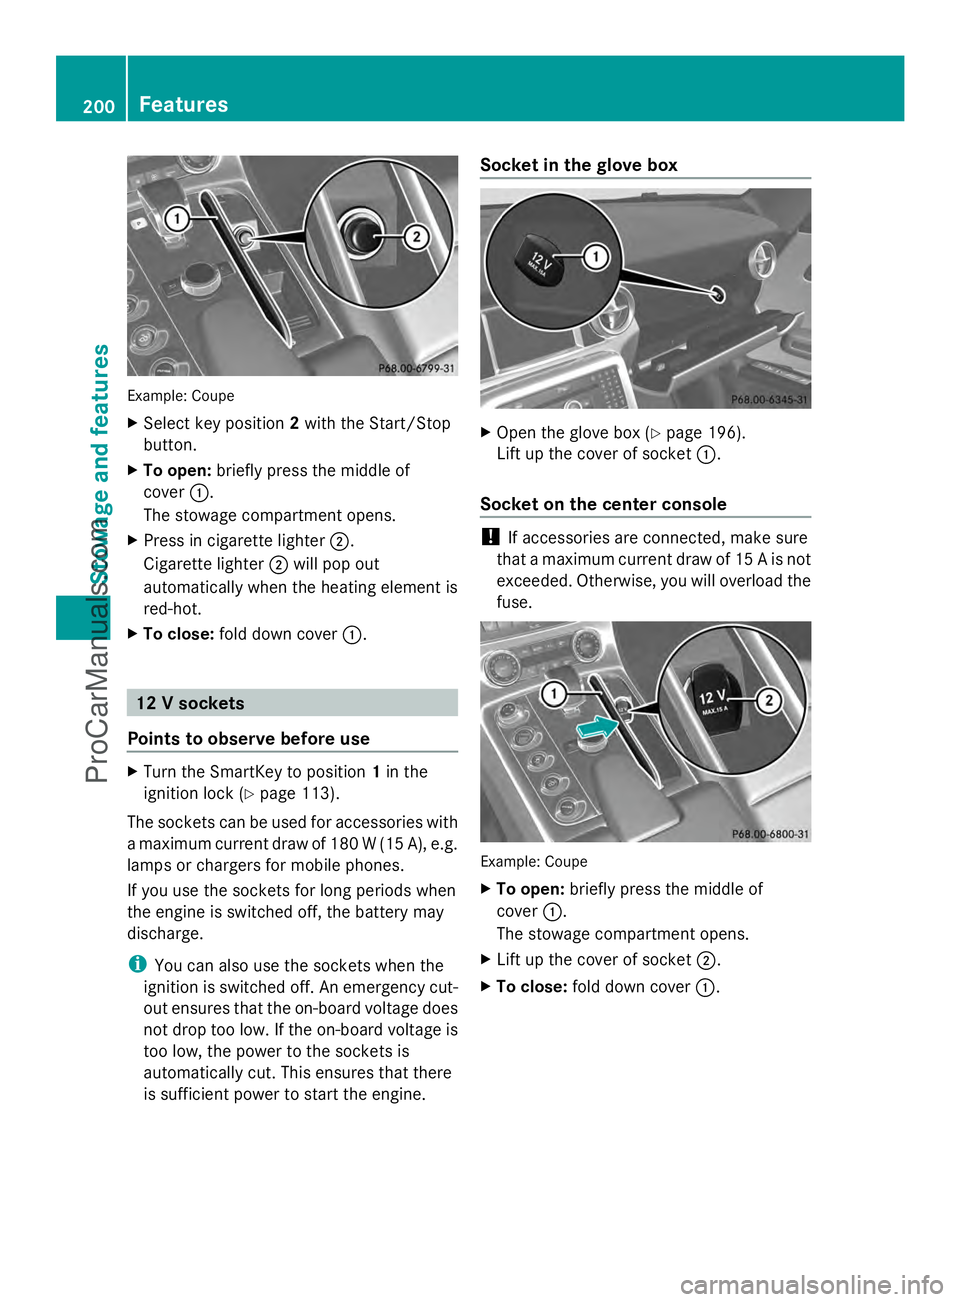
X
Select key position 2with the Start/Stop
button.
X To open: briefly press the middle of
cover :.
The stowage compartment opens.
X Press in cigarette lighter ;.
Cigarette lighter ;will pop out
automatically when the heating element is
red-hot.
X To close: fold down cover :. 12 V sockets
Points to observe before use X
Turn the SmartKey to position 1in the
ignition lock (Y page 113).
The sockets can be used for accessories with
a maximum current draw of 180 W (15 A), e.g.
lamps or chargers for mobile phones.
If you use the sockets for long periods when
the engine is switched off, the battery may
discharge.
i You can also use the sockets when the
ignition is switched off. An emergency cut-
out ensures that the on-board voltage does
not drop too low. If the on-board voltage is
too low, the power to the sockets is
automatically cut. This ensures that there
is sufficient power to start the engine. Socket in the glove box
X
Open the glove box (Y page 196).
Lift up the cover of socket :.
Socket on the center console !
If accessories are connected, make sure
that a maximum current draw of 15 A is not
exceeded. Otherwise, you will overload the
fuse. Example: Coupe
X
To open: briefly press the middle of
cover :.
The stowage compartment opens.
X Lift up the cover of socket ;.
X To close: fold down cover :.200
FeaturesSto
wage an d features
ProCarManuals.com
Page 231 of 286

X
Remove the jack from the left-hand
stowage space in the trunk to allow the
stowage compartment to be opened.
X Turn fastener ;in the direction of the
arrow.
X Open stowage compartment :.
X Remove the TIREFIT kit, wheel chock,
alignment bolt and gloves. Flat tire
Preparing the vehicle
Your vehicle is equipped with a TIREFIT kit.
X Stop the vehicle on solid, non-slippery and
level ground, as far away as possible from
traffic.
X Switch on the hazard warning lamps.
X Apply the electric parking brake manually
(Y page 129).
X Bring the front wheels into the straight-
ahead position.
X Shift the transmission to Pwith the button
in the center console.
X Switch off the engine.
X Remove the SmartKey from the ignition
lock.
X All occupants must get out of the vehicle.
Make sure that they are not endangered as
they do so.
X Make sure that no one is near the danger
area while a wheel is being changed.
Anyone who is not directly assisting in the
wheel change should, for example, stand
behind the barrier.
X Get out of the vehicle. Pay attention to
traffic conditions when doing so.
X Close the driver's door. TIREFIT kit
Using the TIREFIT kit G
WARNING
TIREFIT is a limited repair device. TIREFIT
cannot be used for cuts or punctures larger
than approximately 0.16 in (4 mm) and tire
damage caused by driving with extremely low
tire inflation pressure, or on a flat tire, or a
damaged wheel.
Do not drive the vehicle under such
circumstances.
Contact the nearest authorized Mercedes-
Benz Center for assistance or call Roadside
Assistance. G
WARNING
Take care not to allow the contents of TIREFIT
to come in contact with hair, eyes or clothing.
TIREFIT is harmful if inhaled, swallowed or
absorbed through the skin - causes skin, eye
and respiratory irritation.
Any contact with eyes or skin should be
flushed immediately with plenty of water.
If clothing comes in contact with TIREFIT,
change clothing as soon as possible.
In case of allergic reaction or rash, consult a
physician immediately. G
WARNING
Keep TIREFIT away from children. If
swallowed, rinse mouth immediately with
plenty of water and drink plenty of water.
Do not induce vomiting.
Consult a doctor immediately.
Keep away from open flame or heat source.
You can use the TIREFIT kit to seal small
punctures, particularly those in the tire tread.
You can use TIREFIT at outside temperatures
down to -40 †. Flat ti
re
229Breakdo wn assis tance Z
ProCarManuals.com
Page 243 of 286
R
Do not start the engine if the battery is frozen. Let the battery thaw first.
R Only jump-start from batteries with a 12 V voltage rating.
R Only use jumper cables which have a sufficient cross-section and insulated terminal clamps.
R If the battery is fully discharged, leave the battery that is being used to jump-start connected
for a few minutes before attempting to start. This charges the battery slightly.
R Make sure that the two vehicles do not touch.
Make sure that:
R the jumper cables are not damaged.
R when the jumper cables are connected to the battery, uninsulated sections of the terminal
clamp do not come into contact with other metal sections.
R the jumper cables cannot come into contact with parts such as the V-belt pulley or the fan.
These parts move when the engine is started and while it is running.
X Press the electric parking brake handle.
X Shift the transmission to Pwith the button in the center console.
X Remove the SmartKey from the ignition lock.
X Switch off all electrical consumers (e.g. radio, blower, etc.).
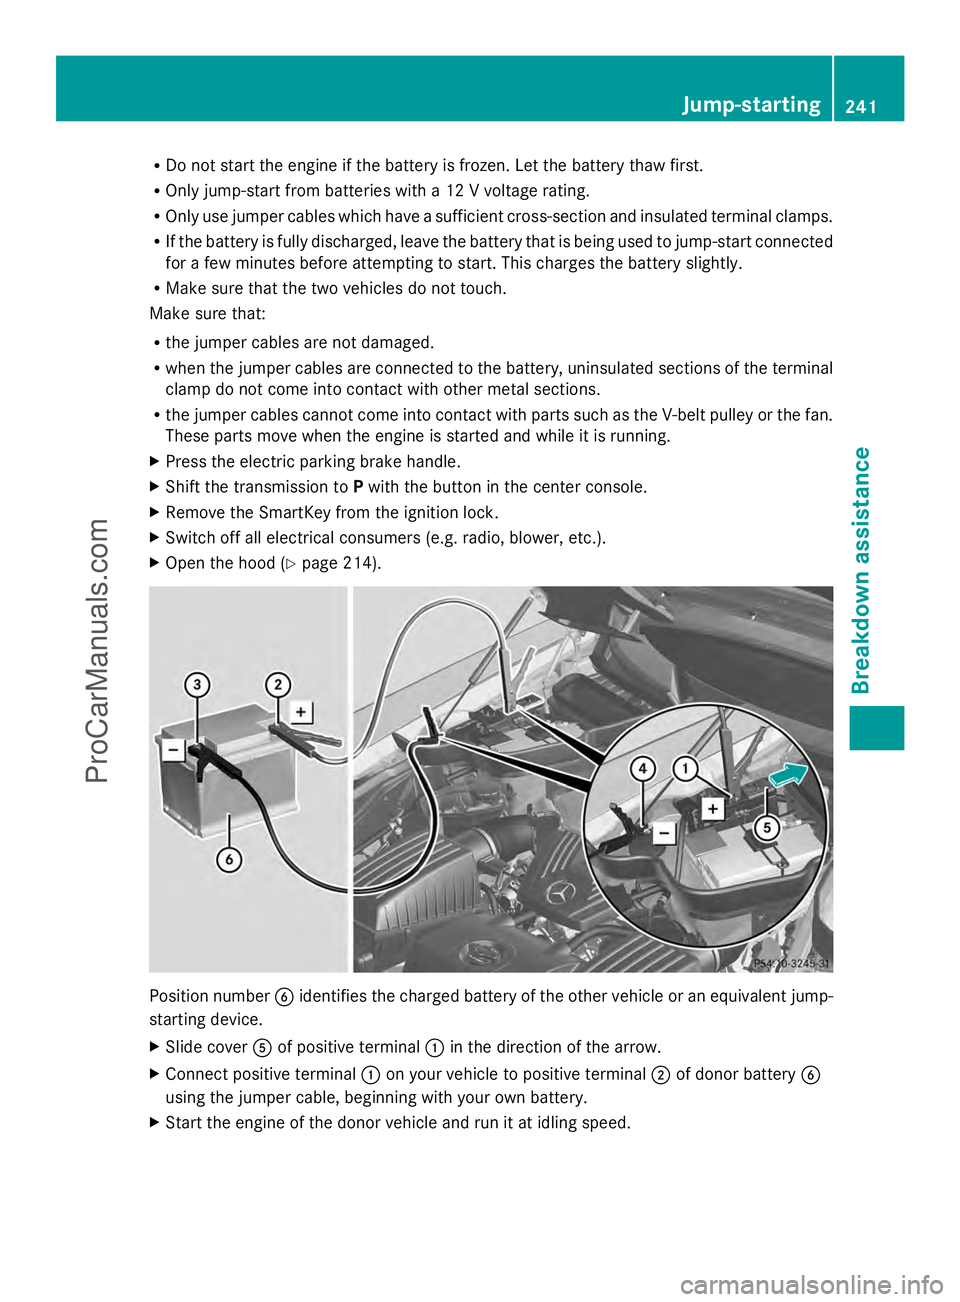
X Open the hood (Y page 214). Position number
Bidentifies the charged battery of the other vehicle or an equivalent jump-
starting device.
X Slide cover Aof positive terminal :in the direction of the arrow.
X Connect positive terminal :on your vehicle to positive terminal ;of donor battery B
using the jumper cable, beginning with your own battery.
X Start the engine of the donor vehicle and run it at idling speed. Jump-starting
241Breakdown assistance Z
ProCarManuals.com
Page 246 of 286
X
Switch on the hazard warning lamps
(Y page 94).
X Make sure that the SmartKey is in position
2 in the ignition and that the engine is
running throughout the towing procedure.
X Move the transmission to Nwith the E-
SELECT lever. Check the transmission
position in the instrument cluster. Towing a vehicle with both axles on
the ground
When having your vehicle towed, observe the
important safety notes ( Ypage 242).
X Switch on the hazard warning lamps
(Y page 94).
i When towing with the hazard warning
lamps switched on, use the combination
switch as usual to signal a change of
direction. In this case, only the turn signals
for the desired direction flash. When the
combination switch is reset, the hazard
warning lamps start flashing again.
X Insert the SmartKey into the ignition lock
(Y page 113).
X Start the engine and leave the SmartKey in
the ignition.
X Move the transmission to Nwith the E-
SELECT lever.
X Check the transmission position in the
instrument cluster display (Y page 119).
X Leave the engine running during the entire
towing procedure. Transporting the vehicle
The towing eye can be used to pull the vehicle
onto a trailer or transporter for transporting
purposes.
! Only lash the vehicle down by the wheels
or wheel rims, not by parts of the vehicle
such as axle or steering components.
Otherwise, the vehicle could be damaged. X
Start the engine.
X Make sure that the SmartKey is in position
2in the ignition and that the engine is
running during the entire loading operation.
X Move the transmission to Nwith the E-
SELECT lever. Check the transmission
position in the instrument cluster.
As soon as the vehicle is loaded:
X Prevent the vehicle from rolling away by
applying the electric parking brake.
X Shift the transmission to Pwith the button
in the center console.
X Turn the SmartKey to position 0in the
ignition lock and remove the SmartKey
from the ignition lock.
X Secure the vehicle. Fuses
Important safety notes
G
WARNING
Only use fuses approved by Mercedes-Benz
with the specified amperage for the system in
question and do not attempt to repair or
bridge a blown fuse. Using other than
approved fuses or using repaired or bridged
fuses may cause an overload leading to a fire,
and/or cause damage to electrical
components and/or systems. Have the cause
determined and remedied by an authorized
Mercedes-Benz Center.
! Only use fuses that have been approved
for Mercedes-Benz vehicles and which
have the correct fuse rating for the system
concerned. Otherwise, components or
systems could be damaged.
The fuses in your vehicle serve to close down
faulty circuits. If a fuse blows, all the
components on the circuit and their functions
stop operating.
Blown fuses must be replaced with fuses of
the same rating, which you can recognize by
the color and value. The fuse ratings are listed 244
FusesBreakdown assistance
ProCarManuals.com