2013 MERCEDES-BENZ SLS-CLASS coolant
[x] Cancel search: coolantPage 186 of 286
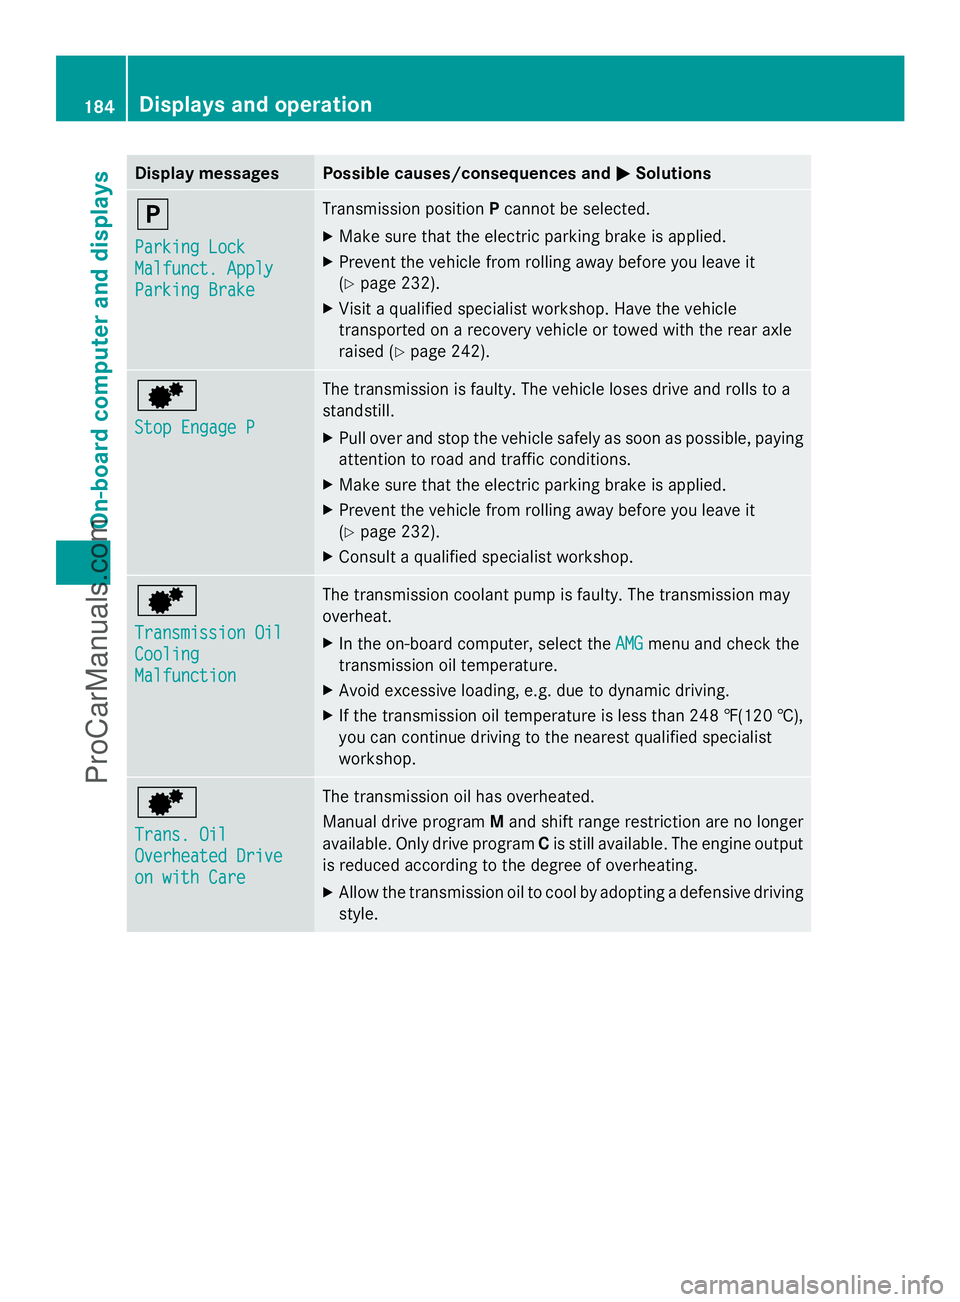
Display messages Possible causes/consequences and
M
MSolutions j
Parking Lock Parking Lock
Malfunct. Apply Malfunct. Apply
Parking Brake Parking Brake Transmission position
Pcannot be selected.
X Make sure that the electric parking brake is applied.
X Prevent the vehicle from rolling away before you leave it
(Y page 232).
X Visit a qualified specialist workshop. Have the vehicle
transported on a recovery vehicle or towed with the rear axle
raised ( Ypage 242). d
Stop Engage P Stop Engage P The transmission is faulty. The vehicle loses drive and rolls to a
standstill.
X
Pull over and stop the vehicle safely as soon as possible, paying
attention to road and traffic conditions.
X Make sure that the electric parking brake is applied.
X Prevent the vehicle from rolling away before you leave it
(Y page 232).
X Consult a qualified specialist workshop. d
Transmission Oil Transmission Oil
Cooling Cooling
Malfunction Malfunction The transmission coolant pump is faulty. The transmission may
overheat.
X
In the on-board computer, select the AMG AMGmenu and check the
transmission oil temperature.
X Avoid excessive loading, e.g. due to dynamic driving.
X If the transmission oil temperature is less than 248 ‡(120 †),
you can continue driving to the nearest qualified specialist
workshop. d
Trans. Oil Trans. Oil
Overheated Drive Overheated Drive
on with Care on with Care The transmission oil has overheated.
Manual drive program
Mand shift range restriction are no longer
available. Only drive program Cis still available. The engine output
is reduced according to the degree of overheating.
X Allow the transmission oil to cool by adopting a defensive driving
style. 184
Displays and operationOn-board compu
ter and displays
ProCarManuals.com
Page 194 of 286
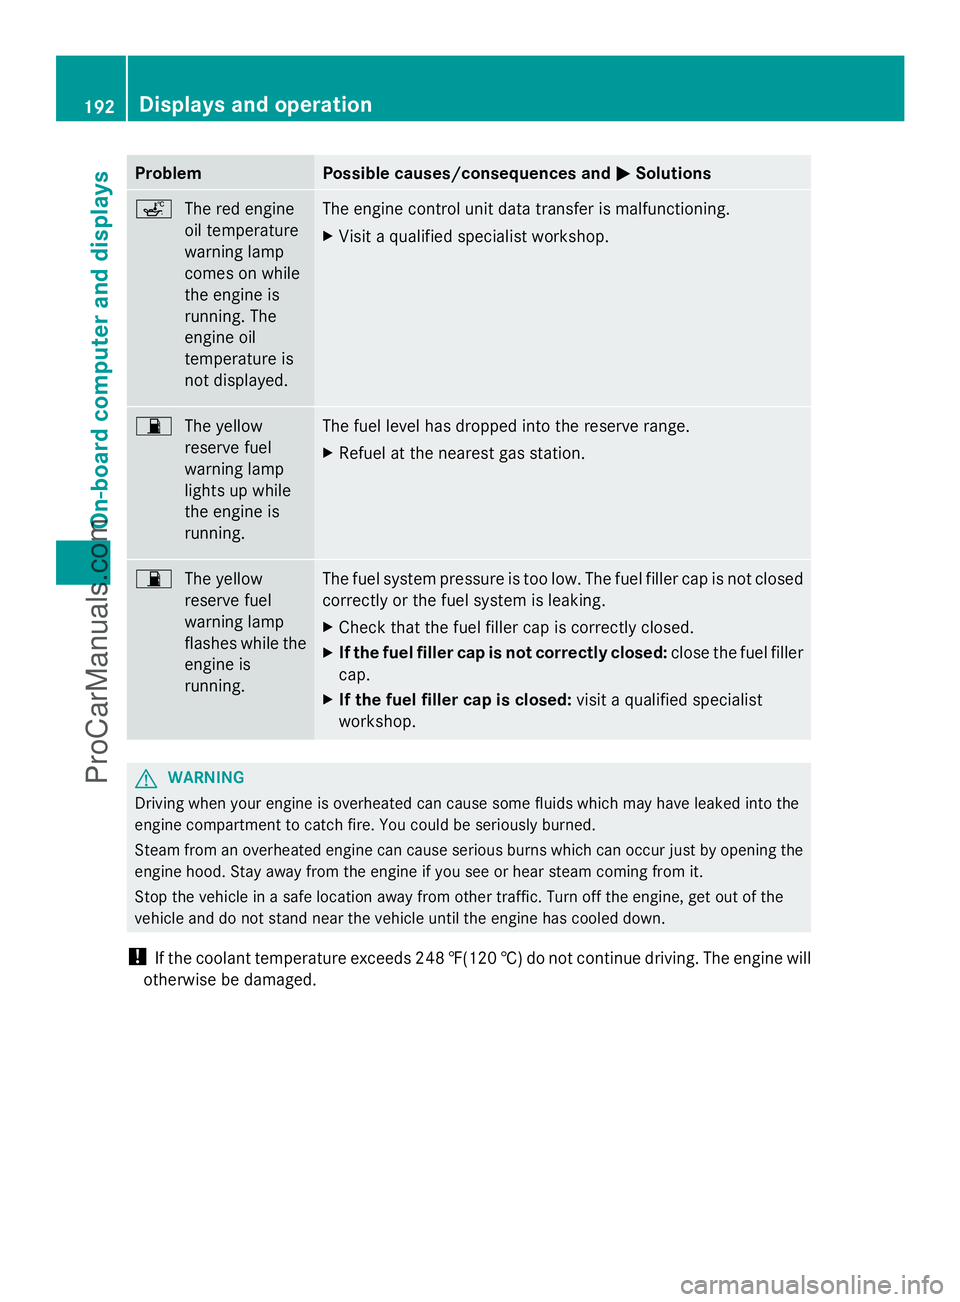
Problem Possible causes/consequences and
M
MSolutions ç
The red engine
oil temperature
warning lamp
comes on while
the engine is
running. The
engine oil
temperature is
not displayed. The engine control unit data transfer is malfunctioning.
X
Visit a qualified specialist workshop. 7
The yellow
reserve fuel
warning lamp
lights up while
the engine is
running. The fuel level has dropped into the reserve range.
X
Refuel at the nearest gas station. 7
The yellow
reserve fuel
warning lamp
flashes while the
engine is
running. The fuel system pressure is too low. The fuel filler cap is not closed
correctly or the fuel system is leaking.
X
Check that the fuel filler cap is correctly closed.
X If the fuel filler cap is not correctly closed: close the fuel filler
cap.
X If the fuel filler cap is closed: visit a qualified specialist
workshop. G
WARNING
Driving when your engine is overheated can cause some fluids which may have leaked into the
engine compartment to catch fire. You could be seriously burned.
Steam from an overheated engine can cause serious burns which can occur just by opening the
engine hood. Stay away from the engine if you see or hear steam coming from it.
Stop the vehicle in a safe location away from other traffic. Turn off the engine, get out of the
vehicle and do not stand near the vehicle until the engine has cooled down.
! If the coolant temperature exceeds 248 ‡(120 †) do not continue driving. The engine will
otherwise be damaged. 192
Displays and operationOn-board computer and displays
ProCarManuals.com
Page 218 of 286

X
Unscrew oil filler cap :again and read the
dipstick.
If the level is between MIN mark =and
MAX mark ;, the oil level is correct.
X If the oil level has dropped to MIN mark
= or below, add 1.1 US qt (1.0 liter) of
engine oil.
Adding engine oil G
WARNING
If engine oil comes into contact with hot
components in the engine compartment, it
may ignite. There is a risk of fire and injury.
Make sure that engine oil is not spilled next
to the filler neck. Let the engine cool down
and thoroughly clean the engine oil off the
components before starting the engine. H
Environmental note
When adding oil, take care not to spill any. If
oil enters the soil or waterways, it is harmful
to the environment.
! Only use engine oils and oil filters that
have been approved for vehicles with a
service system. You can obtain a list of the
engine oils and oil filters tested and
approved in accordance with the
Mercedes-Benz Specifications for Service
Products at any Mercedes-Benz Service
center.
Damage to the engine or exhaust system is
caused by the following:
R using engine oils and oil filters that have
not been specifically approved for the
service system
R replacing engine oil and oil filters after
the interval for replacement specified by
the service system has been exceeded
R using engine oil additives.
! Do not add too much oil. adding too much
engine oil can result in damage to the
engine or to the catalytic converter. Have
excess engine oil siphoned off. X
Unscrew and remove oil filler cap :with
the integrated dipstick.
X Add engine oil.
If the oil level is at or under the MIN mark
on the oil dipstick, add 1.1 US qt (1.0 liter)
of engine oil.
X Replace cap :on the filler neck and
tighten clockwise.
Ensure that the cap locks into place
securely.
X Check the oil level again with the oil
dipstick (Y page 215).
You will find further information about engine
oil in the "Technical data" section
(Y page 279). Checking and adding other service
products
Checking coolant level G
WARNING
The engine cooling system is pressurized,
particularly when the engine is warm. When
opening the cap, you could be scalded by hot
coolant spraying out. There is a risk of injury.
Let the engine cool down before opening the
cap. Wear eye and hand protection when
opening the cap. Open the cap slowly half a
turn to allow pressure to escape.
Only check the coolant level when the vehicle
is on a level surface and the engine has cooled
down. 216
Engine compartmentMaintenance and care
ProCarManuals.com
Page 219 of 286
X
Set the Start/Stop button to key position
2.
X Check the coolant temperature display in
the "AMG" menu (Y page 157).
The coolant temperature must be below
158 ‡ (70 †). X
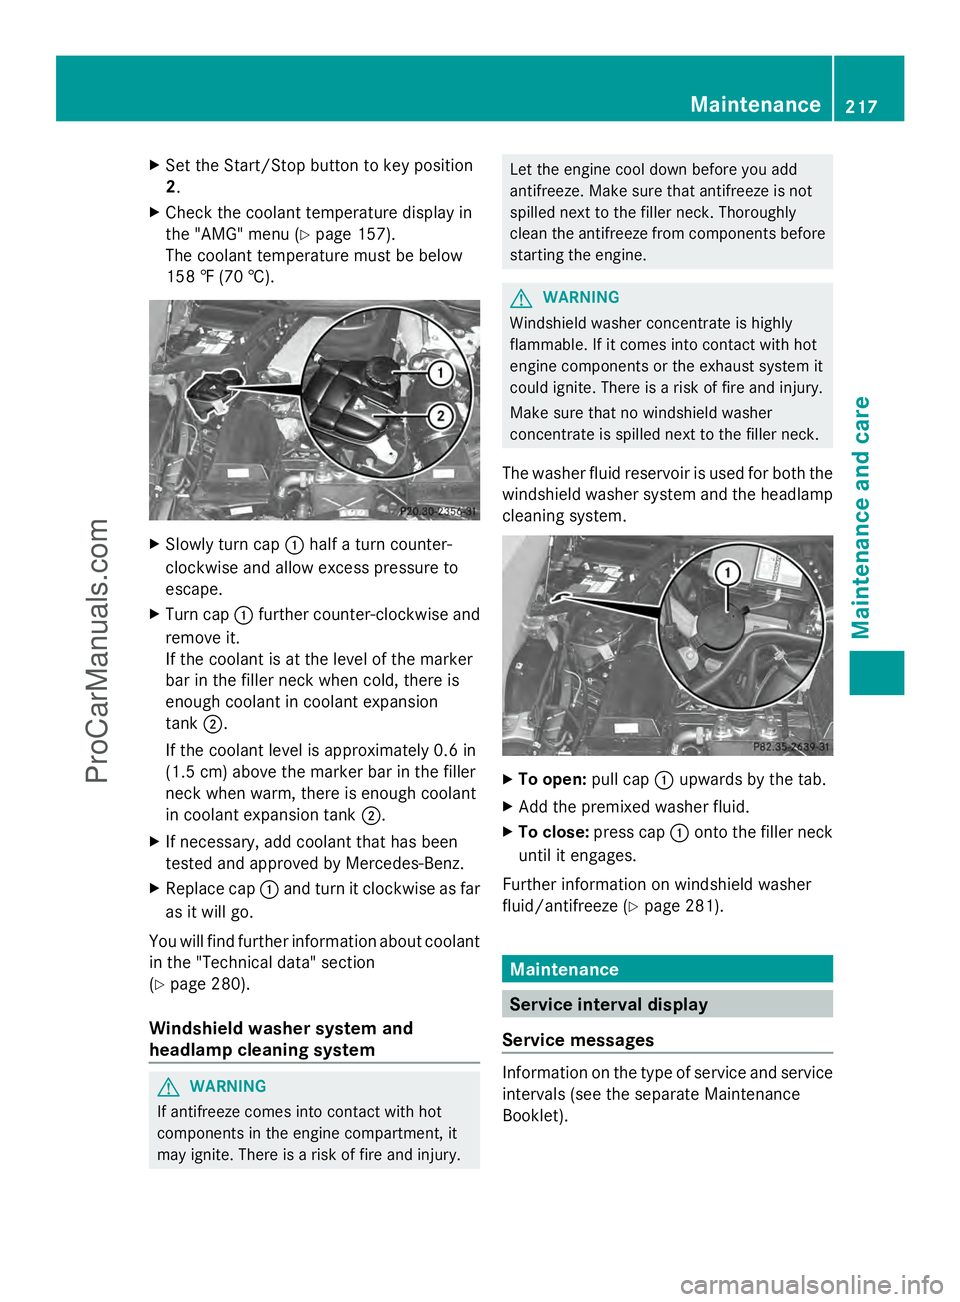
Slowly turn cap :half a turn counter-
clockwise and allow excess pressure to
escape.
X Turn cap :further counter-clockwise and
remove it.
If the coolant is at the level of the marker
bar in the filler neck when cold, there is
enough coolant in coolant expansion
tank ;.
If the coolant level is approximately 0.6 in
(1.5 cm) above the marker bar in the filler
neck when warm, there is enough coolant
in coolant expansion tank ;.
X If necessary, add coolant that has been
tested and approved by Mercedes-Benz.
X Replace cap :and turn it clockwise as far
as it will go.
You will find further information about coolant
in the "Technical data" section
(Y page 280).
Windshield washer system and
headlamp cleaning system G
WARNING
If antifreeze comes into contact with hot
components in the engine compartment, it
may ignite. There is a risk of fire and injury. Let the engine cool down before you add
antifreeze. Make sure that antifreeze is not
spilled next to the filler neck. Thoroughly
clean the antifreeze from components before
starting the engine.
G
WARNING
Windshield washer concentrate is highly
flammable. If it comes into contact with hot
engine components or the exhaust system it
could ignite. There is a risk of fire and injury.
Make sure that no windshield washer
concentrate is spilled next to the filler neck.
The washer fluid reservoir is used for both the
windshield washer system and the headlamp
cleaning system. X
To open: pull cap:upwards by the tab.
X Add the premixed washer fluid.
X To close: press cap :onto the filler neck
until it engages.
Further information on windshield washer
fluid/antifreeze (Y page 281). Maintenance
Service interval display
Service messages Information on the type of service and service
intervals (see the separate Maintenance
Booklet). Maintenance
217Maintenance and care Z
ProCarManuals.com
Page 223 of 286
X
Use plenty of water and rinse out the
sponge frequently.
X Rinse the vehicle with clean water and dry
thoroughly with a chamois.
X Do not let the cleaning agent dry on the
paintwork.
Carefully remove all deposits of road salt as
soon as possible when driving in winter.
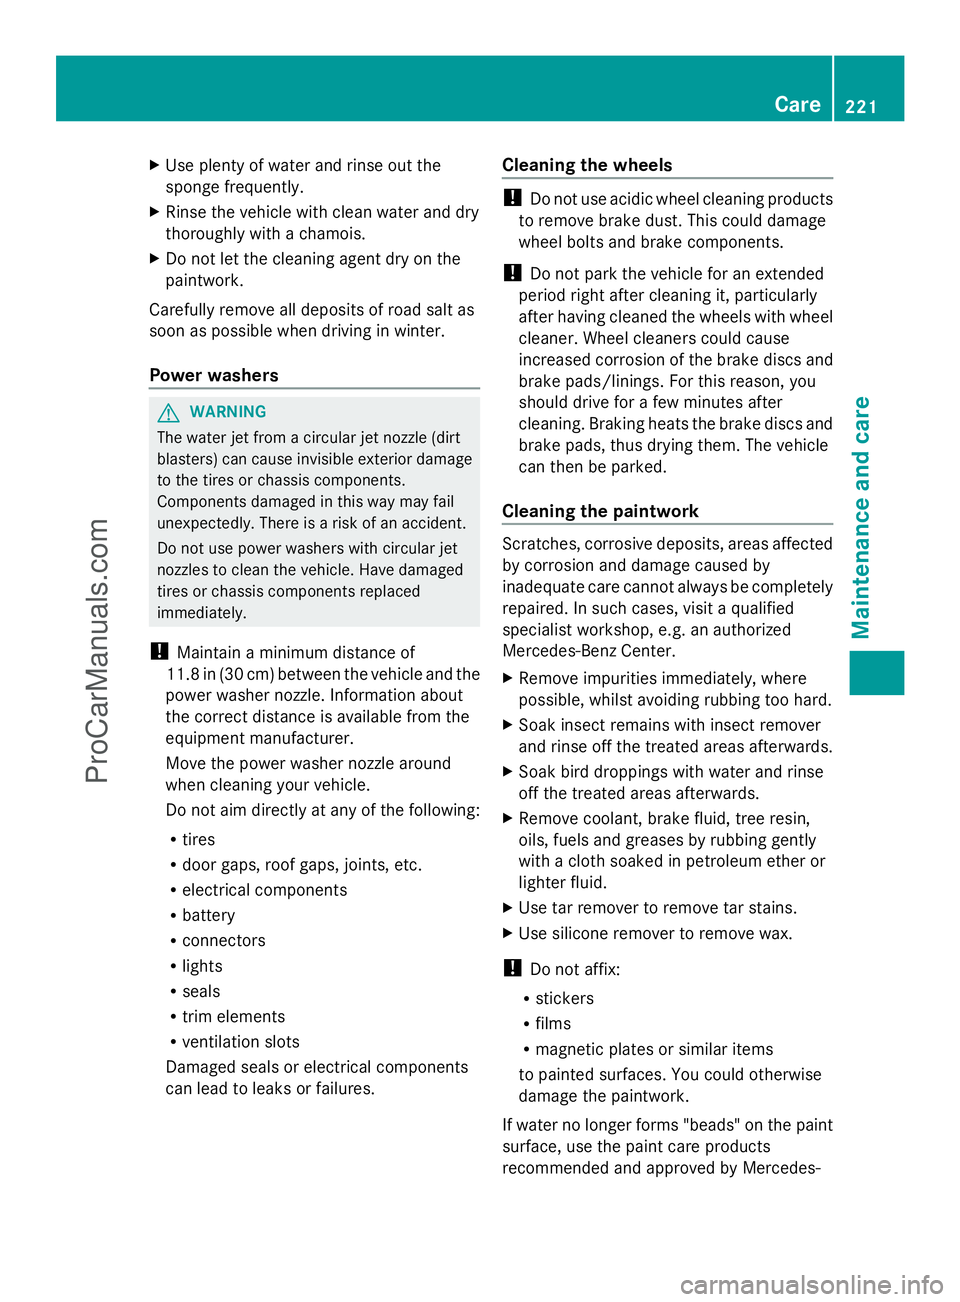
Power washers G
WARNING
The water jet from a circular jet nozzle (dirt
blasters) can cause invisible exterior damage
to the tires or chassis components.
Components damaged in this way may fail
unexpectedly. There is a risk of an accident.
Do not use power washers with circular jet
nozzles to clean the vehicle. Have damaged
tires or chassis components replaced
immediately.
! Maintain a minimum distance of
11.8 in (30 cm) between the vehicle and the
power washer nozzle. Information about
the correct distance is available from the
equipment manufacturer.
Move the power washer nozzle around
when cleaning your vehicle.
Do not aim directly at any of the following:
R tires
R door gaps, roof gaps, joints, etc.
R electrical components
R battery
R connectors
R lights
R seals
R trim elements
R ventilation slots
Damaged seals or electrical components
can lead to leaks or failures. Cleaning the wheels !
Do not use acidic wheel cleaning products
to remove brake dust. This could damage
wheel bolts and brake components.
! Do not park the vehicle for an extended
period right after cleaning it, particularly
after having cleaned the wheels with wheel
cleaner. Wheel cleaners could cause
increased corrosion of the brake discs and
brake pads/linings. For this reason, you
should drive for a few minutes after
cleaning. Braking heats the brake discs and
brake pads, thus drying them. The vehicle
can then be parked.
Cleaning the paintwork Scratches, corrosive deposits, areas affected
by corrosion and damage caused by
inadequate care cannot always be completely
repaired. In such cases, visit a qualified
specialist workshop, e.g. an authorized
Mercedes-Benz Center.
X
Remove impurities immediately, where
possible, whilst avoiding rubbing too hard.
X Soak insect remains with insect remover
and rinse off the treated areas afterwards.
X Soak bird droppings with water and rinse
off the treated areas afterwards.
X Remove coolant, brake fluid, tree resin,
oils, fuels and greases by rubbing gently
with a cloth soaked in petroleum ether or
lighter fluid.
X Use tar remover to remove tar stains.
X Use silicone remover to remove wax.
! Do not affix:
R stickers
R films
R magnetic plates or similar items
to painted surfaces. You could otherwise
damage the paintwork.
If water no longer forms "beads" on the paint
surface, use the paint care products
recommended and approved by Mercedes- Care
221Maintenance and care Z
ProCarManuals.com
Page 270 of 286
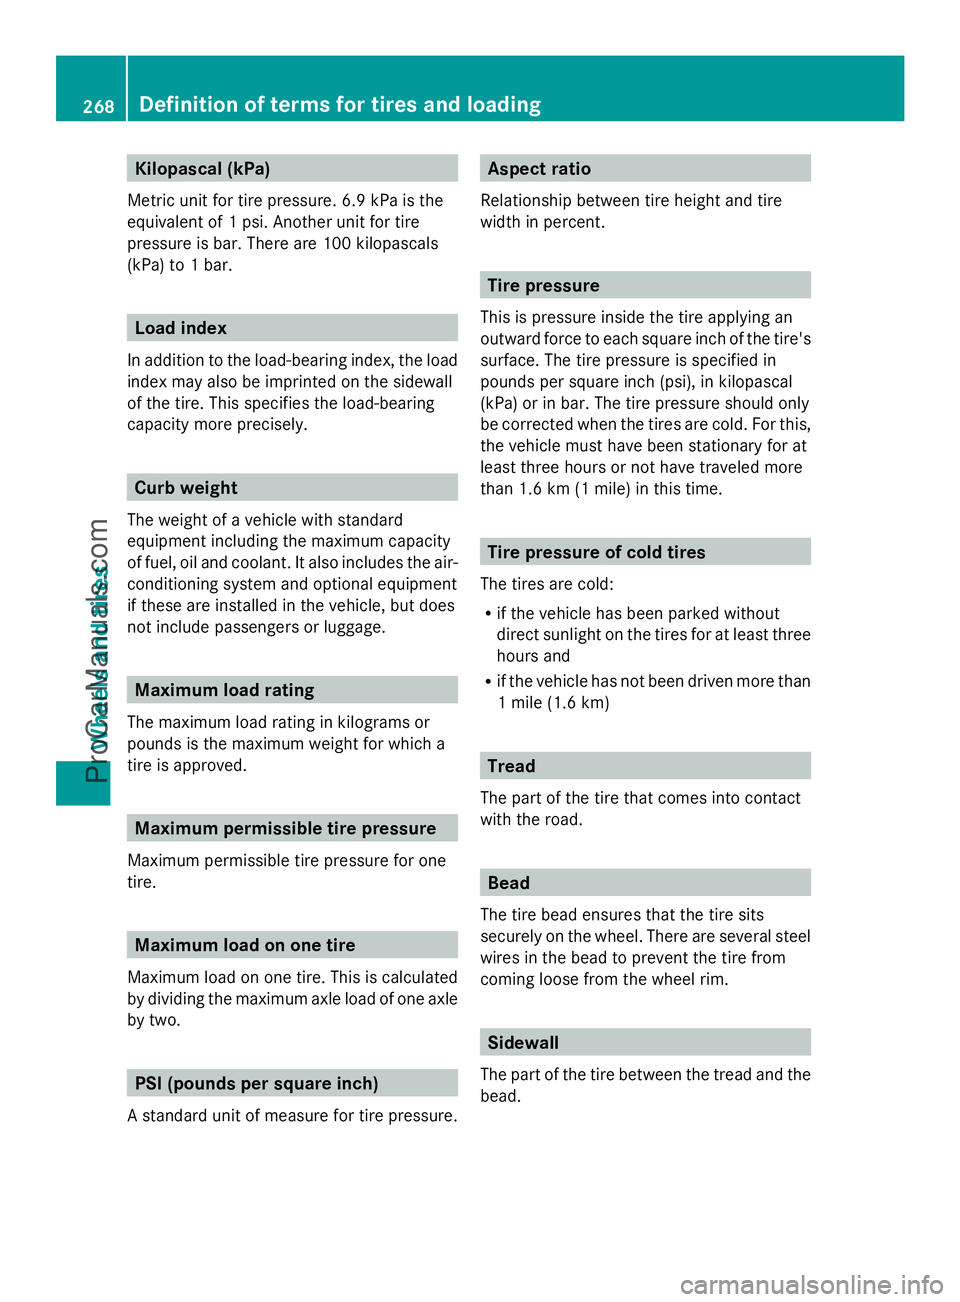
Kilopascal (kPa)
Metric unit for tire pressure. 6.9 kPa is the
equivalent of 1 psi. Another unit for tire
pressure is bar. There are 100 kilopascals
(kPa) to 1 bar. Load index
In addition to the load-bearing index, the load
index may also be imprinted on the sidewall
of the tire. This specifies the load-bearing
capacity more precisely. Curb weight
The weight of a vehicle with standard
equipment including the maximum capacity
of fuel, oil and coolant. It also includes the air-
conditioning system and optional equipment
if these are installed in the vehicle, but does
not include passengers or luggage. Maximum load rating
The maximum load rating in kilograms or
pounds is the maximum weight for which a
tire is approved. Maximum permissible tire pressure
Maximum permissible tire pressure for one
tire. Maximum load on one tire
Maximum load on one tire. This is calculated
by dividing the maximum axle load of one axle
by two. PSI (pounds per square inch)
A standard unit of measure for tire pressure. Aspect ratio
Relationship between tire height and tire
width in percent. Tire pressure
This is pressure inside the tire applying an
outward force to each square inch of the tire's
surface. The tire pressure is specified in
pounds per square inch (psi), in kilopascal
(kPa) or in bar. The tire pressure should only
be corrected when the tires are cold. For this,
the vehicle must have been stationary for at
least three hours or not have traveled more
than 1.6 km (1 mile) in this time. Tire pressure of cold tires
The tires are cold:
R if the vehicle has been parked without
direct sunlight on the tires for at least three
hours and
R if the vehicle has not been driven more than
1 mile (1.6 km) Tread
The part of the tire that comes into contact
with the road. Bead
The tire bead ensures that the tire sits
securely on the wheel. There are several steel
wires in the bead to prevent the tire from
coming loose from the wheel rim. Sidewall
The part of the tire between the tread and the
bead. 268
Definition of ter
ms for tires and loadingWheels and tires
ProCarManuals.com
Page 278 of 286
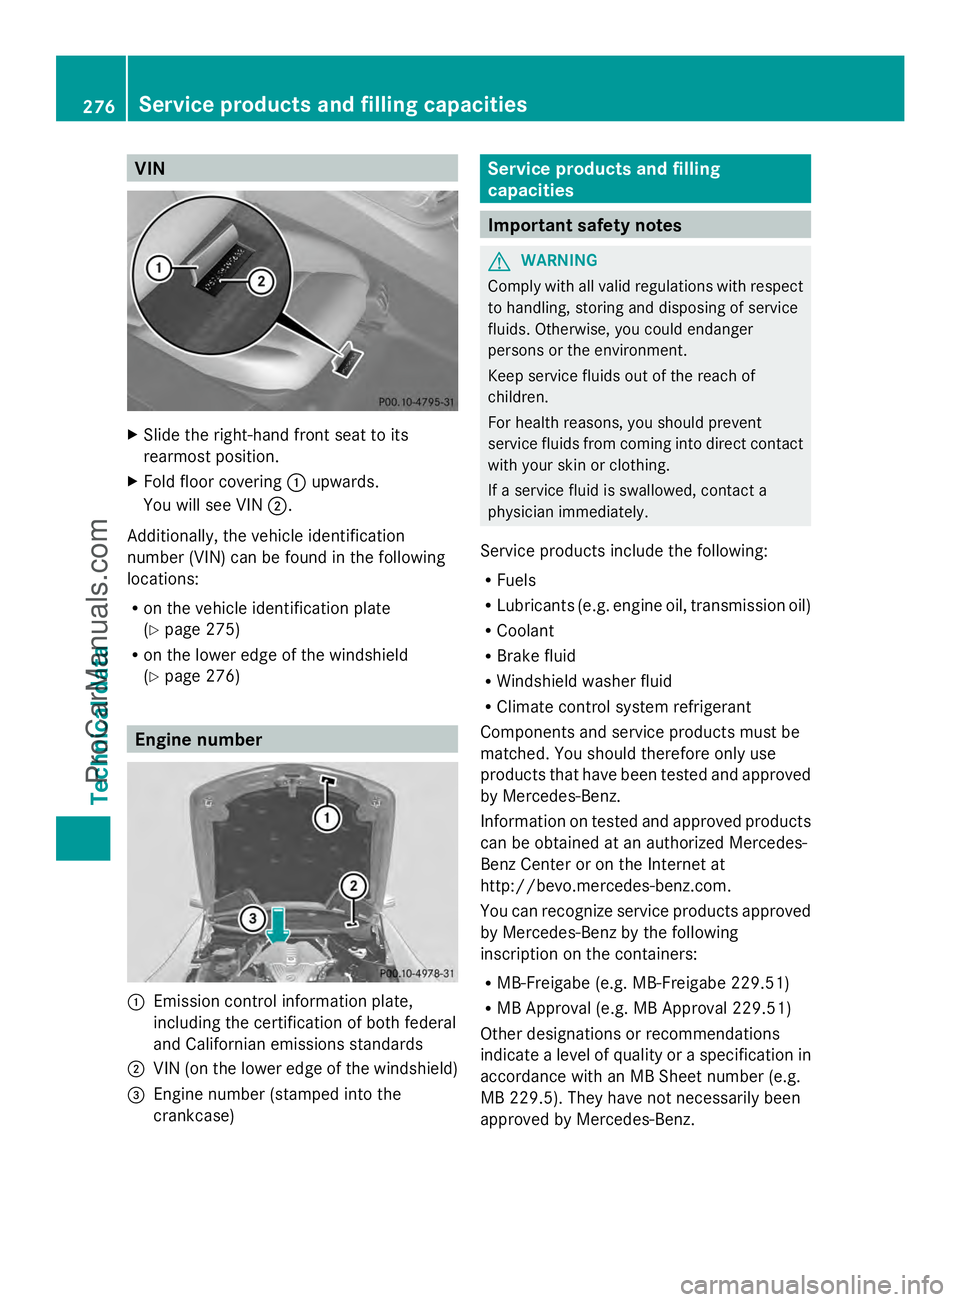
VIN
X
Slide the right-hand front seat to its
rearmost position.
X Fold floor covering :upwards.
You will see VIN ;.
Additionally, the vehicle identification
number (VIN) can be found in the following
locations:
R on the vehicle identification plate
(Y page 275)
R on the lower edge of the windshield
(Y page 276) Engine number
:
Emission control information plate,
including the certification of both federal
and Californian emissions standards
; VIN (on the lower edge of the windshield)
= Engine number (stamped into the
crankcase) Service products and filling
capacities
Important safety notes
G
WARNING
Comply with all valid regulations with respect
to handling, storing and disposing of service
fluids. Otherwise, you could endanger
persons or the environment.
Keep service fluids out of the reach of
children.
For health reasons, you should prevent
service fluids from coming into direct contact
with your skin or clothing.
If a service fluid is swallowed, contact a
physician immediately.
Service products include the following:
R Fuels
R Lubricants (e.g. engine oil, transmission oil)
R Coolant
R Brake fluid
R Windshield washer fluid
R Climate control system refrigerant
Components and service products must be
matched. You should therefore only use
products that have been tested and approved
by Mercedes-Benz.
Information on tested and approved products
can be obtained at an authorized Mercedes-
Benz Center or on the Internet at
http://bevo.mercedes-benz.com.
You can recognize service products approved
by Mercedes-Benz by the following
inscription on the containers:
R MB-Freigabe (e.g. MB-Freigabe 229.51)
R MB Approval (e.g. MB Approval 229.51)
Other designations or recommendations
indicate a level of quality or a specification in
accordance with an MB Sheet number (e.g.
MB 229.5). They have not necessarily been
approved by Mercedes-Benz. 276
Service products and filling capacitiesTechnical data
ProCarManuals.com
Page 279 of 286
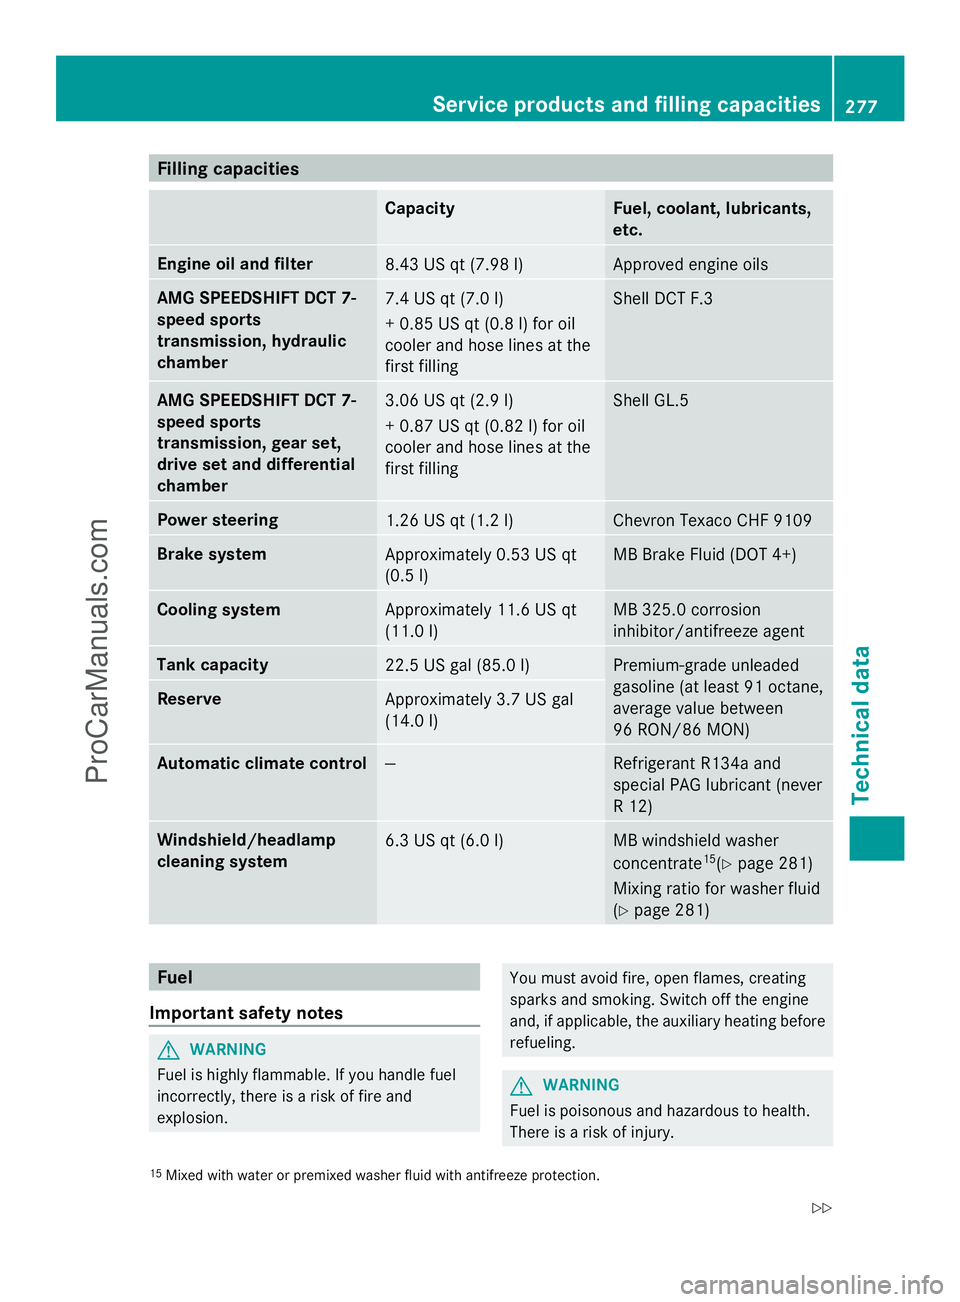
Filling capacities
Capacity Fuel, coolant, lubricants,
etc.
Engine oil and filter
8.43 US qt (7.98 l) Approved engine oils
AMG SPEEDSHIFT DCT 7-
speed sports
transmission, hydraulic
chamber 7.4 US qt (7.0 l)
+ 0.85 US qt (0.8 l) for oil
cooler and hose lines at the
first filling Shell DCT F.3
AMG SPEEDSHIFT DCT 7-
speed sports
transmission, gear set,
drive set and differential
chamber
3.06 US qt (2.9 l)
+ 0.87 US qt (0.82 l) for oil
cooler and hose lines at the
first filling Shell GL.5
Power steering
1.26 US qt (1.2 l) Chevron Texaco CHF 9109
Brake system
Approximately 0.53 US qt
(0.5 l) MB Brake Fluid (DOT 4+)
Cooling system
Approximately 11.6 US qt
(11.0 l) MB 325.0 corrosion
inhibitor/antifreeze agent
Tank capacity
22.5 US gal (85.0 l) Premium-grade unleaded
gasoline (at least 91 octane,
average value between
96 RON/86 MON)
Reserve
Approximately 3.7 US gal
(14.0 l)
Automatic climate control
— Refrigerant R134a and
special PAG lubricant (never
R 12)
Windshield/headlamp
cleaning system
6.3 US qt (6.0 l) MB windshield washer
concentrate
15
(Y page 281)
Mixing ratio for washer fluid
(Y page 281) Fuel
Important safety notes G
WARNING
Fuel is highly flammable. If you handle fuel
incorrectly, there is a risk of fire and
explosion. You must avoid fire, open flames, creating
sparks and smoking. Switch off the engine
and, if applicable, the auxiliary heating before
refueling.
G
WARNING
Fuel is poisonous and hazardous to health.
There is a risk of injury.
15 Mixed with water or premixed washer fluid with antifreeze protection. Service products and filling capacities
277Technical data
Z
ProCarManuals.com