2013 MERCEDES-BENZ S-CLASS SEDAN turn signal
[x] Cancel search: turn signalPage 140 of 536

dts™
MLP™
Selecting settings for the Bang & Olufsen
sound system
Calling up the selection menu
X
Select Sound.
X Highlight Bang & Olufsen.
X Press W.
A selection menu appears.
A # dot in front of an entry indicates the
current setting.
Selecting the setting for True Image™
X Turn cVd or slide ZVÆ and highlight
reference or 3D Sound.
X Press W.
Selecting sound mode
X Select Sound Mode in the selection menu.
X Turn cVd or slide ZVÆ and highlight left,
all or right.
X Press W.
X To exit the menu: press the % back
button beside the COMAND controller.
or
X Slide XVY.
i Please bear the following in mind: You will achieve the best sound results on
your Bang & Olufsen sound system by
playing high-quality audio DVDs and CDs.
MP3
tracks should have a bit rate of at least
224 kbit/s.
When playing using an iPod ®
, the bit rate
should also be at least 224 kbit/s.
For optimum playback quality:
XDeactivate the EQ setting on the
iPod ®
.
Surround-sound playback does not
function for mono signal sources, such as
the medium wave range (MW) in radio
mode.
On some stereo recordings, the sound
characteristics may differ from
conventional stereo playback. Rear Seat Entertainment System
Components Overview
The Rear Seat Entertainment System
comprises:
R
two screens for the rear behind the front-
seat head restraints
R two remote controls
R a CD/DVD drive
R AUX jacks on both screens (display AUX)
and on the CD/DVD drive (drive AUX)
R two sets of cordless headphones138
At a glance
COMAND
Page 144 of 536

Cordless headphones
Overview
The
cordless headphones for the rear compartment can be recognized by the "DIGITAL AUDIO"
inscription on the battery compartment cover and by the fact that there is no SPLITVIEW
symbol ( Y page 122)( Y page 122).:
Volume control
; To select a screen for the headphones
= Battery compartment cover
? To switch the cordless headphones on/off
A Indicator lamp with various displays ( Y page 143)
X Gently pull both sides of the headphones out and adjust the fit of the headphones by pulling
the headband in the direction of the arrow.
Switching the cordless headphones on/
off
X Press button ?.
Depending on the previous status, the
headphones
are switched on or off. To save
the battery, the headphones are switched
off automatically if they do not receive a
signal within three minutes.
Adjusting the volume of the headphones
X Turn volume control : until you have
reached the desired volume. i
If you have connected corded
headphones to a rear-compartment
screen, you can adjust the volume by
pressing
buttons C on the remote control
(Y page 125).
Selecting a screen for the headphones
X Move push slider ;
to L (left-hand screen)
or R (right-hand screen). 142
At a glance
COMAND
Page 162 of 536

on the same street:
call up an address
destination from the last destinations.
X Select Change by turning cVd and sliding
ZVÆ the COMAND controller and press
W to confirm.
All destination entry functions are
available.
X Edit/enter the destination as described for
destination entry ( Y page 153).
Entering a destination using the map Calling up the map
X
To activate navigation mode: press the
S function button once or twice.
X To show the menu: press W the COMAND
controller.
X Select Destination in the navigation
system menu bar by turning cVd the
COMAND controller and pressing W to
confirm.
X Select Via Map and press W to confirm.
You see the map with the crosshair. :
Current vehicle position
; Crosshair
= Details of the crosshair position
? Map scale selected
Display = depends on the settings selected
in "Map information in the display"
(Y page 185). The current street name can
be shown, provided the digital map contains
the
necessary data, or the coordinates of the
crosshair if the geo-coordinate display is switched on and the GPS signal is strong
enough.
Moving the map and selecting the
destination
X
To scroll the map: slide XVY, ZVÆ or
aVb the COMAND controller.
X To set the map scale:
as soon as you turn
cVd the COMAND controller, the scale bar
appears.
X Turn cVd until the desired scale is set.
Turning
clockwise zooms out from the map;
turning counter-clockwise zooms in.
X To select a destination: press W the
COMAND
controller once or several times.
You will see either the address entry menu
with the destination address or, if COMAND
is unable to assign a unique address, a
selection list. X
Select a destination by turning cVd the
COMAND controller and press W to
confirm.
If the destination is within the limits of the
digital map, COMAND attempts to assign
the destination to the map.
If
the destination can be assigned, you will
see the address entry menu with the
address of the destination. If not, you will
see the entry Destination from Map.
X To start route calculation: select Start
and press W to confirm. 160
Navigation
COMAND
Page 188 of 536

Geo-coordinate display
Geo-coordinate display active
:
Current height above average sea level,
rounded
; Current vehicle position: latitude
coordinates
= Current vehicle position: longitude
coordinates
? Number of GPS satellites currently being
used
There must be sufficient GPS reception for all
displays to be shown. If this is not the case,
the display will be grayed out. Height
display : may vary from the actual value,
because
the navigation system uses the GPS
signals for the calculation.
While scrolling the map (Y page 183), you will
see the geo-coordinates of the crosshair
position. Height display : and number of
satellites used ? are not displayed.
"None" menu option Display switched off
:
Current map orientation
i During the "Move map" function you can
see additional information depending on
the
position of the crosshair, such as a road
name, if the digital map supports this data. Switching the topographical map on/
off The topographical map uses different colors
to depict elevation. The color key generally
reflects the topography's dominant
vegetation or the ground's perceived color
when seen from the air, for example:
R
green for lowland
R yellow or brown for hills
R gray or white for mountains
X To show the menu:
press W the COMAND
controller.
X Select Navi in the main function bar by
sliding ZV
and turning cVd the COMAND
controller and press W to confirm.
X Select Topographical Map and confirm
with W.
Depending on the previous state, switch
the option on O or off ª.
Switching the city model on/off When the city model is switched on, the map
shows buildings as 3D models.
i
The city model is only shown in the "3D
map" map orientation.
It is available for map scales
50 m and
100 m.
The data required for displaying buildings
is not available for all cities.
X To show the menu:
press W the COMAND
controller.
X Select Navi in the main function bar by
sliding ZV
and turning cVd the COMAND
controller and press W to confirm.
X Select City
(3D) and press W to confirm.
Depending on the previous state, switch
the option on O or off ª.186
Navigation
COMAND
Page 201 of 536
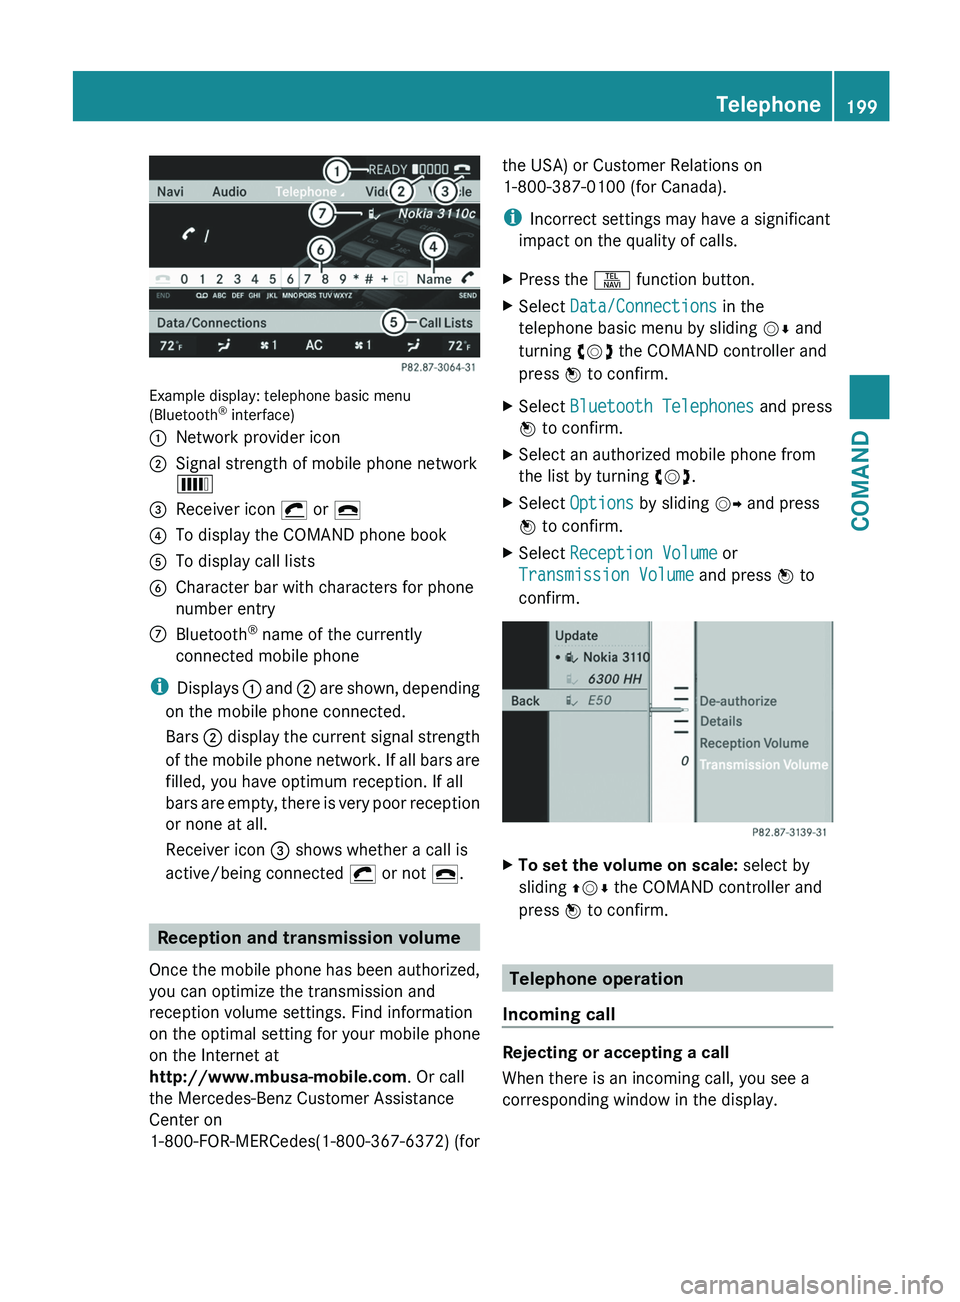
Example display: telephone basic menu
(Bluetooth
®
interface)
: Network provider icon
; Signal strength of mobile phone network
È
= Receiver icon ¡ or ¢
? To display the COMAND phone book
A To display call lists
B Character bar with characters for phone
number entry
C Bluetooth ®
name of the currently
connected mobile phone
i Displays :
and ; are shown, depending
on the mobile phone connected.
Bars ; display the current signal strength
of the mobile phone network. If all bars are
filled, you have optimum reception. If all
bars are empty, there is very poor reception
or none at all.
Receiver icon = shows whether a call is
active/being connected ¡ or not ¢. Reception and transmission volume
Once
the mobile phone has been authorized,
you can optimize the transmission and
reception volume settings. Find information
on the optimal setting for your mobile phone
on the Internet at
http://www.mbusa-mobile.com. Or call
the Mercedes-Benz Customer Assistance
Center on
1-800-FOR-MERCedes(1-800-367-6372) (for the USA) or Customer Relations on
1-800-387-0100
(for Canada).
i Incorrect settings may have a significant
impact on the quality of calls.
X Press the S function button.
X Select Data/Connections in the
telephone basic menu by sliding VÆ and
turning cVd the COMAND controller and
press W to confirm.
X Select Bluetooth Telephones and press
W to confirm.
X Select an authorized mobile phone from
the list by turning cVd.
X Select Options by sliding VY and press
W to confirm.
X Select Reception Volume or
Transmission Volume and press W to
confirm. X
To set the volume on scale: select by
sliding ZVÆ the COMAND controller and
press W to confirm. Telephone operation
Incoming call Rejecting or accepting a call
When there is an incoming call, you see a
corresponding window in the display. Telephone
199
COMAND Z
Page 219 of 536
Satellite radio mode may be temporarily
unavailable or interrupted for a variety of
reasons. These reasons include
environmental or topographical conditions
as well as other issues beyond the control
of Mercedes-Benz USA, LLC. Operation
may also be impaired in certain locations
(e.g. tunnels, multi-storey car parks or
within as well as close to buildings).
i SIRIUS XM Radio offers more than 130
digital-quality radio channels providing
100% commercial-free music, sport, news
and entertainment.
SIRIUS XM Radio employs a fleet of high-
performance
satellites to broadcast around
the clock throughout the USA and Canada.
The satellite radio program is available for
a monthly fee. Details are available from
the SIRIUS XM Service Center and at
http://www.sirius.com (USA) or
http://www.siriuscanada.com
(Canada).
Registering satellite radio X
Select Audio in the main function bar by
sliding ZV
and turning cVd the COMAND
controller and press W to confirm.
X Select Sat. Radio and press W to
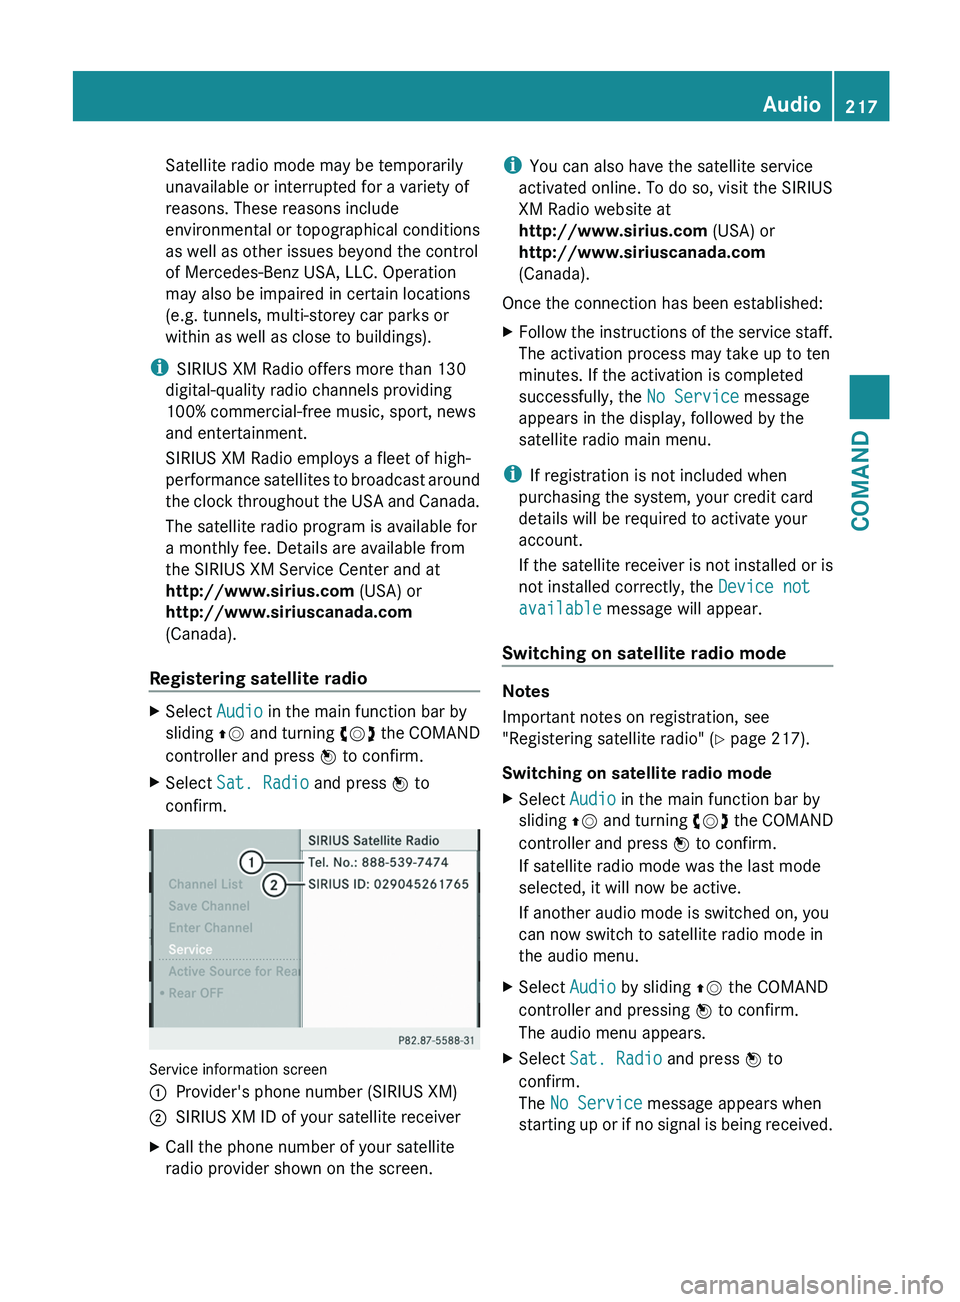
confirm. Service information screen
1
Provider's phone number (SIRIUS XM)
2 SIRIUS XM ID of your satellite receiver
X Call the phone number of your satellite
radio provider shown on the screen. i
You can also have the satellite service
activated online. To do so, visit the SIRIUS
XM Radio website at
http://www.sirius.com (USA) or
http://www.siriuscanada.com
(Canada).
Once the connection has been established:
X Follow the instructions of the service staff.
The activation process may take up to ten
minutes. If the activation is completed
successfully, the No Service message
appears in the display, followed by the
satellite radio main menu.
i If registration is not included when
purchasing the system, your credit card
details will be required to activate your
account.
If
the satellite receiver is not installed or is
not installed correctly, the Device not
available message will appear.
Switching on satellite radio mode Notes
Important notes on registration, see
"Registering satellite radio"
(Y page 217).
Switching on satellite radio mode
X Select Audio in the main function bar by
sliding ZV
and turning cVd the COMAND
controller and press W to confirm.
If satellite radio mode was the last mode
selected, it will now be active.
If another audio mode is switched on, you
can now switch to satellite radio mode in
the audio menu.
X Select Audio by sliding ZV the COMAND
controller and pressing W to confirm.
The audio menu appears.
X Select Sat. Radio and press W to
confirm.
The No Service message appears when
starting
up or if no signal is being received. Audio
217
COMAND Z
Page 220 of 536

If the satellite receiver is not installed or is
not installed correctly, the Device not
available message will appear.
Once COMAND receives the signal, the
satellite radio display appears. The station
last selected is played. Satellite radio main menu
1
Satellite radio main display
2 Preset
3 Channel name
4 Selected category/channel number
5 Sound settings
6 Category list
7 Channel information (in brief)
8 Channel information (in detail)
9 Channel preset list
a SatRadio menu
Channel information 7 can be viewed in
detail ( Y page 220).
Changing the category
Satellite
radio stations are sorted into various
categories. You can choose between the
different categories, such as news/talk
shows, sports or country, if they are available.
The category list is sorted alphabetically. Selecting a category
X
To call up the category list: select
Category by turning cVd the COMAND
controller and press W to confirm.
The category list appears.
X To select a category:
select a category by
turning cVd the COMAND controller and
pressing W to confirm.
The category selected is shown in the
display. You hear the station last selected
for this category.
The All Channels category is at the top
of the category list. This category is sorted
by channel number and allows you to
browse all available channels.
Selecting a channel
Channel search
X Turn cVd or slide XVY the COMAND
controller while the display/selection
window in the SatRadio display is active.
COMAND searches in both directions
(ascending and descending) and stops at
the next channel found in the selected
category.
Using the multifunction steering wheel
X Press = or ; to select the Audio
menu.
X Press and hold 9 or :.
SatRadio menu
X Select Sat. Radio in the submenu bar by
turning cVd the COMAND controller and
press W to confirm.
The SatRadio menu appears.
Entering channel numbers directly
Option 1
X Press the Ä button.
An input menu appears.218
Audio
COMAND
Page 278 of 536

Useful information
i This Operator's Manual describes all
models and all standard and optional
equipment of your vehicle available at the
time of publication of the Operator's
Manual. Country-specific differences are
possible.
Please note that your vehicle may
not be equipped with all features
described. This also applies to safety-
related systems and functions.
i Please read the information on qualified
specialist workshops (Y page 31). Exterior lighting
Important safety notes
For reasons of safety, Mercedes-Benz
recommends that you drive with the lights
switched
on even during the daytime. In some
countries, operation of the headlamps varies
due to legal requirements and self-imposed
obligations. Information about driving abroad
Converting to symmetrical low beam
when
driving abroad: switch the headlamps
to symmetrical low beam in countries in
which traffic drives on the opposite side of the
road to the country where the vehicle is
registered. This prevents glare to oncoming
traffic. Symmetrical lights do not illuminate
as large an area of the edge of the road.
Have the headlamps converted at a qualified
specialist workshop, e.g. an authorized
Mercedes-Benz Center, as close to the border
as possible before driving in these countries.
Converting to asymmetrical low beam
after returning: have the headlamps
converted back to asymmetrical low beam at
a qualified specialist workshop, e.g. an
authorized Mercedes-Benz Center, as soon as
possible after crossing the border again. Light switch
Operation Depending on the date of manufacture of your
vehicle, the c or à symbol for the
automatic headlamp mode/daytime running
lamps is located on the light switch. 1W
Left-hand standing lamps
2X Right-hand standing lamps
3$ Lights off/daytime running lamps
4c Automatic headlamp mode/daytime
running lamps
5T Parking lamps, license plate and
instrument cluster lighting
6L Low-beam/high-beam headlamps
7N Front fog lamps 11
8R Rear fog lamp
The turn signals, high-beam headlamps and
the
high-beam flasher are operated using the
combination switch (Y page 279).
! Switch off the parking lamps and standing
lamps when you leave the vehicle. This
prevents the battery from discharging.
The exterior lighting (except the parking/
standing lamps) switches off automatically if
you:
R remove the SmartKey from the ignition lock
R open the driver's door with the SmartKey
in position 0
If you hear a warning tone when you leave the
vehicle, the lights may still be switched on.
11 Only
vehicles with Bi-Xenon headlamps without the Intelligent Light System are equipped with front fog lamps.276
Exterior lighting
Lights and windshield wipers