2013 MERCEDES-BENZ R-CLASS FAMILY TOURER check oil
[x] Cancel search: check oilPage 12 of 364

EBD (electronic brake force
distribution)
Display message ............................ 217
Function/notes ................................ 70
Electronic Stability Program
see ESP ®
(Electroni cStability Program)
Emergenc yrelease
Driver's door .................................... 84
Fuel filler fla p................................. 162
Vehicle ............................................. 84
Emergency spare wheel
Important safety notes ..................342
Points to remember .......................342
Storage location ............................ 342
Stowing .......................................... 344
Technical data ............................... 346
Emergency Tensioning Devices
Function .......................................... .59
Safety guidelines. ............................ 42
Emissions control
Service and warranty information ....21
Engine
Check Engine warning lamp ........... 245
Display message ............................ 224
Engine number ............................... 350
Irregularr unning............................ 153
Jump-starting ................................. 304
Starting problems ..........................153
Starting the engine with the
SmartKey ....................................... 151
Starting with KEYLESS-GO .............151
Switching off .................................. 167
Tow-starting (vehicle) ..................... 308
Engine electronics
Problem (malfunction) ...................153
Engine emergency stop ....................310
Engine oil Adding ........................................... 286
Additives ........................................ 354
Checking the oil level ..................... 285
Checking the oil level using the
dipstick .......................................... 286
Display message ............................ 226
Filling capacity ............................... 354
Notes about oil grades ................... 354
Notes on oil level/consumption ....285
Viscosity ........................................ 354ESP
®
(Electronic Stability
Program) 4ETS ................................................ 69
Deactivating/activating ...................69
Display message ............................ 215
Function/notes ................................ 69
Important safety information ...........69
Trailer stabilization ........................... 70
Warning lamp ................................. 241
Exhaus tcheck ................................... 169
Exhaus ttail pipe (cleaning
instructions) ...................................... 293
Exterior lighting see Lights
Exterior mirrors
Adjusting ....................................... 114
Dipping (automatic) .......................115
Folding in/out( automatically).......115
Folding in/out( electrically)...........115
Folding in whenl ocking (on-board
computer) ...................................... 210
Out of position (troubleshooting) ...115
Setting ........................................... 115
Storing settings (memory
function) ........................................ 116
Storing the parking position ..........116 F
Fille rcap
see Fuel filler flap
First-aid kit ......................................... 298
Flat tire MOExtended tires ..........................300
Preparing the vehicle .....................299
Floormat ............................................ .280
Fog lamps Switching on/off ........................... 122
Front fog lamps
Display message ............................ 223
Switching on/off ........................... 122
Fuel
Additives ........................................ 352
Calling up the range .......................212
Consumption statistics ..................211
Displaying the current
consumption .................................. 212
Driving tips .................................... 168 Index
9
Page 18 of 364

Warning lamp ................................. 238
Warning lamp (function) ...................58
Seats
Adjusting (electrically) ...................102
Adjusting the head restraint ..........103
Cleaning the cover .........................295
Correct driver's sea tposition ........100
Entry position (3rd row of seats) ....108
Exit position (3rd row of seats) ......108
Folding downt he 2nd row of
seats .............................................. 256
Folding downt he 3rd row of seats .257
Folding the 2nd row of seats
forward manually ........................... 107
Folding the rear bench seat
forwards/back ............................... 254
Important safety notes ..................101
Overview ........................................ 101
Resetting the 2nd row of seats ......258
Resetting the 3rd row of seats ....... 258
Seat heating problem ....................111
Seat ventilation problem ................111
Storing settings (memory
function) ........................................ 116
Switching sea theating on/off .......110
Switching seat ventilation on/off ..111
Securing hooks .................................. 260
Selector lever Cleaning ......................................... 295
Sensors (cleaning instructions) .......293
Service see ASSYST PLUS
Service products
Brake fluid ..................................... 355
Coolant (engine) ............................ 355
DEF special additive s..................... 353
Engine oil ....................................... 354
Fuel ................................................ 351
Important safety notes ..................350
Washer fluid .................................. .356
Service work
see ASSYST PLUS
Settings
Factory (on-board computer) .........206
On-board computer .......................206
Setting the air distribution ...............141
Setting the airflow ............................141Short journeys (diesel particle
filter)
................................................... 169
Side impact air bag .............................45
Side marker lamp (display
message) ............................................ 223
Side marker lamps (changing
bulbs) ................................................. 128
Side windows Cleaning ......................................... 292
Convenience closing feature ............91
Convenience opening feature ..........90
Hinged sid ewindows ....................... 90
Important safety information ...........89
Opening/closing .............................. 89
Overview .......................................... 89
Problem (malfunction) .....................93
Resetting ......................................... 92
Sliding sunroof
Important safety notes ....................93
Opening/closing .............................. 94
Problem (malfunction) .....................97
Resetting ......................................... 95
see Panorama roof with power
tilt/sliding panel
SmartKey
Changing the battery .......................80
Changing the programming .............78
Checking the battery .......................79
Convenience closing feature ............91
Convenience opening feature ..........90
Display message ............................ 236
Door central locking/unlocking .......77
Important safety notes ....................76
Loss ................................................. 81
Mechanical key ................................ 78
Overview .......................................... 76
Positions (ignition lock) .................149
Problem (malfunction) .....................81
Starting the engine ........................151
Snow chains
Information .................................... 315
Sockets
2nd row of seats ............................ 270
Center console .............................. 269
Front-passenger footwell ...............269
General notes ................................ 269
Luggage compartment ...................270 Index
15
Page 80 of 364
The Product label with FCC ID and IC
certification number can be found in the
battery case of the SmartKey.
R Do not keep the SmartKey:
-with electronic devices, e.g. a mobile
phone or another SmartKey
- with metallic objects, e.g. coins or metal
foil
- inside metallic objects, e.g. a metal case
This can affect the SmartKey's
functionality.
Do not keep the KEYLESS-GO key in the
temperature-controlled cup holder.
Otherwise, the KEYLESS-GO key will not be
recognized.
Keep the SmartKey away from strong
magnetic fields. Otherwise, the remote
control function could be affected. SmartKey functions
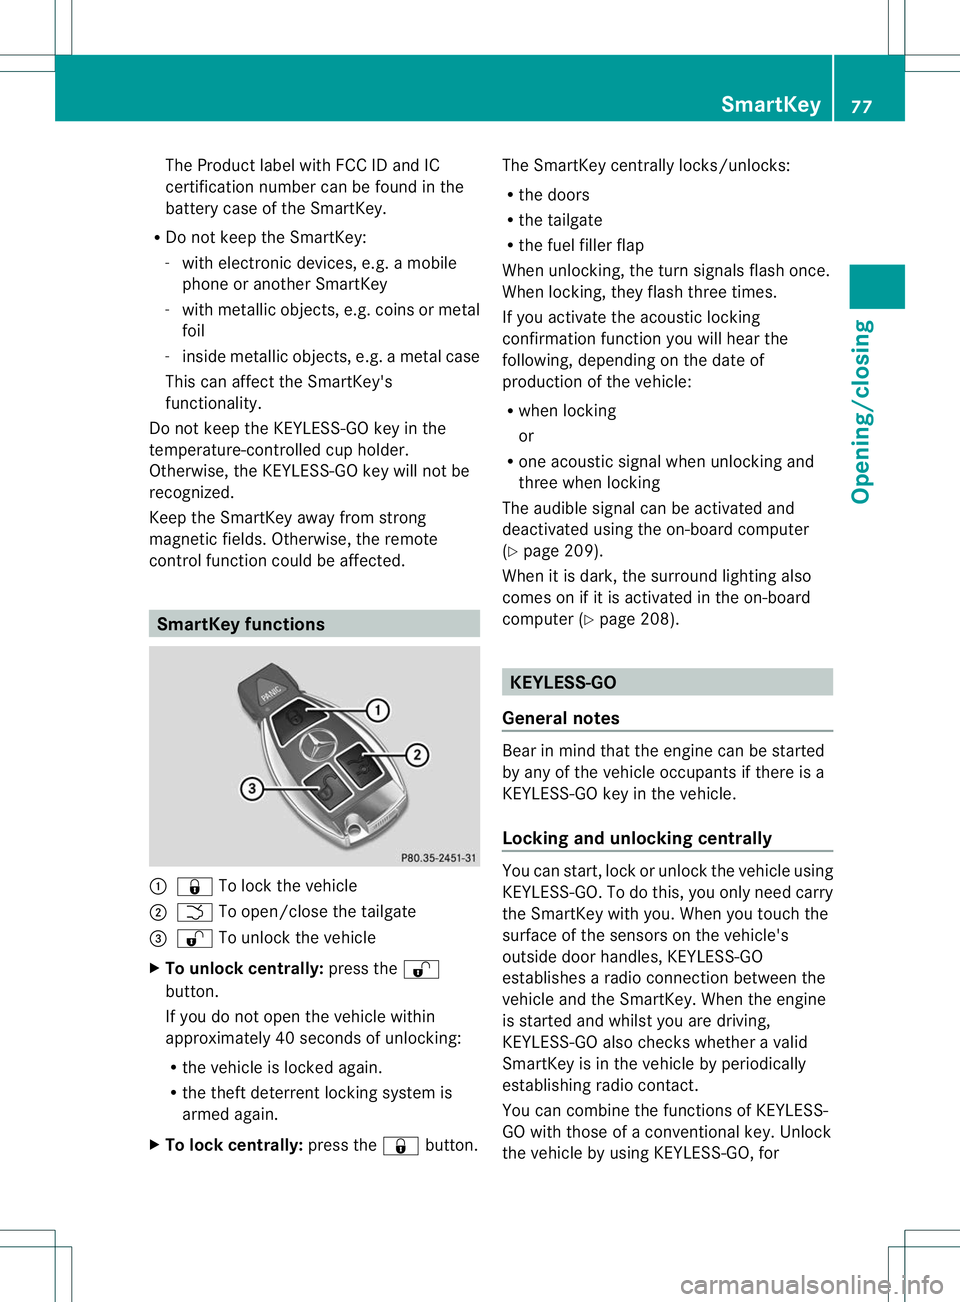
:
& To lock the vehicle
; F To open/close the tailgate
= % To unlock the vehicle
X To unlock centrally: press the%
button.
If you do not open the vehicle within
approximately 40 seconds of unlocking:
R the vehicle is locked again.
R the theft deterrent locking system is
armed again.
X To lock centrally: press the&button. The SmartKey centrally locks/unlocks:
R
the doors
R the tailgate
R the fuel filler flap
When unlocking, the turn signals flash once.
When locking, they flash three times.
If you activate the acoustic locking
confirmation function you will hear the
following, depending on the date of
production of the vehicle:
R when locking
or
R one acoustic signal when unlocking and
three when locking
The audible signal can be activated and
deactivated using the on-board computer
(Y page 209).
When it is dark, the surround lighting also
comes on if it is activated in the on-board
computer (Y page 208). KEYLESS-GO
General notes Bear in mind that the engine can be started
by any of the vehicle occupants if there is a
KEYLESS-GO key in the vehicle.
Locking and unlocking centrally
You can start, lock or unlock the vehicle using
KEYLESS-GO. To do this, you only need carry
the SmartKey with you. When you touch the
surface of the sensors on the vehicle's
outside door handles, KEYLESS-GO
establishes a radio connection between the
vehicle and the SmartKey. When the engine
is started and whilst you are driving,
KEYLESS-GO also check
swhether a valid
SmartKey is in the vehicle by periodically
establishing radio contact.
You can combine the functions of KEYLESS-
GO with those of a conventional key. Unlock
the vehicle by using KEYLESS-GO, for SmartKey
77Opening/closing Z
Page 163 of 364
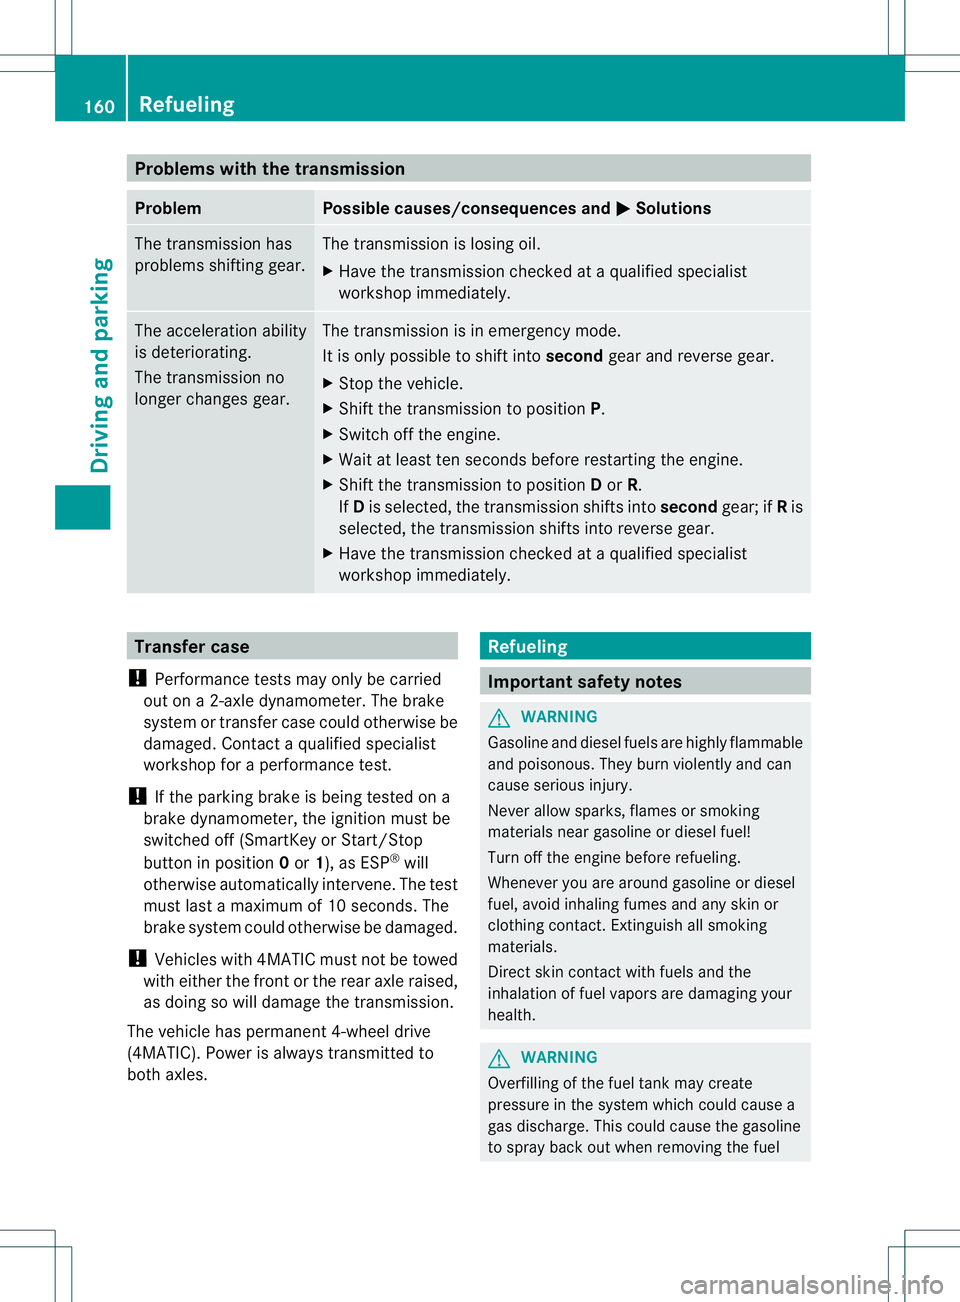
Problems with the transmission
Problem Possible causes/consequences and
M Solutions
The transmission has
problems shifting gear. The transmission is losing oil.
X
Have the transmission checked at a qualified specialist
workshop immediately. The acceleration ability
is deteriorating.
The transmission no
longer changes gear. The transmission is in emergency mode.
It is only possible to shift into
secondgear and reverse gear.
X Stop the vehicle.
X Shift the transmission to position P.
X Switch off the engine.
X Wait at least ten seconds before restarting the engine.
X Shift the transmission to position Dor R.
If D is selected, the transmission shifts into secondgear; ifRis
selected, the transmission shifts into reverse gear.
X Have the transmission checked at a qualified specialist
workshop immediately. Transfer case
! Performance tests may only be carried
out on a 2-axle dynamometer. The brake
system or transfer case could otherwise be
damaged. Contact a qualified specialist
workshop for a performance test.
! If the parking brake is being tested on a
brake dynamometer, the ignition must be
switched off (SmartKey or Start/Stop
button in position 0or 1), as ESP ®
will
otherwise automatically intervene. The test
must last a maximum of 10 seconds. The
brake system could otherwise be damaged.
! Vehicles with 4MATIC must not be towed
with either the front or the rear axle raised,
as doing so will damage the transmission.
The vehicle has permanent 4-wheel drive
(4MATIC). Power is always transmitted to
both axles. Refueling
Important safety notes
G
WARNING
Gasoline and diesel fuels are highly flammable
and poisonous. They burn violently and can
cause serious injury.
Never allow sparks, flames or smoking
materials near gasoline or diesel fuel!
Turn off the engine before refueling.
Whenever you are around gasoline or diesel
fuel, avoid inhaling fumes and any skin or
clothing contact. Extinguish all smoking
materials.
Direct skin contact with fuels and the
inhalation of fuel vapors are damaging your
health. G
WARNING
Overfilling of the fuel tank may create
pressure in the system which could cause a
gas discharge. This could cause the gasoline
to spray back out when removing the fuel 160
RefuelingDriving and parking
Page 172 of 364

Drinking an
ddriving G
WARNING
Drinking and driving and/or taking drugs and
driving are very dangerous combinations.
Even a small amount of alcohol or drugs can
affec tyour reflexes, perceptions and
judgment.
The possibility of a serious or even fatal
accident are greatly increased when you drink
or take drugs and drive.
Do not drink or take drugs and drive or allow
anyone to drive who has been drinking or
taking drugs.
Exhaust check G
WARNING
Combustion engines emit poisonous exhaust
gases such as carbon monoxide. Inhaling
these exhaust gases leads to poisoning. There
is a risk of fatal injury. Therefore never leave
the engine running in enclosed spaces
without sufficient ventilation.
Certain engine systems are designed to keep
the level of poisonous components in exhaust
fumes within legal limits.
These systems only work at peak efficiency if
they are serviced exactly in accordance with
the manufacturer's specifications. For this
reason, all work on the engine must be carried
out by qualified and authorized Mercedes-
Benz technicians.
The engine settings must not be changed
under any circumstances. Furthermore, all
specific service work must be carried out at
regular intervals and in accordance with the
Mercedes-Benz service requirements. Details
can be found in the Maintenance Booklet. Engine oil
! Vehicles with adiesel particle filter: if
the vehicle is predominantly used to travel
short distances, this can lead to
malfunctions in the automatic cleaning of the diesel particle filter. This can result in
fuel collecting in the engine oil and causing
engine failure. Therefore, if you frequently
drive short distances, make sure to drive
on highways or country roads for 20
minutes at least every 310 miles (500km).
Braking
Important safety notes G
WARNING
If you shift down on a slippery road surface in
an attempt to increase the engine's braking
effect, the drive wheels could lose their grip.
There is an increased danger of skidding and
accidents.
Do not shift down for additional engine
braking on a slippery road surface.
Downhill gradients !
On long and steep gradients, you must
reduce the load on the brakes by shifting
early to a lower gear. This allows you to take
advantage of the engine braking effect and
helps avoid overheating and excessive
wear of the brakes.
When you take advantage of the engine
braking effect, a drive wheel may not turn
for some time, e.g. on a slippery road
surface. This could cause damage to the
drive train. This type of damage is not
covered by the Mercedes-Benzw arranty.
Do no tdepress the brake pedal continuously
while the vehicle is in motion, e.g. never
cause the brakes to rub by applying constant
slight pedal pressure. This results in
excessive and premature wear to the brake
pads.
Heavy and light loads G
WARNING
If you rest your foot on the brake pedal while
driving, the braking system can overheat .This Driving tips
169Driving and parking
Z
Page 229 of 364

Display messages Possible causes/consequences and
M Solutions
# The battery is no
tbeing charged.
Aw arning tone also sounds.
Possible causes are:
R a defective alternator
R a torn poly-V-belt
R a malfunction in the electronics
X Pull ove rand stop the vehicle safely and switch off the engine,
paying attention to road and traffic conditions.
X Ope nthe hood.
X Check whether the poly-V-belt is torn.
If the poly-V-belt is torn:
! Do not continue driving. The engine could otherwise overheat.
X Consult a qualified specialist workshop.
If the poly-V-belt is not damaged:
X Visit a qualified specialist workshop. #
Battery /
Alternator Stop
Vehicle The battery is defective.
You will need to use considerably more force to brake. The brake
pedal travel and braking distance will increase. If necessary,
depress the brake pedal with maximum force.
X
Pull over and stop the vehicle safely as soon as possible, paying
attention to road and traffic conditions. Do not continue driving
under any circumstances.
X Apply the parking brake.
X Consult a qualified specialist workshop. 4
Check engine oil
level at next
refueling The engine oil level has dropped to the minimum level.
Aw
arning tone also sounds.
X Chec kthe oil level when next refueling, at the latest
(Y page 286).
X If necessary, add engine oil (Y page 286).
X Have the engine checked at a qualified specialist workshop if
engine oil needs to be added more often than usual.
! Avoid long journeys with too little engine oil. The engine will
otherwise be damaged.
Information on approved engine oils can be obtained from any
qualified specialist workshop or on the Internet at http://
www.mbusa.com (USA only). 226
Display messagesOn-board computer and displays
Page 288 of 364

!
Make sure that the windshieldw ipers are
not folded away fro mthe windshield. You
could otherwise damage the windshield
wipers or the hood. X
Make sure that the windshield wipers are
turned off.
X Pull release lever :on the hood.
The hood is released. X
Reach into the gap, pull hood catch
handle ;up and lift the hood.
If you lift the hood approximately
15 inches (40c m), the hood is opened and
held open automatically by the gas-filled
struts.
Closing the hood G
WARNING
When closing the hood, use extreme caution
not to catch hands or fingers. Be careful that
you do not close the hood on anyone.
Make sure the hood is securely engaged
before driving off. Do not continue driving if
the hood can no longer engage after an accident, for example. The hood could
otherwise come loose while the vehicle is in
motion and injure you and/oro
thers.
X Lower the hood and le titfall from a height
of approximately 8inche s(20cm).
X Check that the hood has engaged properly.
If the hood can be raised slightly, it is not
properly engaged. Open it again and close
it with a little more force. Radiator
Vehicles with adiesel engine: do not cover
the radiator, for example with a winter front
or bug cover. The reading softhe on-board-
diagnostic system may otherwise be
inaccurate. Some of these readings are
required by law and must be accurate at all
times. Engine oil
General notes Depending on the driving style, the vehicle
consumes up to 0.9 US qts (0.8 l) of oil over
a distance of 600 miles (1000 km). The oil
consumption may be higher than this when
the vehicle is new or if you frequently drive at
high engine speeds.
Depending on the engine, the oil dipstick may
be in a different location.
When checking the oil level:
R
park the vehicle on a level surface.
R the engine should be switched off for
approximately five minutes if the engine is
at normal operating temperature.
R if the engine is not at normal operating
temperature, e.g. if the engine was only
started briefly: wait about 30 minutes
before carrying out the measurement. Engine compartment
285Maintenance and care Z
Page 289 of 364

Checking the oil level using the oil
dipstick
Example
:vehicles with a gasoline engine Example: vehicles with a diesel engine
X
Pull oil dipstick :out of the dipstick guide
tube.
X Wipe off oil dipstick :.
X Slowly slide oil dipstick :into the guide
tube to the stop, and take it out again.
If the level is between MIN mark =and
MAX mark ;, the oil level is correct.
X If the oil level has dropped to MIN mark
= or below, add 1.1 US qt (1.0 liter) of
engine oil.
Adding engine oil G
WARNING
If engine oil comes into contact with hot
engine parts, it may ignite and you could burn
yourself. Do not spill any engine oil on hot
engine parts. H
Environmental note
When adding oil, take care not to spill any. If
oil enters the soil or waterways, it is harmful
to the environment.
! Only use engine oils and oil filters that
have been approved for vehicles with a
service system. You can obtain a list of the
engine oils and oil filters tested and
approved in accordance with the
Mercedes-Benz Specifications for Service
Products at any Mercedes-Benz Service
center.
Damage to the engine or exhaust system is
caused by the following:
R using engine oils and oil filters that have
not been specifically approved for the
service system
R replacing engine oil and oil filters after
the interval for replacemen tspecified by
the service system has been exceeded
R using engine oil additives.
! Do not add too much oil. adding too much
engine oil can result in damage to the
engine or to the catalytic converter. Have
excess engine oil siphoned off. Example: engine oil cap
X
Turn cap :counter-clockwise and remove
it.
X Add engine oil.
If the oil level is at or below the MIN mark
on the oil dipstick, add 1.1 US qt (1.0 liter)
of engine oil. 286
Engine compartmentMaintenance and care