2013 MERCEDES-BENZ M-Class roof
[x] Cancel search: roofPage 188 of 458
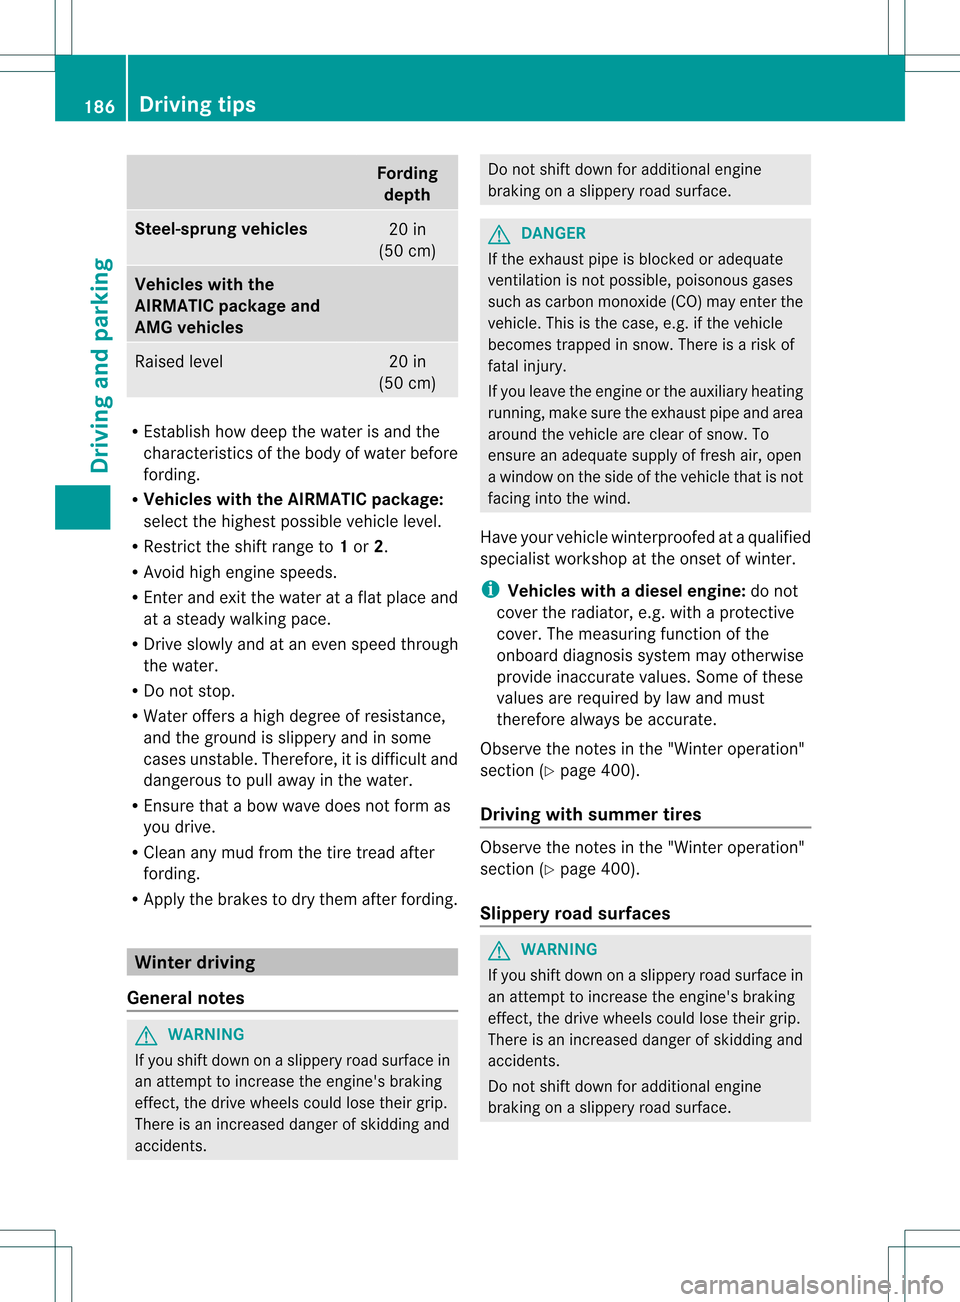
Fording
depth Steel-sprung vehicles
20 in
(50 cm) Vehicles with the
AIRMATIC package and
AMG vehicles
Raised level 20 in
(50 cm) R
Establish how deep the wate ris and the
characteristics of the body of water before
fording.
R Vehicles with the AIRMATIC package:
select the highest possible vehicle level.
R Restrict the shift range to 1or 2.
R Avoid high engine speeds.
R Enter and exit the water at a flat place and
at a steady walking pace.
R Drive slowly and at an even speed through
the water.
R Do not stop.
R Water offers a high degree of resistance,
and the ground is slippery and in some
cases unstable. Therefore, it is difficult and
dangerous to pull away in the water.
R Ensure that a bow wave does not form as
you drive.
R Clean any mud from the tire tread after
fording.
R Apply the brakes to dry them after fording. Winter driving
General notes G
WARNING
If you shift down on a slippery road surface in
an attempt to increase the engine's braking
effect, the drive wheels could lose their grip.
There is an increased danger of skidding and
accidents. Do not shift down for additional engine
braking on a slippery road surface.
G
DANGER
If the exhaust pipe is blocked or adequate
ventilation is not possible, poisonous gases
such as carbon monoxide (CO) may enter the
vehicle. This is the case, e.g. if the vehicle
becomes trapped in snow. There is a risk of
fatal injury.
If you leave the engine or the auxiliary heating
running, make sure the exhaust pipe and area
around the vehicle are clear of snow. To
ensure an adequate supply of fresh air, open
a window on the side of the vehicle that is not
facing into the wind.
Have your vehicle winterproofed at a qualified
specialist workshop at the onset of winter.
i Vehicles with adiesel engine: do not
cover the radiator, e.g. with a protective
cover. The measuring function of the
onboard diagnosis syste mmay otherwise
provide inaccurate values .Some of these
values are required by law and must
therefore always be accurate.
Observe the notes in the "Winter operation"
section (Y page 400).
Driving with summer tires Observe the notes in the "Winter operation"
section (Y
page 400).
Slippery road surfaces G
WARNING
If you shift down on a slippery road surface in
an attempt to increase the engine's braking
effect, the drive wheels could lose their grip.
There is an increased danger of skidding and
accidents.
Do not shift down for additional engine
braking on a slippery road surface. 186
Driving tipsDriving and parking
Page 190 of 458

damaging the vehicle, make sure there is
always sufficient ground clearance.
R Check that items of luggage and loads are
stowed safely and are well secured
(Y page 337).
R Always keep the engine running and in gear
when driving on a downhill gradient.
Activate DSR( Ypage 246).
R Always keep the doors, tailgate, windows
and sliding sunroof closed while driving.
R Adapt your speed to the terrain. The
rougher, steeper or more ruts on the
terrain, the slower your speed should be.
R Drive slowly and at an even speed through
the water. Ensure that a bow wave does not
form as you drive.
R Drive with extreme care on unfamiliar off-
road routes where visibility is poor. For
safety reasons, get out of the vehicle first
and survey the off-road route.
R Look out for obstacles, such as rocks,
holes, tree stumps and furrows.
R Check the depth of water before fording
rivers and streams.
R When fording, do not stop and do not
switch off the engine.
R On sand, drive quickly to overcome the
rolling resistance. Otherwise the vehicle's
wheels could become stuc kinloose
ground.
R Do not jump with the vehicle as this will
interrupt the vehicle's propulsion.
R Always keep the engine running and in gear
when driving on a slope.
R Do not shift the automatic transmission to
transmission position N.
i Do not use the HOLD function when
driving off-road, on steep uphill or downhill
gradients or on slippery or loose surfaces.
The HOLD function cannot hold the vehicle
on such surfaces. Checklist before driving off-road !
If the engine oil warning lamp lights up
while the vehicle is in motion, stop the
vehicle in a safe place as soon as possible.
Check the engine oil level. The engine oil
warning lamp warning must not be ignored.
Continuing the journey while the symbol is
displayed could lead to engine damage.
X Engine oil level: check the engine oil level
and add oil if necessary.
When driving on steep gradients, the
engine oil level must be sufficiently high to
ensure a correc toil supply in the vehicle.
X DEF tank (BlueTEC vehicles): check the
fluid level and, if necessary, refill to the
maximum (13 l) (Y page 177).
X Wheel-changing tool kit: check that the
jac kis working and make sure you have the
lug wrench, a robust tow cable and a folding
spade in the vehicle.
X Wheels and tires: check the tire tread
depth and tire pressure.
X Check for damage and remove any foreign
objects, e.g. small stones, from the
wheels/tires.
X Replace any missing valve caps.
X Replace dented or damaged wheels.
X Rims: dented or bent rims can result in a
loss of tire pressure and damage the tire
bead. Therefore, check your rims before
driving off-road and replace them as
required.
Checklist after driving off-road !
If you detect damage to the vehicle after
driving off-road, have the vehicle checked
immediately at a qualified specialist
workshop.
X Deactivate DSR (Y page 246).
X Vehicles with the AIRMATIC package:
lower the vehicle to a ride height suitable
for the road conditions, e.g. to the
highway/high-speed level. 188
Driving tipsDriving and parking
Page 217 of 458

If there is an obstacle within this range, the
relevant warning displays lightu p and a
warning tone sounds. If the distance falls
below the minimum, the distance may no
longer be shown.
Warning displays Warning display for the fron
tarea
0002 Segments on the left-hand side of the
vehicle
0003 Segments on the right-hand side of the
vehicle
001F Segments showing operational readiness
The warning displays show the distance
betwee nthe sensors and the obstacle. The
warning display for the front area is located
on the dashboard above the center air vents.
The warning display for the rear area is in the
roof lamp in the rear compartment.
The warning display for each side of the
vehicle is divided into five yellow and two red
segments. PARKTRONIC is operational if
yellow segments showing operational
readiness 001Flight up.
The selected transmission position and the
direction in which the vehicle is rolling
determine which warning display is active
when the engine is running. Transmission
position Warning display
D
Front area activated
R,
Nor the vehicle
is rolling
backwards Rear and front areas
activated P
No areas activated
One or more segments light up as the vehicle
approaches an obstacle, depending on the
vehicle's distance from the obstacle.
From the:
R
sixth segment onwards, you will hear an
intermittent warning tone for
approximately two seconds.
R seventh segment onwards, you will hear a
warning tone for approximately two
seconds. This indicates that you have now
reached the minimum distance.
Deactivating/activating PARKTRONIC 0002
Indicator lamp
0003 Deactivating/activating PARKTRONIC
If indicator lamp 0002lights up, PARKTRONIC is
deactivated. Active Park Assist is then also
deactivated.
i PARKTRONIC is automatically activated
when you turn the SmartKey to position 2
in the ignition lock. Driving systems
215Driving and parking Z
Page 345 of 458
cargo compartment floor, fasten it with the
press studs. Roof carrier
Important safety notes G
WARNING
Whe nyou load the roof, the center of gravity
of the vehicle rises and the driving
characteristics change. If you exceed the
maximum roof load, the driving
characteristics, as well as steering and
braking, will be greatly impaired. There is a
risk of an accident.
Never exceed the maximum roof load and
adjust your driving style.
! Mercedes-Benz recommends that you
only use roof carriers that have been tested
and approved for Mercedes-Benz vehicles.
This helps to prevent damage to the
vehicle.
Position the load on the roof carrier in such
a way that the vehicle will not sustain
damage even when it is in motion.
Depending on the vehicle equipment,
ensure that when the roof carrier is
installed you can:
R raise the sliding sunroof fully
R open the panorama roof with power tilt/
sliding panel fully
R open the tailgate fully
The maximum roof load is 220 lbs(100 kg). Attaching the roof carrier X
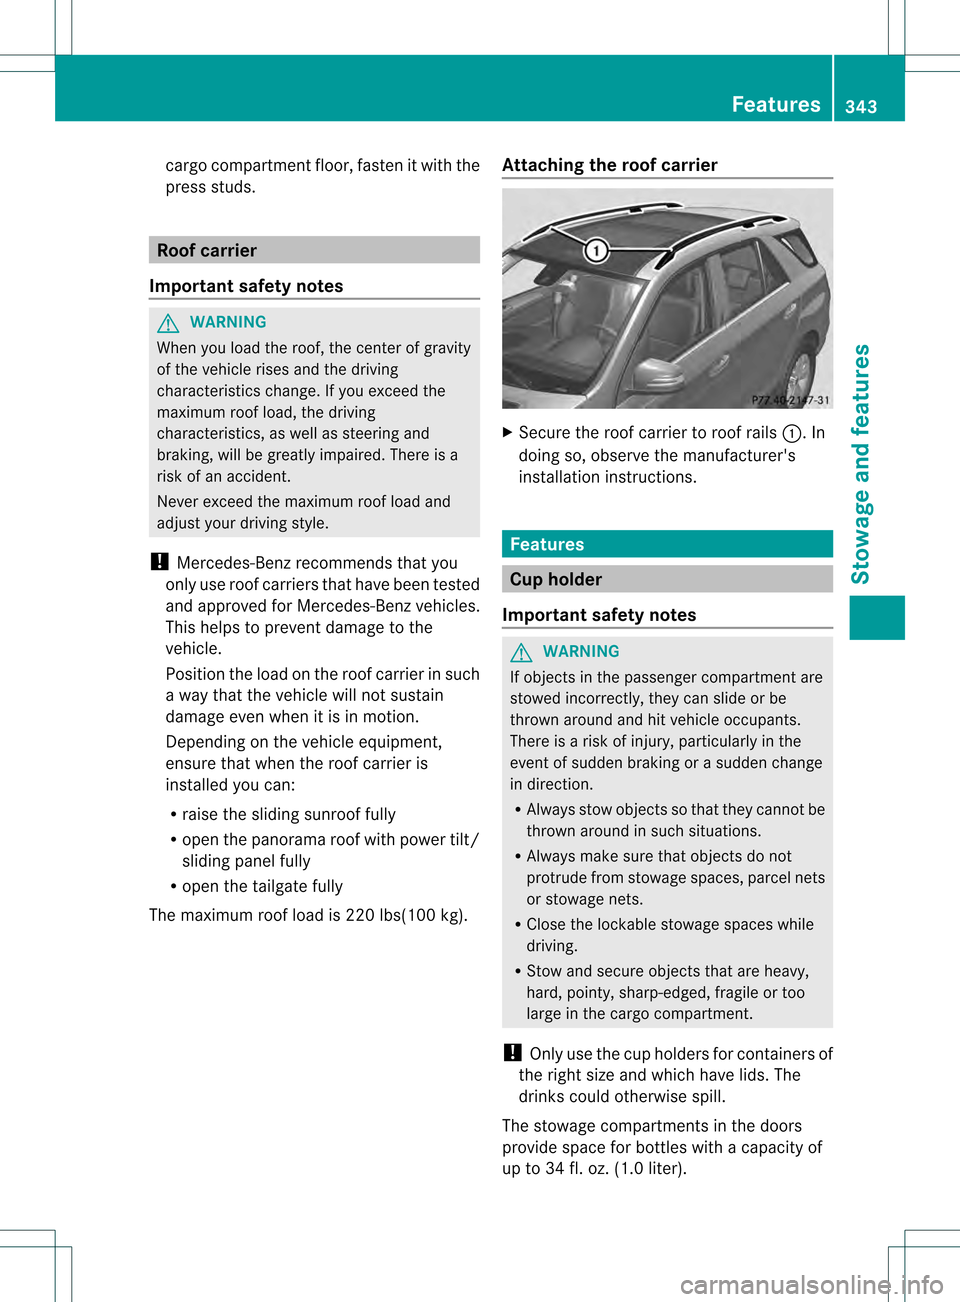
Secure the roof carrier to roof rails 0002. In
doing so, observe the manufacturer's
installation instructions. Features
Cup holder
Important safety notes G
WARNING
If objects in the passenger compartment are
stowed incorrectly, they can slide or be
thrown around and hit vehicle occupants.
There is a risk of injury, particularly in the
event of sudden braking or a sudden change
in direction.
R Always stow objects so that they cannot be
thrown around in such situations.
R Always make sure that objects do not
protrude from stowage spaces, parcel nets
or stowage nets.
R Close the lockable stowage spaces while
driving.
R Stow and secure objects that are heavy,
hard, pointy, sharp-edged, fragile or too
large in the cargo compartment.
! Only use the cup holders for containers of
the right size and which have lids. The
drinks could otherwise spill.
The stowage compartments in the doors
provide space for bottles with a capacity of
up to 34 fl. oz. (1.0 liter). Features
343Stowage and features Z
Page 372 of 458

should drive for a few minutes after
cleaning. Braking heats the brake discs and
the brake pads/linings, thus drying them.
The vehicle can then be parked.
Regular care of your vehicle is a condition for
retaining the quality in the long term.
Use care products and cleaning agents
recommended and approved by Mercedes-
Benz. Washing the vehicle and cleaning the
paintwork
Automatic car wash G
WARNING
Braking efficiency is reduced after washing
the vehicle. There is a risk of an accident.
After the vehicle has been washed, brake
carefully while paying attention to the traffic
conditions until full braking power is restored.
! If DISTRONIC PLUS or the HOLD function
is activated, the vehicle brakes
automatically in certain situations. To
prevent damage to the vehicle, deactivate
DISTRONIC PLUS and the HOLD function in
the following or other similars ituations:
R when towing the vehicle
R in the car wash
! Neve rclean your vehicle in a Touchless
Automatic Car Wash as these use special
cleaning agents. These cleaning agents can
damage the paintwork or plastic parts.
! Make sure that:
R the side windows and the sliding sunroof
are fully closed.
R the ventilation/heating is switched off
(the OFF button has been pressed).
R the windshield wiper switch is in position
0.
Otherwise, the vehicle might be damaged.
! In car washes with a towing mechanism,
make sure that the automatic transmission is in transmission position
N, otherwise the
vehicle could be damaged.
R Vehicles with a SmartKey:
Do not remove the SmartKey from the
ignition lock. Do not open the driver's
door or front-passenger door when the
engine is switched off .Otherwise, the
automatic transmission selects park
position Pautomatically and locks the
wheels .You can prevent this by shifting
the automatic transmission to N
beforehand.
R Vehicles with KEYLESS-GO:
Do not open the driver's door or front-
passenger door when the engine is
switched off. Otherwise, the automatic
transmission selects park position P
automatically and locks the wheels.
Observe the following to make sure that the
automatic transmission stays in position N:
X Make sure the vehicle is stationary and the
ignition is switched off.
X Turn the SmartKey to position
2(Y page 157) in the ignition lock.
Use the SmartKey instead of the Start/
Stop button on vehicles with KEYLESS-GO.
X Depress and hold the brake pedal.
X Shift the automatic transmission to
position N.
X Release the brake pedal.
X Release the electric parking brake.
X Switch off the ignition and leave the
SmartKey in the ignition lock.
You can wash the vehicle in an automatic car
wash from the very start.
If the vehicle is very dirty, pre-wash it before
cleaning it in an automatic car wash.
After using an automatic car wash, wipe off
wax from the windshield and the wiper
blades. This will prevent smears and reduce
wiping noises caused by residue on the
windshield. 370
CareMaintenance and care
Page 373 of 458
Washing by hand
In some countries, washing by hand is only
allowed at specially equipped washing bays.
Observe the legal requirements in all
countries concerned.
X Do not use hot water and do not wash the
vehicle in direct sunlight.
X Use a soft sponge to clean.
X Use a mild cleaning agent, such as a car
shampoo approved by Mercedes-Benz.
X Thoroughly hose dow nthe vehicle with a
gentle jet of water.
X Do not point the water jet directly towards
the air inlets.
X Use plenty of water and rinse out the
sponge frequently.
X Rinse the vehicle with clean water and dry
thoroughly with a chamois.
X Do not let the cleaning agent dry on the
paintwork.
When using the vehicle in winter, remove all
traces of road salt deposits carefully and as
soon as possible.
Powerw ashers G
WARNING
The water jet from a circular jet nozzle (dirt
blasters) can cause invisibl eexterior damage
to the tires or chassis components.
Components damaged in this way may fail
unexpectedly .There is a risk of an accident.
Do not use power washers with circular jet
nozzles to clean the vehicle. Have damaged
tires or chassis components replaced
immediately.
! Always maintain a distance of at least
11.8 in (30 cm) between the vehicle and the
power washer nozzle. Information about
the correct distance is available from the
equipment manufacturer.
Move the power washer nozzle around
when cleaning your vehicle. Do not aim directly at any of the following:
R
tires
R door gaps, roof gaps, joints, etc.
R electrical components
R battery
R connectors
R lights
R seals
R trim
R ventilation slots
Damaged seals or electrical components
can lead to leaks or failures.
Cleaning the paintwork !
Do not affix:
R stickers
R films
R magnetic plates or similar items
to painted surfaces. You could otherwise
damage the paintwork.
Scratches, corrosive deposits, areas affected
by corrosion and damage caused by
inadequate care cannot always be completely
repaired. In such cases, visit a qualified
specialist workshop.
X Remove dirt immediately, where possible,
while avoiding rubbing too hard.
X Soak insect remains with insect remover
and rinse off the treated areas afterwards.
X Soak bird droppings with water and rinse
off the treated areas afterwards.
X Remove coolant, brake fluid, tree resin,
oils, fuels and greases by rubbing gently
with a cloth soaked in petroleum ether or
lighter fluid.
X Use tar remover to remove tar stains.
X Use silicone remover to remove wax.
If water no longer forms "beads" on the paint
surface, use the paint care products
recommended and approved by Mercedes-
Benz.T his is the case approximately every Care
371Maintenance and care Z
Page 379 of 458
Cleaning the seat belts
G
WARNING
Seat belts can become severely weakened if
bleached or dyed. This could cause the seat
belts to tear or fail, for instance, in the event
of an accident. This pose sanincreased risk
of injury or fatal injury.
Never bleach or dye the sea tbelts.
! Do not clean the seat belts using chemical
cleaning agents .Do not dry the seat belts
by warming them above 176 ‡ (80 †) or
placing them in direct sunlight.
X Use clean, lukewarm water and soap
solution.
Cleaning the roof lining and carpets X
Headliner: if it is very dirty, use a soft brush
or dry shampoo.
X Carpets: use the carpet and textile
cleaning agents recommended and
approved by Mercedes-Benz. Care
377Maintenance and care Z
Page 402 of 458
Bar indicator
0002for tread wear is integrated
into the tire tread.
Treadwear indicators (TWI) are required by
law. Six indicators are positioned on the tire
tread. They are visible once the tread depth
is approximately 0008in (1.6 mm). If this is the
case, the tire is so worn that it mus tbe
replaced. Selecting, mounting and replacing
tires
R Only mount tires and wheels of the same
type and make.
Exception: it is permissible to install a
different type or make in the event of a flat
tire. Observe the "MOExtended tires (tires
with run-flat characteristics" section
(Y page 382).
R Only mount tires of the correct size onto
the wheels.
R Break in new tires at moderate speeds for
the first 60 miles (100 km) .They only reach
their full performance after this distance.
R Do not drive with tires which have too little
tread depth, as this significantly reduces
the traction on wet roads (hydroplaning).
R Replace the tires after six years at the
latest, regardless of wear.
Observe the notes on the emergency spare
wheel (Y page 436). MOExtended tires (tires with run-flat
properties)
With MOExtended tires (tires with run flat
characteristics), you can continue to drive
your vehicle even if there is a total loss of
pressure in one or more tires.
MOExtended tires may only be used in
conjunction with an active tire pressure loss
warning system or with an active tire pressure
monitor and on wheels specifically tested by
Mercedes-Benz. Notes on driving with MOExtended tires with
a flat tire (Y
page 382).
i Vehicles equipped with MOExtended tires
are not equipped with a TIREFIT kit at the
factory. It is therefore recommended that
you additionally equip your vehicle with a
TIREFIT kit if you mount tires that do not
feature run-flat properties, e.g. winter tires.
A TIREFIT kit can be obtained from a
qualified specialist workshop. Winter operation
General notes
Have your vehicle winterproofed at a qualified
specialist workshop at the onset of winter.
Observe the notes in the "Changing a wheel"
section (Y page 421). Driving with summer tires
At temperatures below 45 ‡(+7 †), summer
tires lose elasticity and therefore traction and
braking power. Change the tires on your
vehicle to M+S tires. Using summer tires at
very cold temperatures could cause cracks to
form, thereby damaging the tires
permanently. Mercedes-Benz cannot accept
responsibility for this type of damage. M+S tires
G
WARNING
M+S tires with a tire tread depth of less than
000A in (4 mm) are not suitable for use in winter
and do not provide sufficient traction. There
is a risk of an accident.
M+S tires with a tread depth of less than 000A
in (4 mm) must be replaced immediately.
At temperatures below 45 ‡ (+7 †), use
winter tires or all-season tires. Both types of
tire are identified by the M+S marking. 400
Winter operationWheels and tires