2013 MERCEDES-BENZ M-Class Cargo
[x] Cancel search: CargoPage 341 of 458

Removing/installing the cargo
compartment cove
r(withou tintegrated
cargo net) X
To remove: make sure that cargo
compartment cover 0002is rolled up.
X Push end cap 001Fof cargo compartment
cover 0002in the direction of the arrow on
the right or left-hand side.
X Push cargo compartment cover 0002into
opposite anchorage 0003.
X Remove cargo compartment cover 0002.
X To install: if installed, remove the
protective caps from the side panels of the
seat row in which the cargo compartment
cover is to be installed. Use a suitable
objec there, e.g. a coin.
X Install the protective caps to the side
panels of the other seat row.
X Place cargo compartment cover 0002into
anchorage 0003on the right or left-hand side.
X Push in opposite end cap 001Fof cargo
compartment cover 0002in the direction of
the arrow and insert cargo compartment
cover 0002into opposite anchorage 0003.Removing/installing the combined
cargo cover and net (cargo
compartment cover with integrated
cargo net) You can install and remove the combined
cargo cover and net from the cargo
compartment.
X
Make sure that the cargo net and the cargo
compartment cover are rolled up.
X To remove: press button 0003.
X Swing the combined cargo cover and net in
the direction of the arrow.
X First, detach the combined cargo cover and
net from left-hand catch 0002and then
remove it from right-hand fixture 001F.
X To install: push the combined cargo cover
and net up to the stop into right-hand
fixture 001F.
X Place the combined cargo cover and net
into the left-hand fixture and push it into
catch 0002until the combined cargo cover
and net engages audibly. Stowage areas
339Stowage and features Z
Page 342 of 458

X
Make sure that red lock status
indicator 001Eis no longer visible. The
combined cargo cover and net will
otherwise not be locked in place. Cargo net in combined cargo cover
and net
Important safety notes G
WARNING
On its own, the cargo net cannot secure or
restrain heavy objects, items of luggage and
heavy loads. You could be hit by an unsecured
load during sudden changes in direction,
braking or in the event of an accident. There
is an increased risk of injury or even fatal
injury.
Always store objects so that they cannot be
flung around. Secure objects, luggage or
loads against slipping or tipping over, e.g. by
using tie downs, even if you are using the
cargo net.
It is important to use a cargo net if you load
the vehicle with small objects above the seat
backrests.F or safety reasons, always use a
cargo net when transporting loads.
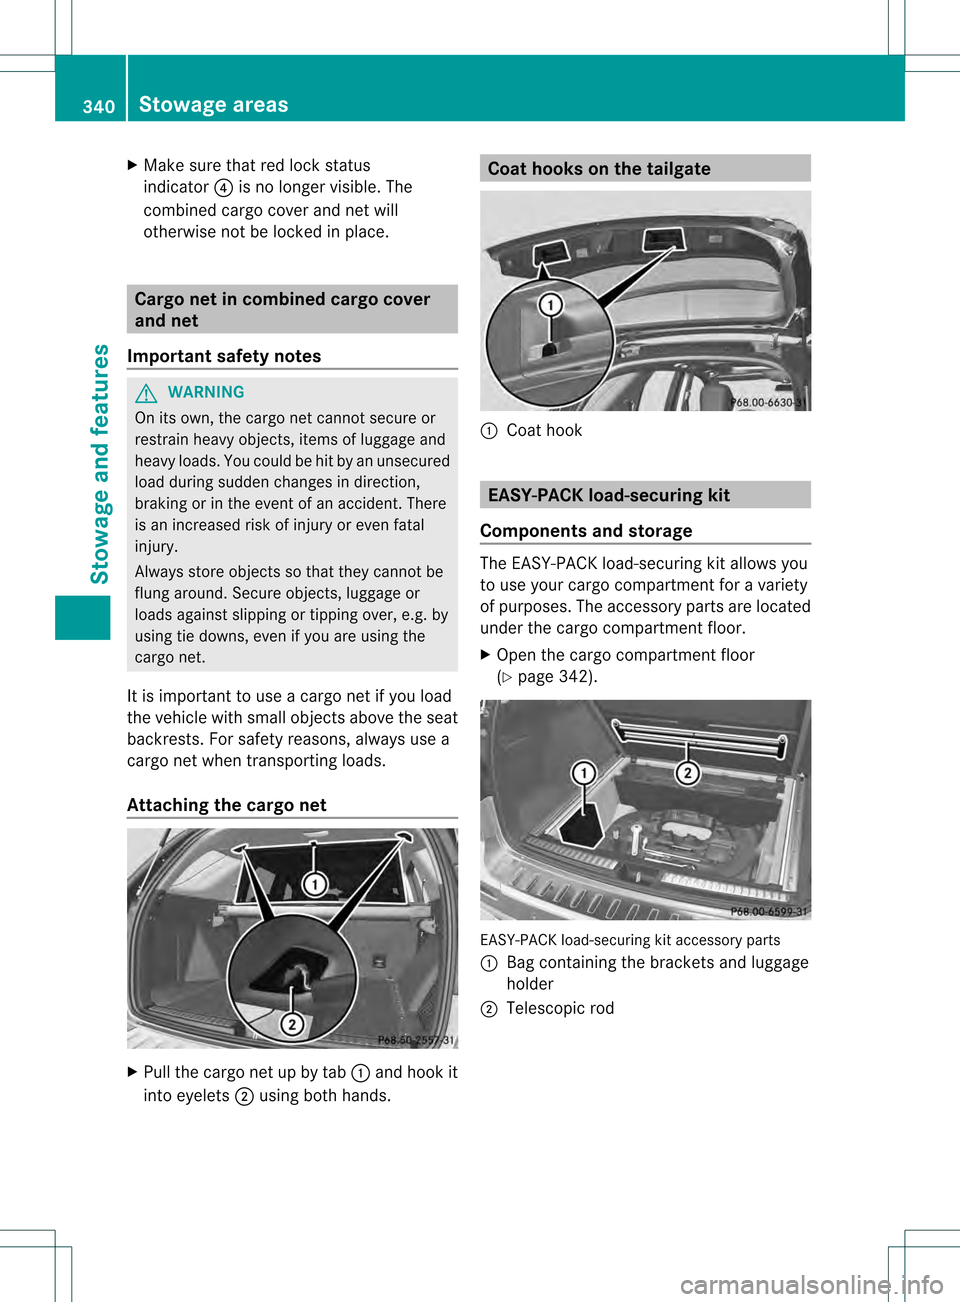
Attaching the cargo net X
Pull the cargo net up by tab 0002and hook it
into eyelets 0003using both hands. Coat hooks on the tailgate
0002
Coat hook EASY-PACK load-securing kit
Components and storage The EASY-PACK load-securing kit allows you
to use your cargo compartment for a variety
of purposes. The accessory parts are located
under the cargo compartment floor.
X
Open the cargo compartment floor
(Y page 342). EASY-PACK load-securing kit accessory parts
0002
Bag containing the brackets and luggage
holder
0003 Telescopic rod 340
Stowage areasStowage and features
Page 343 of 458

Inserting the brackets int
othe loading
rail X
Insert bracket 0002into the center of loading
rail 001E.
X Press release button 0003and push
bracket 0002into the desired position in
loading rail 001E.
X Let go of release button 0003.
X Press locking button 001F.
Bracket 0002is locked in loading rail 001E.
X If necessary, fold cargo tie-dow nring 001C
upwards.
Luggage holder !
Only use the luggage holder to secure
cargo with a maximum weight of 15.4 lbs
(7 kg) and with dimensions that the luggage
holder can safely and securely contain. The luggage holder can be used to secure
light loads against the side wall of the cargo
compartment to prevent them from moving
around. X
To install: insert two brackets 001Cinto the
left or right loading rail (Y page 340).
X Press release button 0002of the luggage
holder and pull the strap out slightly.
X Insert luggage holder 0003into brackets 001C
and, while doing so, press release button
001F and push the luggage holder downwards
until it engages.
X Press release button 0002of the luggage
holder and pull the strap out in the direction
of the arrow.
X Place the load between the strap and the
cargo compartmen tside wall.
X Using one hand, press locking button 0002of
the luggage holder.
X With your other hand, let the strap go slowly
until the load is secured.
X Make sure that locking button 001Eon
brackets 001Cis pressed.
This keeps brackets 001Cin place on the
loading rail.
X To remove: press release button 001Fon
respective bracket 001Cand remove luggage
holder 0003by pulling upwards and out.
Telescopic rod The telescopic rod can be used to secure the
load against the rear seats to prevent it from
moving around. Stowage areas
341Stowage and features Z
Page 344 of 458

X
To install: insert one bracket 0003into both
the left and the right loading rails and slide
it to the desired positio n(Ypage 340).
X Insert telescopic rod 0002into brackets 0003
and, while doing so, press release
button 001Eand push the rod downwards
until it engages.
X Make sure that locking button 001Fon
brackets 0003is pressed.
This keeps brackets 0003in place on the
loading rail.
X To remove: press release button 001Eon
respective bracket 0003and remove
telescopic rod 0002by pulling it upwards and
out. Stowage well under the cargo
compartment floor
G
WARNING
If you drive when the cargo compartment floor
is open, objects could be flung around, thus
striking vehicle occupants. There is a risk of
injury, particularly in the event of sudden
braking or a sudden change in direction.
Always close the cargo compartment floor
before a journey. A removable insert under the cargo
compartment floor contains the parts of the
EASY-PACK load-securing kit. The tire-
change tool kit is stored beneath this insert. X
To open: holding the ribbing, press
handle 0002downwards 0003.
Handle 0002folds up.
X Swing the cargo compartment floor
upwards using handle 0002until it rests
against the cargo compartment cover. X
Fold out hook 001Fon the underside of the
cargo compartment floor in the direction of
the arrow. X
Attach hook 001Fto the cargo
compartment's upper seal 001E.
X To close: detach hook 001Ffrom the cargo
compartment's upper seal 001E.
X Fasten hook 001Fto the bracket on the
underside of the cargo compartment floor.
X Fold the trunk floor down.
X Press the cargo compartment floor
down 0003until it engages.
i To remove the cargo compartment floor,
undo the press studs below the cargo
compartment floor. When you re-install the 342
Stowage areasStowage and features
Page 345 of 458

cargo compartment floor, fasten it with the
press studs. Roof carrier
Important safety notes G
WARNING
Whe nyou load the roof, the center of gravity
of the vehicle rises and the driving
characteristics change. If you exceed the
maximum roof load, the driving
characteristics, as well as steering and
braking, will be greatly impaired. There is a
risk of an accident.
Never exceed the maximum roof load and
adjust your driving style.
! Mercedes-Benz recommends that you
only use roof carriers that have been tested
and approved for Mercedes-Benz vehicles.
This helps to prevent damage to the
vehicle.
Position the load on the roof carrier in such
a way that the vehicle will not sustain
damage even when it is in motion.
Depending on the vehicle equipment,
ensure that when the roof carrier is
installed you can:
R raise the sliding sunroof fully
R open the panorama roof with power tilt/
sliding panel fully
R open the tailgate fully
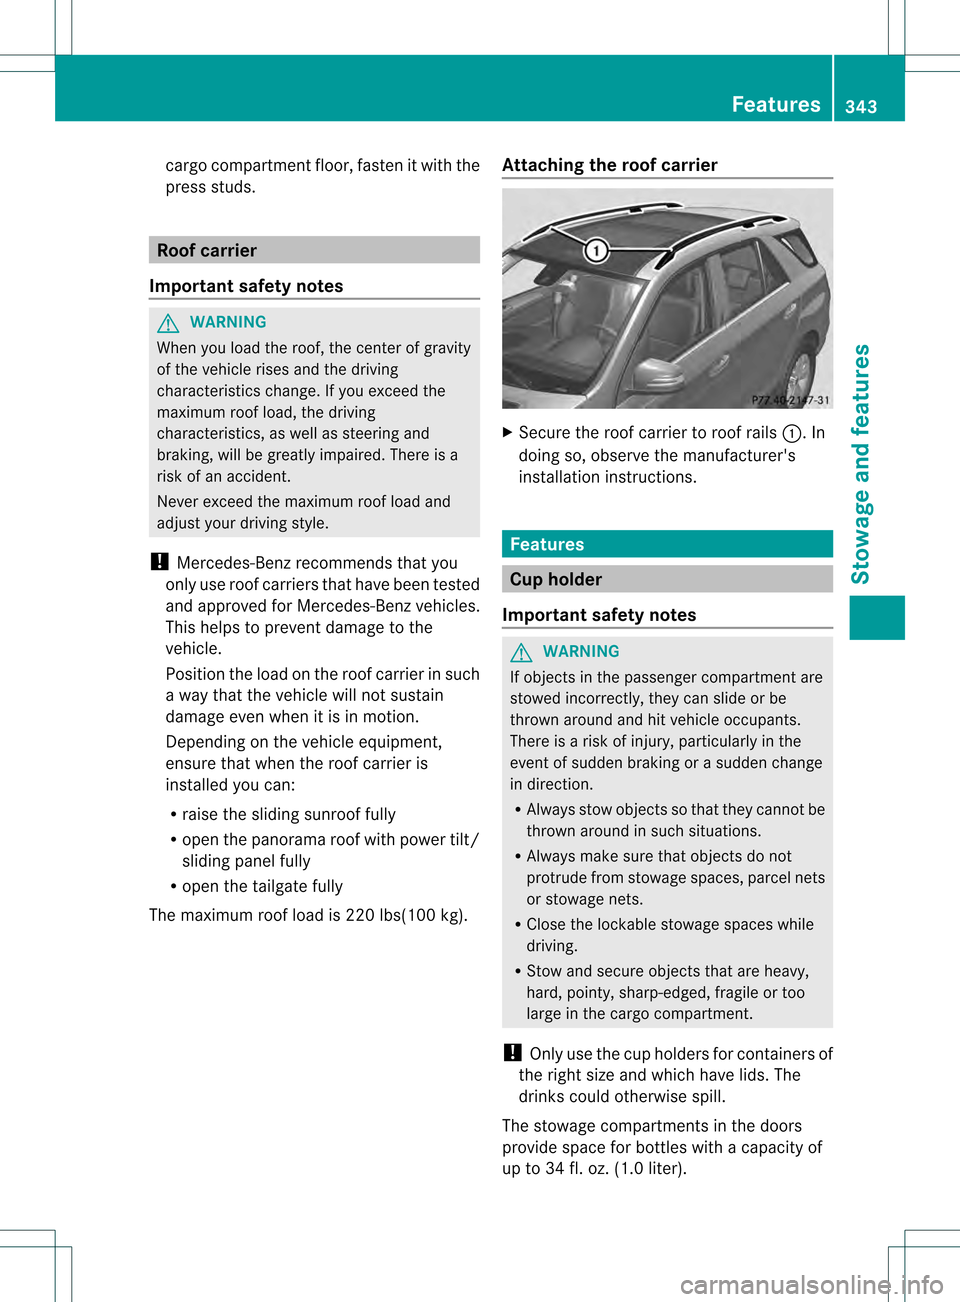
The maximum roof load is 220 lbs(100 kg). Attaching the roof carrier X
Secure the roof carrier to roof rails 0002. In
doing so, observe the manufacturer's
installation instructions. Features
Cup holder
Important safety notes G
WARNING
If objects in the passenger compartment are
stowed incorrectly, they can slide or be
thrown around and hit vehicle occupants.
There is a risk of injury, particularly in the
event of sudden braking or a sudden change
in direction.
R Always stow objects so that they cannot be
thrown around in such situations.
R Always make sure that objects do not
protrude from stowage spaces, parcel nets
or stowage nets.
R Close the lockable stowage spaces while
driving.
R Stow and secure objects that are heavy,
hard, pointy, sharp-edged, fragile or too
large in the cargo compartment.
! Only use the cup holders for containers of
the right size and which have lids. The
drinks could otherwise spill.
The stowage compartments in the doors
provide space for bottles with a capacity of
up to 34 fl. oz. (1.0 liter). Features
343Stowage and features Z
Page 350 of 458

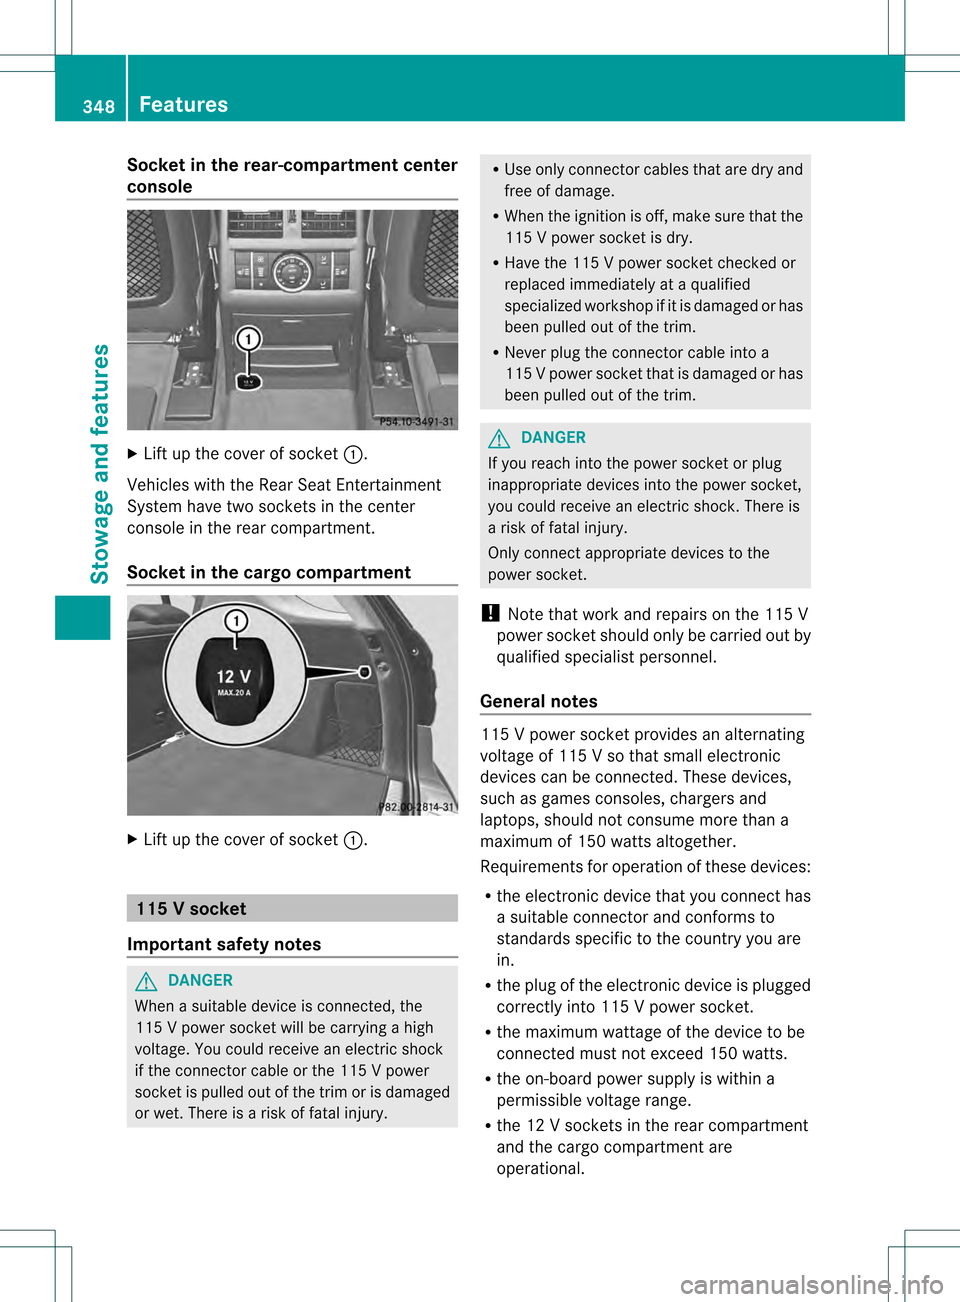
Socket in the rear-compartment center
console X
Lift up the cover of socket 0002.
Vehicles with the Rear Seat Entertainment
System have two sockets in the center
console in the rear compartment.
Socket in the cargo compartment X
Lift up the cover of socket 0002.115
Vsocket
Important safety notes G
DANGER
When a suitable device is connected, the
11 5Vp ower socket will be carrying a high
voltage. You could receive an electric shock
if the connector cable or the 115 V power
socket is pulled out of the trim or is damaged
or wet. There is a risk of fatal injury. R
Use only connector cables that are dry and
free of damage.
R When the ignition is off, make sure that the
115 V power socket is dry.
R Have the 115 V power socket checked or
replaced immediately at a qualified
specialized workshop if it is damaged or has
been pulled out of the trim.
R Never plug the connector cable into a
115 Vpower socket that is damaged or has
been pulled out of the trim. G
DANGER
If you reach into the power socket or plug
inappropriate devices into the power socket,
you could receive an electric shock. There is
a risk of fatal injury.
Only connect appropriate devices to the
power socket.
! Note that work and repairs on the 115 V
power socket should only be carried out by
qualified specialist personnel.
General notes 115 V power socket provides an alternating
voltage of 115 V so that small electronic
devices can be connected. These devices,
such as games consoles, chargers and
laptops, should not consume more than a
maximum of 150 watts altogether.
Requirements for operation of these devices:
R the electronic device that you connect has
a suitable connector and conforms to
standards specific to the country you are
in.
R the plug of the electronic device is plugged
correctly into 115 V power socket.
R the maximum wattage of the device to be
connected must not exceed 150 watts.
R the on-board power supply is within a
permissible voltage range.
R the 12 V sockets in the rear compartment
and the cargo compartment are
operational. 348
FeaturesStowage and features
Page 382 of 458

Useful information
i This Operator's Manual describes all
models and all standard and optional
equipment of your vehicle available at the
time of publication of the Operator's
Manual. Country-specific differences are
possible. Please note that your vehicle may
not be equipped with all features
described. This also applies to safety-
related systems and functions.
i Read the information on qualified
specialist workshops: (Y page 27).Where will I find...?
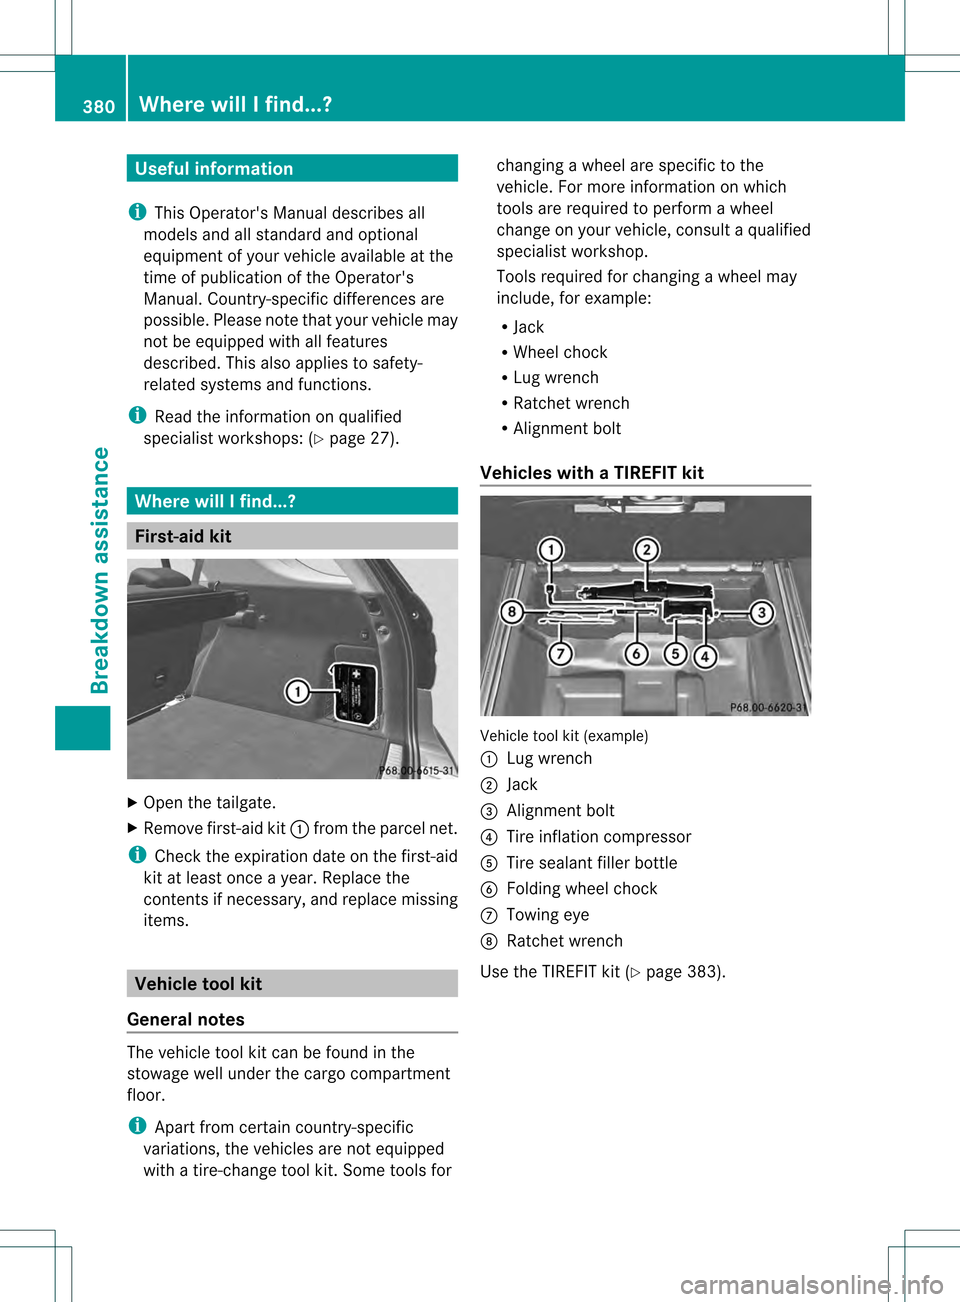
First-aid kit
X
Open the tailgate.
X Remove first-aid kit 0002from the parcel net.
i Check the expiration date on the first-aid
kit at least once a year. Replace the
contents if necessary, and replace missing
items. Vehicle tool kit
General notes The vehicle tool kit can be found in the
stowage well under the cargo compartment
floor.
i
Apart from certain country-specific
variations, the vehicles are not equipped
with a tire-change tool kit .Some tools for changing a wheel are specific to the
vehicle. For more information on which
tools are required to perform a wheel
change on your vehicle, consult a qualified
specialist workshop.
Tools required for changing
awheel may
include, for example:
R Jack
R Wheel chock
R Lug wrench
R Ratchet wrench
R Alignment bolt
Vehicles with aTIREFIT kit Vehicle tool kit (example)
0002
Lug wrench
0003 Jack
001F Alignmen tbolt
001E Tire inflation compressor
001C Tire sealant filler bottle
001D Folding wheel chock
0011 Towing eye
0012 Ratchet wrench
Use the TIREFIT kit (Y page 383).380
Where will I find...?Breakdown assistance
Page 383 of 458

Vehicles with
a"Minispare" emergency
spare wheel Example
:vehicles with AIRMATIC and trailer tow
hitch
0002 Folding wheel chock
0003 Lug wrench
001F Alignment bolt
001E Ball coupling of the trailer tow hitch
001C Towing eye
001D Jack
0011 Ratchet wrench
X Lift the cargo compartment floor up
(Y page 342).
X Remove the "Minispare" emergency spare
wheel (Y page 437). Flat tire
Preparing the vehicle
Your vehicle may be equipped with:
R MOExtended tires (tires with run-flat
properties) (Y page 382)
Vehicle preparation is not necessary on
vehicles with MOExtended tires.
R a TIREFIT kit (Y page 380)
R an emergency spare wheel (only for certain
countries) (Y page 436)
Information on changing/mounting a wheel
(Y page 421). X
Stop the vehicle on solid, non-slippery and
level ground, as far away as possible from
traffic.
X Switch on the hazard warning lamps.
X Secure the vehicle against rolling away
(Y page 179).
X If possible, bring the fron twheels into the
straight-ahead position.
X Vehicles with the AIRMATIC package:
make sure that highway level is selected
(Y page 209).
X Switch off the engine.
X Vehicles without KEYLESS-GO: remove
the SmartKey from the ignition lock.
X Vehicles with KEYLESS-GO: open the
driver's door.
The on-board electronics now have status
0.T his is the same as the key having been
removed.
X Vehicles with KEYLESS-GO: remove the
Start/Stop button from the ignition lock
(Y page 158).
X All occupants must get out of the vehicle.
Make sure that they are not endangered as
they do so.
X Make sure that no one is near the danger
area while a wheel is being changed.
Anyone who is not directly assisting in the
wheel change should, for example, stand
behind the barrier.
X Get out of the vehicle. Pay attention to
traffic conditions when doing so.
X Close the driver's door.
X Unload heavy luggage.
i Only operate the tire inflation compressor
using a 12 V socket, even if the ignition is
turned off (Y page 347).
An emergency cut-out ensures that the on-
board voltage does not drop too low. If the
on-board voltage is too low, the power to
the sockets is automatically cut. This
ensures that there is sufficient power to
start the engine. Flat tire
381Breakdown assistance