2013 MERCEDES-BENZ M-Class rear view mirror
[x] Cancel search: rear view mirrorPage 347 of 458

Sun visors
Overview G
WARNING
If the mirror cover of the vanity mirror is folded
up when the vehicle is in motion, you could be
blinded by incident light. There is a risk of an
accident.
Always keep the mirror cover folded down
while driving. 0002
Mirror light
0003 Bracket
001F Retaining clip, e.g. for a car park ticket
001E Vanity mirror
001C Mirror cover
Vanity mirror in the sun visor Mirror light
0002only functions if the sun visor
is clipped into bracket 0003and mirror cover
001C has been folded up.
Glare from the side X
Fold down sun visor 0002.
X Pull sun visor 0002out of retainer 001F.
X Swing sun visor 0002to the side.
X Slide sun visor 0002horizontally as required.
X Fold down additional sun visor 0003to the
windshield. Roller sunblinds on the rear side
windows
! Always guide the roller sunblind by hand.
Do not let it snap back suddenly as this
would damage the automatic roller
mechanism.
! Do not drive the vehicle with the roller
sunblind hooked in and the side windows
opened simultaneously .The roller sunblind
can jump out of the retainers and spring
back suddenly when driving at high speeds,
e.g. when driving on the freeway. This could
damage the inertia reel. Therefore, either
close the side window or retract the roller
sunblind before driving at high speeds. X
To extend: pull the roller sunblind out by
tab 0002and hook it onto retainers 0003at the
back of the window. Features
345Stowage and features Z
Page 361 of 458

Triggering the vehicle alarm
With this function, you can trigge
rthe
vehicle's panic alarm via SMS. An alarm
sounds and the exterior lighting flashes.
Depending on the setting, the panic alarm
lasts five or ten seconds. Afterwards, the
alarm switches off. Garage door opener
Important safety notes G
WARNING
When you operate or program the garage door
with the integrated garage door opener,
persons in the range of movement of the
garage door can become trapped or struck by
the garage door. There is arisk of injury.
When using the integrated garage door
opener, always make sure that nobody is
within the range of movement of the garage
door. G
WARNING
Combustion engines emit poisonous exhaust
gases such as carbo nmonoxide. Inhaling
these exhaust gases leads to poisoning. There
is a risk of fatal injury. Therefore never leave
the engine running in enclosed spaces
without sufficient ventilation.
The HomeLink ®
garage door opener
integrated in the rear-view mirror allows you
to operate up to three different door and gate
systems.
Only operate garage doors using the
integrated garage door opener if:
R they are equipped with a safety stop and
reverse feature, and
R they conform to the current U.S. safety
standards.
When programming a garage door opener,
park vehicle outside the garage.
i Certain garage door drives are
incompatible with the integrated garage door opener. If you have difficulty
programming the integrated garage door
opener, contact an authorized Mercedes-
Benz Center.
Alternatively, you can call the following
telephone assistance services:
R USA: Mercedes-Benz Customer
Assistance Center at
1-800-FOR-MERCedes
R Canada: Customer Service at
1-800-387-0100
R HomeLink ®
hotline 1-800-355-3515
(free of charge)
More information on HomeLink ®
and/or
compatible products is also available
online at http://www.homelink.com.
i Notes on the declaration of conformity
(Y page 27).
Programming Programming buttons
Observe the "Important safety notes"
(Y
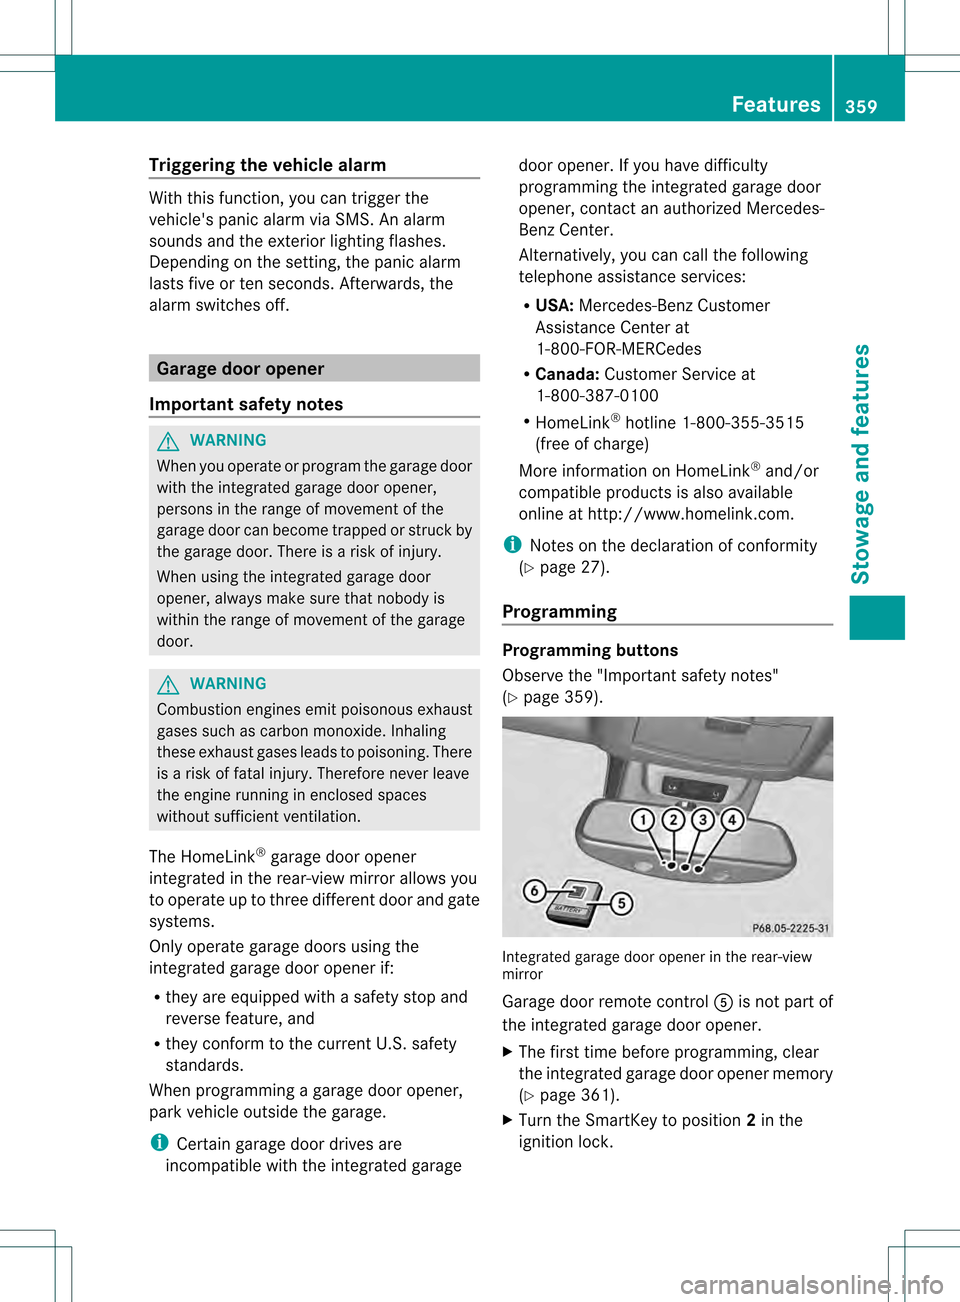
page 359). Integrated garage door opener in the rear-view
mirror
Garage door remote control
001Cis not part of
the integrated garage door opener.
X The first time before programming, clear
the integrated garage door opener memory
(Y page 361).
X Turn the SmartKey to position 2in the
ignition lock. Features
359Stowage and features Z
Page 362 of 458

X
Press and hold one of buttons 0003to001E on
the integrated garage door opener.
After a short time, indicator lamp 0002lights
up yellow.
i Indicator lamp 0002lights up yellow as soon
as button 0003,001For001E is programmed for
the first time. If the selected button has
already been programmed, indicator
lamp 0002will only light up yellow after ten
seconds have elapsed.
X Release button 0003,001For001E. Indicator
lamp 0002flashes yellow.
X Point garage door remote control 001C
towards buttons 0003to001E on the rear-view
mirror at a distance of 2 to 8 inches (5 to
20 cm).
i The required distance between remote
control 001Cand the integrated garage door
opener depends on the garage door drive
system. Several attempts might be
necessary. You should test every position
for at least 25 seconds before trying
another position.
X Press and hold button 001Don remot econtrol
001C until indicator lamp 0002lights up green.
If indicator lamp 0002lights up green or
flashes, then programming has been
successful.
X Release button 001Don remote control 001Cfor
the garage door drive system.
X If indicator lamp 0002lights up red: repeat
the programming procedure for the
corresponding button on the rear-view
mirror. When doing so, vary the distance
between remote control 001Cand the rear-
view mirror.
i If the indicator lamp flashes green after
successful programming, the garage door
system is using a rolling code. After
programming, you must synchronize the
garage door opener integrated in the rear-
view mirror with the receiver of the garage
door system. Synchronizing the rolling code
Observe the "Important safety notes"
(Y
page 359).
Your vehicle must be within reach of the
garage door or exterior gate drive. Make sure
that neither your vehicle nor any persons/
objects are present within the sweep of the
door or gate.
X Turn the SmartKey to position 2in the
ignition lock.
X Press the program button of the door or
gate drive (see the door or gate drive
operating instructions, e.g. under
"programming of additional remote
controls").
i Usually, you now have 30seconds to
initiate the next step.
X Press previously programmed button 0003,
001F or001E of the integrated garage door
opener until the door closes.
The rolling code synchronization is then
complete.
Notes on programming the remote
control
Canadia nradio frequency laws require a
"break" (or interruption) of the transmission
signals after broadcasting for a few seconds.
Therefore, these signals may no tlast long
enough for the integrated garage door
opener. The signal is no trecognized during
programming. Comparable with Canadian
law, some U.S.g arage door openers also
feature a "break".
Proceed as follows:
R if you live in Canada
R if you have difficulties programming the
garage door opener (regardless of where
you live) when using the programming
steps 360
FeaturesStowage and features
Page 363 of 458

X
Press and hold one of buttons 0003to001E on
the integrated garage door opener.
After a short time, indicator lamp 0002lights
up yellow.
X Release the button.
Indicator lamp 0002flashes yellow.
X Press button 001Dof garage door remote
control 001Cfor two seconds, then release it
for two seconds.
X Press button 001Dagain for two seconds.
X Repeat this sequence on button 001Dof
remote control 001Cuntil indicator lamp 0002
lights up green.
If indicator lamp 0002turns red, repeat the
process.
X Continue with the other programming
steps (see above).
Problems when programming
If you are experiencing problems
programming the integrated garage door
opener on the rear-view mirror, take note of
the following instructions:
R Check the transmitter frequency of garage
door drive remote control 001C.This can
usually be found on the back of the remote
control.
The integrated garage door opener is
compatible with devices that have units
which operate in the frequency range of
280to 433MHz.
R Replace the batteries in garage door
remote control 001C.This increases the
likelihood that garage door remote control
001C will transmit a stronga nd precise signal
to the integrated garage door opene rinthe
rear-view mirror.
R When programming, hold remote control
001C at varying distances and angles from the
button that you are programming. Try
various angles at a distance between 2and
12 inches (5to 30 cm) or at the same angle
but at varying distances.
R If another remote control for the same
garage door drive is available, repeat the same programming steps with this remote
control. Before performing these steps,
make sure that new batteries have been
installed in garage door drive remote
control
001C.
R Note that some remote controls only
transmit for a limited amount of time (the
indicator lamp on the remote control goes
out). Press button 001Don remote control
001C again before transmission ends.
R Align the antenna cable of the garage door
opener unit. This can improve signal
reception/transmission.
Opening/closing the garage door After it has been programmed, the integrated
garage door opener performs the function of
the garage door system remote control.
Please also read the operating instructions
for the garage door system.
X
Turn the SmartKey to position 2in the
ignition lock.
X Press button 0003,001For001E which you have
programmed to operate the garage door.
Garage door system with a fixed code:
indicator lamp 0002lights up green.
Garage door system with a rolling code:
indicator lamp 0002flashes green.
i The transmitter will transmit a signal as
long as the button is pressed. The
transmission is halted after a maximum of
ten seconds and indicator lamp 0002lights
up yellow. Press button 0003,001For001E again
if necessary.
Clearing the memory X
Turn the SmartKey to position 2in the
ignition lock.
X Press buttons 0003and 001E.
The indicator lamp lights up yellow.
X Press and hold buttons 0003and 001Euntil the
indicator lamp turns green. Features
361Stowage and features Z
Page 375 of 458

away. This can lead to corrosio
ndamage
and damage to electronic components.
X Clean the inside and outside of the
windows with a damp cloth and a cleaning
product that is recommended and
approved by Mercedes-Benz.
Cleaning wiper blades G
WARNING
You could become trapped by the windshield
wipers if they start moving while cleaning the
windshield or wiper blades .There is a risk of
injury.
Always switch off the windshield wipers and
the ignition before cleaning the windshield or
wiper blades.
! Do not pull the wiper blade. Otherwise,
the wiper blade could be damaged.
! Do not clean wiper blades too often and
do not rub them too hard. Otherwise, the
graphite coating could be damaged. This
could cause wiper noise.
! Hold the wiper arm securely when folding
back. The windshield could be damaged if
the wiper arm smacks against it suddenly.
X Fold the windshield wiper arms away from
the windshield.
X Carefully clean the wiper blades with a
damp cloth.
X Fold the windshield wiper arms back again
before switching on the ignition.
Cleaning the exterior lighting !
Only use cleaning agents or cleaning
cloths which are suitable for plastic light
lenses. Unsuitable cleaning agents or
cleaning cloths could scratch or damage
the plastic light lenses.
X Cleant he plastic lenses of the exterior
lighting using a wet sponge and a mild
cleaning agent, e.g. Mercedes-Ben zcar
shampoo or cleaning cloths. Mirror turn signals !
Only use cleaning agents or cleaning
cloths that are suitable for plastic lenses.
Unsuitable cleaning agents or cleaning
cloths could scratch or damage the plastic
lenses of the mirror tur nsignals.
X Clean the plasti clenses of the mirror turn
signals in the exterior mirror housing using
a wet sponge and mild cleaning agent, e.g.
Mercedes-Benzc ar shampoo or cleaning
cloths.
Cleaning the sensors !
If you clean the sensor swith a power
washer, make sure that you keep a
distance of at least 11. 8in(30 cm) between
the vehicle and the power washer nozzle.
Information about the correct distance is
available from the equipment
manufacturer. X
Clean sensors 0002of the driving systems
with water, car shampoo and a soft cloth.
Cleaning the rear view camera !
Do not clea nthe camera lens and the area
around the rear view camera with a power
washer. Care
373Maintenance and care Z