2013 MERCEDES-BENZ M-Class lights
[x] Cancel search: lightsPage 326 of 458

Problem Possible causes/consequences and
0001 Solutions
0008
(USA only)
000D (Canada only)
The red electric parking
brake indicator lamp
flashes or lights up
and/or
000D
warning lamp for the
electric parking brake
lights up. X
Observe the additional display messages in the multifunction
display. 001F
The red SRS warning
lamp is lit while the
engine is running.
There is a malfunction in the SRS (Supplemental Restraint
System).
G WARNING
The air bags or Emergency Tensioning Devices may either be
triggered unintentionally or, in the event of an accident, may not
be triggered.
There is an increased risk of injury.
X Drive on carefully.
X Have SRS checked at a qualified specialist workshop
immediately.
For further information about SRS, see (Y page 43).324
Warning and indicator lamps in the instrument clusterOn-board computer and displays
Page 327 of 458

Engine
Problem Possible causes/consequences and
0001 Solutions
0010
The yellow Check
Engine warning lamp
lights up while the
engine is running.
There may be a malfunction, for example:
R
in the engine management
R in the fuel injection system
R in the exhaust system
R in the ignition system (for vehicles with a gasoline engine)
R in the fuel system
The emission limit values may be exceeded and the engin emay
be running in emergency mode.
X Have the vehicle checked as soon as possible at a qualified
specialist workshop.
i In some states, you must immediately visit a qualified
specialist workshop as soon as the yellow Chec kEngine warning
lamp lights up .This is due to the legal requirements in effect in
these states. If in doubt, check whether such legal regulations
apply in the state in which you are currently driving. Vehicles with a diesel engine: the fuel tank has been run dry
(Y
page 176).
X Start the engine three to four times after refueling.
If the yellow Check Engine warning lamp goes out, emergency
running mode is canceled. The vehicle need not be checked. 0012
The yellow reserve fuel
warning lamp lights up
while the engine is
running.
The fuel level has dropped into the reserve range.
X
Refuel at the nearest gas station. 0012
The yellow reserve fuel
warning lamp flashes
while the vehicle is in
motion.
In addition, the
0010
Check Engine warning
lamp may light up. The fuel system pressure is too low. The fuel filler cap is not closed
correctly or the fuel system is leaking.
X
Check that the fuel filler cap is correctly closed.
X If the fuel filler cap is not correctly closed: close the fuel filler
cap.
X If the fuel filler cap is closed: visit a qualified specialist
workshop. Warning and indicator lamps in the instrument cluster
325On-board computer and displays Z
Page 328 of 458

Problem Possible causes/consequences and
0001 Solutions
000E
The red coolant
warning lamp lights up
while the engine is
running and the coolant
temperature gauge is
at the start of the scale. The temperature sensor for the coolant temperature gauge is
defective.
The coolant temperature is no longer being monitored. There is a
risk of engine damage if the coolant temperature is too high.
X
Pull over and stop the vehicle safely and switch off the engine,
paying attention to road and traffic conditions. Do not continue
driving under any circumstances.
X Secure the vehicle against rolling away (Y page 179).
X Consult a qualified specialist workshop. 326
Warning and indicator lamps in the instrument clusterOn-board computer and displays
Page 346 of 458

The bottles are not secured or prevented from
tipping over. Therefore, do not place any open
drink containers in the stowage
compartments.
Cup holder in the front-compartment
center console
0002
Cup holder
0003 Cover
X To open: slide cover 0003to its foremost
position.
X To close: pull cover 0003back as far as it will
go.
You can remove the cup holder's rubber mat
for cleaning. Clean with clear, lukewarm
water only.
Temperature-controlled cup holder in
the front-compartment center console 0002
Cup holder
0003 Residual heat indicator lamp
001F Switch The temperature-controlled cup holder can
be used to keep cold drink
scool and warm
drinks warm.
X Turn the SmartKey to position 2in the
ignition lock.
X To switch on the cooling function: press
and hold button 001Funtil the blue indicator
lamp on the button lights up.
X To switch on the heating function: press
and hold button 001Funtil the red indicator
lamp on the button lights up.
X To switch off the function: press and hold
button 001Funtil the indicator lamp on the
button goes out.
When the heating function is used, the metal
insert of the cup holder is heated. Once a
certain temperature is reached, residual heat
indicator lamp 0003lights up. This means that
the metal insert of the cup holder is hot. For
this reason, you must not reach into the cup
holder metal insert.
Do not use hard or sharp objects to clean the
cup holder. Use only a soft cloth to clean it.
Cup holder in the rear seat armrest !
Do not sit on or support your body weight
on the rear seat armrest when it is folded
down, as you could otherwise damage it. X
Fold down the rear seat armrest.
Cup holder 0002is located in the rear seat
armrest. 344
FeaturesStowage and features
Page 351 of 458

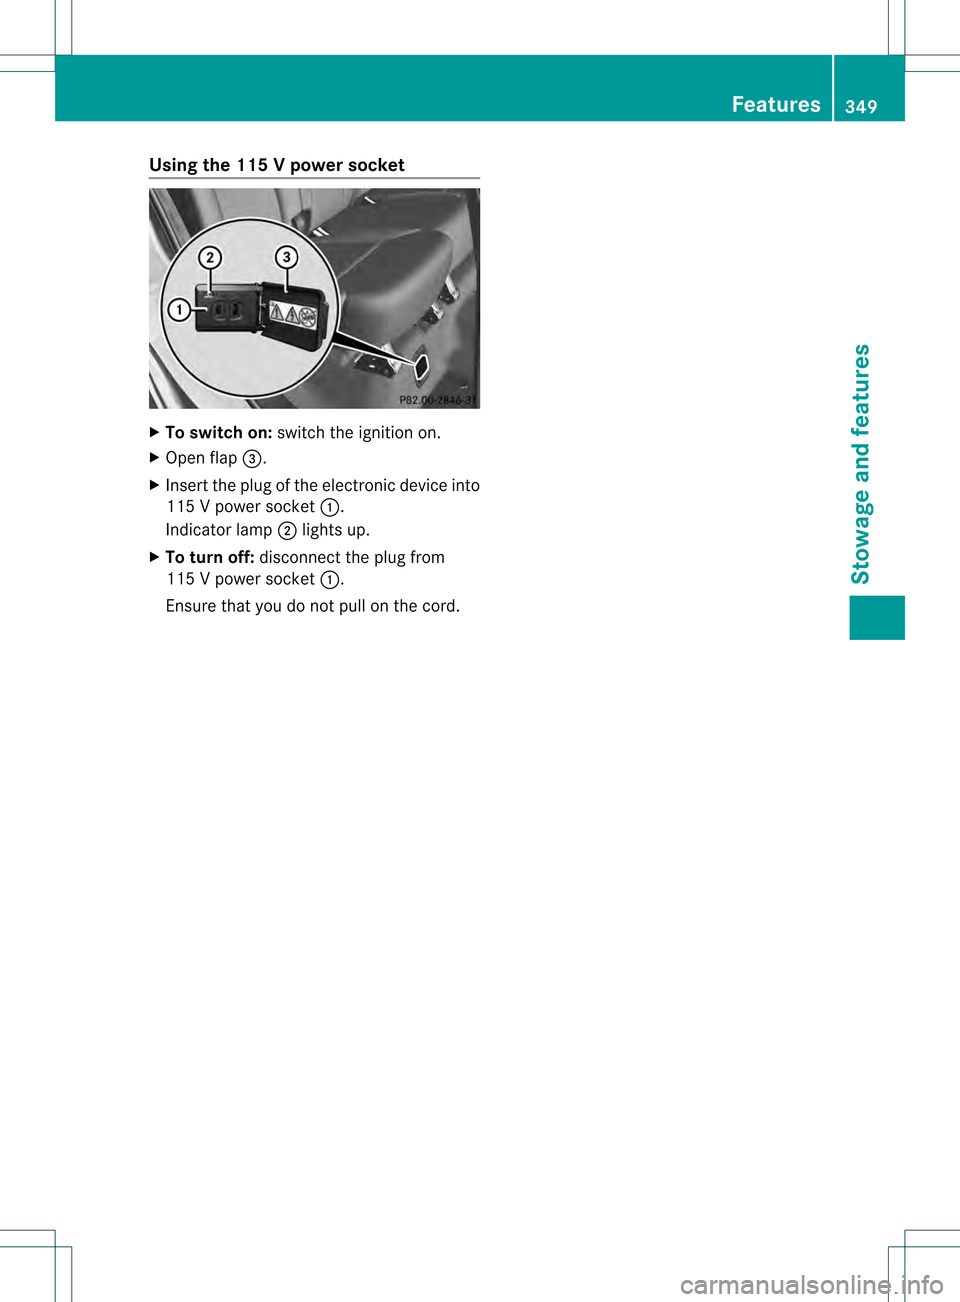
Using the 115
Vpower socket X
To switch on: switch the ignitio non.
X Ope nflap 001F.
X Insert the plug of the electronic device into
115 V power socket 0002.
Indicator lamp 0003lights up.
X To turn off: disconnect the plug from
115 V power socket 0002.
Ensure that you do not pull on the cord. Features
349Stowage and features Z
Page 362 of 458

X
Press and hold one of buttons 0003to001E on
the integrated garage door opener.
After a short time, indicator lamp 0002lights
up yellow.
i Indicator lamp 0002lights up yellow as soon
as button 0003,001For001E is programmed for
the first time. If the selected button has
already been programmed, indicator
lamp 0002will only light up yellow after ten
seconds have elapsed.
X Release button 0003,001For001E. Indicator
lamp 0002flashes yellow.
X Point garage door remote control 001C
towards buttons 0003to001E on the rear-view
mirror at a distance of 2 to 8 inches (5 to
20 cm).
i The required distance between remote
control 001Cand the integrated garage door
opener depends on the garage door drive
system. Several attempts might be
necessary. You should test every position
for at least 25 seconds before trying
another position.
X Press and hold button 001Don remot econtrol
001C until indicator lamp 0002lights up green.
If indicator lamp 0002lights up green or
flashes, then programming has been
successful.
X Release button 001Don remote control 001Cfor
the garage door drive system.
X If indicator lamp 0002lights up red: repeat
the programming procedure for the
corresponding button on the rear-view
mirror. When doing so, vary the distance
between remote control 001Cand the rear-
view mirror.
i If the indicator lamp flashes green after
successful programming, the garage door
system is using a rolling code. After
programming, you must synchronize the
garage door opener integrated in the rear-
view mirror with the receiver of the garage
door system. Synchronizing the rolling code
Observe the "Important safety notes"
(Y
page 359).
Your vehicle must be within reach of the
garage door or exterior gate drive. Make sure
that neither your vehicle nor any persons/
objects are present within the sweep of the
door or gate.
X Turn the SmartKey to position 2in the
ignition lock.
X Press the program button of the door or
gate drive (see the door or gate drive
operating instructions, e.g. under
"programming of additional remote
controls").
i Usually, you now have 30seconds to
initiate the next step.
X Press previously programmed button 0003,
001F or001E of the integrated garage door
opener until the door closes.
The rolling code synchronization is then
complete.
Notes on programming the remote
control
Canadia nradio frequency laws require a
"break" (or interruption) of the transmission
signals after broadcasting for a few seconds.
Therefore, these signals may no tlast long
enough for the integrated garage door
opener. The signal is no trecognized during
programming. Comparable with Canadian
law, some U.S.g arage door openers also
feature a "break".
Proceed as follows:
R if you live in Canada
R if you have difficulties programming the
garage door opener (regardless of where
you live) when using the programming
steps 360
FeaturesStowage and features
Page 363 of 458

X
Press and hold one of buttons 0003to001E on
the integrated garage door opener.
After a short time, indicator lamp 0002lights
up yellow.
X Release the button.
Indicator lamp 0002flashes yellow.
X Press button 001Dof garage door remote
control 001Cfor two seconds, then release it
for two seconds.
X Press button 001Dagain for two seconds.
X Repeat this sequence on button 001Dof
remote control 001Cuntil indicator lamp 0002
lights up green.
If indicator lamp 0002turns red, repeat the
process.
X Continue with the other programming
steps (see above).
Problems when programming
If you are experiencing problems
programming the integrated garage door
opener on the rear-view mirror, take note of
the following instructions:
R Check the transmitter frequency of garage
door drive remote control 001C.This can
usually be found on the back of the remote
control.
The integrated garage door opener is
compatible with devices that have units
which operate in the frequency range of
280to 433MHz.
R Replace the batteries in garage door
remote control 001C.This increases the
likelihood that garage door remote control
001C will transmit a stronga nd precise signal
to the integrated garage door opene rinthe
rear-view mirror.
R When programming, hold remote control
001C at varying distances and angles from the
button that you are programming. Try
various angles at a distance between 2and
12 inches (5to 30 cm) or at the same angle
but at varying distances.
R If another remote control for the same
garage door drive is available, repeat the same programming steps with this remote
control. Before performing these steps,
make sure that new batteries have been
installed in garage door drive remote
control
001C.
R Note that some remote controls only
transmit for a limited amount of time (the
indicator lamp on the remote control goes
out). Press button 001Don remote control
001C again before transmission ends.
R Align the antenna cable of the garage door
opener unit. This can improve signal
reception/transmission.
Opening/closing the garage door After it has been programmed, the integrated
garage door opener performs the function of
the garage door system remote control.
Please also read the operating instructions
for the garage door system.
X
Turn the SmartKey to position 2in the
ignition lock.
X Press button 0003,001For001E which you have
programmed to operate the garage door.
Garage door system with a fixed code:
indicator lamp 0002lights up green.
Garage door system with a rolling code:
indicator lamp 0002flashes green.
i The transmitter will transmit a signal as
long as the button is pressed. The
transmission is halted after a maximum of
ten seconds and indicator lamp 0002lights
up yellow. Press button 0003,001For001E again
if necessary.
Clearing the memory X
Turn the SmartKey to position 2in the
ignition lock.
X Press buttons 0003and 001E.
The indicator lamp lights up yellow.
X Press and hold buttons 0003and 001Euntil the
indicator lamp turns green. Features
361Stowage and features Z
Page 373 of 458

Washing by hand
In some countries, washing by hand is only
allowed at specially equipped washing bays.
Observe the legal requirements in all
countries concerned.
X Do not use hot water and do not wash the
vehicle in direct sunlight.
X Use a soft sponge to clean.
X Use a mild cleaning agent, such as a car
shampoo approved by Mercedes-Benz.
X Thoroughly hose dow nthe vehicle with a
gentle jet of water.
X Do not point the water jet directly towards
the air inlets.
X Use plenty of water and rinse out the
sponge frequently.
X Rinse the vehicle with clean water and dry
thoroughly with a chamois.
X Do not let the cleaning agent dry on the
paintwork.
When using the vehicle in winter, remove all
traces of road salt deposits carefully and as
soon as possible.
Powerw ashers G
WARNING
The water jet from a circular jet nozzle (dirt
blasters) can cause invisibl eexterior damage
to the tires or chassis components.
Components damaged in this way may fail
unexpectedly .There is a risk of an accident.
Do not use power washers with circular jet
nozzles to clean the vehicle. Have damaged
tires or chassis components replaced
immediately.
! Always maintain a distance of at least
11.8 in (30 cm) between the vehicle and the
power washer nozzle. Information about
the correct distance is available from the
equipment manufacturer.
Move the power washer nozzle around
when cleaning your vehicle. Do not aim directly at any of the following:
R
tires
R door gaps, roof gaps, joints, etc.
R electrical components
R battery
R connectors
R lights
R seals
R trim
R ventilation slots
Damaged seals or electrical components
can lead to leaks or failures.
Cleaning the paintwork !
Do not affix:
R stickers
R films
R magnetic plates or similar items
to painted surfaces. You could otherwise
damage the paintwork.
Scratches, corrosive deposits, areas affected
by corrosion and damage caused by
inadequate care cannot always be completely
repaired. In such cases, visit a qualified
specialist workshop.
X Remove dirt immediately, where possible,
while avoiding rubbing too hard.
X Soak insect remains with insect remover
and rinse off the treated areas afterwards.
X Soak bird droppings with water and rinse
off the treated areas afterwards.
X Remove coolant, brake fluid, tree resin,
oils, fuels and greases by rubbing gently
with a cloth soaked in petroleum ether or
lighter fluid.
X Use tar remover to remove tar stains.
X Use silicone remover to remove wax.
If water no longer forms "beads" on the paint
surface, use the paint care products
recommended and approved by Mercedes-
Benz.T his is the case approximately every Care
371Maintenance and care Z