2013 MERCEDES-BENZ GLK-CLASS SUV ECU
[x] Cancel search: ECUPage 276 of 380
0043
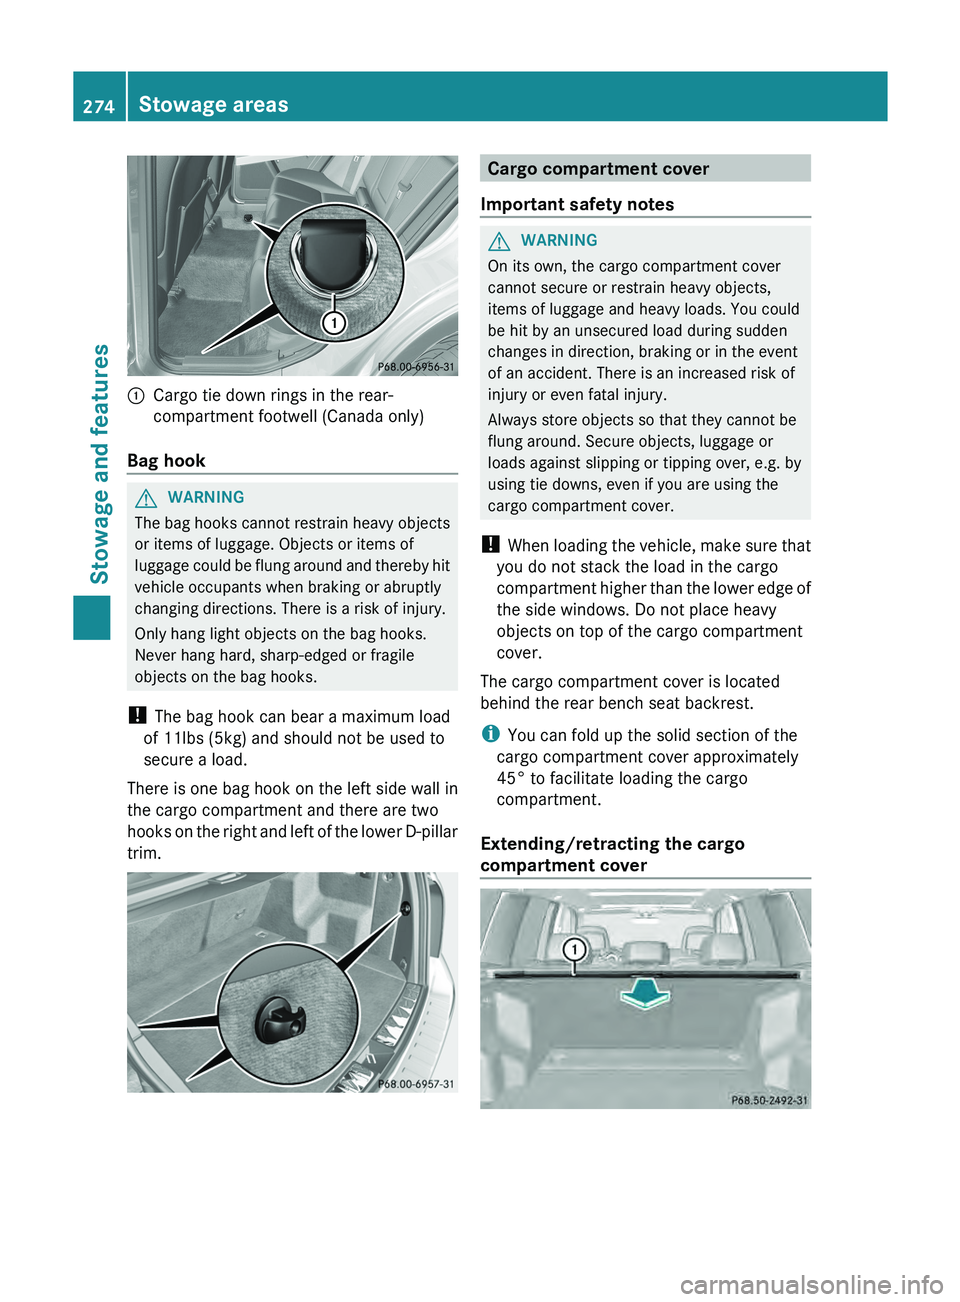
Cargo tie down rings in the rear-
compartment footwell (Canada only)
Bag hook G
WARNING
The bag hooks cannot restrain heavy objects
or items of luggage. Objects or items of
luggage could be flung around
and thereby hit
vehicle occupants when braking or abruptly
changing directions. There is a risk of injury.
Only hang light objects on the bag hooks.
Never hang hard, sharp-edged or fragile
objects on the bag hooks.
! The bag hook can bear a maximum load
of 11lbs (5kg) and should not be used to
secure a load.
There is one bag hook on the left side wall in
the cargo compartment and there are two
hooks on the right and left of the lower D-pillar
trim. Cargo compartment cover
Important safety notes G
WARNING
On its own, the cargo compartment cover
cannot secure or restrain heavy objects,
items of luggage and heavy loads. You could
be hit by an unsecured load during sudden
changes in direction, braking or in the event
of an accident. There is an increased risk of
injury or even fatal injury.
Always store objects so that they cannot be
flung around. Secure objects, luggage or
loads against slipping or tipping over, e.g. by
using tie downs, even if you are using the
cargo compartment cover.
! When loading the vehicle, make
sure that
you do not stack the load in the cargo
compartment higher than the lower edge of
the side windows. Do not place heavy
objects on top of the cargo compartment
cover.
The cargo compartment cover is located
behind the rear bench seat backrest.
i You can fold up the solid section of the
cargo compartment cover approximately
45° to facilitate loading the cargo
compartment.
Extending/retracting the cargo
compartment cover 274
Stowage areas
Stowage and features
Page 277 of 380
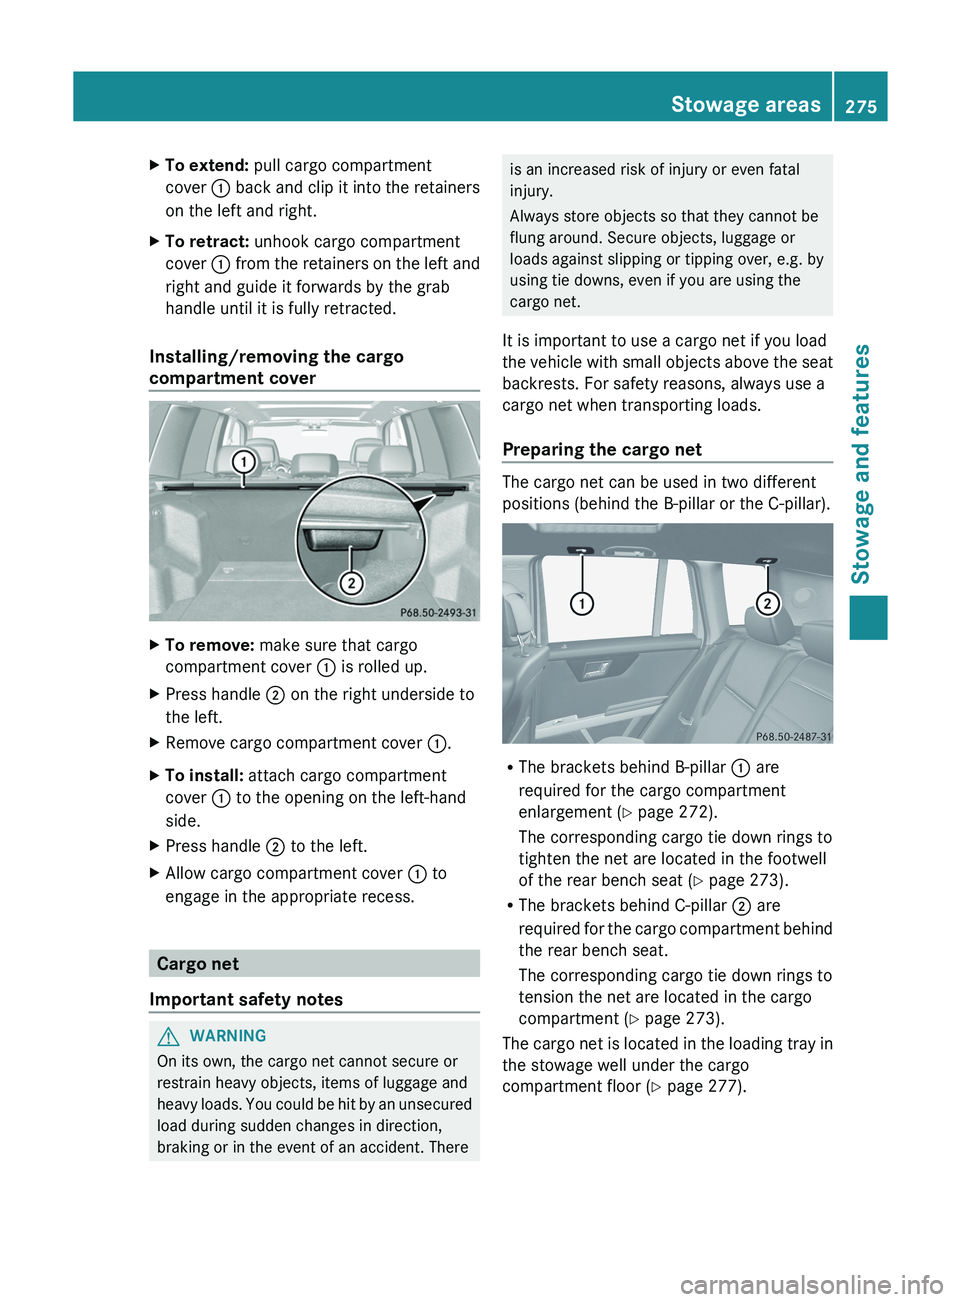
X
To extend: pull cargo compartment
cover 0043 back and clip it
into the retainers
on the left and right.
X To retract: unhook cargo compartment
cover 0043 from the retainers on
the left and
right and guide it forwards by the grab
handle until it is fully retracted.
Installing/removing the cargo
compartment cover X
To remove: make sure that cargo
compartment cover 0043 is rolled up.
X Press handle 0044 on the right underside to
the left.
X Remove cargo compartment cover 0043.
X To install: attach cargo compartment
cover 0043 to the opening on the left-hand
side.
X Press handle 0044 to the left.
X Allow cargo compartment cover 0043 to
engage in the appropriate recess. Cargo net
Important safety notes G
WARNING
On its own, the cargo net cannot secure or
restrain heavy objects, items of luggage and
heavy loads. You
could be
hit by an unsecured
load during sudden changes in direction,
braking or in the event of an accident. There is an increased risk of injury or even fatal
injury.
Always store objects so that they cannot be
flung around. Secure objects, luggage or
loads against slipping or tipping over, e.g. by
using tie downs, even if you are using the
cargo net.
It is important to use a cargo net if you load
the vehicle with small objects
above the seat
backrests. For safety reasons, always use a
cargo net when transporting loads.
Preparing the cargo net The cargo net can be used in two different
positions (behind the B-pillar or the C-pillar).
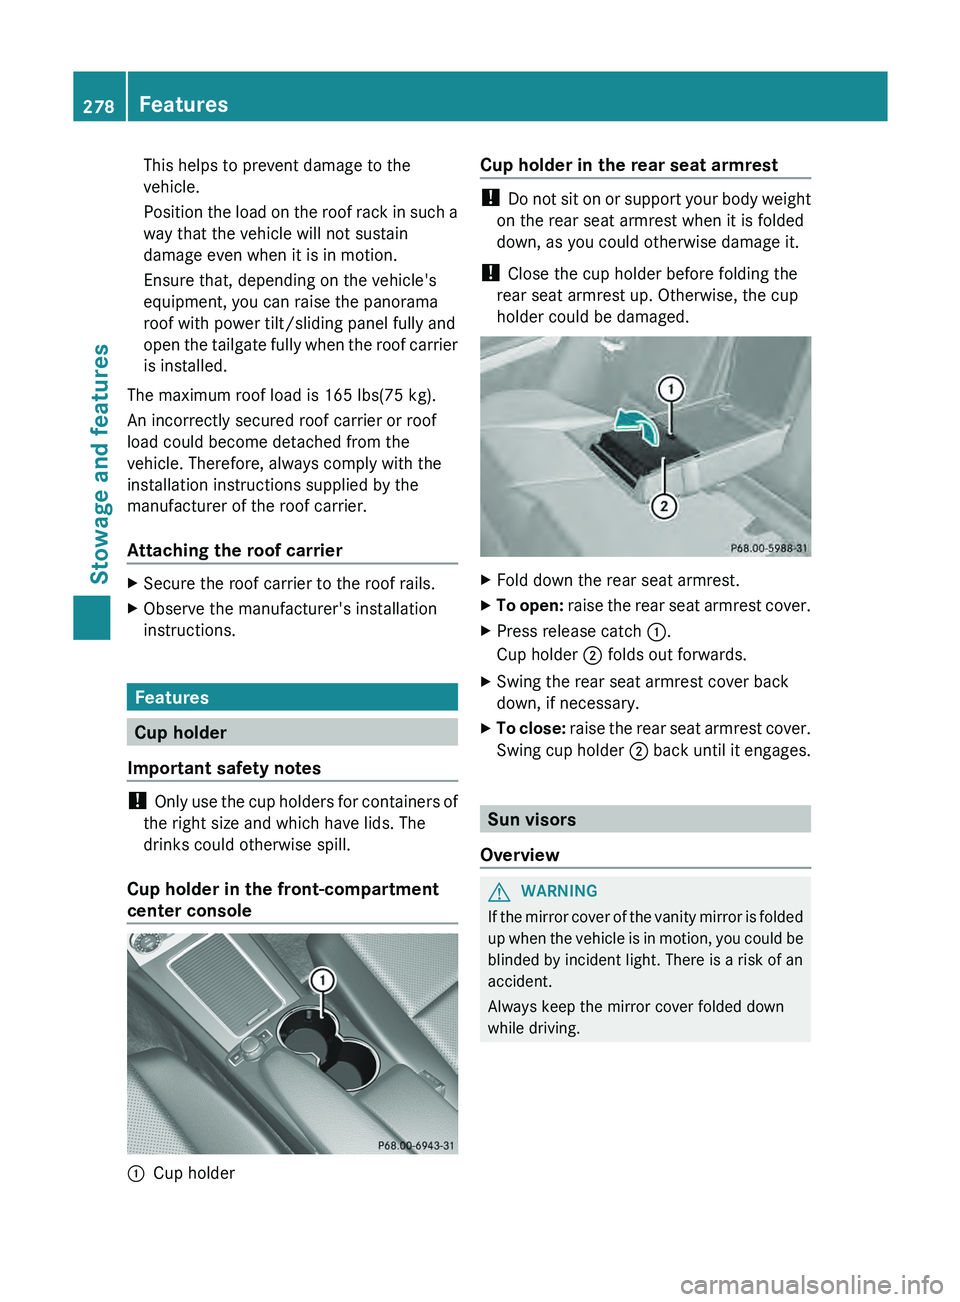
R
The brackets behind B-pillar 0043 are
required for the cargo compartment
enlargement (Y page 272).
The corresponding cargo tie down rings to
tighten the net are located in the footwell
of the rear bench seat (Y page 273).
R The brackets behind C-pillar 0044 are
required for
the cargo
compartment
behind
the rear bench seat.
The corresponding cargo tie down rings to
tension the net are located in the cargo
compartment (Y page 273).
The cargo net is located in the loading tray in
the stowage well under the cargo
compartment floor (Y page 277). Stowage areas
275
Stowage and features Z
Page 280 of 380
This helps to prevent damage to the
vehicle.
Position the load on
the
roof rack in such a
way that the vehicle will not sustain
damage even when it is in motion.
Ensure that, depending on the vehicle's
equipment, you can raise the panorama
roof with power tilt/sliding panel fully and
open the tailgate fully when the roof carrier
is installed.
The maximum roof load is 165 lbs(75 kg).
An incorrectly secured roof carrier or roof
load could become detached from the
vehicle. Therefore, always comply with the
installation instructions supplied by the
manufacturer of the roof carrier.
Attaching the roof carrier X
Secure the roof carrier to the roof rails.
X Observe the manufacturer's installation
instructions. Features
Cup holder
Important safety notes !
Only use the cup holders
for containers of
the right size and which have lids. The
drinks could otherwise spill.
Cup holder in the front-compartment
center console 0043
Cup holder Cup holder in the rear seat armrest !
Do not sit on or
support your body weight
on the rear seat armrest when it is folded
down, as you could otherwise damage it.
! Close the cup holder before folding the
rear seat armrest up. Otherwise, the cup
holder could be damaged. X
Fold down the rear seat armrest.
X To open: raise the rear seat armrest cover.
X Press release catch 0043.
Cup holder 0044 folds out forwards.
X Swing the rear seat armrest cover back
down, if necessary.
X To close:
raise the rear seat armrest cover.
Swing cup holder 0044
back until it engages. Sun visors
Overview G
WARNING
If the mirror cover of the vanity mirror is folded
up when the vehicle is
in motion, you could be
blinded by incident light. There is a risk of an
accident.
Always keep the mirror cover folded down
while driving. 278
Features
Stowage and features
Page 287 of 380
flashes. The
Connecting Call message
appears in the multifunction display.
The audio output is muted.
Once the connection has been made, the
Call Connected message appears in the
multifunction display.
All important information on the emergency
is transmitted, for example:
R Current location of the vehicle (as
determined by the GPS system)
R Vehicle identification number
R Information on the severity of
the accident
Shortly after the emergency call has been
initiated, a voice connection is automatically
established between the Mercedes-Benz
Customer Assistance Center and the vehicle
occupants.
R If the vehicle occupants respond, the
Mercedes-Benz Customer Assistance
Center attempts to get more information
on the emergency.
R If there is no response from the vehicle
occupants, an ambulance is immediately
sent to the vehicle.
The mbrace system has not been able to
initiate an emergency call if no voice
connection to the Response Center has been
established. This can occur, for example, if
the relevant mobile phone network is not
available. The indicator lamp in the SOS
button flashes continuously.
The Call Failed message appears in the
multifunction display and must be confirmed.
In this case, seek assistance by other means. Making an emergency call G
WARNING
It can be dangerous to remain in the vehicle,
even if you have pressed
the SOS button in an
emergency if:
R you see smoke inside or outside of the
vehicle, e.g. if there is a fire after an
accident
R the vehicle is on a dangerous section of
road
R the vehicle is not visible or cannot easily be
seen by other road users, particularly when
dark or in poor visibility conditions
There is a risk of an accident and injury.
Leave the vehicle immediately in this or
similar situations as soon as it is safe to do
so. Move to a safe location along with other
vehicle occupants. In such situations, secure
the vehicle in accordance with national
regulations, e. g. with a warning triangle. X
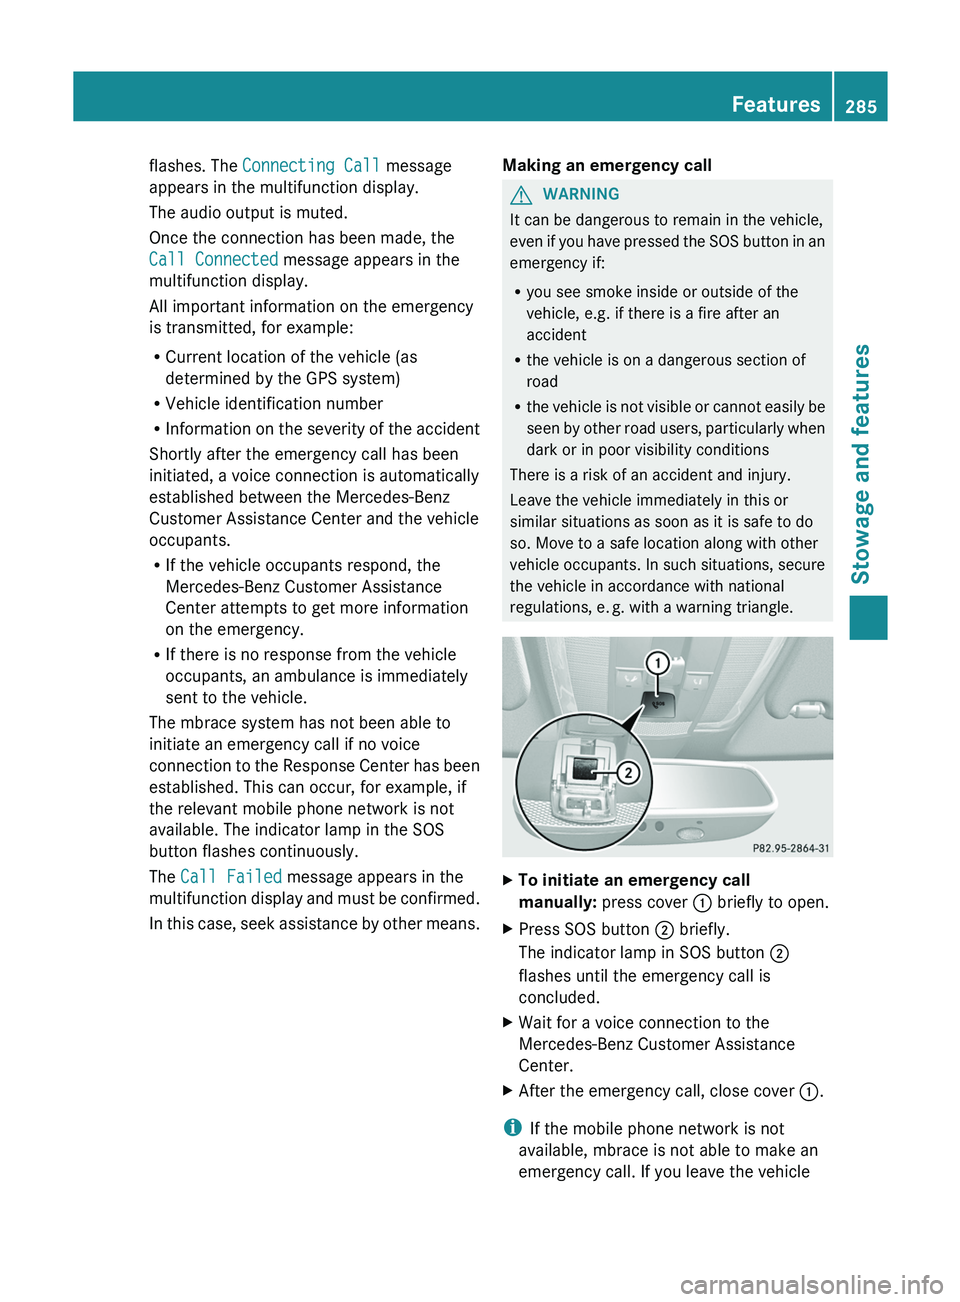
To initiate an emergency call
manually: press cover 0043 briefly to open.
X Press SOS button 0044 briefly.
The indicator lamp in SOS button 0044
flashes until the emergency call is
concluded.
X Wait for a voice connection to the
Mercedes-Benz Customer Assistance
Center.
X After the emergency call, close cover 0043.
i If the mobile phone network is not
available, mbrace is not able to make an
emergency call. If you leave the vehicle Features
285
Stowage and features Z
Page 297 of 380
X
Push a round pen into opening
0087(Y page 294) for approximately three
seconds.
The zone currently selected appears in
compass display 0044(Y page 294).
X To select the zone: push
a round
pen into
opening 0087(Y page 294) until the desired
zone is selected.
If, after a few seconds, the display in
compass display 0044(Y page 294) changes
direction, the zone has been selected.
Calibrating the compass X
Make sure that there is sufficient space for
you to drive in a circle without impeding
traffic.
In order to calibrate the compass correctly,
do the following:
R calibrate the compass in the open and not
in the vicinity of steel structures or high-
voltage transmission lines.
R switch off electrical consumers such
as the
climate control, windshield wipers or rear
window defroster.
R close all doors and the tailgate.
X Switch on the ignition.
X Push a round pen into opening
0087(Y page 294) for approximately six
seconds, until symbol C is shown in
compass display 0044(Y page 294).
X Drive your vehicle in a full circle at
approximately 3 mph (5 km/h) to 6 mph
(10 km/h).
When the
calibration has successfully been
completed, the current direction is shown
in compass display 0044(Y page 294).Floormat on the driver's side
G
WARNING
Objects in the driver's footwell can restrict the
pedal travel or obstruct a depressed pedal. The operating and road safety of the vehicle
is jeopardized. There is a risk of an accident.
Make sure that all objects in the vehicle are
stowed correctly, and that they cannot enter
the driver's footwell. Install the floormats
securely and as specified in order to ensure
sufficient clearance for the
pedals.
Do not use
loose floormats. X
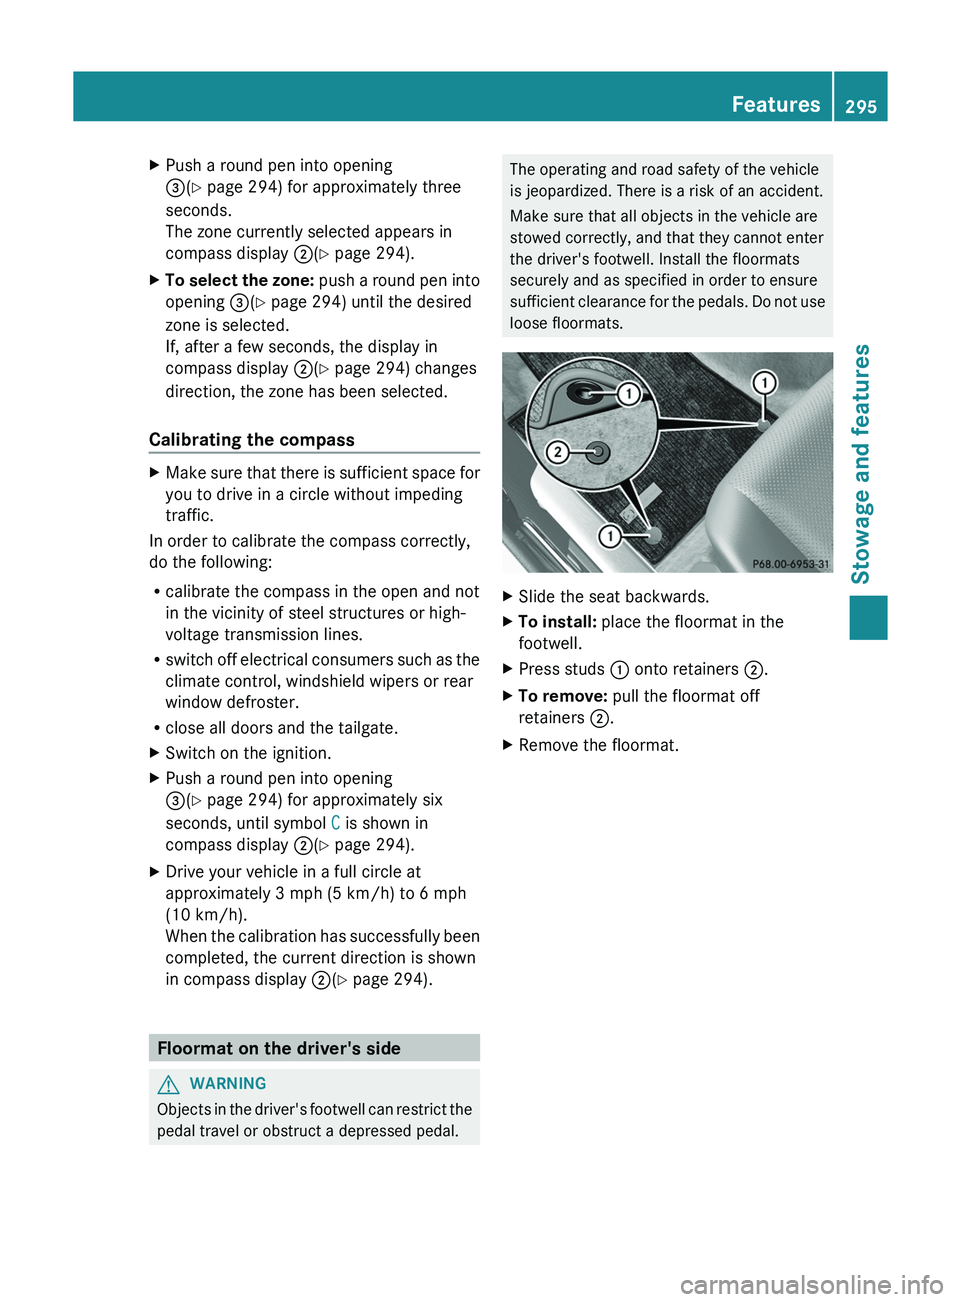
Slide the seat backwards.
X To install: place the floormat in the
footwell.
X Press studs 0043 onto retainers 0044.
X To remove: pull the floormat off
retainers 0044.
X Remove the floormat. Features
295
Stowage and features Z
Page 304 of 380
Damage to the engine or exhaust system is
caused by the following:
R
using engine oils and oil
filters that have
not been specifically approved for the
service system
R replacing engine oil and oil filters after
the interval for replacement specified by
the service system has been exceeded
R using engine oil additives.
! Do not add too much oil. If the oil level is
above the "max" mark on the dipstick, too
much oil has been added. This can lead to
damage to the engine or the catalytic
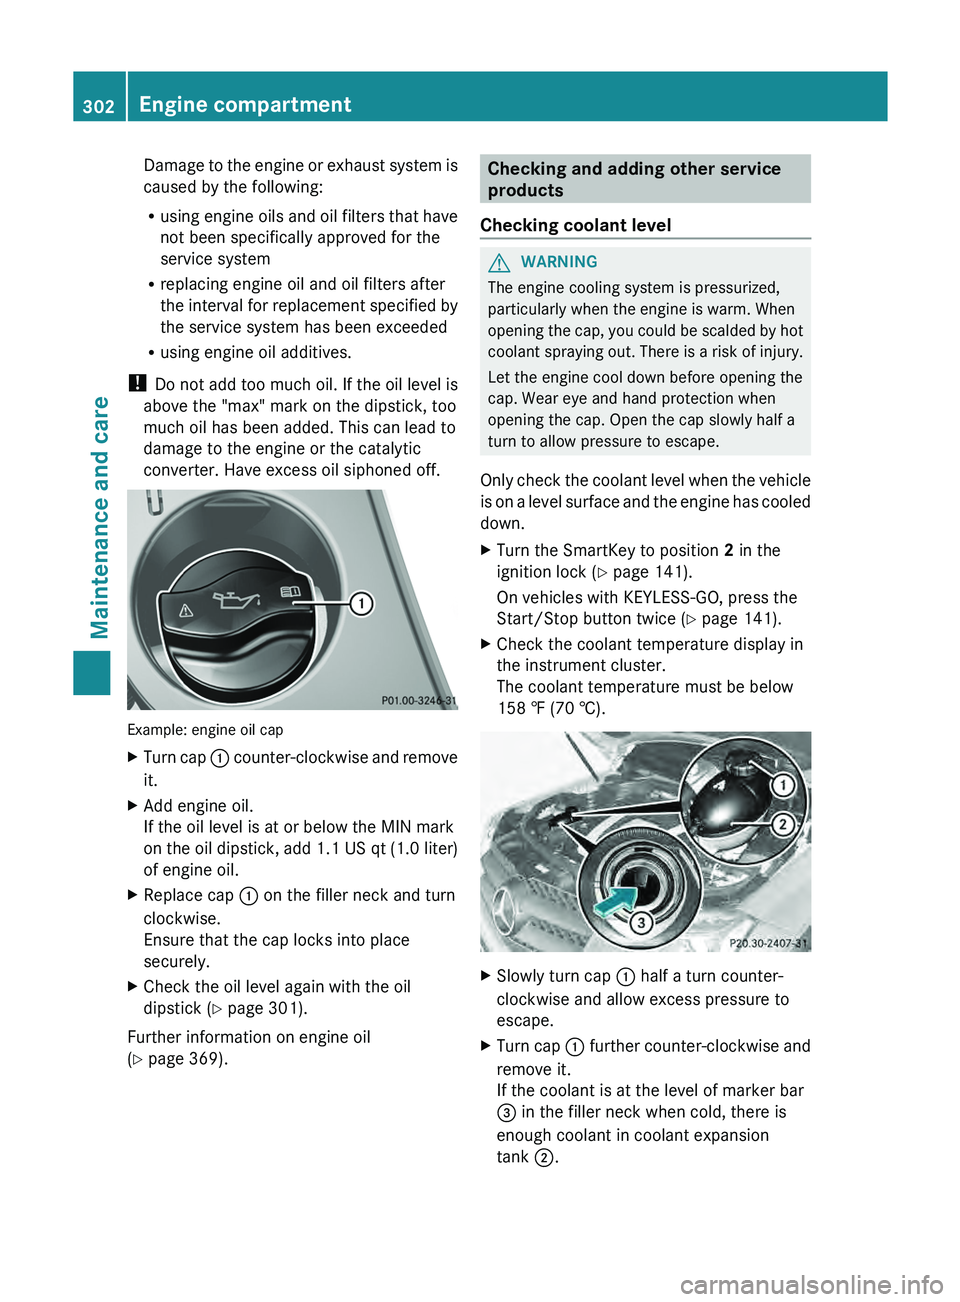
converter. Have excess oil siphoned off. Example: engine oil cap
X
Turn cap 0043 counter-clockwise and remove
it.
X Add engine oil.
If the oil level is at or below the MIN mark
on the oil dipstick, add
1.1 US qt (1.0 liter)
of engine oil.
X Replace cap 0043 on the filler neck and turn
clockwise.
Ensure that the cap locks into place
securely.
X Check the oil level again with the oil
dipstick (Y page 301).
Further information on engine oil
(Y page 369). Checking and adding other service
products
Checking coolant level G
WARNING
The engine cooling system is pressurized,
particularly when the engine is warm. When
opening the cap, you could
be scalded by hot
coolant spraying out. There is a risk of injury.
Let the engine cool down before opening the
cap. Wear eye and hand protection when
opening the cap. Open the cap slowly half a
turn to allow pressure to escape.
Only check the coolant level when the vehicle
is on a level surface and the engine has cooled
down.
X Turn the SmartKey to position 2 in the
ignition lock (Y page 141).
On vehicles with KEYLESS-GO, press the
Start/Stop button twice (Y
page 141).
X Check the coolant temperature display in
the instrument cluster.
The coolant temperature must be below
158 ‡ (70 †). X
Slowly turn cap 0043 half a turn counter-
clockwise and allow excess pressure to
escape.
X Turn cap 0043 further
counter-clockwise and
remove it.
If the coolant is at the level of marker bar
0087 in the filler neck when cold, there is
enough coolant in coolant expansion
tank 0044
.302
Engine compartment
Maintenance and care
Page 308 of 380
!
The following may cause the paint to
become shiny and thus reduce the matte
effect:
R Vigorous rubbing with unsuitable
materials.
R Frequent use of car washes.
R Washing the vehicle in direct sunlight.
! Never use paint cleaner, buffing or
polishing products, or gloss preserver,
e.g.
wax. These products are only suitable for
high-gloss surfaces. Their use on vehicles
with matte finish leads to considerable
surface damage (shiny, spotted areas).
Always have paintwork repairs carried out
at a qualified specialist workshop.
! Do not use wash programs with a hot wax
treatment under any circumstances.
i The vehicle should preferably be washed
by hand using a soft sponge, car shampoo
and plenty of water.
i Use only insect remover and car shampoo
from the range of recommended and
approved Mercedes-Benz care products.
Cleaning the windows G
WARNING
You could become trapped by the windshield
wipers if they start moving
while cleaning the
windshield or wiper blades. There is a risk of
injury.
Always switch off the windshield wipers and
the ignition before cleaning the windshield or
wiper blades.
! Only fold the windshield wipers away from
the windshield when vertical. Otherwise,
you will damage the hood.
! Do not use dry cloths, abrasive products,
solvents or cleaning agents containing
solvents to clean the inside of the windows.
Do not touch the insides of the windows
with hard objects, e.g. an ice scraper or ring. There is otherwise a risk of damaging
the windows.
! Clean the water drainage channels
of the
windshield and the rear window at regular
intervals. Deposits such as leaves, petals
and pollen may under certain
circumstances prevent water from draining
away. This can lead to corrosion damage
and damage to electronic components.
X Clean the inside and outside of the
windows with a damp cloth and a cleaning
product that is recommended and
approved by Mercedes-Benz.
Cleaning wiper blades G
WARNING
You could become trapped by the windshield
wipers if they start moving
while cleaning the
windshield or wiper blades. There is a risk of
injury.
Always switch off the windshield wipers and
the ignition before cleaning the windshield or
wiper blades.
! Only fold the windshield wipers away from
the windshield when vertical. Otherwise,
you will damage the hood.
! Do not pull the wiper blade. Otherwise,
the wiper blade could be damaged.
! Do not clean wiper blades too often and
do not rub them too hard. Otherwise, the
graphite coating could be damaged. This
could cause wiper noise.
! Hold the wiper arm securely when folding
back. The windshield could be damaged if
the wiper arm smacks against it suddenly.
X Fold the windshield wiper arms away from
the windshield.
X Carefully clean the wiper blades with a
damp cloth.
X Fold the windshield wiper arms back again
before switching on the ignition.306
Care
Maintenance and care
Page 315 of 380
Vehicle preparation is not necessary on
vehicles with MOExtended tires.
R
R Collapsible spare wheel
R an emergency spare wheel (only
for certain
countries) (Y page 359)
Information on changing/mounting a wheel
(Y page 352).
X Stop the vehicle on solid, non-slippery and
level ground, as far away as possible from
traffic.
X Switch on the hazard warning lamps.
X Secure the vehicle against rolling away
(Y page 160).
X If possible, bring the front wheels into the
straight-ahead position.
X Switch off the engine.
X Vehicles without KEYLESS-GO: remove
the SmartKey from the ignition lock.
X Vehicles with KEYLESS-GO: open the
driver's door.
The on-board electronics have status 0,
which is the same as the SmartKey having
been removed.
X Vehicles with KEYLESS-GO: remove the
Start/Stop button from the ignition lock
(Y page 141).
X All occupants must get out of the vehicle.
Make sure that
they are
not endangered as
they do so.
X Make sure that no one is near the danger
area while a wheel is being changed.
Anyone who is not directly assisting in the
wheel change should, for example, stand
behind the barrier.
X Get out of the vehicle. Pay attention to
traffic conditions when doing so.
X Close the driver's door. MOExtended tires (tires with run-flat
properties)
General notes With MOExtended tires (tires with run flat
characteristics), you can continue to drive
your vehicle even if there is a total loss of
pressure in one or more tires. The affected
tire must not show
any
clearly visible damage.
You can recognize MOExtended tires by the
MOExtended marking which appears on the
sidewall of the tire. You will find this marking
next to the tire size designation, the load-
bearing capacity and the speed index
(Y page 346).
MOExtended tires may only be used in
conjunction with an active tire pressure loss
warning system or with an active tire pressure
monitor.
If the pressure loss warning message
appears in the multifunction display:
R Observe the instructions in the display
messages ( Y page 252).
R Check the tire for damage.
R If driving on, observe the following notes.
The maximum driving distance is
approximately 50 miles (80 km) when the
vehicle is partially laden and approximately
18 miles (30 km) when the vehicle is fully
laden.
In addition to the vehicle load, the driving
distance possible depends upon:
R Speed
R Road condition
R Outside temperature
The driving distance possible in run-flat mode
may be reduced by extreme driving
conditions/maneuvers, or it can be increased
through a moderate style of driving.
The maximum permissible distance which
can be driven in run-flat mode is counted from
the moment the tire pressure loss warning
appears in the multifunction display. Flat tire
313
Breakdown assistance