2013 MERCEDES-BENZ GLK-CLASS SUV ignition
[x] Cancel search: ignitionPage 124 of 380
Never fold a windshield wiper arm without
a wiper blade back onto the windshield/
rear window.
Hold the windshield wiper
arm
firmly when
you change the wiper blade. If you release
the wiper arm without a wiper blade and it
falls onto the windshield/rear window, the
windshield/rear window may be damaged
by the force of the impact.
Mercedes-Benz recommends that you have
the wiper blades changed at a qualified
specialist workshop.
! To avoid damaging the wiper blades,
make sure that you touch only the wiper
arm of the wiper.
Changing the windshield wiper blades Moving the wiper blades to a vertical
position
!
Before changing the wiper blades,
always
set the wiper arms to a vertical position
using the combination switch. There is
otherwise a risk of damaging the hood.
Vehicles without KEYLESS-GO
X Turn the SmartKey to position 1 or 2 in the
ignition lock.
X Set the windshield wipers to
position
00AA.
X When the wiper arms have reached a
vertical position, turn the SmartKey to
position 0 and remove it from the ignition
lock.
Vehicles with KEYLESS-GO
X Switch off the engine.
X Remove your foot from the brake pedal.
X Set the windshield wipers to
position 00AA.
X Press the Start/Stop button repeatedly
until the windshield wipers start.
X When the wiper arms have reached a
vertical position, press the Start/Stop
button. Removing the wiper blades
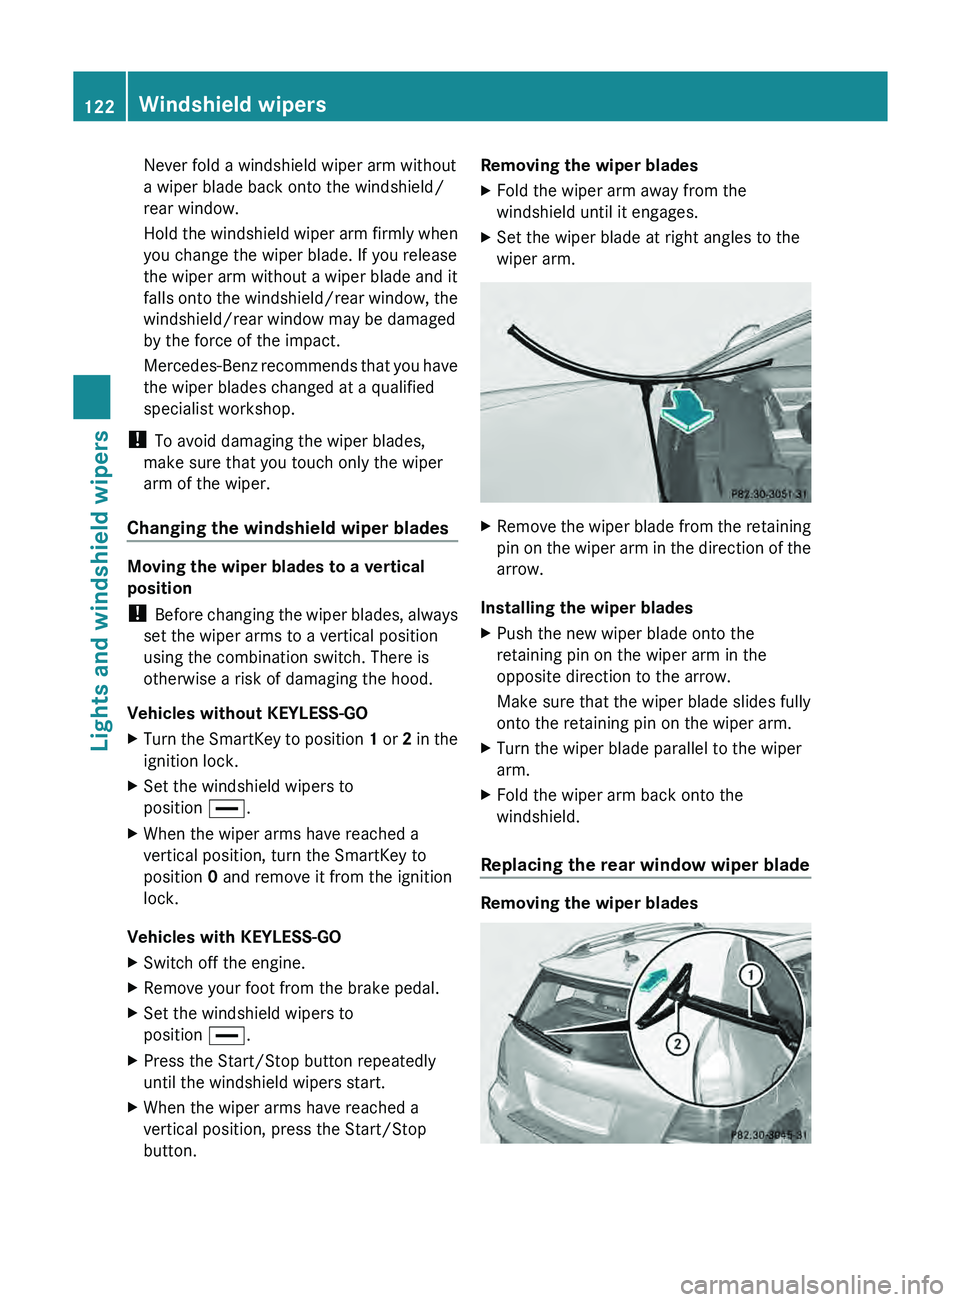
X
Fold the wiper arm away from the
windshield until it engages.
X Set the wiper blade at right angles to the
wiper arm. X
Remove the wiper blade from the retaining
pin on the wiper arm
in the direction of the
arrow.
Installing the wiper blades
X Push the new wiper blade onto the
retaining pin on the wiper arm in the
opposite direction to the arrow.
Make sure that the wiper blade slides fully
onto the retaining pin on the wiper arm.
X Turn the wiper blade parallel to the wiper
arm.
X Fold the wiper arm back onto the
windshield.
Replacing the rear window wiper blade Removing the wiper blades122
Windshield wipers
Lights and windshield wipers
Page 125 of 380
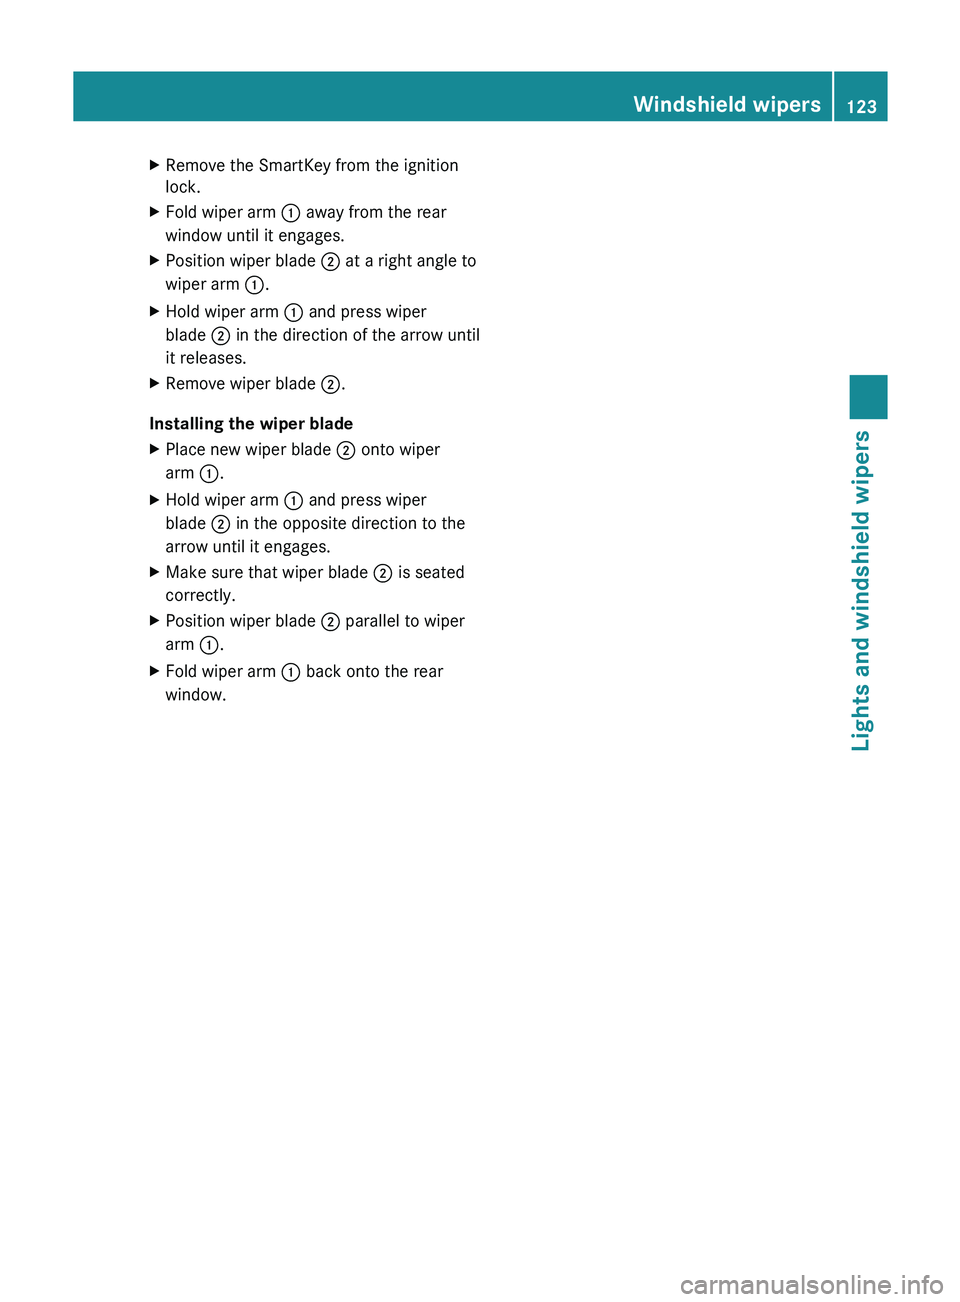
X
Remove the SmartKey from the ignition
lock.
X Fold wiper arm 0043 away from the rear
window until it engages.
X Position wiper blade 0044 at a right angle to
wiper arm 0043.
X Hold wiper arm 0043 and press wiper
blade 0044 in the direction of the arrow until
it releases.
X Remove wiper blade 0044.
Installing the wiper blade
X Place new wiper blade 0044 onto wiper
arm 0043.
X Hold wiper arm 0043 and press wiper
blade 0044 in the opposite direction to the
arrow until it engages.
X Make sure that wiper blade 0044 is seated
correctly.
X Position wiper blade 0044 parallel to wiper
arm 0043.
X Fold wiper arm 0043 back onto the rear
window. Windshield wipers
123Lights and windshield wipers Z
Page 126 of 380
Problems with the windshield wipers
Problem Possible causes/consequences and
0050 SolutionsThe windshield wipers
are jammed. Leaves or snow, for example, may be obstructing the windshield
wiper movement. The wiper motor has been deactivated.
X
For safety reasons, you should remove the SmartKey from the
ignition lock.
or
X Switch off the engine using the Start/Stop button and open the
driver's door.
X Remove the cause of the obstruction.
X Switch the windshield wipers back on. The windshield wipers
fail completely. The windshield wiper drive is malfunctioning.
X
Select another wiper speed on the combination switch.
X Have the windshield wipers checked at a qualified specialist
workshop. The spray nozzles are
misaligned. The windshield washer fluid from the spray nozzles no longer hits
the center of the windshield. The spray nozzles are misaligned.
X
Have the spray nozzles adjusted at a qualified specialist
workshop.124
Windshield wipersLights and windshield wipers
Page 128 of 380
Useful information
i This Operator's Manual describes all
models and all standard and optional
equipment of your vehicle available at the
time of publication of the Operator's
Manual. Country-specific differences are
possible. Please note that your
vehicle may
not be equipped with all features
described. This also applies to safety-
related systems and functions.
i Read the information on qualified
specialist workshops: ( Y page 27).Overview of climate control systems
Important safety notes
Observe the settings recommended on the
following pages. The windows could
otherwise fog up.
To prevent the windows from fogging up:
R switch off climate control only briefly
R switch on air-recirculation mode only
briefly
R switch on the cooling with air
dehumidification function
R switch on the defrost windshield function
briefly, if required
Climate control regulates the temperature
and the humidity in the vehicle interior and
filters undesirable substances out of the air.
Climate control can only be operated when
the engine is running. Optimum operation is
only achieved with the side
windows and roof
closed.
The residual heat function can only be
activated or deactivated with the ignition
switched off (Y page 136).
i Ventilate the vehicle for a brief period
during warm weather, e.g. using the
convenience opening feature ( Y page 87).
This will speed up the cooling process and
the desired vehicle interior temperature
will be reached more quickly. i
The integrated filter can filter out most
particles of dust, and completely
filters out
pollen. A clogged filter reduces the amount
of air supplied to the vehicle interior. For
this reason, you should always observe the
interval for replacing the filter, which is
specified in the Maintenance Booklet. As it
depends on environmental conditions, e.g.
heavy air pollution, the interval may be
shorter than stated in the Maintenance
Booklet.
i It is possible that the dehumidification
function of the climate control system may
be activated automatically an hour after the
SmartKey has been removed. The vehicle
is ventilated for 30 minutes. 126
Overview of climate control systems
Climate control
Page 133 of 380
Notes on using 3-zone automatic
climate control
Automatic climate control The following contains instructions and
recommendations to enable you to get the
most out of your automatic climate control.
R
Activate climate control using the 0058
and
005A buttons. The indicator lamps in the
0058 and 005A buttons light up.
R In automatic mode, you can also use the
00F0 button to adjust airflow (FOCUS/
MEDIUM/DIFFUSE). The MEDIUM level is
recommended.
R Set the temperature to 72 ‡ (22 †).
R Only use the "windshield defrosting"
function briefly until the windshield is clear
again.
R Only use air-recirculation mode briefly, e.g.
if there are unpleasant outside odors or
when in a tunnel. The windows could
otherwise fog up, since no fresh air is drawn
into the vehicle in air-recirculation mode.
R Use the ZONE function to adopt the
temperature settings on the driver's side
for the front-passenger side and the rear
compartment as well. The indicator lamp in
the 00D6 button goes out.
R Use the residual heat function if you want
to heat or ventilate the vehicle interior
when the ignition is switched off. The
residual heat function can only be activated
or deactivated with the ignition switched
off.
ECO start/stop function During automatic engine switch-off, the ECO
start/stop function only operates at a
reduced capacity. If you require the full
climate control output, you can
switch off the
ECO start/stop function by pressing the ECO
button ( Y page 146). Operating the climate control
systems
Switching climate control on/off
Points to observe before use When the climate control is switched off, the
air supply and air circulation are also
switched off. Only use this setting for a brief
period. The windows could otherwise fog up.
Only switch off climate control briefly to
prevent the windows from fogging up.
i
Switch on climate control primarily using
the 0058 button ( Y page 132).
Activating/deactivating X
Turn the SmartKey to position 2 in the
ignition lock (Y page 141).
X To activate: press the 0058 button.
The indicator lamp
in the
0058
button lights
up. Airflow and air distribution are set to
automatic mode.
or
X Press the 0078 button.
The indicator lamp in the 0078
button goes
out. The previously selected settings are
restored.
X To deactivate: press the 0078 button.
The indicator lamp in the 0078
button lights
up. Activating/deactivating cooling with
air dehumidification
Points to observe before use If you switch off the cooling function, the
vehicle will not be cooled when weather
conditions
are
warm. The
windows
can fog up
more quickly. Only deactivate the cooling
with air dehumidification function for a short
time to prevent the windows from fogging up.
The cooling with air dehumidification function
is only available when the engine is running.
The air inside the vehicle is cooled and Operating the climate control systems
131
Climate control
Page 134 of 380
dehumidified according to the temperature
selected.
Condensation may drip from
the
underside of
the vehicle when it is in cooling mode. This is
normal and not a sign that there is a
malfunction.
Activating/deactivating X
To activate: press the 005A button.
The indicator lamp in the 005A
button lights
up.
i When the "Cooling with air
dehumidification" function is activated,
one of the indicator lamps on the auxiliary
heating button will light up
on vehicles with
auxiliary heating.
X To deactivate: press the 005A button.
The indicator lamp in the 005A
button goes
out. The "Cooling with air dehumidification"
function has a delayed switch-off feature.
Problems with the "Cooling with air
dehumidification" function When you press the
005A button, the
indicator lamp in the button flashes three
times or remains off. You
can no longer switch
on the cooling with air dehumidification
function.
X Visit a qualified specialist workshop. Setting the climate control to
automatic
In automatic mode, the set temperature is
maintained automatically at a constant
level.
The system automatically regulates the
temperature of the dispensed air, the airflow
and the air distribution.
The automatic mode functions optimally
when the "Cooling with air dehumidification"
function is activated. If necessary, cooling
with air dehumidification can be deactivated.
If you switch off the cooling function, the
vehicle will not be cooled when weather conditions are warm. The windows can fog up
more quickly. Only deactivate the cooling
with air dehumidification function for a short
time
to prevent the windows
from fogging up.
X Turn the SmartKey to position 2 in the
ignition lock (Y page 141).
X Set the desired temperature.
X To activate: press the 0058 button.
The indicator lamp in the 0058
button lights
up. Automatic air distribution and airflow
are activated.
3-zone automatic climate control: when
automatic mode is activated, you can adjust
airflow (Y page 132).
X To select manually: press the 008F
button.
or
X Press the
0097 or 0095 button.
The indicator lamp in the 0058
button goes
out. Automatic air distribution and airflow
are deactivated. Adjusting airflow
This function is only available with 3-zone
automatic climate control.
In automatic mode you can select the
following airflow settings:
FOCUS high airflow that is set slightly cooler
MEDIUM medium airflow, standard setting
DIFFUSE low airflow that is set slightly warmer and with less draft
X Turn the SmartKey to position 2 in the
ignition lock (Y page 141).
X Press the 0058 button.
X Press the 00F0 button repeatedly until the
required airflow setting appears in the
display. 132
Operating the climate control systems
Climate control
Page 135 of 380

Setting the temperature
Dual-zone automatic climate control Different temperatures can be set for the
driver's and front-passenger sides.
X
Turn the SmartKey to position 2 in the
ignition lock (Y page 141).
X To increase/reduce: turn control 0043 or
0084 clockwise or counter-clockwise
(Y page 127).
Only change the temperature setting in
small increments. Start at 72 ‡ (22 †).
3-zone automatic climate control 9Automatic climate control zones
You can select different
temperature
settings
for the driver's and front-passenger sides as
well as for the rear compartment.
X Turn the SmartKey to position 2 in the
ignition lock (Y page 141).
X To increase/reduce the temperature in
the front: turn control 0043 or 0084 clockwise
or counter-clockwise (Y page 130).
Only change the temperature setting in
small increments. Start at 72 ‡ (22 †
).
X To increase/reduce the temperature in
the rear compartment using the front
control panel: press the 00D6 button.
The indicator lamp in the 00D6
button goes
out. X
Turn control 0043 clockwise or counter-
clockwise (Y page 130).
Only change the temperature setting in
small increments. Start at 72 ‡ (22 †).
X To increase/reduce the
temperature in
the rear compartment using the rear
control panel: press the 0063 or 0064
button on the rear control panel.
Only change the temperature setting in
small increments. Start at 72 ‡ (22 †).
i If you leave the vehicle parked for longer
than 30 minutes, the temperature setting
for the rear compartment then switches
back to 72 ‡ (22 †). Setting the air distribution
Air distribution settings Dual-zone climate control: the air distribution
can be set individually for the driver's and
front-passenger sides.
0061
Directs air through the defroster vents
009C Directs air through the center and side
air vents
009B Directs air through the footwell air
vents
009F Directs the airflow through the center
and side air vents as well as the
footwell air vents 10
008F Directs the airflow to the entire vehicle
interior 11
0087 Directs air through the defroster,
center and side air vents 11
0086 Directs air through the defroster and
footwell vents
i Regardless of the air distribution setting,
airflow is always directed through the side
air vents. The side air vents can only be
closed when the controls on the side air
vents are turned downwards.
9 Canada only.
10 Only for USA.
11 Canada only. Operating the climate control systems
133
Climate control
Page 136 of 380
Adjusting
X
Turn the SmartKey to position 2 in the
ignition lock (Y page 141).
X Press the 008F button repeatedly until the
desired symbol appears in the display.
The indicator lamp in the 0058
button goes
out. Automatic control is deactivated and
the air distribution is controlled according
to the selected setting. Setting the airflow
X Turn the SmartKey to position 2 in the
ignition lock (Y page 141).
X To increase/reduce: press the 0097 or
0095 button.
i You can use 3-zone automatic climate
control to set the airflow in the rear
compartment separately.
If the battery is not sufficiently charged,
blower output may be reduced. As soon as
the battery is
sufficiently charged,
full blower
output will be available. Switching the ZONE function on/off
This function is only available in vehicles for
Canada.
X To activate: press the 00D6 button.
The indicator lamp in the 00D6
button lights
up.
Dual-zone automatic climate control: the
temperature setting for the driver's side is
not adopted for the front-passenger side.
3-zone automatic climate control: the
temperature setting for the driver's side is
not adopted for the front-passenger side
and the rear compartment.
When the buttons for temperature, airflow or
air distribution are activated, the
temperature
setting for the driver's side is not adopted for
the other climate control zones. X
To deactivate: press the 00D6 button.
The indicator lamp in the 00D6
button goes
out.
Dual-zone automatic climate control: the
temperature setting for the driver's side is
adopted for the front-passenger side.
3-zone automatic climate control: the
temperature setting for the driver's side is
adopted for the front-passenger side and
the rear compartment. Defrosting the windshield
You can use this function to defrost the
windshield or to defrost the inside of the
windshield and the side windows.
i You should only select the "windshield
defrosting" function until the windshield is
clear again.
X Turn the SmartKey to position 2 in the
ignition lock (Y page 141).
X To activate: press the 0064 button.
The indicator lamp in the 0064
button lights
up.
The climate control system switches to the
following functions:
R high airflow
R high temperature
R air distribution to the windshield and
front side windows
R air-recirculation mode off
If the battery is not sufficiently charged,
blower output may be reduced. As soon as
the battery is sufficiently charged,
full blower
output will be available.
X To deactivate: press the 0064 button.
The indicator lamp in the 0064
button goes
out. The previously selected settings are
restored. Air-recirculation mode remains
deactivated.
or 134
Operating the climate control systems
Climate control