2013 MERCEDES-BENZ GLK-CLASS SUV light
[x] Cancel search: lightPage 69 of 380

If the
00E5 warning lamp and the 00BB
warning lamp are lit continuously,
ESP®
is not
available due to a malfunction.
Observe the information on warning lamps
(Y page 261) and display messages which
may be shown in the instrument cluster
(Y page 232).
i Only use wheels with the recommended
tire sizes. Only then will ESP ®
function
properly.
Characteristics of ESP General information
ESP
®
is activated automatically when the
engine is started.
If ESP ®
intervenes, the 00E5 ESP®
warning
lamp flashes in the instrument cluster.
If ESP ®
intervenes:
X Do not deactivate ESP ®
under any
circumstances.
X Only depress the accelerator pedal as far
as necessary when pulling away.
X Adapt your driving style to suit the
prevailing road and weather conditions.
Vehicles with the ECO start/stop function
The ECO start/stop function switches the
engine off automatically when the vehicle
stops moving. The engine starts
automatically when the driver wants to pull
away again. ESP ®
remains in its previously
selected status. Example: if ESP ®
was
deactivated before the engine was switched
off, ESP ®
remains deactivated when the
engine is switched on again.
Deactivating/activating ESP ®Important safety notes
You can select between the following states
of ESP:
R
ESP ®
is activated.
R ESP ®
is deactivated. G
WARNING
If you deactivate ESP ®
, ESP ®
no longer
stabilizes the vehicle. There is an increased
risk of skidding and an accident.
Only deactivate ESP ®
in the situations
described in the following.
It may be best to deactivate ESP ®
in the
following situations:
R when using snow chains
R in deep snow
R on sand or gravel
i Activate ESP ®
as soon as the situations
described above no longer apply.
ESP®
will
otherwise not be able to stabilize the
vehicle if the vehicle starts to skid or a
wheel starts to spin.
Deactivating/activating ESP ® X
To switch off: press button 0043.
The 00BB ESP ®
OFF warning lamp in the
instrument cluster lights up.
X To switch on: press button 0043.
The 00BB ESP ®
OFF warning lamp in the
instrument cluster goes out.
Characteristics when ESP ®
is deactivated
If ESP ®
is
deactivated and one or more wheels
start to spin, the 00E5 ESP®
warning lamp in
the instrument cluster flashes. In such
situations, ESP ®
will not stabilize the vehicle. Driving safety systems
67
Safety Z
Page 70 of 380

If you deactivate ESP
®
:
R ESP ®
no longer improves driving stability.
R the engine's torque is
no
longer limited and
the drive wheels are able to spin. The
spinning of the wheels results in a cutting
action, which provides better grip.
R traction control is still activated.
R ESP ®
still provides support when you
brake.
Deactivating/activating ESP ®Important safety notes
You can select between the following
statuses of ESP:
R
ESP ®
is activated.
R SPORT handling mode is activated.
R ESP ®
is deactivated. G
WARNING
When SPORT handling mode is activated,
there is a greater risk of skidding and
accidents.
Only activate SPORT handling mode in the
situations described in the following. G
WARNING
If you deactivate ESP ®
, ESP ®
no longer
stabilizes the vehicle. There is an increased
risk of skidding and an accident.
Only deactivate ESP ®
in the situations
described in the following.
In the following
situations, it
may be better to
activate SPORT handling mode or deactivate
ESP ®
:
R when using snow chains
R in deep snow
R on sand or gravel
R on designated roads when the vehicle's
own oversteering and understeering
characteristics are desired Driving in SPORT handling mode or without
ESP
®
requires an extremely qualified and
experienced driver.
i Activate ESP ®
as soon as the situations
described above no longer apply.
ESP®
will
otherwise not be able to stabilize the
vehicle if the vehicle starts to skid or a
wheel starts to spin.
Deactivating/activating ESP ®
X To activate SPORT handling mode:
briefly press button 0043.
The 0074 SPORT handling mode warning
lamp in the instrument cluster lights up.
The SPORT handling mode message
appears in the multifunction display.
X To deactivate SPORT handling mode:
briefly press button 0043.
The 0074 SPORT handling mode warning
lamp in the instrument cluster goes out.
X To deactivate ESP ®
: press button
0043 until
the 00BB
ESP®
OFF warning lamp lights up
in the instrument cluster.
The 00E5OFF message appears in the
multifunction display.
X To activate ESP ®
: briefly press button 0043.
The
00BB ESP ®
OFF warning lamp in the
instrument cluster goes out. The 00E5
ESP ®
ON message appears in the
multifunction display.
Characteristics of activated SPORT
handling mode
If SPORT handling mode is
activated and one
or more wheels start to spin, the 00E5 ESP ®
warning lamp in the instrument cluster
flashes. ESP ®
only stabilizes the vehicle to a
limited degree.
When SPORT handling mode is activated:
R ESP ®
only improves driving stability to a
limited degree.
R traction control is still activated.
R the engine's torque is restricted to a limited
degree and the drive wheels can spin in a68
Driving safety systems
Safety
Page 72 of 380

reduce the effects of such a collision. If PRE-
SAFE
®
Brake has detected a
risk of collision,
you will be warned visually and acoustically
as well as by automatic braking. PRE-SAFE ®
Brake cannot prevent a collision without your
intervention.
Starting at a speed of around
4 mph (7 km/h), this function warns you if
you very quickly approach a vehicle in front.
An intermittent warning tone will then sound
and the 00BA distance warning lamp will light
up in the instrument cluster.
X Brake immediately in order to increase the
distance from the vehicle in front.
or
X Take evasive action provided it is safe to do
so.
From a speed of approximately
4 mph (7 km/h), if the driver and front
passenger have fastened their seat belts,
PRE-SAFE ®
Brake can brake the vehicle
automatically at speeds up to approximately
124 mph (200 km/h ).
Due to the nature of the system, particularly
complicated driving conditions may cause
unnecessary warnings or the unnecessary
intervention of PRE-SAFE ®
Brake.
You can prevent the intervention of the PRE-
SAFE ®
Brake at any time by:
R depressing the accelerator pedal further
R activating kickdown
R releasing the brake pedal
The braking action of PRE-SAFE ®
Brake is
ended automatically if:
R you maneuver to avoid the obstacle.
R there is no longer
any danger of a rear-end
collision.
R there is no longer an obstacle detected in
front of your vehicle.
At speeds of up to approximately 40 mph
(70 km/h), PRE-SAFE ®
Brake can also detect
stationary objects. Examples of stationary
objects are stopped or parked vehicles. If you approach an obstacle and PRE-SAFE
®
Brake detects a risk of
a collision, the system
will alert you both visually and acoustically. If
you do not brake or take evasive action, the
system will warn you by automatically braking
the vehicle gently. If there is an increased risk
of collision, preventative passenger
protection measures (PRE-SAFE ®
) are
activated (Y page 52). If the risk of collision
with the vehicle in front remains and you do
not brake, take evasive action or accelerate
significantly, automatic braking may be
performed up to a level of emergency braking.
Automatic emergency braking is not
performed until immediately prior to an
accident that can no longer be avoided. G
WARNING
PRE-SAFE ®
Brake will initially brake your
vehicle by a partial application of the brakes
if a danger of collision
is detected. There may
be a collision unless you also brake.
Automatic emergency braking cannot prevent
a collision. There is a risk of an accident.
Always apply the brakes yourself and try to
take evasive action. G
WARNING
PRE-SAFE ®
Brake cannot always clearly
identify objects and complex traffic
conditions.
In these cases, PRE-SAFE ®
Brake may:
R give an unnecessary warning and then
brake the vehicle
R not give a warning or intervene
There is a risk of an accident.
Always pay particular attention to the traffic
situation and be ready to brake, especially if
PRE-SAFE ®
Brake warns you. Terminate the
intervention in a non-critical driving
situation.
In particular, the detection of obstacles can
be impaired if:
R dirt on the sensors or anything else
covering the sensors
R snow or heavy rain70
Driving safety systems
Safety
Page 77 of 380

0043
0037 To lock the vehicle
0044 0054 To open/close the tailgate
0087 0036 To unlock the vehicle
The turn signals flash once when unlocking
and three times when locking.
When it is dark, the surround lighting also
comes on if it is activated in the on-board
computer (Y page 227).
You can also set
an
audible signal to confirm
that the vehicle has been locked. The audible
signal can be activated and deactivated using
the on-board computer (Y page 228).
X To unlock centrally: press the 0036
button.
If you do not open the vehicle within
approximately 40 seconds of unlocking:
R the vehicle is locked again.
R the theft deterrent locking
system is armed
again.
X To lock centrally: press the 0037 button.KEYLESS-GO
General notes Bear in mind that the engine can be started
by any of the vehicle occupants if there is a
KEYLESS-GO key in the vehicle.
Locking/unlocking centrally
You can start, lock or unlock the vehicle using
KEYLESS-GO. To do this, you
only need carry
the SmartKey with you. You can combine the functions of KEYLESS-GO with those of a
conventional SmartKey. Unlock the vehicle
by using KEYLESS-GO, for instance, and lock
it using the 0037 button on the SmartKey.
When locking or unlocking
with
KEYLESS-GO,
the distance between the SmartKey and the
corresponding door handle must not be
greater than 3 ft (1 m).
KEYLESS-GO checks whether a valid
SmartKey is in the vehicle by periodically
establishing a radio connection between the
vehicle and the SmartKey. This happens:
R when the external door handles are
touched
R when starting the engine
R while the vehicle is in motion X
To unlock the vehicle: touch the inner
surface of the door handle.
X To lock the vehicle: touch sensor
surface 0043.
X Convenience closing feature: touch
recessed sensor surface 0044 for an
extended period.
Further information on the convenience
closing feature ( Y page 88).
If you pull on the handle of the tailgate, only
the cargo compartment of the vehicle is
unlocked. Changing the settings of the locking
system
You can change the settings of the locking
system. This means that only
the driver's door SmartKey
75
Opening and closing Z
Page 79 of 380

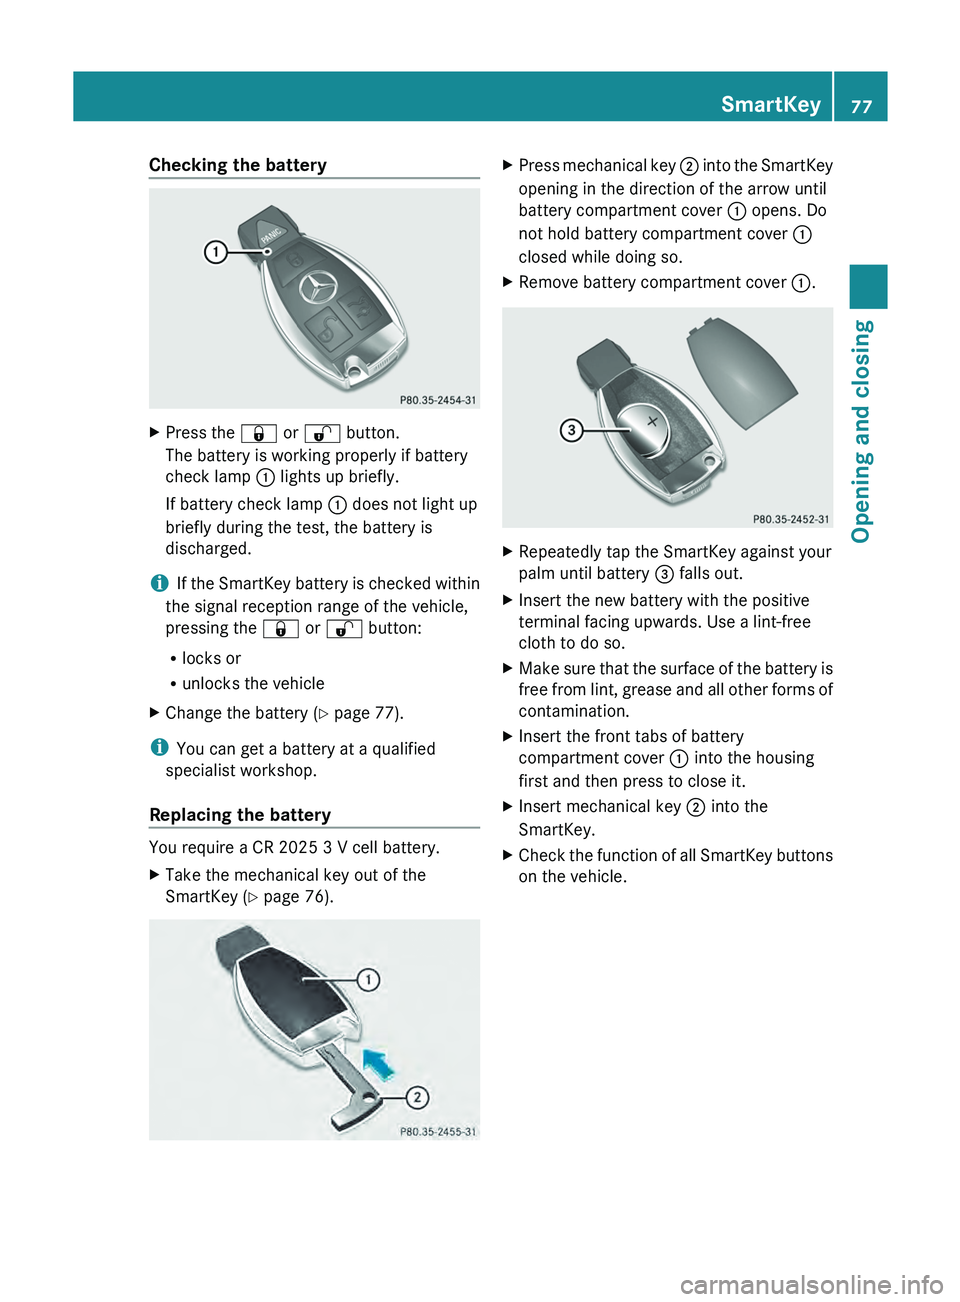
Checking the battery
X
Press the 0037 or 0036 button.
The battery is working properly if battery
check lamp 0043 lights up briefly.
If battery check lamp 0043 does not light up
briefly during the test, the battery is
discharged.
i If the SmartKey battery is checked within
the signal reception range of the vehicle,
pressing the 0037 or 0036
button:
R locks or
R unlocks the vehicle
X Change the battery ( Y page 77).
i You can get a battery at a qualified
specialist workshop.
Replacing the battery You require a CR 2025 3 V cell battery.
X
Take the mechanical key out of the
SmartKey (Y page 76). X
Press mechanical key 0044 into the SmartKey
opening in the direction of the arrow until
battery compartment cover 0043 opens. Do
not hold battery compartment cover 0043
closed while doing so.
X Remove battery compartment cover 0043
. X
Repeatedly tap the SmartKey against your
palm until battery 0087 falls out.
X Insert the new battery with the positive
terminal facing upwards. Use a lint-free
cloth to do so.
X Make sure that the surface of the battery is
free from lint, grease and
all other forms of
contamination.
X Insert the front tabs of battery
compartment cover 0043 into the housing
first and then press to close it.
X Insert mechanical key 0044 into the
SmartKey.
X Check the function of all SmartKey buttons
on the vehicle. SmartKey
77
Opening and closing Z
Page 81 of 380

Problem Possible causes/consequences and
0050 SolutionsYou have lost the
mechanical key. X
Report the loss immediately to the vehicle insurers.
X If necessary, have the locks changed as well. The engine cannot be
started using the
SmartKey. The on-board voltage is too low.
X
Switch off non-essential consumers, e.g. seat heating or interior
lighting, and try to start the engine again.
If this does not work:
X Check the starter battery and charge it if necessary
(Y page 314).
or
X Jump-start the vehicle (Y page 318).
or
X Consult a qualified specialist workshop. The engine cannot be
started
using KEYLESS-
GO. The SmartKey is in
the vehicle. A door is open. Therefore, the SmartKey cannot be detected as
easily.
X
Close the door and try to start the vehicle again. There is interference from a powerful source of radio waves.
X
Start your vehicle with the SmartKey in the ignition lock. Doors
Important safety notes
G
WARNING
If children are left unsupervised in the vehicle,
they could:
R open the doors, thus endangering other
people or road users.
R get out and disrupt traffic.
R operate the vehicle's equipment.
Additionally, children could set the vehicle in
motion if, for example, they:
R release the parking brake.
R shifting the automatic transmission out of
park position P
R Start the engine.
There is a risk of an accident and injury.
When leaving the vehicle, always take the
SmartKey with you and lock
the vehicle. Never leave children or animals unattended in the
vehicle. Always keep the SmartKey out of
reach of children.
G
WARNING
If persons, particularly children are subjected
to prolonged exposure to extreme heat or
cold, there is a risk of injury, possibly even
fatal. Never leave children unattended in the
vehicle. Unlocking and opening doors from
the inside
You can open a door from inside the vehicle
even if it has been
locked. You can only open
the rear doors from inside the vehicle if they
are not secured by the child-proof locks
(Y page 63).
Only open the door when the traffic situation
permits. Doors
79
Opening and closing Z
Page 89 of 380

G
WARNING
The reversing feature does not react:
R to soft, light and thin objects, e.g. small
fingers
R over the last 4 mm
of the closing movement
R during resetting
R when closing the side window again
manually immediately after automatic
reversing
This means that the reversing feature cannot
prevent someone being trapped in these
situations. There is a risk of injury.
Make sure that no body parts are in close
proximity during the closing procedure. If
someone becomes trapped, press the switch
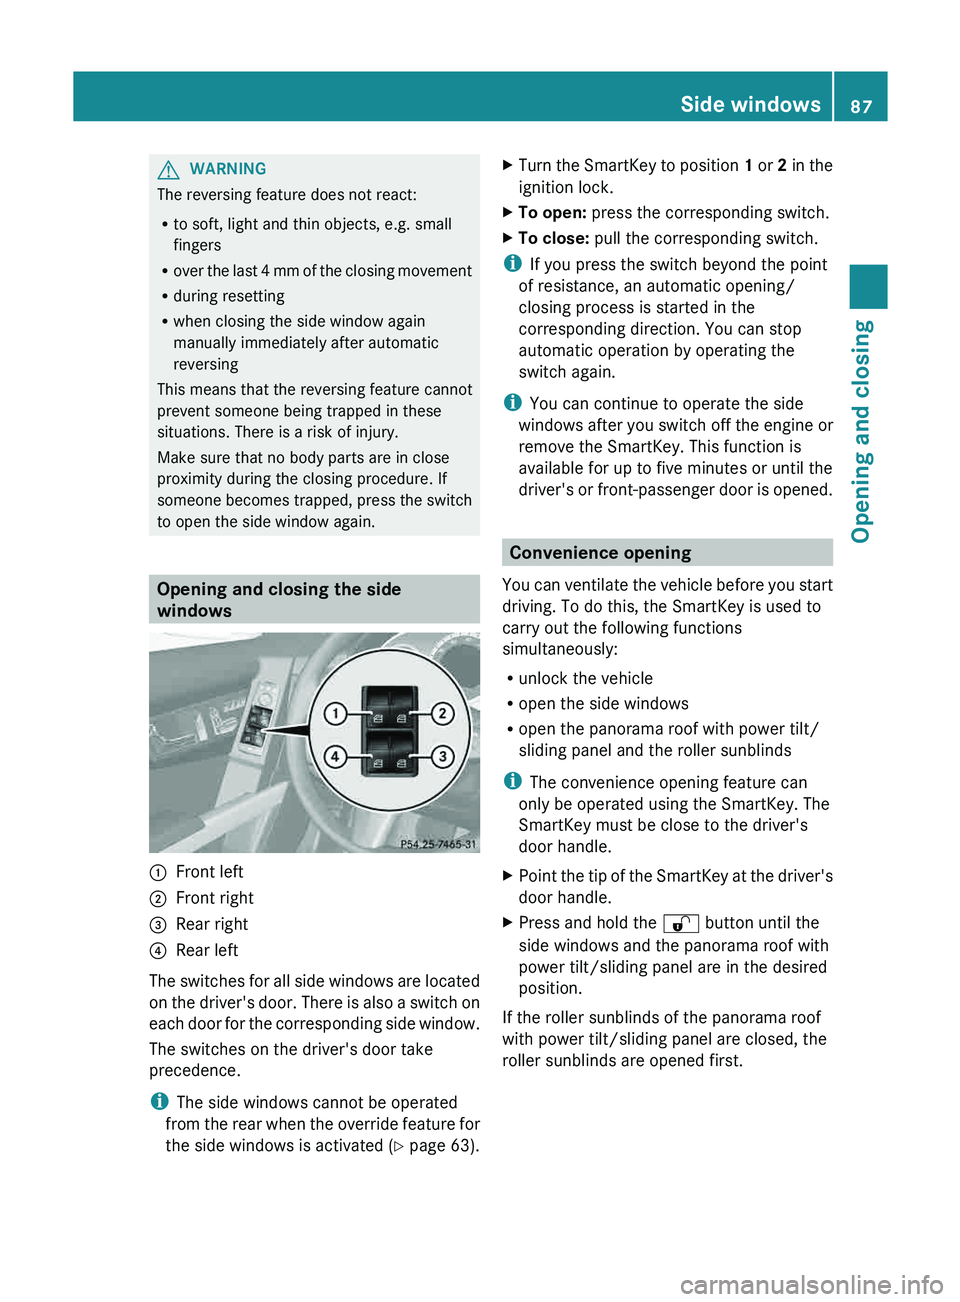
to open the side window again. Opening and closing the side
windows
0043
Front left
0044 Front right
0087 Rear right
0085 Rear left
The switches for all side windows are located
on the driver's door.
There
is also a switch on
each door for the corresponding side window.
The switches on the driver's door take
precedence.
i The side windows cannot be operated
from the rear when the override feature for
the side windows is activated ( Y page 63).X
Turn the SmartKey to position 1 or 2 in the
ignition lock.
X To open:
press the corresponding switch.
X To close: pull the corresponding switch.
i If you press the switch beyond the point
of resistance, an automatic opening/
closing process is started in the
corresponding direction. You can stop
automatic operation by operating the
switch again.
i You can continue to operate the side
windows after you switch off
the engine or
remove the SmartKey. This function is
available for up to five minutes or until the
driver's or front-passenger door is opened. Convenience opening
You can ventilate the vehicle
before you start
driving. To do this, the SmartKey is used to
carry out the following functions
simultaneously:
R unlock the vehicle
R open the side windows
R open the panorama roof with power tilt/
sliding panel and the roller sunblinds
i The convenience opening feature can
only be operated using the SmartKey. The
SmartKey must be close to the driver's
door handle.
X Point the tip of the SmartKey at the driver's
door handle.
X Press and hold the 0036 button until the
side windows and the panorama roof with
power tilt/sliding panel are in the desired
position.
If the roller sunblinds of the panorama roof
with power tilt/sliding panel are closed, the
roller sunblinds are opened first. Side windows
87Opening and closing Z
Page 91 of 380

panorama roof with power tilt/sliding
panel are fully closed.
i Make sure you only touch recessed
sensor surface 0043.
X Make sure that all the side windows and the
panorama roof with power tilt/sliding
panel are closed.
On vehicles with a panorama roof with power
tilt/sliding panel:
X Touch recessed sensor surface 0043 on the
door handle again until the
roller sunblinds
of the panorama roof with power tilt/
sliding panel close.
X To interrupt convenience closing:
release recessed
sensor surface
0043
on the
door handle. Resetting the side windows
You must reset each side window if a side
window can no longer be closed fully.
X Close all the doors.
X Turn the SmartKey to position 1 or 2 in the
ignition lock.
X Pull the corresponding switch on the door
control panel until the side window is
completely closed
(Y page 87).
X Hold the switch for an additional second.
If the side window opens again slightly:
X Immediately pull the
corresponding switch
on the door control panel until the side
window is completely closed ( Y page 87).
X Hold the switch for an additional second.
X If the corresponding side window remains
closed after the button has been released,
the side window has been reset correctly.
If this is not the case, repeat the steps
above again. Problems with the side windows
Problem: a side window cannot
be closed
because it is blocked by objects, e.g.
leaves in the window guide.
X Remove the objects.
X Close the side window.
Problem: a side window cannot be closed
and you cannot see the cause. G
WARNING
If you close a side window again immediately
after it has been blocked or reset, the side
window closes with increased or maximum
force. The reversing feature is
then not active.
Parts of the body could be trapped in the
closing area in the process. This poses an
increased risk of injury or even fatal injury.
Make sure that no parts of the body are in the
closing area. To stop the closing process,
release the switch or push the switch again to
reopen the side window.
If a side window is obstructed during closing
and reopens again slightly:
X Immediately after the window blocks, pull
the corresponding switch again until the
side window has closed.
The side window is closed with increased
force.
If a side window is obstructed again during
closing and reopens again slightly:
X Immediately after the window blocks, pull
the corresponding switch again until the
side window has closed.
The side window is closed
without the anti-
entrapment feature. Sliding sunroof
Important safety notes
In the following section, the term "sliding
sunroof" refers to the panorama roof with
power tilt/sliding panel. Sliding sunroof
89
Opening and closing Z