2013 MERCEDES-BENZ GLK-CLASS SUV height
[x] Cancel search: heightPage 102 of 380
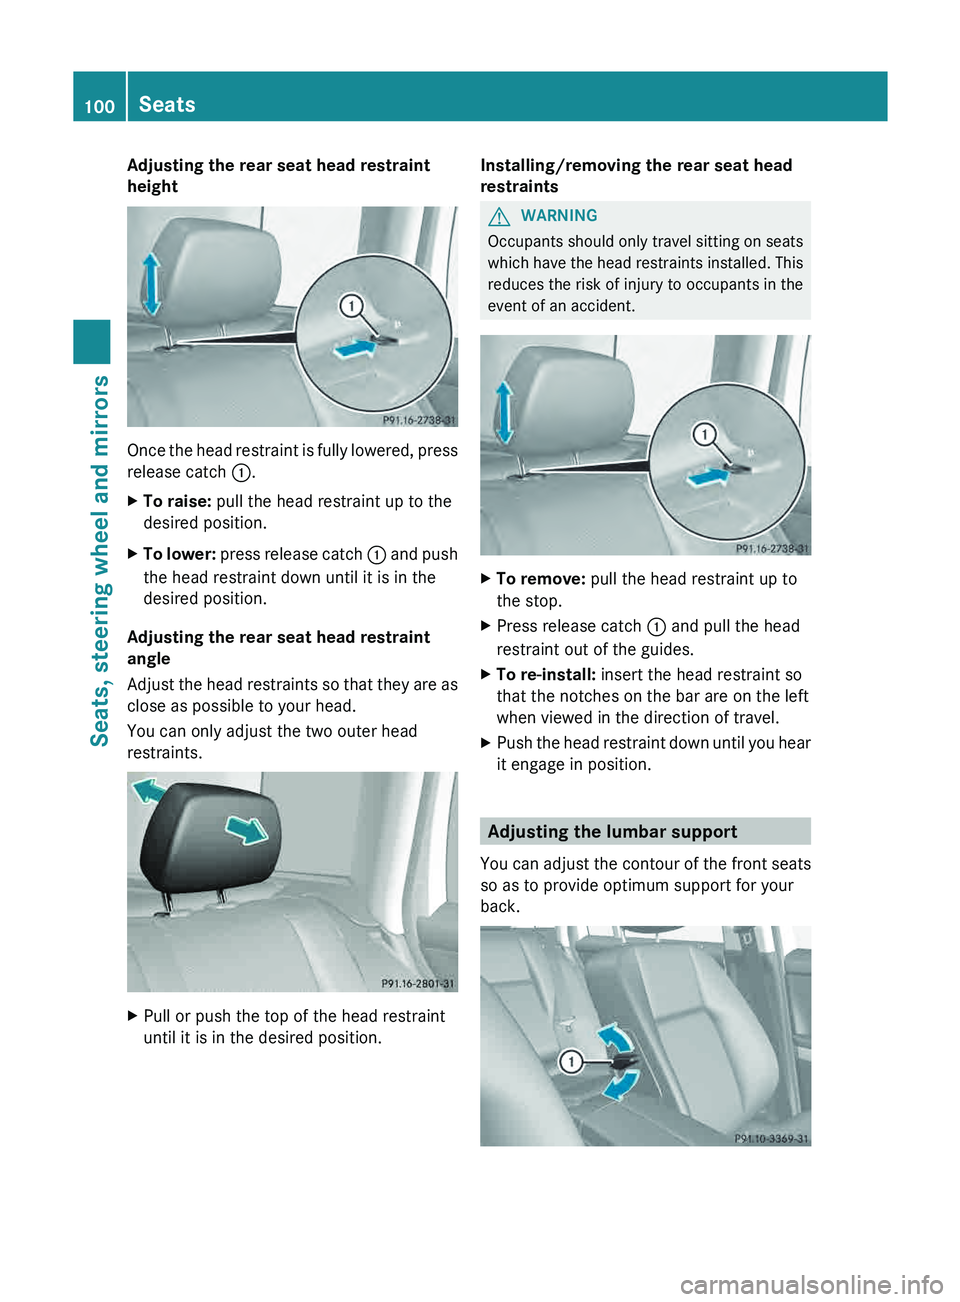
Adjusting the rear seat head restraint
height
Once the head restraint is fully lowered, press
release catch 0043.
X
To raise: pull the head restraint up to the
desired position.
X To lower: press release catch 0043 and push
the head restraint down until it is in the
desired position.
Adjusting the rear seat head restraint
angle
Adjust the
head restraints
so
that they are as
close as possible to your head.
You can only adjust the two outer head
restraints. X
Pull or push the top of the head restraint
until it is in the desired position. Installing/removing the rear seat head
restraints G
WARNING
Occupants should only travel sitting on seats
which have the head restraints
installed. This
reduces the risk of injury to occupants in the
event of an accident. X
To remove: pull the head restraint up to
the stop.
X Press release catch 0043 and pull the head
restraint out of the guides.
X To re-install: insert the head restraint so
that the notches on the bar are on the left
when viewed in the direction of travel.
X Push the head restraint down until you hear
it engage in position. Adjusting the lumbar support
You can
adjust the
contour
of the front seats
so as to provide optimum support for your
back. 100
Seats
Seats, steering wheel and mirrors
Page 104 of 380
Steering wheel
Important safety notes
G
WARNING
Do not adjust the steering wheel while driving.
Adjusting the steering wheel while
driving, or
driving without the steering wheel adjustment
feature locked could cause the driver to lose
control of the vehicle.
The electrical steering wheel adjustment
feature can be operated at any time.
Therefore, do not leave children unattended
in the vehicle, or with access to an unlocked
vehicle. A child's unsupervised access to a
vehicle could result in an accident and/or
serious personal injury. Adjusting the steering wheel
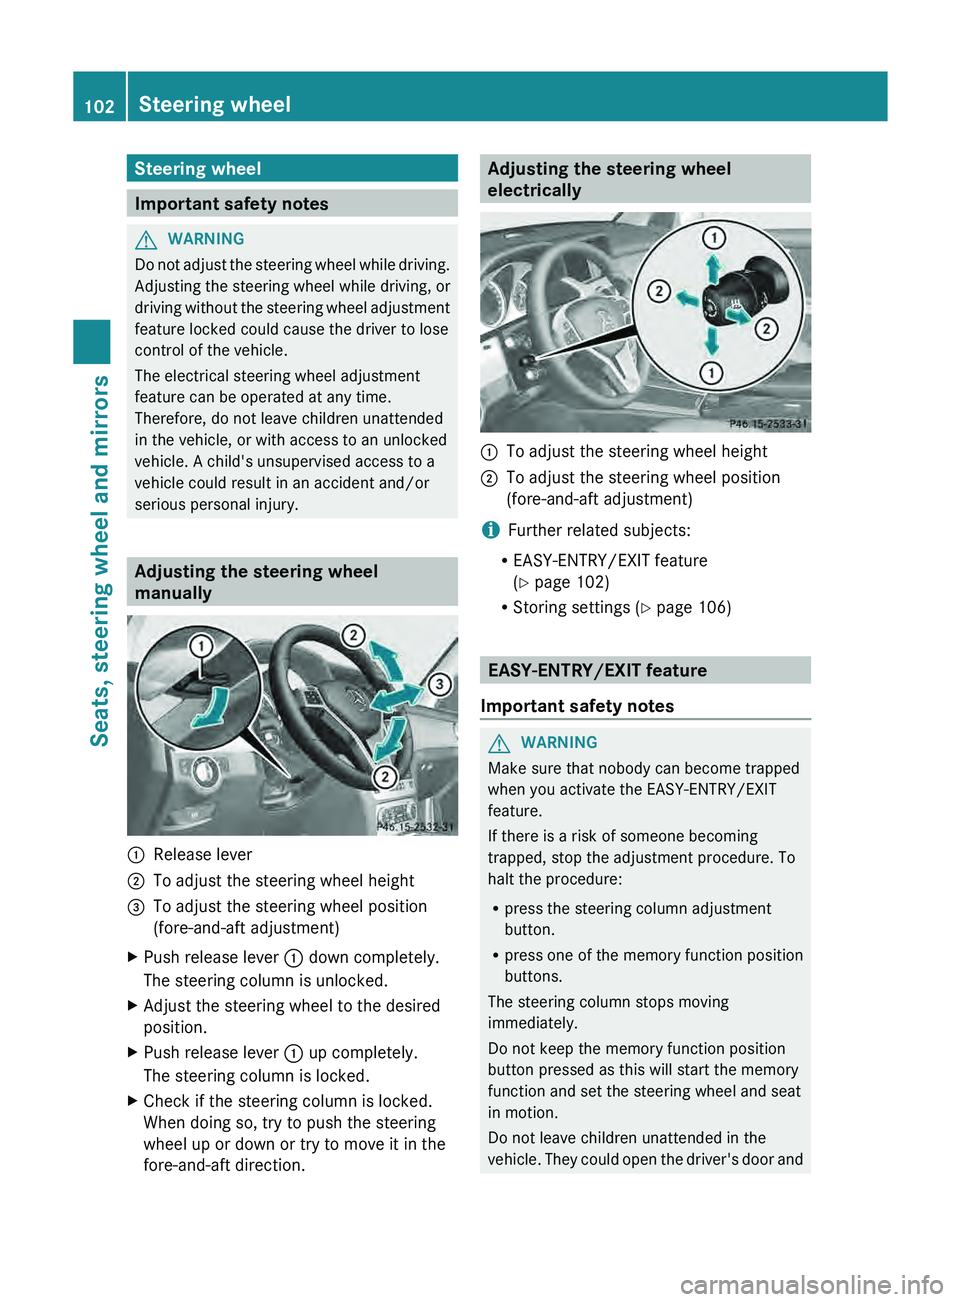
manually
0043
Release lever
0044 To adjust the steering wheel height
0087 To adjust the steering wheel position
(fore-and-aft adjustment)
X Push release lever 0043 down completely.
The steering column is unlocked.
X Adjust the steering wheel to the desired
position.
X Push release lever 0043 up completely.
The steering column is locked.
X Check if the steering column is locked.
When doing so, try to push the steering
wheel up or down or try to move it in the
fore-and-aft direction. Adjusting the steering wheel
electrically
0043
To adjust the steering wheel height
0044 To adjust the steering wheel position
(fore-and-aft adjustment)
i Further related subjects:
R EASY-ENTRY/EXIT feature
(Y page 102)
R Storing settings ( Y page 106) EASY-ENTRY/EXIT feature
Important safety notes G
WARNING
Make sure that nobody can become trapped
when you activate the EASY-ENTRY/EXIT
feature.
If there is a risk of someone becoming
trapped, stop the adjustment procedure. To
halt the procedure:
R press the steering column adjustment
button.
R press one of the memory function position
buttons.
The steering column stops moving
immediately.
Do not keep the memory function position
button pressed as this will start the memory
function and set the steering wheel and seat
in motion.
Do not leave children unattended in the
vehicle. They could open the
driver's door and102
Steering wheel
Seats, steering wheel and mirrors
Page 187 of 380
Use Active Parking Assist for parking spaces:
R
that are parallel to the direction of travel
R that are on straight roads, not bends
R that are on the same
level as the road, e.g.
not on the pavement
Parking tips:
R On narrow roads, drive as close to the
parking space as possible.
R Parking spaces that are littered, overgrown
or partially occupied by trailer drawbars
might be identified incorrectly or not at all.
R Snowfall or heavy rain may lead to a parking
space being measured inaccurately.
R Pay attention to the PARKTRONIC
(Y page 182) warning messages during the
parking procedure.
R You can intervene in the steering procedure
to correct it at any time. Active Parking
Assist will then be canceled.
R When transporting a load which protrudes
from your vehicle, you should not use
Active Parking Assist.
R when snow chains or an emergency spare
wheel are mounted, you should not use
Active Parking Assist here either.
R Make sure that the tire pressures are
always correct. This has a direct influence
on the parking characteristics of the
vehicle.
Detecting parking spaces Objects located above the height range of
Active Parking Assist will not be detected
when the parking space is measured. These
are not taken into account when the parking
procedure is calculated, e.g. overhanging
loads, tail sections or
loading
ramps of goods
vehicles. In some circumstances, Active
Parking Assist may therefore guide you into
the parking space too early. G
WARNING
If there are objects above the detection range,
Active Parking Assist may turn prematurely. You may cause a collision as a result. There is
a risk of an accident.
If there are objects
above
the detection range,
stop and deactivate Active Parking Assist.
Active Parking Assist is switched on
automatically when driving forwards. The
system is operational at speeds of up to
approximately 22 mph (35 km/h). While in
operation, the system independently locates
and measures parking spaces on both sides
of the vehicle. When driving at speeds below
19 mph (30 km/h), you will see the parking
symbol as a status indicator in the instrument
cluster. By default, Active Parking Assist only
displays parking spaces on the front-
passenger side. Parking spaces on the
driver's side are displayed as soon as the turn
signal on the driver's side is activated. To park
on the driver's side, you must leave the
driver's side turn signal switched on. This
must remain switched on until you
acknowledge the use of Active Parking Assist
by pressing the 0076 button on the
multifunction steering wheel.
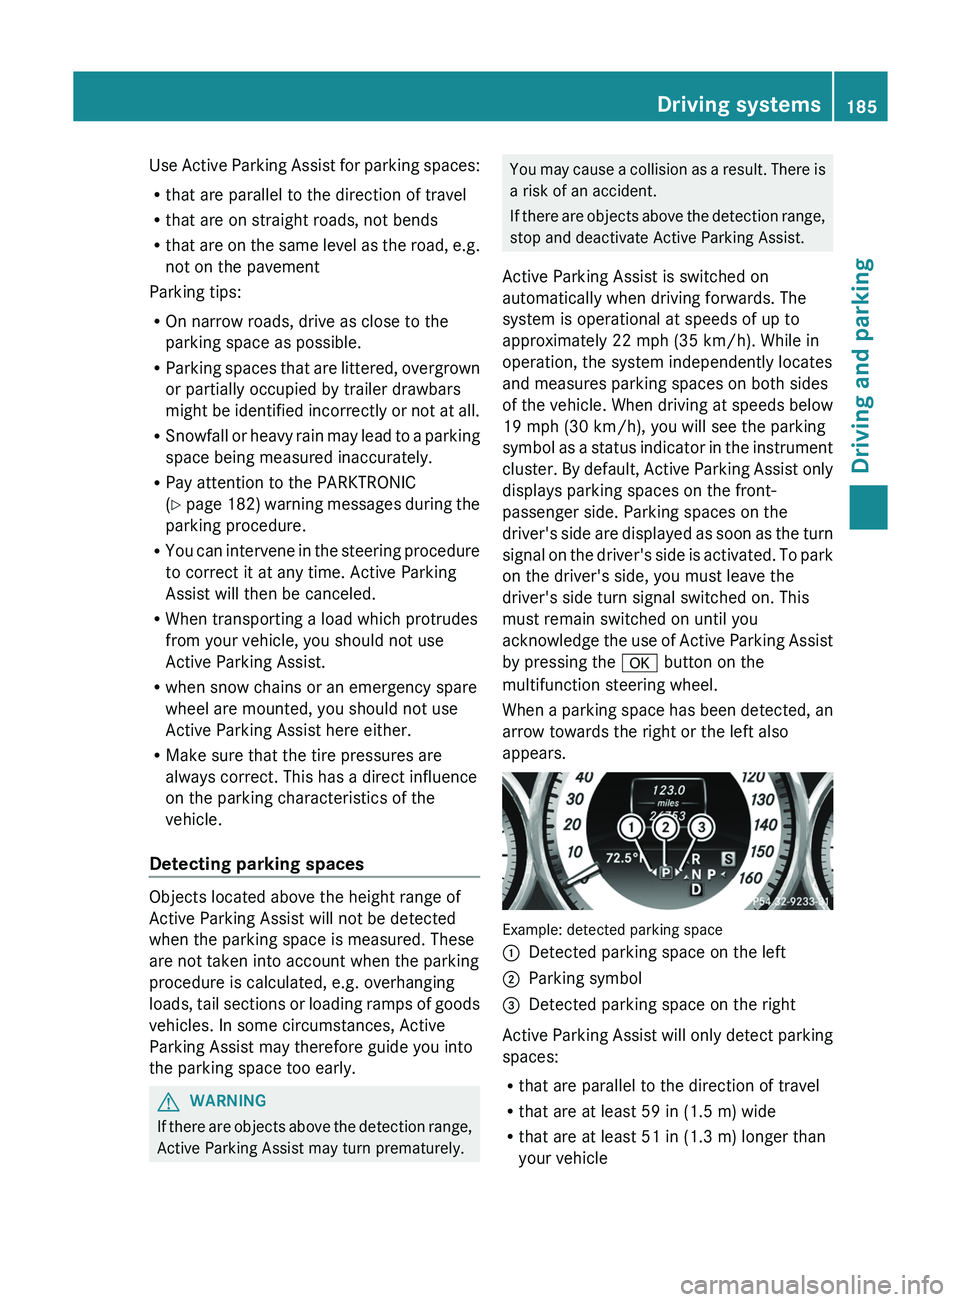
When a parking space has been detected, an
arrow towards the right or the left also
appears. Example: detected parking space
0043
Detected parking space on the left
0044 Parking symbol
0087 Detected parking space on the right
Active Parking Assist will only detect parking
spaces:
R that are parallel to the direction of travel
R that are at least 59 in (1.5 m) wide
R that are at least 51 in (1.3 m) longer than
your vehicle Driving systems
185
Driving and parking Z
Page 194 of 380
X
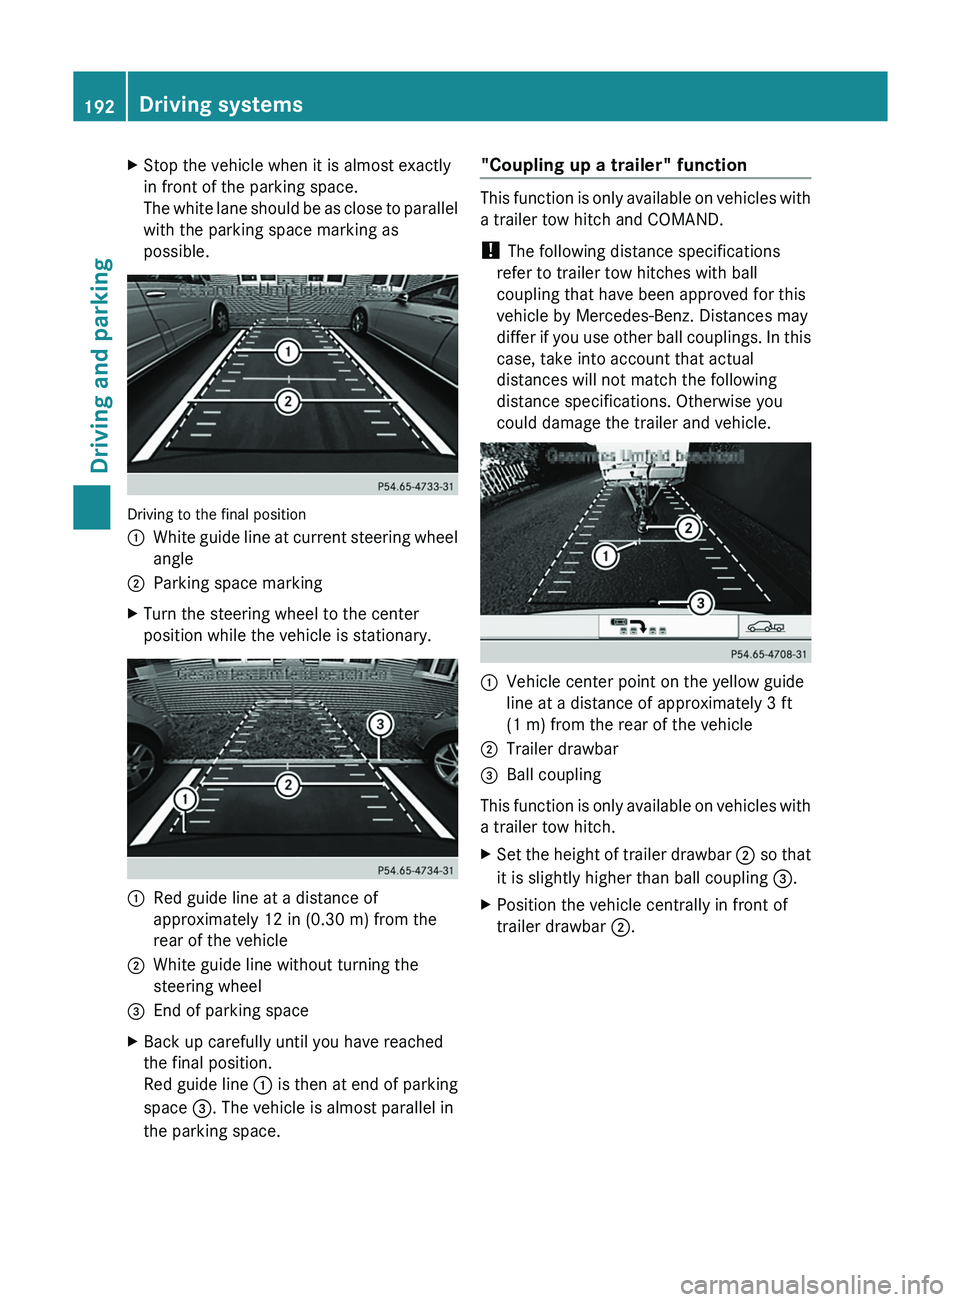
Stop the vehicle when it is almost exactly
in front of the parking space.
The white lane should be
as close to parallel
with the parking space marking as
possible. Driving to the final position
0043
White guide line at current steering wheel
angle
0044 Parking space marking
X Turn the steering wheel to the center
position while the vehicle is stationary. 0043
Red guide line at a distance of
approximately 12 in (0.30 m) from the
rear of the vehicle
0044 White guide line without turning the
steering wheel
0087 End of parking space
X Back up carefully until you have reached
the final position.
Red guide line 0043 is
then at end
of parking
space 0087. The vehicle is almost parallel in
the parking space. "Coupling up a trailer" function This function is only available on vehicles with
a trailer tow hitch and COMAND.
!
The following distance specifications
refer to trailer tow hitches with ball
coupling that have been approved for this
vehicle by Mercedes-Benz. Distances may
differ if you use other
ball couplings. In this
case, take into account that actual
distances will not match the following
distance specifications. Otherwise you
could damage the trailer and vehicle. 0043
Vehicle center point on the yellow guide
line at a distance of approximately 3 ft
(1 m) from the rear of the vehicle
0044 Trailer drawbar
0087 Ball coupling
This function is only
available on vehicles with
a trailer tow hitch.
X Set the height of trailer drawbar 0044 so that
it is slightly higher than ball coupling 0087.
X Position the vehicle centrally in front of
trailer drawbar 0044.192
Driving systems
Driving and parking
Page 211 of 380

The vehicle/trailer combination:
R
is heavier
R is restricted in its acceleration and
gradient-climbing capability
R has an increased braking distance
R is affected more by strong crosswinds
R demands more sensitive steering
R has a larger turning radius
This could impair the handling
characteristics.
When towing a trailer, always adjust your
speed to the current road and weather
conditions. Do not exceed the maximum
permissible speed for your vehicle/trailer
combination.
General notes R
Do not exceed the legally prescribed
maximum speed for vehicle/trailer
combinations in the relevant country.
This lowers the risk of an accident.
R Only install an approved trailer
coupling on
your vehicle.
Further information on availability and on
installation is available from any authorized
Mercedes-Benz Center.
R The bumpers of your vehicle are not
suitable for installing detachable trailer
couplings.
R Do not install hired trailer couplings or
other detachable trailer couplings on the
bumpers of your vehicle.
R To reduce the risk of damage to the ball
coupling, remove it from the ball coupling
recess when not in use.
i When towing a trailer, set the tire
pressure on the rear axle of the towing
vehicle for a maximum load; see the tire
pressure table in the fuel filler flap
(Y page 349).
You will find installation dimensions and loads
in the "Technical data" section
(Y page 374). Missing values for the maximum noseweight
of the trailer drawbar on the ball coupling
were
unavailable at
the time
of going to print.
However, the actual noseweight must not
exceed the value given on the identification
plates of the trailer tow hitch and trailer. The
lowest weight applies.
Please note that when towing a trailer,
PARKTRONIC ( Y page 180) is only available
with limitations or not at all.
i On vehicles without level control, the
height of the ball coupling will alter
according to the load placed on the vehicle.
If necessary, use a trailer with a height-
adjustable drawbar.
Driving tips i
Observe the notes on ESP ®
trailer
stabilization ( Y page 69).
The maximum permissible speed for
vehicle/
trailer combinations depends on the type of
trailer. Before beginning the journey, check
the trailer's documents to see what the
maximum permissible speed is. Observe the
legally prescribed maximum speed in the
relevant country.
For certain Mercedes-Benz vehicles, the
maximum permissible rear axle load is
increased when towing a trailer. Refer to the
"Technical data" section to find out whether
this applies to your vehicle.
If you utilize any of the added maximum rear
axle load when towing a trailer, the vehicle/
trailer combination may not exceed a
maximum speed of 60 mph (100 km/h) for
reasons concerning the operating permit.
This also applies in countries in which the
permissible maximum speed for vehicle/
trailer combinations is above 60 mph
(100 km/h).
When towing a trailer, your vehicle's handling
characteristics will be different in comparison
with when driving without a trailer.
On long and steep downhill gradients, you
must select shift range 1, 2 or 3 in good time. Towing a trailer
209
Driving and parking Z
Page 302 of 380
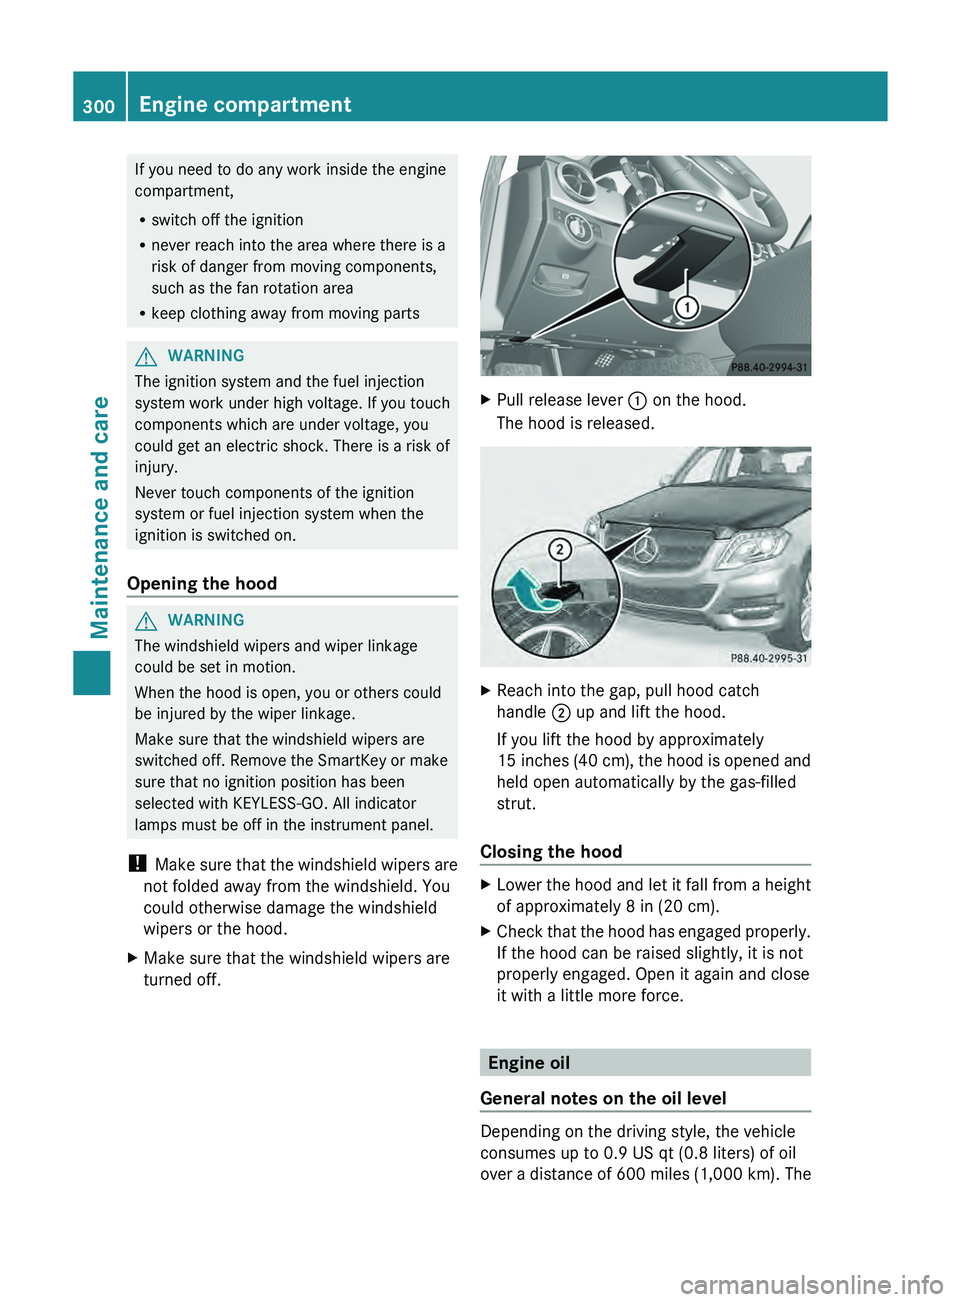
If you need to do any work inside the engine
compartment,
R
switch off the ignition
R never reach into the area where there is a
risk of danger from moving components,
such as the fan rotation area
R keep clothing away from moving parts G
WARNING
The ignition system and the fuel injection
system work under high voltage.
If you touch
components which are under voltage, you
could get an electric shock. There is a risk of
injury.
Never touch components of the ignition
system or fuel injection system when the
ignition is switched on.
Opening the hood G
WARNING
The windshield wipers and wiper linkage
could be set in motion.
When the hood is open, you or others could
be injured by the wiper linkage.
Make sure that the windshield wipers are
switched off. Remove the SmartKey or make
sure that no ignition position has been
selected with KEYLESS-GO. All indicator
lamps must be off in the instrument panel.
! Make sure that
the windshield
wipers are
not folded away from the windshield. You
could otherwise damage the windshield
wipers or the hood.
X Make sure that the windshield wipers are
turned off. X
Pull release lever 0043 on the hood.
The hood is released. X
Reach into the gap, pull hood catch
handle 0044 up and lift the hood.
If you lift the hood by approximately
15 inches (40 cm
), the
hood is opened and
held open automatically by the gas-filled
strut.
Closing the hood X
Lower the hood and let it fall from a height
of approximately 8 in (20 cm).
X Check that the hood
has engaged properly.
If the hood can be raised slightly, it is not
properly engaged. Open it again and close
it with a little more force. Engine oil
General notes on the oil level Depending on the driving style, the vehicle
consumes up to 0.9 US qt
(0.8 liters) of oil
over a
distance of
600 miles (1,000 km). The300
Engine compartment
Maintenance and care
Page 348 of 380
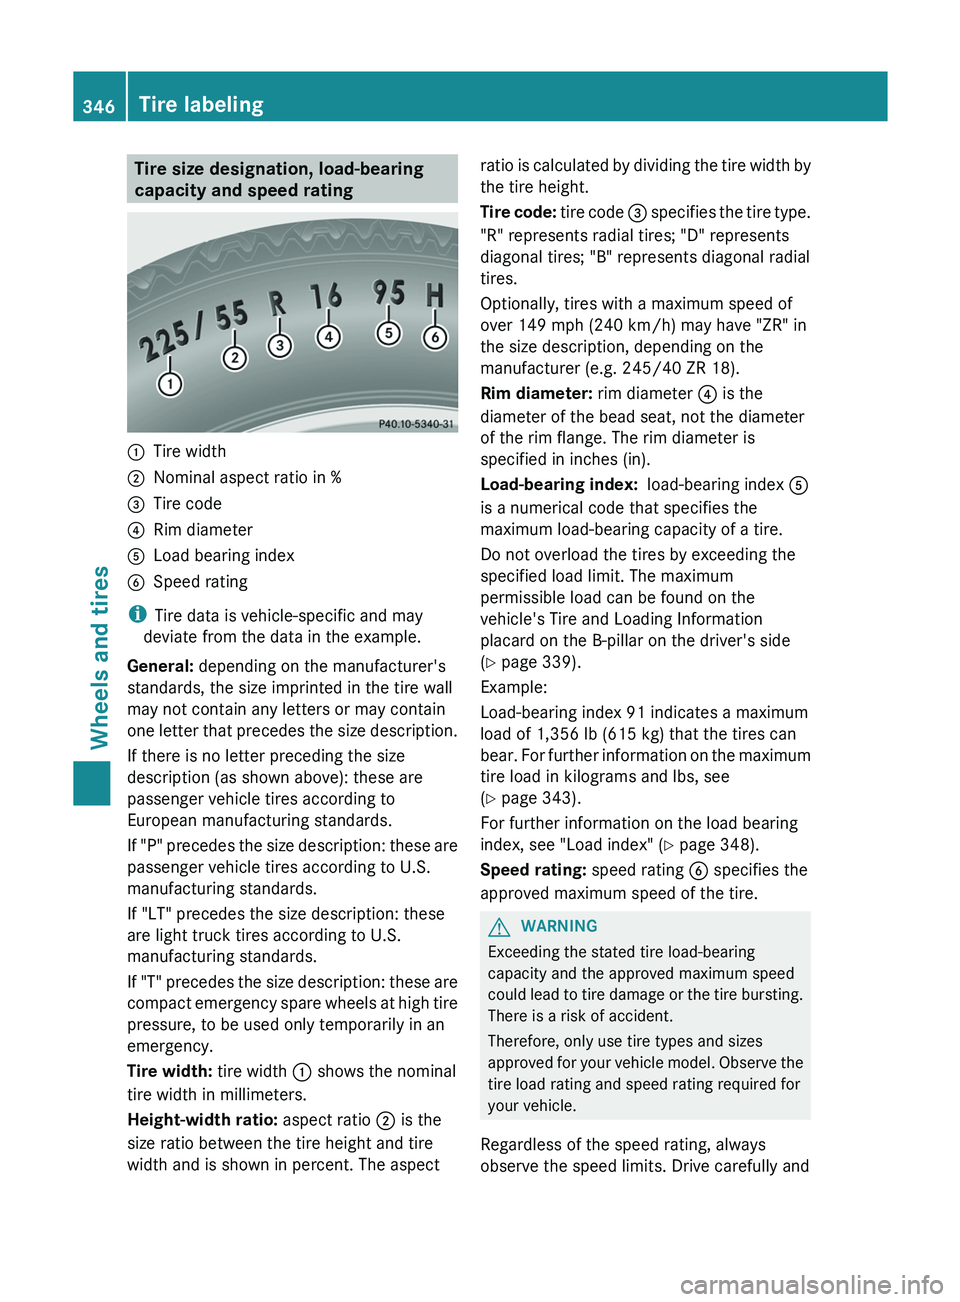
Tire size designation, load-bearing
capacity and speed rating
0043
Tire width
0044 Nominal aspect ratio in %
0087 Tire code
0085 Rim diameter
0083 Load bearing index
0084 Speed rating
i Tire data is vehicle-specific and may
deviate from the data in the example.
General: depending on the manufacturer's
standards, the size imprinted in the tire wall
may not contain any letters or may contain
one letter that precedes
the
size description.
If there is no letter preceding the size
description (as shown above): these are
passenger vehicle tires according to
European manufacturing standards.
If "P" precedes the size description: these are
passenger vehicle tires according to U.S.
manufacturing standards.
If "LT" precedes the size description: these
are light truck tires according to U.S.
manufacturing standards.
If "T" precedes the size description: these are
compact emergency spare wheels at high tire
pressure, to be used only temporarily in an
emergency.
Tire width: tire width 0043 shows the nominal
tire width in millimeters.
Height-width ratio: aspect ratio 0044 is the
size ratio between the tire height and tire
width and is shown in percent. The aspect ratio is calculated by dividing the tire width by
the tire height.
Tire code:
tire code 0087 specifies
the tire type.
"R" represents radial tires; "D" represents
diagonal tires; "B" represents diagonal radial
tires.
Optionally, tires with a maximum speed of
over 149 mph (240 km/h) may have "ZR" in
the size description, depending on the
manufacturer (e.g. 245/40 ZR 18).
Rim diameter: rim diameter 0085 is the
diameter of the bead seat, not the diameter
of the rim flange. The rim diameter is
specified in inches (in).
Load-bearing index: load-bearing index 0083
is a numerical code that specifies the
maximum load-bearing capacity of a tire.
Do not overload the tires by exceeding the
specified load limit. The maximum
permissible load can be found on the
vehicle's Tire and Loading Information
placard on the B-pillar on the driver's side
(Y page 339).
Example:
Load-bearing index 91 indicates a maximum
load of 1,356 lb (615 kg) that the tires can
bear. For further information on the maximum
tire load in kilograms and lbs, see
(Y page 343).
For further information on the load bearing
index, see "Load index" ( Y page 348).
Speed rating: speed rating 0084 specifies the
approved maximum speed of the tire. G
WARNING
Exceeding the stated tire load-bearing
capacity and the approved maximum speed
could lead to tire damage
or the tire bursting.
There is a risk of accident.
Therefore, only use tire types and sizes
approved for your vehicle model. Observe the
tire load rating and speed rating required for
your vehicle.
Regardless of the speed rating, always
observe the speed limits. Drive carefully and 346
Tire labeling
Wheels and tires
Page 353 of 380
Maximum load on one tire
Maximum load on one tire. This is calculated
by dividing the maximum axle
load of one axle
by two. PSI (pounds per square inch)
A standard unit of measure for tire pressure. Aspect ratio
Relationship between tire height and tire
width in percent. Tire pressure
This is pressure inside the tire applying an
outward force to each square
inch of the tire's
surface. The tire pressure is specified in
pounds per square inch (psi), in kilopascal
(kPa) or in bar. The tire pressure should only
be corrected when the tires are cold. Tire pressure of cold tires
The tires are cold:
R if the vehicle has been parked without
direct sunlight on the tires
for at least three
hours and
R if the vehicle has not been driven further
than 1 mile (1.6 km) Tread
The part of the tire that comes into contact
with the road. Bead
The tire bead ensures that the tire sits
securely on the wheel. There
are several steel
wires in the bead to prevent the tire from
coming loose from the wheel rim. Sidewall
The part of the tire
between the tread and the
bead. Weight of optional extras
The combined weight of those
optional extras
that weigh more than the replaced standard
parts and more than 2.3 kg (5 lbs). These
optional extras, such as high-performance
brakes, level control, a roof rack or a high-
performance battery, are not included in the
curb weight and the weight of the
accessories. TIN (Tire Identification Number)
This is a unique identifier which can be used
by a tire manufacturer to identify tires, for
example for a product recall,
and thus identify
the purchasers. The TIN is made up of the
manufacturer's identity code, tire size, tire
type code and the manufacturing date. Load bearing index
The load bearing index (also load index) is a
code that contains the maximum
load bearing
capacity of a tire. Traction
Traction is the result of friction between the
tires and the road surface. TWR (Tongue Weight Rating)
The TWR specifies the maximum permissible
weight that the ball coupling
of the trailer tow
hitch can support. Definition of terms for tires and loading
351
Wheels and tires Z