2013 MERCEDES-BENZ GLK-CLASS SUV change wheel
[x] Cancel search: change wheelPage 156 of 380
Problems with the transmission
Problem Possible causes/consequences and
0050 SolutionsThe transmission has
problems shifting gear. The transmission is losing oil.
X
Have the transmission checked at a qualified specialist
workshop immediately. The acceleration ability
is deteriorating.
The transmission no
longer changes gear. The transmission is in emergency mode.
It is only possible to shift into second
gear and reverse gear.
X Stop the vehicle.
X Shift the transmission to position P.
X Switch off the engine.
X Wait at least ten seconds before restarting the engine.
X Shift the transmission to position D or R.
If D
is selected, the transmission
shifts into second gear; if R is
selected, the transmission shifts into reverse gear.
X Have the transmission checked at a qualified specialist
workshop immediately. Transfer case
This section is only valid for vehicles with 4-
wheel drive (4MATIC). Power is always
transmitted to both axles.
! Performance tests may only be carried
out on a 2-axle dynamometer. The brake
system or transfer case could
otherwise be
damaged. Contact a qualified specialist
workshop for a performance test.
! To prevent ESP ®
from intervening, the
ignition must be switched off (SmartKey in
position 0 or 1) if:
R the parking brake is being tested on a
brake dynamometer.
R the vehicle is being towed with only one
axle raised (not permitted for vehicles
with 4MATIC).
The brake system could otherwise be
damaged.
! Vehicles with 4MATIC must not be towed
with either the front or the rear axle raised,
as doing so will damage the transmission. Refueling
Important safety notes
G
WARNING
Fuel is highly flammable. If you handle fuel
incorrectly, there is a risk of fire and
explosion.
You must avoid fire, open flames, creating
sparks and smoking. Switch off the engine
and, if applicable,
the auxiliary
heating before
refueling. G
WARNING
Fuel is poisonous and hazardous to health.
There is a risk of injury.
You must make
sure that
fuel does not come
into contact with your skin, eyes or clothing
and that it is not swallowed. Do not inhale fuel
vapors. Keep fuel away from children. 154
Refueling
Driving and parking
Page 166 of 380
i
The ECO display summaries the driving
characteristics from the start of
the journey
to its completion. For this reason, the bars
change dynamically at the beginning of the
journey. On longer journeys, there are
fewer changes. For more dynamic changes,
carry out a manual reset.
Further information on the ECO display
(Y page 220). Brakes
Important safety notes G
WARNING
If you shift down on a slippery road surface in
an attempt to increase the engine's braking
effect, the drive wheels could lose their grip.
There is an increased danger of skidding and
accidents.
Do not shift down for additional engine
braking on a slippery road surface.
Downhill gradients !
On long and steep gradients, you must
reduce the load on the brakes by shifting
early to a lower gear.
This allows you to take
advantage of the engine braking effect and
helps avoid overheating and excessive
wear of the brakes.
When you take advantage of the engine
braking effect, a drive wheel may not turn
for some time, e.g. on a slippery road
surface. This could cause damage to the
drive train. This type of damage is not
covered by the Mercedes-Benz warranty.
Heavy and light loads G
WARNING
If you rest your foot on the brake pedal while
driving, the braking system can
overheat. This
increases the stopping distance and can even
cause the braking system to fail. There is a
risk of an accident. Never use the brake pedal as a footrest. Never
depress the brake pedal and the accelerator
pedal at the same time.
! Depressing the brake pedal constantly
results in excessive and premature
wear to
the brake pads.
If the brakes have been subjected to a heavy
load, do not stop the vehicle immediately.
Drive on for a short while. This allows the
airflow to cool the brakes more quickly.
Wet roads If you have driven for a long time in heavy rain
without braking, there may be a delayed
reaction from the brakes
when
braking for the
first time. This may also occur after the
vehicle has been washed.
You have to depress the brake pedal more
firmly. Maintain a greater distance from the
vehicle in front.
After driving on a wet road or having the
vehicle washed, brake firmly while paying
attention to the traffic conditions. This will
warm up the brake discs, thereby drying them
more quickly and protecting them against
corrosion.
Limited braking performance on salt-
treated roads If you drive on salted roads, a layer of salt
residue may form on the brake discs and
brake pads. This can result in a significantly
longer braking distance.
R
Brake occasionally
to remove
any
possible
salt residue. Make sure that you do not
endanger other road users when doing so.
R Carefully depress the brake pedal and the
beginning and end of a journey.
R Maintain a greater distance to the vehicle
ahead.164
Driving tips
Driving and parking
Page 171 of 380
lose control of the vehicle. If the gradient is
too steep for your
vehicle,
drive back down in
reverse gear.
Maximum gradient-climbing capability i
If the load on the front axle is reduced
when pulling away on a steep uphill slope,
the front wheels have a tendency to spin.
4ETS recognizes this and brakes the
wheels accordingly. The rear wheel torque
is increased, making it easier to drive off.
Hilltops When driving up an uphill gradient, slightly
reduce pressure on the accelerator
immediately before reaching the brow of the
hill.
Make
use of
the
vehicle's own impetus to
travel over the brow.
This style of driving prevents:
R the vehicle from lifting off the ground on the
brow of a hill
R the vehicle from traveling too quickly down
the other side
Driving downhill R
Drive slowly.
R Do not drive at an angle down steep
inclines. Steer into the line
of fall and drive
with the front wheels aligned straight.
Otherwise, the vehicle could slip sideways,
tip and rollover.
R Before tackling steep downhill gradients,
select shift range 1.
R Activate DSR. If this is not sufficient, brake
gently. When doing so, make sure that the
vehicle is facing in the direction of the line
of fall.
R Check that the brakes are working normally
after a long downhill stretch. Driving systems
Cruise Control
Important safety notes Cruise control maintains a constant road
speed for you. It
brakes
automatically in order
to avoid exceeding the set speed. On long and
steep downhill gradients, especially if the
vehicle is laden or towing a trailer, you must
select shift range 1, 2 or 3 in good time. By
doing so, you will make use of the braking
effect of the engine. This relieves the load on
the brake system and prevents the brakes
from overheating and wearing too quickly.
Use cruise control only if road and traffic
conditions make it appropriate to maintain a
steady speed for a prolonged period. You can
store any road speed above 20 mph
(30 km/h).
If you fail to adapt your driving style, cruise
control can neither reduce the risk of an
accident nor override the laws of physics.
Cruise control cannot take into account the
road, traffic and weather conditions. Cruise
control is only an aid. You are responsible for
the distance to the vehicle in front, for vehicle
speed, for braking in good time and for
staying in your lane.
Do not use cruise control:
R in road and traffic conditions which do not
allow you to maintain a constant speed e.g.
in heavy traffic or on winding roads
R on slippery road surfaces. Braking or
accelerating could cause the drive wheels
to lose traction and the vehicle could then
skid
R when there is poor visibility, e.g. due to fog,
heavy rain or snow
If there is a change of drivers, advise the new
driver of the speed stored.
i Cruise control should not be activated
when driving off-road. Driving systems
169
Driving and parking Z
Page 174 of 380

!
If DISTRONIC PLUS or the
HOLD function
is activated, the vehicle brakes
automatically in certain situations. To
prevent damage to the vehicle, deactivate
DISTRONIC PLUS and the HOLD function in
the following or other similar situations:
R when towing the vehicle
R in the car wash
If you fail to adapt your driving style,
DISTRONIC PLUS can neither reduce the risk
of accident nor override the laws of physics.
DISTRONIC PLUS cannot take into account
the road, traffic and weather conditions.
DISTRONIC PLUS is only an aid. You are
responsible for the distance to the vehicle in
front, for vehicle speed, for braking in good
time and for staying in your lane.
Do not use DISTRONIC PLUS:
R in road and traffic conditions which do not
allow you to maintain a constant speed e.g.
in heavy traffic or on winding roads
R on slippery road surfaces. Braking or
accelerating could cause the drive wheels
to lose traction and the vehicle could then
skid
R when there is poor visibility, e.g. due to fog,
heavy rain or snow
DISTRONIC PLUS may not detect narrow
vehicles driving in front, e.g. motorcycles, or
vehicles driving on a different line.
In particular, the detection of obstacles can
be impaired if:
R dirt on the sensors or anything else
covering the sensors
R snow or heavy rain
R interference by other radar sources
R strong radar reflections, for example, in
parking garages
If DISTRONIC PLUS no longer detects a
vehicle in front, DISTRONIC PLUS may
unexpectedly accelerate the vehicle to the
stored speed. This speed may:
R
be too high if you
are driving in a filter lane
or an exit lane
R be so high when driving in the right-hand
lane that you overtake vehicles in the left-
hand lane
R be so high when driving in the left-hand lane
that you overtake vehicles in the right-hand
lane
If there is a change of drivers, advise the new
driver of the speed stored.
For DISTRONIC PLUS to assist you when
driving, the radar sensor system must be:
R activated (Y page 229)
R operational
If there is no vehicle in front, DISTRONIC
PLUS operates in the same way as cruise
control in the speed range between 20 mph
(Canada: 30 km/h) and 120 mph (Canada:
200 km/h). If a vehicle is driving in front of
you, it operates in the speed range between
0 mph (0 km/h) and 120 mph (Canada:
200 km/h).
Do not use DISTRONIC PLUS while driving on
roads with steep gradients.
As DISTRONIC PLUS transmits radar waves,
it can resemble the radar detectors of the
responsible authorities. You can refer to the
relevant chapter in the Operator's Manual if
questions are asked about this.
i USA only:
This device has been approved by the FCC
as a "Vehicular Radar System". The radar
sensor is intended for use in an automotive
radar system only. Removing, tampering
with, or altering the device will void any
warranties, and is not permitted by the
FCC. Do not tamper with, alter, or use in
any non-approved way.
Any unauthorized modification to this
device could void the user’s authority to
operate the equipment. 172
Driving systems
Driving and parking
Page 189 of 380
X
Maneuver if necessary.
X Always observe the warning messages
displayed by PARKTRONIC ( Y page 182).
Parking tips:
R The way your vehicle is positioned in the
parking space after parking is dependent
on various factors. These include the
position and shape of the vehicles parked
in front and
behind it
and the conditions of
the location. It may be the case that Active
Parking Assist guides you too far into a
parking space, or not far enough into it. In
some cases, it may also lead you across or
onto the curb. If necessary, you should
cancel the parking procedure with Active
Parking Assist.
R You can also engage forward gear
prematurely. The vehicle redirects and
does not drive as far into the parking space.
Should a gear be changed too early, the
parking procedure will be canceled. A
sensible parking position can no longer be
achieved from this position.
Exiting a parking space In order that Active Parking Assist can
support you when you
exit
the parking space:
R the border of the parking space must not
be too low.
R the border of the parking space must not
be too wide. The system maneuvers the
vehicle into a position at a maximum of 45°
to the starting position in the parking
space.
R a maneuvering distance of at least 24 in
(0.60 m) must be available.
Active Parking Assist can only assist you with
exiting a parking space if you have parked the
vehicle using Active Parking Assist.
X Start the engine.
X Switch on the turn signal on the side facing
the street. X
Shift the transmission to position D or R.
The Start Park Assist? Yes: OK No:
0038 message appears in the
multifunction
display.
X To cancel the procedure: press the
0038 button on the multifunction steering
wheel or pull away.
or
X To exit a parking space using Active
Parking Assist: press the 0076 button on
the multifunction steering wheel.
The Park Assist Active Accelerate
and Brake Observe Surroundings
message appears in the multifunction
display.
X Let go of the multifunction steering wheel.
X Reverse the vehicle or drive forwards, being
ready to brake at all times. Do not exceed
a maximum speed of approximately
6 mph (10 km/h) when exiting a parking
space. Otherwise Active Parking
Assist will
be canceled.
X Stop when PARKTRONIC sounds the
continuous warning tone, if not before.
X Shift the transmission to position D or R as
required while the vehicle is stationary.
Active Parking
Assist immediately steers in
the other direction. The Park Assist
Active Accelerate and Brake
Observe Surroundings message appears
in the multifunction display.
i You will achieve the best results by
waiting for the steering procedure to
complete before pulling away.
If you back up
after
activation, the steering
wheel is moved to the straight-ahead
position.
X Drive forwards or back up the vehicle, being
ready to brake at all times.
X Stop as soon as PARKTRONIC sounds the
continuous warning tone, if not before.
X Drive forwards and reverse as prompted by
the PARKTRONIC warning displays, several
times if necessary. Driving systems
187
Driving and parking Z
Page 190 of 380
Once you have exited the parking space
completely, the steering wheel is moved to
the straight-ahead position. You hear a tone
and the Park Assist Finished message
appears in the multifunction
display.
You will
then have to steer and merge into traffic on
your own. PARKTRONIC is still available.
Canceling Active Parking Assist You can cancel Active Parking Assist at any
time.
X
Stop the movement of the multifunction
steering wheel or steer yourself.
Active Parking Assist will be canceled at
once. The Park Assist Canceled
message appears in the multifunction
display.
or
X Press the PARKTRONIC button on the
center console (Y page 182).
PARKTRONIC is switched off and Active
Parking Assist is immediately canceled.
The Park Assist Canceled
message
appears in the multifunction display.
Active Parking Assist is canceled
automatically if:
R you engage the electric parking brake
R parking using Active Parking Assist is no
longer possible
R you are driving faster than 6 mph
(10 km/h)
R a wheel spins, ESP®
intervenes or fails. The
00E5 warning lamp lights up in the
instrument cluster.
A warning tone sounds. The parking space
symbol disappears and the multifunction
display shows the Park Assist Canceled
message.
If Active Parking Assist is canceled, you must
steer again yourself.
If a system malfunction occurs, the vehicle is
braked to a standstill. To drive on, depress the
accelerator again. Towing a trailer For vehicles with a trailer tow hitch, the
minimum length for parking
spaces
is slightly
increased.
If you have attached a trailer to your vehicle,
you should not use Active Parking Assist.
Once the electrical connection is established
between your vehicle and the trailer, Active
Parking Assist is no longer available.
PARKTRONIC is deactivated for the rear area. Rear view camera
Important safety notes The rear view camera is only an aid. It is not
a replacement for your attention to your
immediate surroundings. You are always
responsible for safe maneuvering and
parking.
When
maneuvering or
parking,
make
sure that there are no persons, animals or
objects in the area in which you are
maneuvering.
Under the following circumstances, the rear
view camera will not function, or will function
in a limited manner:
R the tailgate is open
R in heavy rain, snow or fog
R at night or in very dark places
R if the camera is exposed to very bright light
R if the area is lit by fluorescent light or LED
lighting (the display may flicker)
R if there is a sudden change in temperature,
e.g. when driving into a heated garage in
winter
R if the camera lens is dirty or obstructed
R if the rear of your vehicle is damaged. In
this event, have the camera position and
setting checked at a qualified specialist
workshop.188
Driving systems
Driving and parking
Page 196 of 380

The system analyzes images from the
following cameras:
R
rear view camera
R front camera
R two cameras in the exterior rear view
mirrors
The cameras capture the immediate
surroundings of the vehicle. The system
supports you, e.g. when parking
or if vision is
restricted at an exit.
The 360° camera images can be shown in full
screen mode or in seven different split-screen
views on the COMAND display. A split-screen
view also includes a top view of the vehicle.
This view is calculated from the data supplied
by the installed cameras (virtual camera).
The seven split-screen views are:
R top view and picture from the rear view
camera (130° viewing angle)
R top view and picture from the front camera
(without displaying the maximum steering
wheel angle)
R top view and enlarged rear view
R top view and enlarged front view
R top view and trailer view (vehicles with
trailer tow hitch)
R top view and pictures from the rearward
facing mirror cameras (rear wheel view)
R top view and pictures from the forward
facing mirror cameras (front wheel view)
i The top view and trailer view are available
for vehicles equipped with a trailer tow
hitch.
When the function is active and you shift the
transmission from position D or R to N, you
see the previous view in the COMAND
display. The dynamic guidelines are hidden.
When you change between transmission
positions D and R, you see the previously
selected front or rear view. Activation conditions The 360° camera image can be displayed if:
R
your vehicle is equipped with a 360°
camera
R COMAND is switched on, see
the separate
COMAND operating instructions
R the 360° Camera function is activated
Activating the 360° camera using the
SYS button X
Press and hold the 0066 button for longer
than 2 seconds, see the
separate COMAND
operating instructions.
Depending on whether position D or R is
engaged, the following is shown:
R full screen display with the image from
the front camera
R full screen display with the image from
the rear camera
Activating the 360° camera with
COMAND X
Press the 0066 button, see the separate
COMAND operating instructions.
X Select System by turning 00790052007A the
COMAND controller and press 0098 to
confirm.
X Select 360° Camera and press 0098 to
confirm.
Depending on whether position D or R is
engaged, the following is shown:
R a split screen with top view and the
image from the front camera or
R a split screen with top view and the
image from the rear view camera
For further information about the COMAND
Controller, see the separate COMAND
operating instructions. 194
Driving systems
Driving and parking
Page 203 of 380
G
WARNING
Lane Keeping Assist may not always clearly
recognize lane markings.
In this case, Lane Keeping Assist may:
R give an unnecessary warning
R not give a warning
There is a risk of an accident.
Always pay particular attention to the traffic
situation and stay in lane, in particular if
warned by Lane Keeping Assist. G
WARNING
The Lane Keeping Assist warning does not
return the vehicle to the original lane. There
is a risk of an accident.
You should always steer, brake or accelerate
yourself, in particular if warned by Lane
Keeping Assist.
The Lane Keeping Assist does not keep the
vehicle in the lane.
The system may be impaired or may not
function if:
R there is poor visibility, e.g. due to
insufficient illumination of the road,
or due
to snow, rain, fog or spray
R there is glare, e.g. from oncoming traffic,
the sun or reflections (e.g. when the road
surface is wet)
R the windshield is dirty, fogged up, damaged
or covered, for instance by a sticker, in the
vicinity of the camera
R there are no, several or unclear lane
markings for a lane, e.g. in areas with road
construction work
R the lane markings are worn away, dark or
covered up, e.g. by dirt or snow
R the distance to the vehicle in front is too
small and the lane markings thus cannot be
detected
R the lane markings change quickly, e.g.
lanes branch off, cross one another or
merge R
the road is narrow and winding
R there are strong shadows cast on the lane
General notes
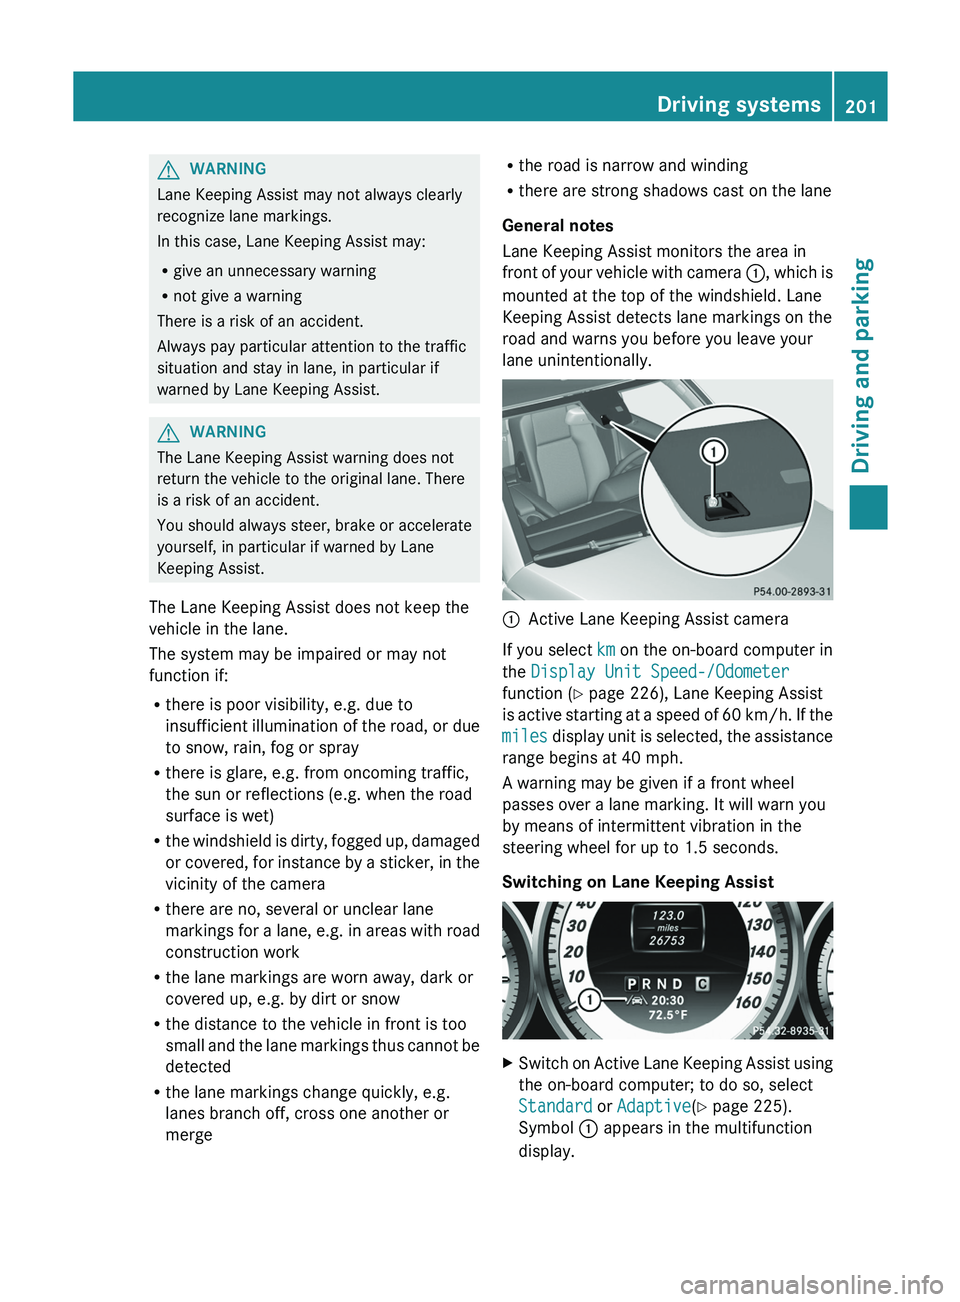
Lane Keeping Assist monitors the area in
front of your vehicle with
camera 0043, which is
mounted at the top of the windshield. Lane
Keeping Assist detects lane markings on the
road and warns you before you leave your
lane unintentionally. 0043
Active Lane Keeping Assist camera
If you select km on the on-board computer in
the Display Unit Speed-/Odometer
function ( Y page 226), Lane Keeping Assist
is active starting at a
speed of 60 km/h. If the
miles display unit is selected, the assistance
range begins at 40 mph.
A warning may be given if a front wheel
passes over a lane marking. It will warn you
by means of intermittent vibration in the
steering wheel for up to 1.5 seconds.
Switching on Lane Keeping Assist X
Switch on Active Lane Keeping Assist using
the on-board computer; to do so, select
Standard or Adaptive(Y page 225).
Symbol 0043 appears in the multifunction
display. Driving systems
201
Driving and parking Z