2013 MERCEDES-BENZ GLK-CLASS SUV key
[x] Cancel search: keyPage 291 of 380
R
USA: Mercedes-Benz Customer
Assistance Center at
1-800-FOR-MERCedes
(1-800-367-6372) or 1-866-990-9007
R Canada: Customer Service at
1-888-923-8367
You will be asked for your PIN.
The next time you are inside the vehicle and
you switch on the ignition, the Doors
Locked Remotely message appears in the
multifunction display.
USA only: alternatively, the vehicle can be
locked via:
R the Internet, under the "Owners Online"
section
R the telephone application (e.g. iPhone ®
,
Blackberry)
To do this, you will need your identification
number and password.
i The vehicle remote closing feature is
available when the relevant mobile phone
network is available and
data
connection is
possible.
Stolen vehicle recovery service If your vehicle has been stolen:
X
Notify the police.
The police will issue a numbered incident
report.
X This number will be forwarded to the
Mercedes-Benz Customer Assistance
Center together with your PIN.
The Mercedes-Benz Customer Assistance
Center then attempts to locate
the mbrace
system. The Mercedes-Benz Customer
Assistance Center contacts you and the
local law enforcement agency if the vehicle
is located. However, only the law
enforcement agency is informed of the
location of the vehicle.
i If the anti-theft alarm system
is activated
for longer than 30 seconds, the Mercedes-
Benz Customer Assistance center is
automatically informed. Vehicle remote malfunction diagnosis With the vehicle remote malfunction
diagnosis (Vehicle Health Check), the
Customer Assistance center can provide
improved support for problems with your
vehicle. During an existing call, vehicle data
is transferred to the Customer Assistance
center. The customer service representative
can use the received
data
to decide what kind
of assistance is required. You are then, for
example, guided to the nearest Mercedes-
Benz Service center or a recovery vehicle is
called.
If vehicle data needs to be transferred during
an MB Info call or a Roadside Assistance call,
this is initiated by the Customer Assistance
center. You will see the Roadside
Assistance Connected message in the
COMAND display. If the vehicle remote
malfunction diagnosis is able to be started,
the Request for vehicle diagnosis
received. Start vehicle diagnosis?
message appears in the display.
X Press Yes to confirm the message.
X If the Vehicle Diagnosis: Please
switch on ignition. message appears:
turn the key to position 2 in the ignition
lock.
X If the Please follow the
instructions received by phone
and
move your vehicle to a safe
position.
message appears: follow the
instructions of the customer service
representative.
The message in the display disappears.
If you select Cancel, the vehicle remote
malfunction diagnosis is canceled
completely.
The vehicle operating state check begins.
Meanwhile, the Vehicle diagnosis
activated message appears.
When the check is finished, the Sending
vehicle diagnosis data...(Voice
connection may be interrupted
during data transfer.) message Features
289
Stowage and features Z
Page 294 of 380
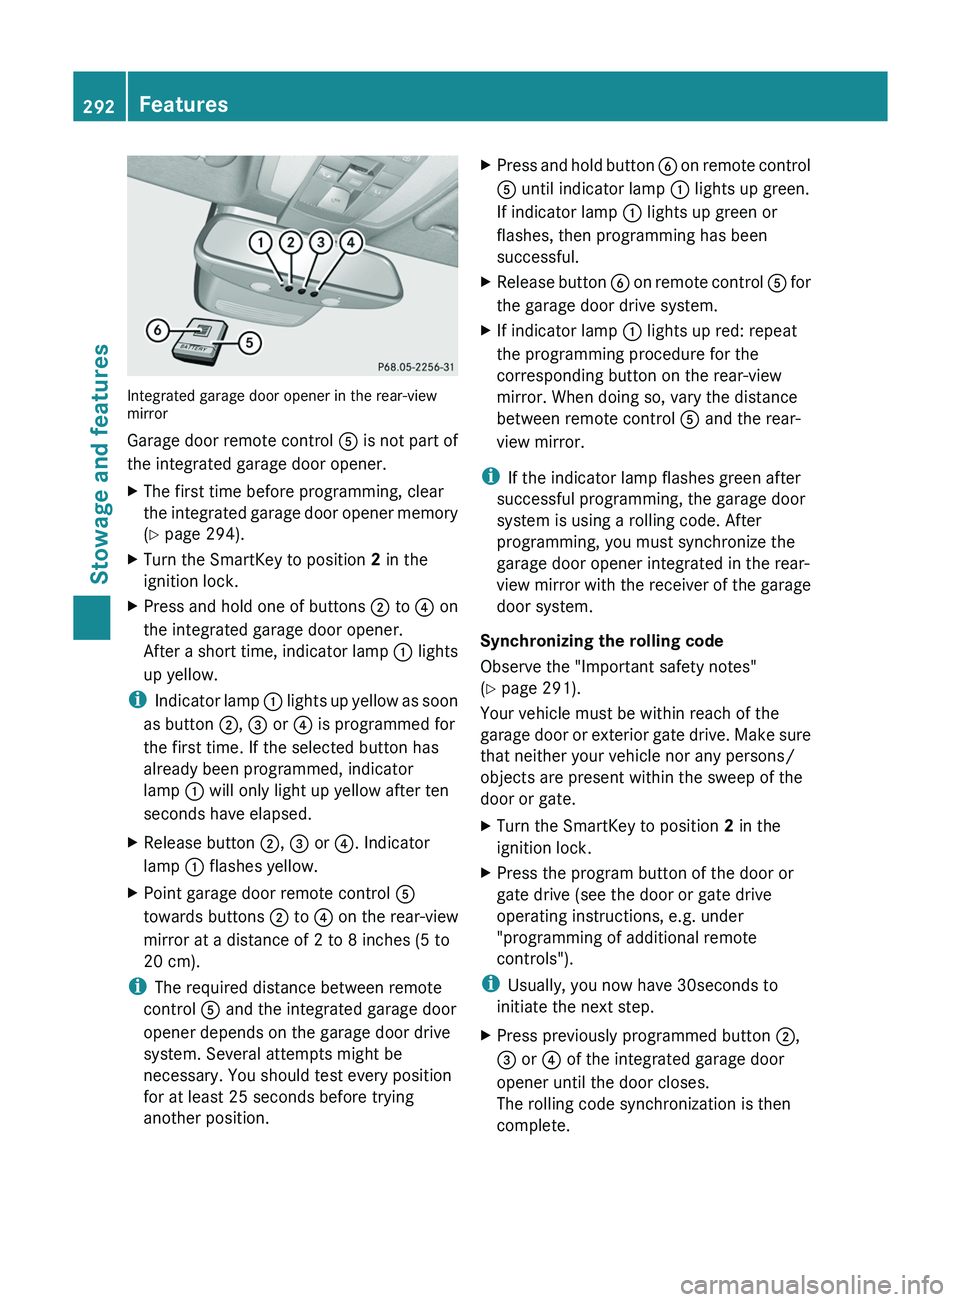
Integrated garage door opener in the rear-view
mirror
Garage door remote control
0083 is not part of
the integrated garage door opener.
X The first time before programming, clear
the integrated garage door opener
memory
(Y page 294).
X Turn the SmartKey to position 2 in the
ignition lock.
X Press and hold one of buttons 0044 to 0085 on
the integrated garage door opener.
After a short time, indicator
lamp 0043 lights
up yellow.
i Indicator lamp
0043 lights up
yellow as soon
as button 0044, 0087 or 0085 is programmed for
the first time. If the selected button has
already been programmed, indicator
lamp 0043 will only light up yellow after ten
seconds have elapsed.
X Release button 0044, 0087 or 0085. Indicator
lamp 0043 flashes yellow.
X Point garage door remote control 0083
towards buttons 0044 to 0085 on the rear-view
mirror at a distance of 2 to 8 inches (5 to
20 cm).
i The required distance between remote
control 0083 and the integrated garage door
opener depends on the garage door drive
system. Several attempts might be
necessary. You should test every position
for at least 25 seconds before trying
another position. X
Press and hold
button
0084 on remote control
0083 until indicator lamp 0043
lights up green.
If indicator lamp 0043 lights up green or
flashes, then programming has been
successful.
X Release button 0084 on remote control
0083
for
the garage door drive system.
X If indicator lamp 0043 lights up red: repeat
the programming procedure for the
corresponding button on the rear-view
mirror. When doing so, vary the distance
between remote control 0083 and the rear-
view mirror.
i If the indicator lamp flashes green after
successful programming, the garage door
system is using a rolling code. After
programming, you must synchronize the
garage door opener integrated in the rear-
view mirror with the
receiver
of the garage
door system.
Synchronizing the rolling code
Observe the "Important safety notes"
(Y page 291).
Your vehicle must be within reach of the
garage door or exterior gate drive. Make sure
that neither your vehicle nor any persons/
objects are present within the sweep of the
door or gate.
X Turn the SmartKey to position 2 in the
ignition lock.
X Press the program button of the door or
gate drive (see the door or gate drive
operating instructions, e.g. under
"programming of additional remote
controls").
i Usually, you now have 30seconds to
initiate the next step.
X Press previously programmed button 0044,
0087 or 0085
of the integrated garage door
opener until the door closes.
The rolling code synchronization is then
complete. 292
Features
Stowage and features
Page 295 of 380
Notes on programming the remote
control
Canadian radio frequency laws require a
"break" (or interruption) of the transmission
signals after broadcasting for
a
few seconds.
Therefore, these signals may not last long
enough for the integrated garage door
opener. The signal is not recognized during
programming. Comparable with Canadian
law, some U.S. garage door openers also
feature a "break".
Proceed as follows:
R if you live in Canada
R if you have difficulties programming the
garage door opener (regardless of where
you live) when using the programming
steps
X Press and hold one of buttons 0044 to 0085 on
the integrated garage door opener.
After a short time, indicator
lamp 0043 lights
up yellow.
X Release the button.
Indicator lamp 0043 flashes yellow.
X Press button 0084 of garage door remote
control 0083 for two seconds, then
release it
for two seconds.
X Press button 0084 again for two seconds.
X Repeat this sequence on button 0084 of
remote control 0083 until indicator lamp 0043
lights up green.
If indicator lamp 0043 turns red, repeat the
process.
X Continue with the other programming
steps (see above).
Problems when programming
If you are experiencing problems
programming the integrated garage door
opener on the rear-view mirror, take note of
the following instructions:
R Check the transmitter frequency
of
garage
door drive remote control 0083. This can
usually be found on the back of the remote
control. The integrated garage door opener is
compatible with devices that have units
which operate in the frequency range of
280to 433
MHz.
R Replace the batteries in garage door
remote control 0083. This increases the
likelihood that garage door remote control
0083 will
transmit a strong and precise signal
to the integrated garage door opener in the
rear-view mirror.
R When programming, hold remote control
0083 at varying distances and angles from the
button that you are programming. Try
various angles at a distance between 2and
12 inches (5to 30 cm) or at the same angle
but at varying distances.
R If another remote control for the same
garage door drive is available, repeat the
same programming steps with this remote
control. Before performing these steps,
make sure that new batteries have been
installed in garage door drive remote
control 0083.
R Note that some remote controls only
transmit for a limited amount of time (the
indicator lamp on the remote control goes
out). Press button 0084 on remote control
0083 again before transmission ends.
R Align the antenna cable of the garage door
opener unit. This can improve signal
reception/transmission.
Opening/closing the garage door After it has been programmed, the integrated
garage door opener performs the function of
the garage door system remote control.
Please also read the operating instructions
for the garage door system.
X
Turn the SmartKey to position 2 in the
ignition lock.
X Press button 0044, 0087 or 0085 which you have
programmed to operate the garage door.
Garage door system with a fixed code:
indicator lamp 0043 lights up green. Features
293
Stowage and features Z
Page 296 of 380
Garage door system with a rolling code:
indicator lamp
0043 flashes green.
i The transmitter will transmit a signal as
long as the button is pressed. The
transmission is halted after a maximum of
ten seconds and indicator lamp 0043 lights
up yellow. Press button 0044, 0087
or 0085 again
if necessary.
Clearing the memory X
Turn the SmartKey to position 2 in the
ignition lock.
X Press buttons 0044 and 0085.
The indicator lamp lights up yellow.
X Press and hold buttons 0044 and 0085 until the
indicator lamp turns green.
i Make sure that you clear the memory of
the integrated garage door opener before
selling the vehicle. Compass
Calling up the compass The compass displays in which compass
direction the vehicle is currently traveling: N,
NE, E, SE, S, SW, W or NW.
To receive a correct display in rear-view
mirror 0043, the compass must be calibrated
and the magnetic field zone set. Setting the compass X
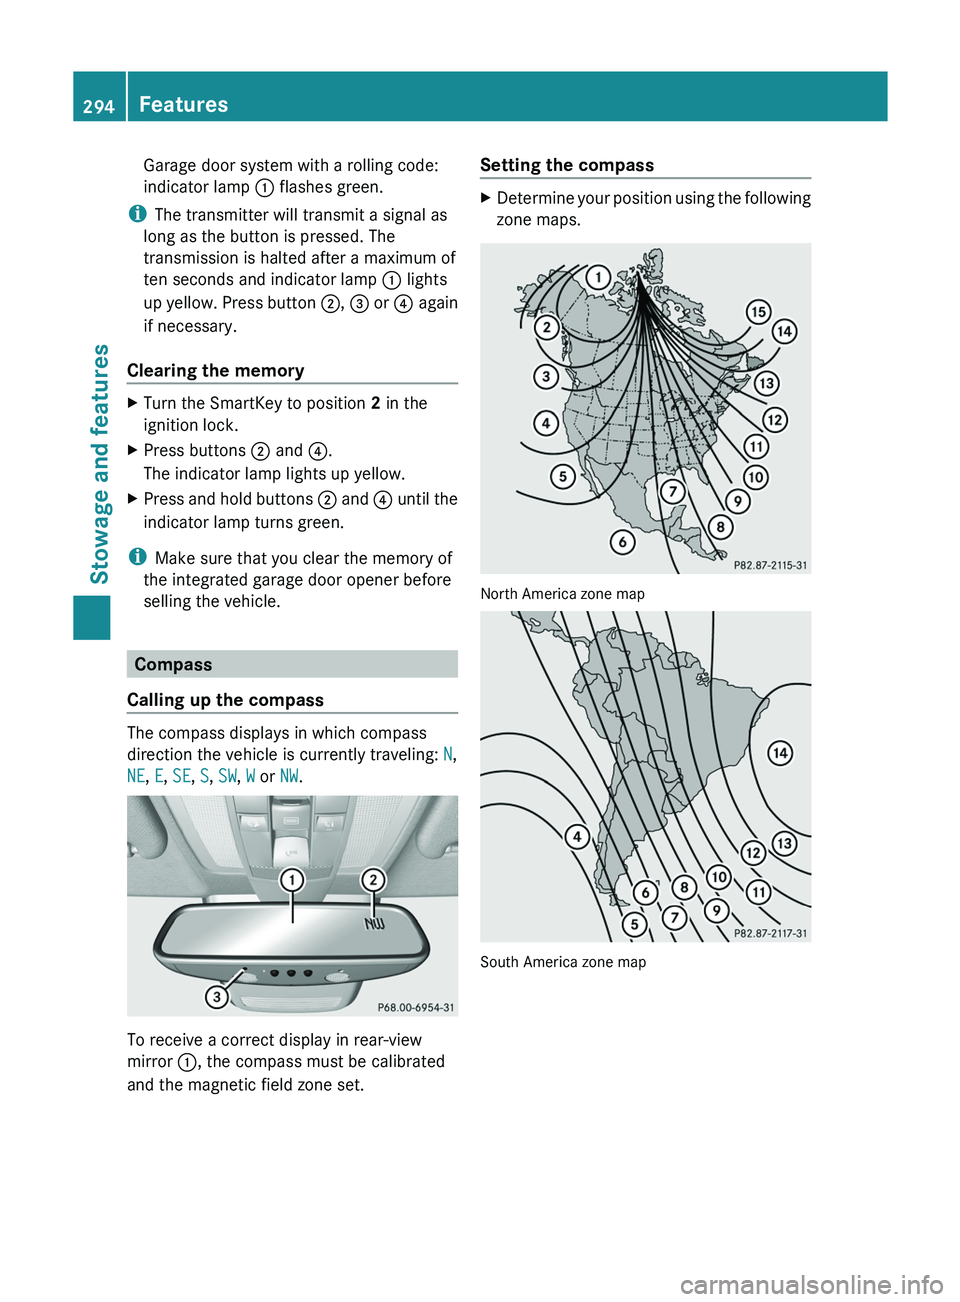
Determine your position using the following
zone maps. North America zone map
South America zone map294
Features
Stowage and features
Page 302 of 380
If you need to do any work inside the engine
compartment,
R
switch off the ignition
R never reach into the area where there is a
risk of danger from moving components,
such as the fan rotation area
R keep clothing away from moving parts G
WARNING
The ignition system and the fuel injection
system work under high voltage.
If you touch
components which are under voltage, you
could get an electric shock. There is a risk of
injury.
Never touch components of the ignition
system or fuel injection system when the
ignition is switched on.
Opening the hood G
WARNING
The windshield wipers and wiper linkage
could be set in motion.
When the hood is open, you or others could
be injured by the wiper linkage.
Make sure that the windshield wipers are
switched off. Remove the SmartKey or make
sure that no ignition position has been
selected with KEYLESS-GO. All indicator
lamps must be off in the instrument panel.
! Make sure that
the windshield
wipers are
not folded away from the windshield. You
could otherwise damage the windshield
wipers or the hood.
X Make sure that the windshield wipers are
turned off. X
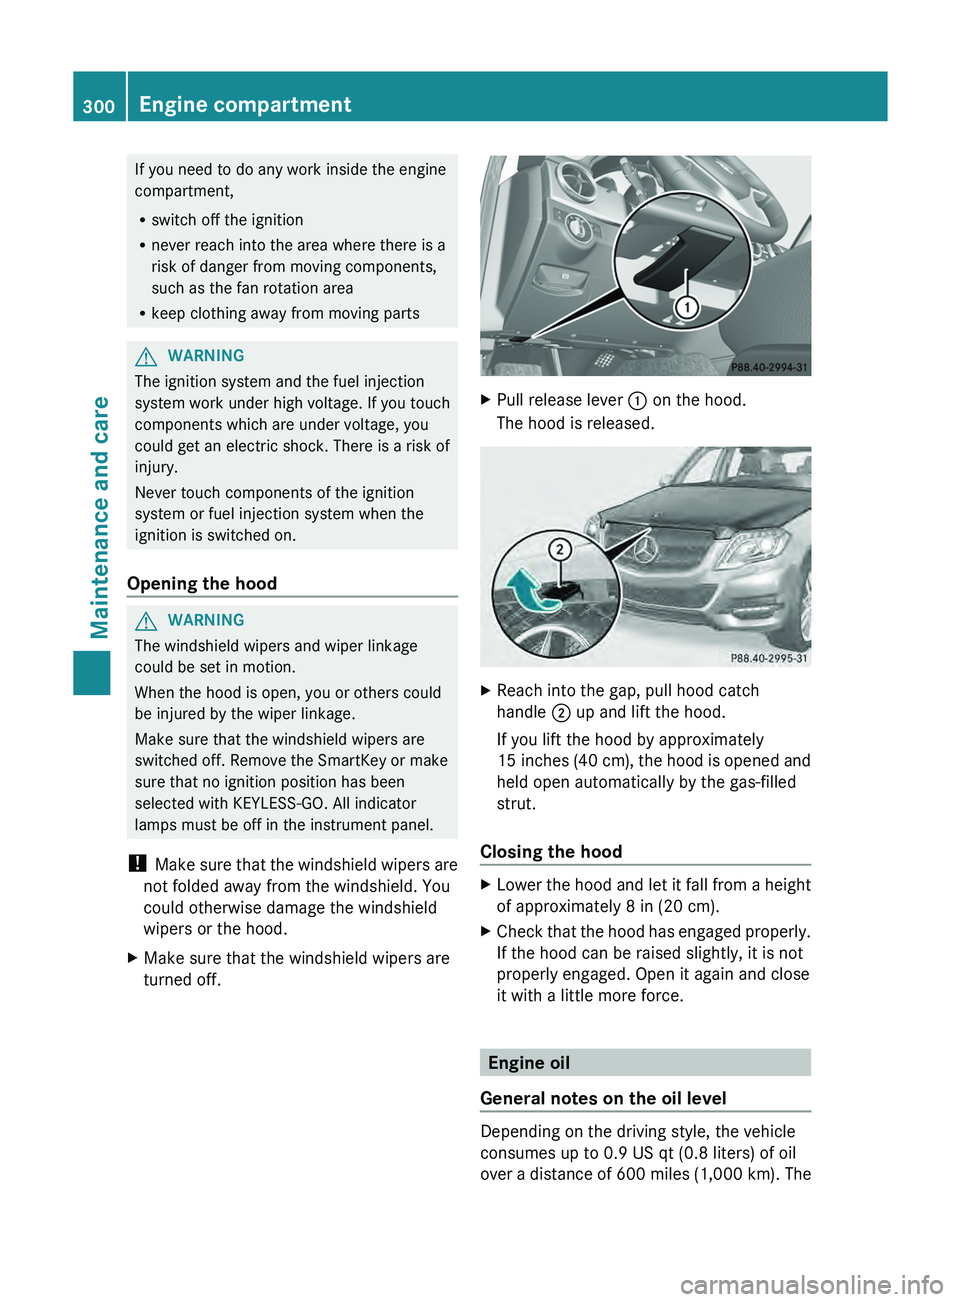
Pull release lever 0043 on the hood.
The hood is released. X
Reach into the gap, pull hood catch
handle 0044 up and lift the hood.
If you lift the hood by approximately
15 inches (40 cm
), the
hood is opened and
held open automatically by the gas-filled
strut.
Closing the hood X
Lower the hood and let it fall from a height
of approximately 8 in (20 cm).
X Check that the hood
has engaged properly.
If the hood can be raised slightly, it is not
properly engaged. Open it again and close
it with a little more force. Engine oil
General notes on the oil level Depending on the driving style, the vehicle
consumes up to 0.9 US qt
(0.8 liters) of oil
over a
distance of
600 miles (1,000 km). The300
Engine compartment
Maintenance and care
Page 304 of 380
Damage to the engine or exhaust system is
caused by the following:
R
using engine oils and oil
filters that have
not been specifically approved for the
service system
R replacing engine oil and oil filters after
the interval for replacement specified by
the service system has been exceeded
R using engine oil additives.
! Do not add too much oil. If the oil level is
above the "max" mark on the dipstick, too
much oil has been added. This can lead to
damage to the engine or the catalytic
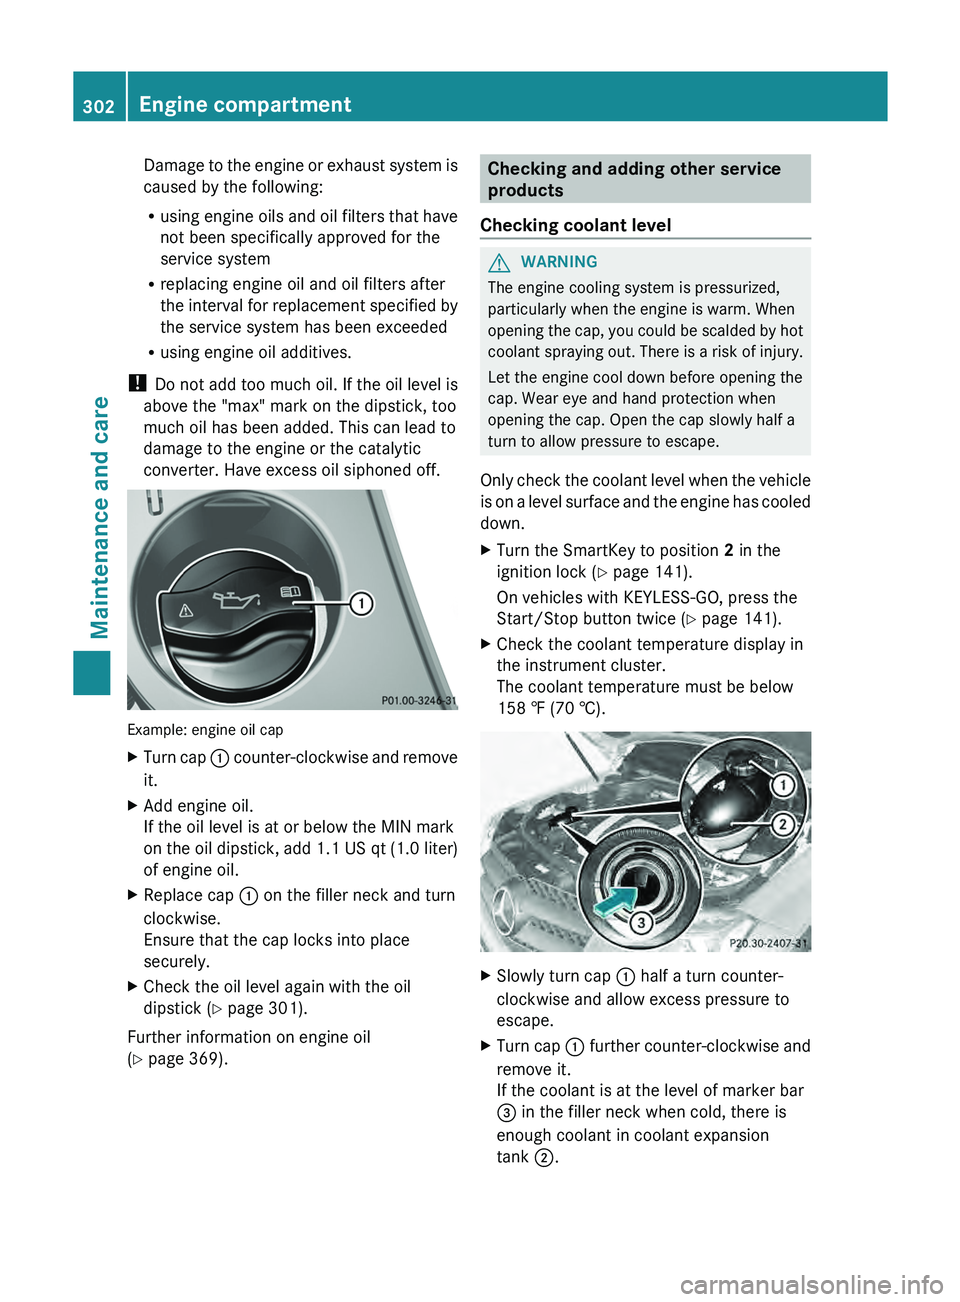
converter. Have excess oil siphoned off. Example: engine oil cap
X
Turn cap 0043 counter-clockwise and remove
it.
X Add engine oil.
If the oil level is at or below the MIN mark
on the oil dipstick, add
1.1 US qt (1.0 liter)
of engine oil.
X Replace cap 0043 on the filler neck and turn
clockwise.
Ensure that the cap locks into place
securely.
X Check the oil level again with the oil
dipstick (Y page 301).
Further information on engine oil
(Y page 369). Checking and adding other service
products
Checking coolant level G
WARNING
The engine cooling system is pressurized,
particularly when the engine is warm. When
opening the cap, you could
be scalded by hot
coolant spraying out. There is a risk of injury.
Let the engine cool down before opening the
cap. Wear eye and hand protection when
opening the cap. Open the cap slowly half a
turn to allow pressure to escape.
Only check the coolant level when the vehicle
is on a level surface and the engine has cooled
down.
X Turn the SmartKey to position 2 in the
ignition lock (Y page 141).
On vehicles with KEYLESS-GO, press the
Start/Stop button twice (Y
page 141).
X Check the coolant temperature display in
the instrument cluster.
The coolant temperature must be below
158 ‡ (70 †). X
Slowly turn cap 0043 half a turn counter-
clockwise and allow excess pressure to
escape.
X Turn cap 0043 further
counter-clockwise and
remove it.
If the coolant is at the level of marker bar
0087 in the filler neck when cold, there is
enough coolant in coolant expansion
tank 0044
.302
Engine compartment
Maintenance and care
Page 315 of 380
Vehicle preparation is not necessary on
vehicles with MOExtended tires.
R
R Collapsible spare wheel
R an emergency spare wheel (only
for certain
countries) (Y page 359)
Information on changing/mounting a wheel
(Y page 352).
X Stop the vehicle on solid, non-slippery and
level ground, as far away as possible from
traffic.
X Switch on the hazard warning lamps.
X Secure the vehicle against rolling away
(Y page 160).
X If possible, bring the front wheels into the
straight-ahead position.
X Switch off the engine.
X Vehicles without KEYLESS-GO: remove
the SmartKey from the ignition lock.
X Vehicles with KEYLESS-GO: open the
driver's door.
The on-board electronics have status 0,
which is the same as the SmartKey having
been removed.
X Vehicles with KEYLESS-GO: remove the
Start/Stop button from the ignition lock
(Y page 141).
X All occupants must get out of the vehicle.
Make sure that
they are
not endangered as
they do so.
X Make sure that no one is near the danger
area while a wheel is being changed.
Anyone who is not directly assisting in the
wheel change should, for example, stand
behind the barrier.
X Get out of the vehicle. Pay attention to
traffic conditions when doing so.
X Close the driver's door. MOExtended tires (tires with run-flat
properties)
General notes With MOExtended tires (tires with run flat
characteristics), you can continue to drive
your vehicle even if there is a total loss of
pressure in one or more tires. The affected
tire must not show
any
clearly visible damage.
You can recognize MOExtended tires by the
MOExtended marking which appears on the
sidewall of the tire. You will find this marking
next to the tire size designation, the load-
bearing capacity and the speed index
(Y page 346).
MOExtended tires may only be used in
conjunction with an active tire pressure loss
warning system or with an active tire pressure
monitor.
If the pressure loss warning message
appears in the multifunction display:
R Observe the instructions in the display
messages ( Y page 252).
R Check the tire for damage.
R If driving on, observe the following notes.
The maximum driving distance is
approximately 50 miles (80 km) when the
vehicle is partially laden and approximately
18 miles (30 km) when the vehicle is fully
laden.
In addition to the vehicle load, the driving
distance possible depends upon:
R Speed
R Road condition
R Outside temperature
The driving distance possible in run-flat mode
may be reduced by extreme driving
conditions/maneuvers, or it can be increased
through a moderate style of driving.
The maximum permissible distance which
can be driven in run-flat mode is counted from
the moment the tire pressure loss warning
appears in the multifunction display. Flat tire
313
Breakdown assistance
Page 317 of 380
G
WARNING
Battery acid is caustic. There is a risk of injury.
Avoid contact with the skin,
eyes or clothing.
Do not inhale any battery gases. Do not lean
over the battery. Keep children away from
batteries. Wash battery acid immediately with
water and seek medical attention. G
WARNING
During the charging process, a battery
produces hydrogen gas. If a short circuit
occurs or sparks are created, the hydrogen
gas can ignite. There is
a risk of an explosion.
R Make sure that the positive terminal of a
connected battery does not come into
contact with vehicle parts.
R Never place metal objects or tools on a
battery.
R It is important that you observe the
described order of the battery terminals
when connecting and disconnecting a
battery.
R When jump-starting, make sure that the
battery poles with identical polarity are
connected.
R It is particularly important to observe the
described order when connecting and
disconnecting the jumper cables.
R Never connect or disconnect the battery
terminals while the engine is running. G
WARNING
During charging and jump-starting, explosive
gases can escape from the
battery. There is a
risk of an explosion.
Particularly avoid fire, open flames, creating
sparks and smoking. Ensure there is sufficient
ventilation while charging and jump-starting.
Do not lean over a battery. H
Environmental note Batteries contain dangerous
substances. It is against the
law to dispose of them with
the household rubbish. They must be collected separately
and recycled to protect the
environment.
Dispose of batteries in an
environmentally friendly
manner. Take discharged
batteries to a qualified
specialist workshop or a
special collection point for
used batteries.
! Have the battery checked regularly at a
qualified specialist workshop.
Observe the service intervals in the
Maintenance Booklet or contact a
qualified
specialist workshop for more information.
! You should have all work involving the
battery carried out at a qualified specialist
workshop. In the exceptional case that it is
necessary for you to disconnect the battery
yourself, make sure that:
R you switch off the engine and remove the
SmartKey. On vehicles with KEYLESS-
GO, ensure that the ignition is switched
off. Check that all the indicator lamps in
the instrument cluster are off. Otherwise,
electronic components, such as the
alternator, may be damaged.
R you first remove the negative terminal
clamp and then the positive terminal
clamp. Never swap the terminal clamps.
Otherwise, the vehicle's electronic
system may be damaged.
R the transmission is locked in position P
after disconnecting the battery. The
vehicle is secured against rolling away.
You can then no longer move the vehicle.
The battery and the cover of the positive
terminal clamp must be installed securely
during operation.
Comply with safety precautions and take
protective measures when handling
batteries. Battery (vehicle)
315
Breakdown assistance Z