2013 MERCEDES-BENZ GLK-Class width
[x] Cancel search: widthPage 57 of 378

Correct use of the seat belts
G
WARNING
USE SEAT BELTS PROPERLY
R Seat belts can only work when used
properly. Never wear seat belts in any other
way than as described in this section, as
that could result in serious injuries in the
event of an accident.
R Each occupan tshould wear their seat belt
at all times, because seat belts help reduce
the likelihood of and potential severity of
injuries in accidents, including rollovers.
The integrated restraint system includes
SRS (driver front air bag, driver's side knee
bag, front-passenger front air bag, side
impact air bags, pelvis air bags, window
curtain air bags for the side windows),
Emergency Tensioning Devices, seat belt
force limiters, and front seat knee bolsters.
The system is designed to enhance the
protection offered to properly belted
occupants in certain frontal (front air bags,
driver's side knee bag and ETDs) and side
(side impact air bags, window curtain air
bags, and ETDs) impacts which exceed
preset deployment thresholds and in
certain rollovers (window curtain air bags
and ETDs).
R Never wear the shoulder belt under your
arm, across your neck or off your shoulder.
In a frontal crash, your body would move
too far forward. That would increase the
chance of head and neck injuries. The seat
belt would also apply too much force to the
ribs or abdomen, which could severely
injure internal organs such as your liver or
spleen.
Adjust the seat belt so that the shoulder
section is located as close as possible to
the middle of the shoulder. It should not
touch the neck.N ever pass the shoulder
portion of the seat belt under your arm. For
this purpose, you can adjust the height of
the seat belt outlet. R
Position the lap belt as low as possible on
your hips and not across the abdomen. If
the lap belt is positioned across your
abdomen, it could cause serious injuries in
a crash.
R Never wear seat belts over rigid or
breakable objects in or on your clothing,
such as eyeglasses, pens, keys etc., as
these might cause injuries.
R Make sure the seat belt is always fitted
snugly. Take special care of this when
wearing loose clothing.
R Never use a seat belt for more than one
person at a time. Do not fasten a seat belt
around a person and another person or
other objects at the same time.
R Seat belts should not be worn twisted. In a
crash, you would not have the full width of
the seat belt to distribut eimpact forces.
The twisted seat belt against yourb ody
could cause injuries.
R Pregnant women should also always use a
lap-shoulder belt. The lap belt portion
should be positioned as low as possible on
the hips to avoid any possible pressure on
the abdomen.
R Place the seat backrest in a position that is
as upright as possible.
R Check your seat belt during travel to make
sure it is properly positioned.
R Never place your feet on the instrument
panel, dashboard, or on the seat. Always
keep both feet on the floor in front of the
seat.
R When using a seat belt to secure infant
restraints, toddler restraints, or children in
booster seats, always follow the child seat
manufacturer's instructions. G
WARNING
Do not pass seat belts over sharp edges. They
could tear.
Do not allow the seat belt to get caught in the
door or in the seat adjustment mechanism.
This could damage the seat belt. Occupant safety
55Safety
Z
Page 180 of 378

Cornering, going into and coming out of a
bend
The ability of DISTRONIC PLU
Sto detect
vehicles when cornering is limited. Your
vehicle may brake unexpectedly or late.
Vehicles traveling on adifferent line DISTRONIC PLUS may not detect vehicles
traveling on a different line. The distance to
the vehicle in fron twill be too short.
Other vehicles changing lanes DISTRONIC PLUS has not detected the
vehicle cutting in yet. The distance to this
vehicle will be too short.
Narrow vehicles
DISTRONIC PLUS has not yet detected the
vehicle in front on the edge of the road,
because of its narrow width
.The distance to
the vehicle in front will be too short.
Obstructions and stationary vehicles DISTRONIC PLUS does not brake for
obstacles or stationary vehicles. If, for
example, the detected vehicle turns a corner
and reveals an obstacle or stationary vehicle,
DISTRONIC PLUS will not brake for these.178
Driving systemsDriving and parking
Page 192 of 378

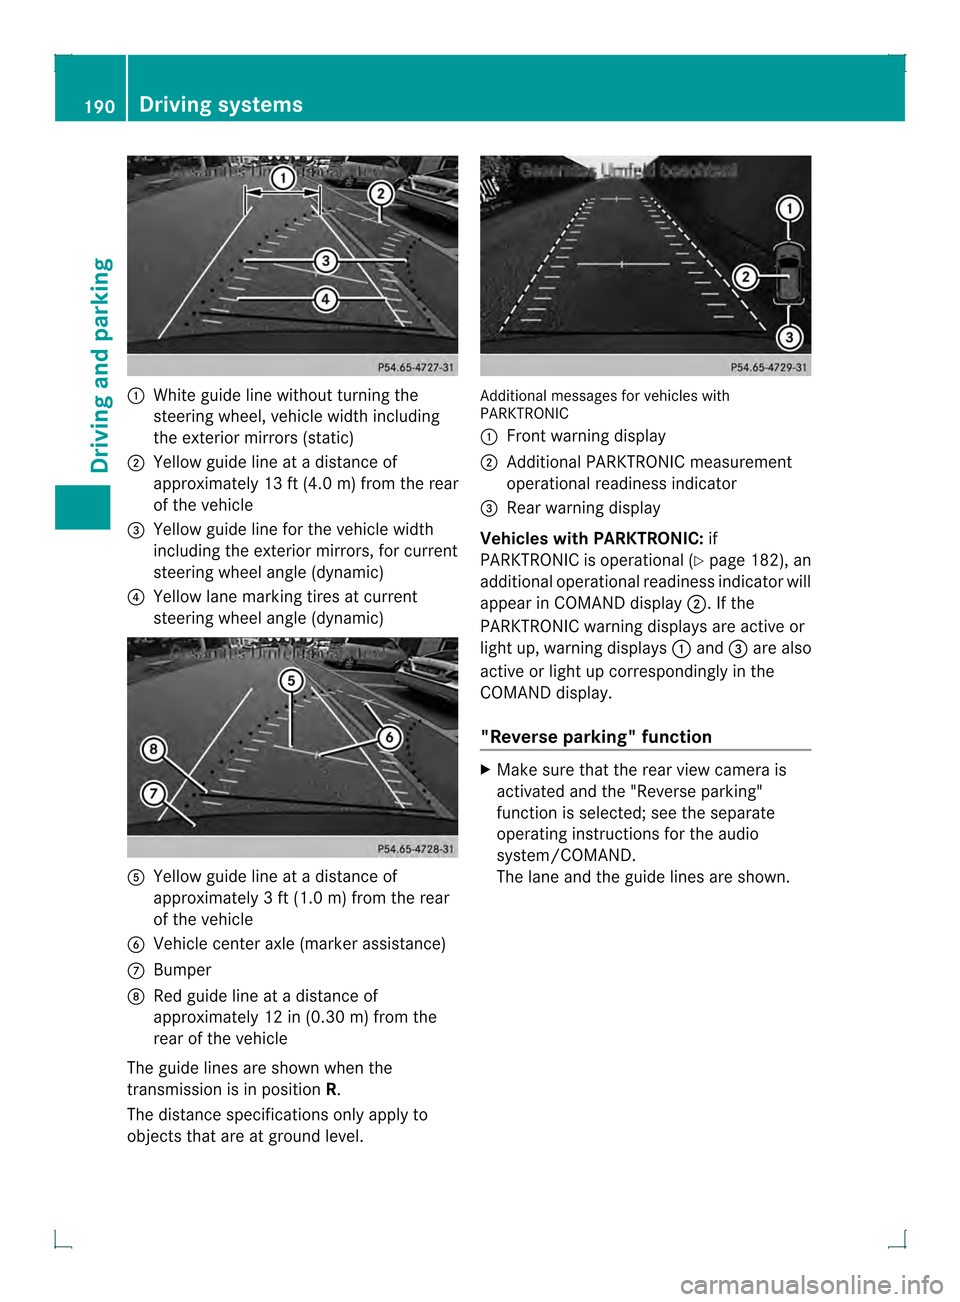
0002
White guide line without turning the
steering wheel, vehicle width including
the exterior mirrors (static)
0003 Yellow guide line at a distance of
approximately 13 ft (4.0 m) from the rear
of the vehicle
0021 Yellow guide line for the vehicle width
including the exterior mirrors, for current
steering wheel angle (dynamic)
0020 Yellow lane marking tires at current
steering wheel angle (dynamic) 001E
Yellow guide line at a distance of
approximately 3 ft (1.0 m) from the rear
of the vehicle
001F Vehicle center axle (marker assistance)
0011 Bumper
0012 Red guide line at a distance of
approximately 12 in (0.30 m) from the
rear of the vehicle
The guide lines are show nwhen the
transmission is in position R.
The distance specifications only apply to
objects that are at ground level. Additional messages for vehicles with
PARKTRONIC
0002
Front warning display
0003 Additional PARKTRONIC measurement
operational readiness indicator
0021 Rear warning display
Vehicles with PARKTRONIC: if
PARKTRONIC is operational (Y page 182), an
additional operational readiness indicator will
appearinC OMAND display 0003. If the
PARKTRONIC warning displays are active or
light up, warning displays 0002and 0021are also
active or light up correspondingly in the
COMAND display.
"Reverse parking" function X
Make sure that the rear view camera is
activated and the "Reverse parking"
function is selected; see the separate
operating instructions for the audio
system/COMAND.
The lane and the guide lines are shown. 190
Driving systemsDriving and parking
Page 193 of 378

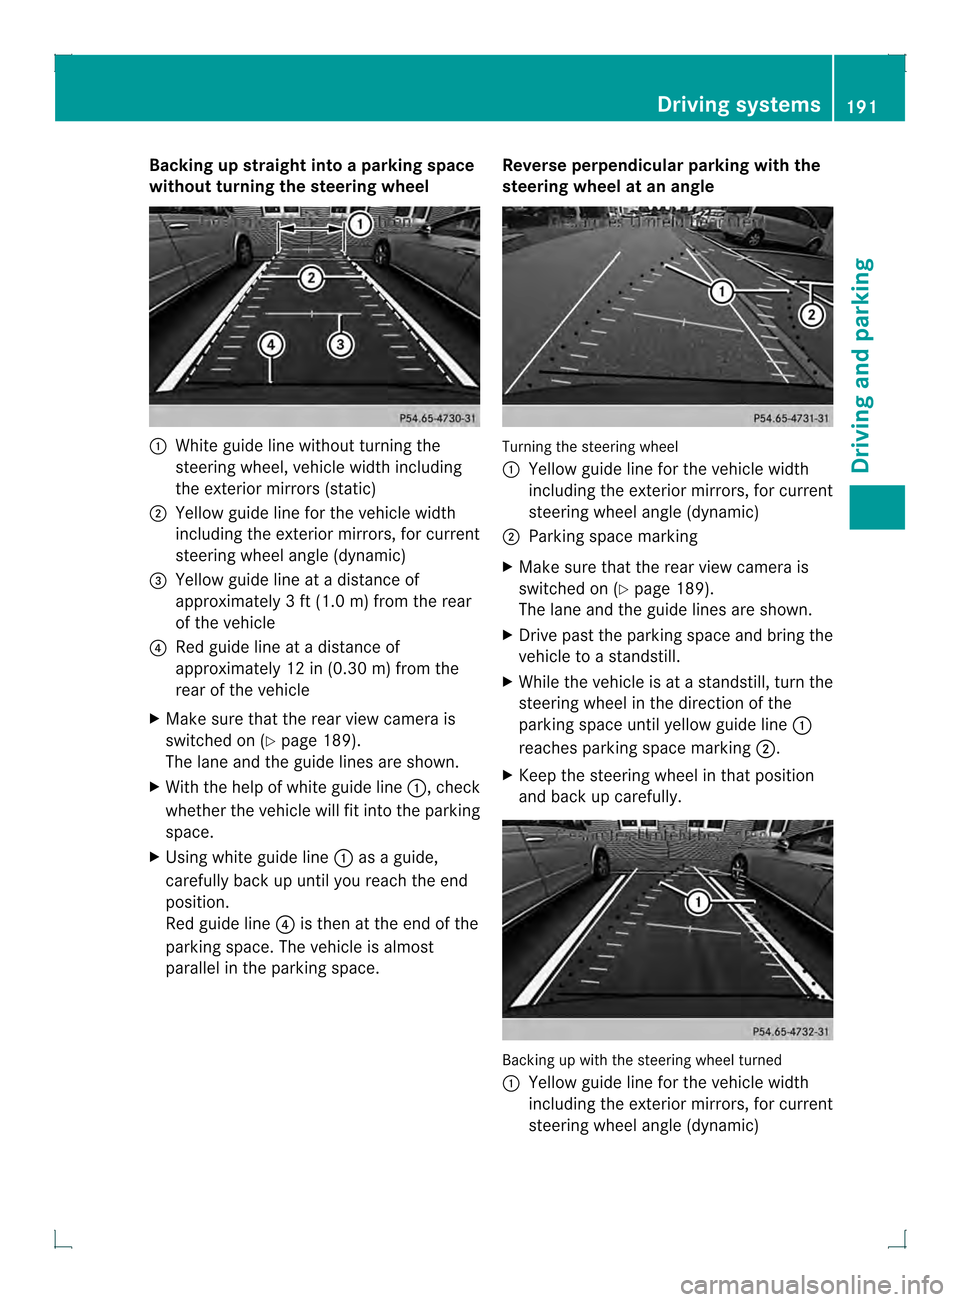
Backing up straight into a parking space
withou tturning the steering wheel 0002
White guide line without turning the
steering wheel, vehicle width including
the exterior mirrors (static)
0003 Yellow guide line for the vehicle width
including the exterior mirrors, for current
steering wheel angle (dynamic)
0021 Yellow guide line at a distance of
approximately 3 ft (1.0 m) from the rear
of the vehicle
0020 Red guide line at a distance of
approximately 12 in (0.30 m) from the
rear of the vehicle
X Make sure that the rear view camera is
switched on (Y page 189).
The lane and the guide lines are shown.
X With the help of white guide line 0002, check
whether the vehicle will fit into the parking
space.
X Using white guide line 0002as a guide,
carefully back up until you reach the end
position.
Red guide line 0020is then at the end of the
parking space. The vehicle is almost
parallel in the parking space. Reverse perpendicular parking with the
steering wheel at an angle Turning the steering wheel
0002
Yellow guide line for the vehicle width
including the exterior mirrors, for current
steering wheel angle (dynamic)
0003 Parking space marking
X Make sure that the rear view camera is
switched on (Y page 189).
The lane and the guide lines are shown.
X Drive pas tthe parking space and bring the
vehicle to a standstill.
X While the vehicle is at a standstill, turn the
steering wheel in the direction of the
parking space until yellow guide line 0002
reaches parking space marking 0003.
X Keep the steering wheel in that position
and back up carefully. Backing up with the steering wheel turned
0002
Yellow guide line for the vehicle width
including the exterior mirrors, for current
steering wheel angle (dynamic) Driving systems
191Driving and parking Z
Page 197 of 378

Activating the 360° camera using
reverse gear The 360° camera images can be
automatically displayed by engaging reverse
gear.
X Make sure that the SmartKey is in position
2in the ignition lock.
X Make sure that the Activation by R gear setting is active in COMAND, see the
separate COMAND operating instructions.
X To show the 360° camera image: engage
reverse gear.
The COMAND display shows the area
behind the vehicle in split screen:
R vehicle with guide lines
R top view of the vehicle
Selecting the split-screen and full
screen displays X
To switch between split screen views:
switch to the line with the vehicle icons by
sliding 00090002the COMAND controller.
X Turn 000C0002000D the COMAND controller and
select one of the vehicle symbols.
X To switch to full screen mode: select
Full Screen by turning
000C0002000Dthe
COMAND controller and press 000Ato
confirm.
Displays in the COMAND display Important safety notes
!
Objects no tatground level may appear to
be further away than they actually are, e.g.:
R the bumper of a parked vehicle
R the drawbar of a trailer
R the ball coupling of a trailer tow hitch
R the rear section of an HGV
R a slanted post
Use the guidelines only for orientation.
Approach objects no further than the
bottom-most guideline. Top view with picture from the rear view
camera
0002
Symbol for the spli tscree nsetting with
top view and rear view camera image
0003 Yellow guide line at a distance of
approximately 13 ft (4.0 m) from the rear
of the vehicle
0021 Yellow guide line for the vehicle width
including the exterior mirrors, for current
steering wheel angle (dynamic)
0020 Yellow lane marking tires at current
steering wheel angle (dynamic) 001E
Yellow guide line at a distance of
approximately 3 ft (1.0 m) from the rear
of the vehicle
001F Vehicle center axle (marker assistance)
0011 Red guide line at a distance of
approximately 12 in (0.30 m) from the
rear of the vehicle
0012 Bumper
The guide lines are show nwhen the
transmission is in position R.
The distance specifications only apply to
objects that are at ground level. Driving systems
195Driving and parking Z
Page 198 of 378

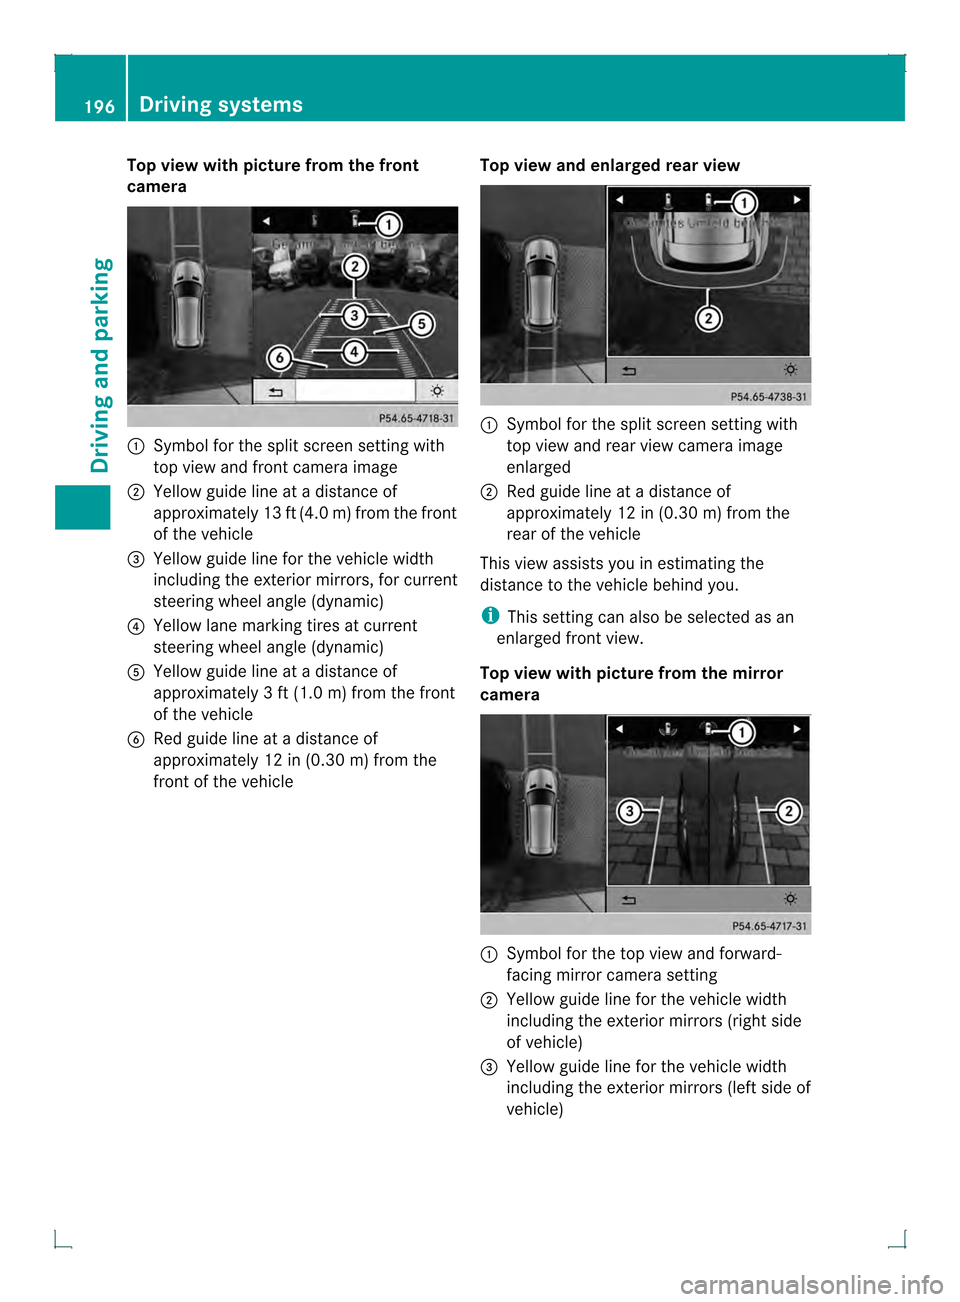
Top view with picture from the front
camera
0002
Symbol for the split screen setting with
top view and front camera image
0003 Yellow guide line at a distance of
approximatel y13 ft (4.0 m) from the front
of the vehicle
0021 Yellow guide line for the vehicle width
including the exterior mirrors, for current
steering wheel angle (dynamic)
0020 Yellow lane marking tires at current
steering wheel angle (dynamic)
001E Yellow guide line at a distance of
approximately 3 ft (1.0 m) fromthe front
of the vehicle
001F Red guide line at a distance of
approximately 12 in (0.30 m) fromthe
front of the vehicle Top view and enlarged rea
rview 0002
Symbol for the split screen setting with
top view and rear view camera image
enlarged
0003 Red guide line at a distance of
approximately 12 in (0.30 m) from the
rear of the vehicle
This view assists you in estimating the
distance to the vehicle behind you.
i This setting can also be selected as an
enlarged fron tview.
Top view with picture from the mirror
camera 0002
Symbol for the top view and forward-
facing mirror camera setting
0003 Yellow guide line for the vehicle width
including the exterior mirrors (right side
of vehicle)
0021 Yellow guide line for the vehicle width
including the exterior mirrors (left side of
vehicle) 196
Driving systemsDriving and parking
Page 212 of 378

i
This also applies if you have activated
cruise control.
This will use the braking effect of the engine,
so that less braking will be required to
maintain the speed, This relieves the load on
the brake system and prevents the brakes
from overheating and wearing too quickly. If
you need additional braking, depress the
brake pedal repeatedly rather than
continuously.
Driving tips R
Maintain a greater distance from the
vehicle in frontt han when driving without a
trailer.
R Avoid braking abruptly. If possible, brake
gently at first to allow the trailer to run on.
Then, increase the braking force rapidly.
R The values given for gradient-climbing
capabilities from a standstill refer to sea
level. When driving in mountainous areas,
note that the power output of the engine
and, consequently, the vehicle's gradient-
climbing capability, decreases with
increasing altitude.
If the trailer swings from side to side:
X Do not accelerate.
X Do not counter-steer.
X Brake if necessary. Installing the ball coupling
G
WARNING
If the ball coupling is not installed and secured
correctly the trailer may come loose. There is
a risk of an accident.
Install and secure the ball coupling as
described in the ball coupling installation
instructions. Make sure that the ball coupling
is installed and secured correctly before every
journey.
! Mercedes-Ben zrecommends that you
only use ball couplings that have been tested and approved by Mercedes-Benz.
This helps to avoid damage to the vehicle.
Cover cap
X
Pull protective cap 0002in the direction of the
arrow, out of ball coupling recess 0003.
X Store protective cap 0002in a safe place.
X Observe the manufacturer's installation
instructions. G
WARNING
If the ball coupling is not installed and secured
correctly it can become detached while the
vehicle is in motion and fall onto the road.
There is a risk of an accident and injury.
Install and secure the ball coupling as
described in the ball coupling installation
instructions. Make sure that the ball coupling
is installed and secured correctly before every
journey. Coupling up a trailer
Observe the maximum permissible trailer
dimensions (width and length).
Most U.S.s tates and all Canadia nprovinces
require by law:
R safety chains between the towing vehicle
and the trailer. The chains should be cross-
wound under the trailer drawbar. They must
be fastened to the vehicle's trailer
coupling, not to the bumper or the axle. 210
Towing
atrailerDriving an d parking
Page 331 of 378

or other obstacles. If it is necessary to drive
over curbs, speed humps or similar
elevations, try to do so slowly and at an
obtuse angle. Otherwise, the tires,
particularly the sidewalls, may be
damaged. Regular checking of wheels and tires
G
WARNING
Damaged tires can cause tire inflation
pressure loss. As a result, you could lose
control of your vehicle. There is a risk of
accident.
Check the tires regularly for signs of damage
and replace any damaged tires immediately.
R Regularly check the wheels and tires of
your vehicle for damage (e.g. cuts,
punctures, tears, bulges on tires and
deformation or cracks or severe corrosion
on wheels) at least once amonth, as well
as after driving off-road or on rough roads.
Damaged wheels can cause a loss of tire
pressure.
R Regularly check the tire tread depth and
the condition of the tread across the whole
width of the tire (Y page 329). If necessary,
turn the front wheels to full lock in order to
inspect the inner side of the tire surface.
R All wheels must have a valve cap to protect
the valve against dirt and moisture. Do not
mount anything onto the valve other than
the standard valve cap or other valve caps
approved by Mercedes-Benz for your
vehicle. Do not use any other valve caps or
systems, e.g. tire pressure monitoring
systems.
R Regularly check the pressure of all the tires
including the emergency spare wheel or the
spare wheel, particularly prior to long trips,
and correc tthe pressure as necessary
(Y page 331). Tire tread
G
WARNING
Insufficient tire tread will reduce tire traction.
The tire is no longer able to dissipate water.
This means that on wet road surfaces, the risk
of hydroplaning increases, in particular where
speed is not adapted to suit the driving
conditions. There is a risk of accident.
If the tire pressure is too high or too low, tires
may exhibit different levels of wear at
different locations on the tire tread. Thus, you
should regularly check the tread depth and
the condition of the tread across the entire
width of all tires.
Minimum tire tread depth for:
R Summer tires: 0008in (3 mm)
R M+S tires: 0009in (4 mm)
For safety reasons, replace the tires before
the legally prescribed limit for the minimum
tire tread depth is reached.
Treadweari ndicators (TWI) are required by
law. Six indicators are positioned on the tire
tread. They are visible once the tread depth
is approximately 0007in (1.6 mm). If thi sisthe
case, the tire is so worn that it must be
replaced. Bar indicator
0002for tread wear is integrated
into the tire tread. Operation
329Wheels and tires Z