2013 MERCEDES-BENZ GLA SUV engine oil
[x] Cancel search: engine oilPage 189 of 401
The following driving systems are specially
adapted for driving over easily negotiable off-
road terrain:
R Off-road program (Y page 205)
R Off-road ABS (Y page 73)
R Off-road 4ETS (Y page 77)
R Off-road ESP ®
(Y page 80)
R DSR (Downhill Speed Regulation)
(Y page 204)
Observe the following notes:
R Stop the vehicle before driving off-road. If
necessary, activate the off-road program
(Y page 205).
R To avoid damaging the vehicle, make sure
there is always sufficient ground clearance.
R Make sure that items of luggage and loads
are stowed safely and are well secured
(Y page 306).
R Always keep the engine running and in gear
when driving on a downhill gradient. Acti-
vate DSR (Y page 204).
R Drive slowly and evenly, if necessary at
walking pace.
R Ensure that the wheels are in contact with
the ground at all times.
R Drive with extreme care on unknown off-
road routes where visibility is poor. For
safety reasons, get out of the vehicle first
and survey the off-road route.
R Check the depth of water before fording
rivers and streams.
R Watch out for obstacles.
R Take care when turning on an uphill or
downhill slope or when driving across a
slope. The vehicle could otherwise tip over.
R Always keep the side windows and the pan-
orama sliding sunroof closed during the
journey.
R Do not deviate from marked routes.
i Do not use the HOLD function when driv-
ing off-road, on steep uphill or downhill gra- dients or on slippery or loose surfaces. The HOLD function cannot hold the vehicle on
such surfaces.
Checklist before driving off-road X
Engine oil level: check the engine oil and
top it up if necessary.
When driving on steep gradients, the oil
level must be sufficiently high to ensure a
correct oil supply in the vehicle.
X Wheels and tyres: check the tyre tread
depth and tyre pressure.
X Check for damage and remove any foreign
objects, e.g. small stones, from the
wheels/tyres.
X Replace any missing valve caps.
X Replace dented or damaged wheels.
X Wheels: dented or bent wheels can lead to
a loss of tyre pressure and damage to the
tyre bead. Before driving off-road, check
the wheels and replace them if necessary.
Checklist after driving off-road !
If you detect damage to the vehicle after
driving off-road, have the vehicle checked
immediately at a qualified specialist work-
shop.
X Deactivate off-road program (Y page 205).
X Deactivate DSR (Y page 204).
X Clean the headlamps and rear lights and
check for damage.
X Clean the front and rear licence plates.
X Clean the wheels/tyres with a water jet and
remove any foreign objects.
X Clean the wheels, wheel arches and the
vehicle underside with a water jet; check
for any foreign objects and damage.
X Check whether twigs or other parts of
plants have become trapped. These
increase the risk of fire and can damage
fuel pipes, brake hoses or the rubber bel-
lows of the axle joints and propeller shafts.
X After the trip, examine without fail the
entire undercarriage, wheels, tyres, brakes, 186
Driving tipsDriving and parking
Page 254 of 401
Resetting to factory settings
X
Press the =or; button on the steer-
ing wheel to select the Settings
Settings menu.
X Press the :or9 button to select the
Factory setting
Factory setting submenu.
X Press ato confirm.
The Reset all settings?
Reset all settings? message
appears.
X Press the :or9 button to select No
No
or Yes
Yes.
X Press the abutton to confirm the selec-
tion.
If you have selected Yes Yes, the multifunction
display shows a confirmation message.
For safety reasons, not all functions are reset: the Limit
Limit speed
speed(winter
(winter tyres)
tyres)function
in permanent SPEEDTRONIC can only be set
in the Vehicle
Vehicle submenu. If you want to reset
the Daytime
Daytime driving
drivinglights
lightsin theLights
Lights
submenu, you must turn the key to position 1
in the ignition lock. AMG menu in AMG vehicles
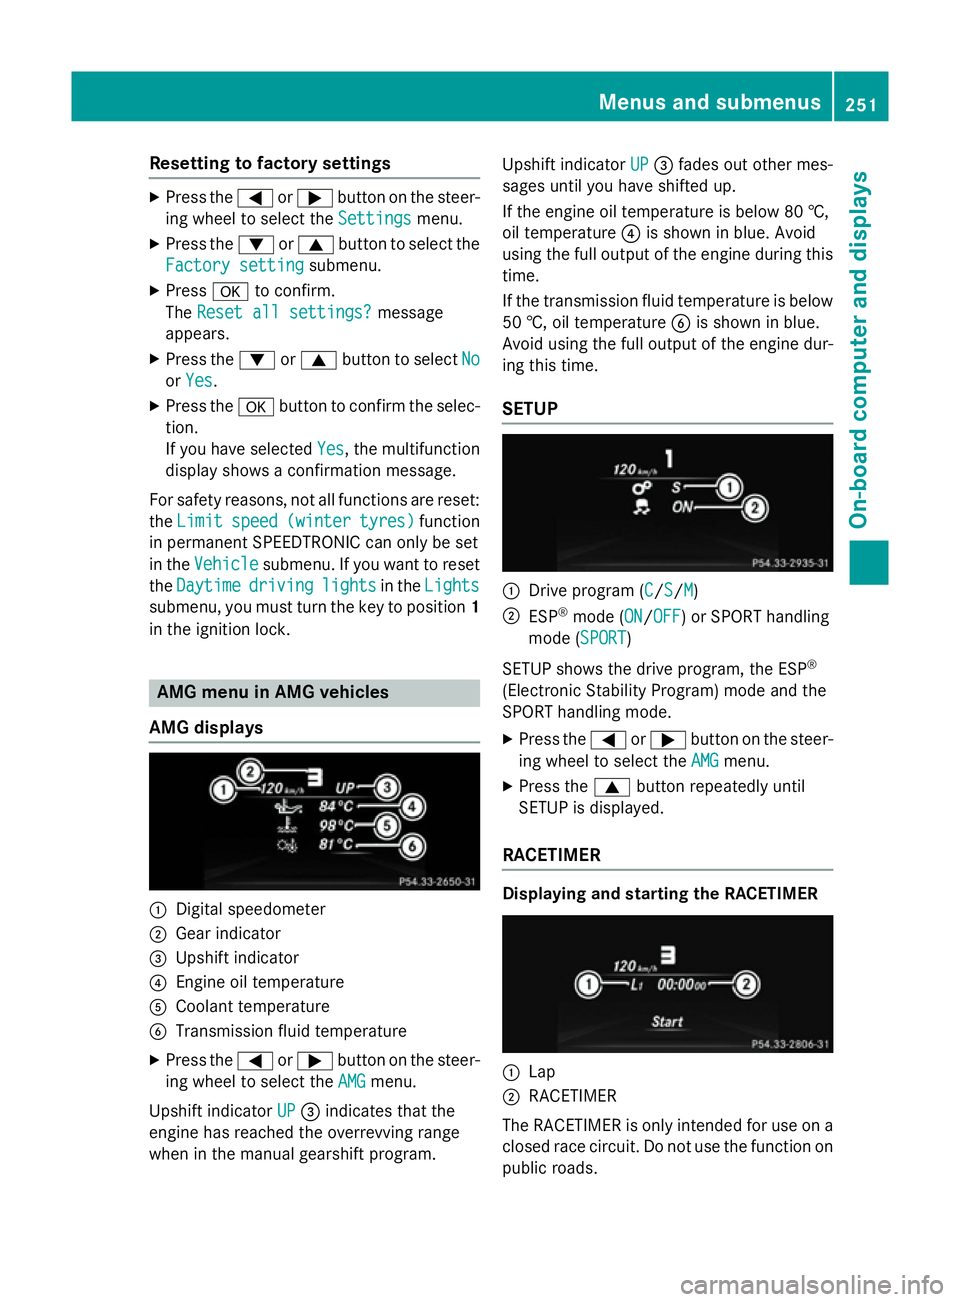
AMG displays :
Digital speedometer
; Gear indicator
= Upshift indicator
? Engine oil temperature
A Coolant temperature
B Transmission fluid temperature
X Press the =or; button on the steer-
ing wheel to select the AMG
AMG menu.
Upshift indicator UP
UP = indicates that the
engine has reached the overrevving range
when in the manual gearshift program. Upshift indicator
UP UP= fades out other mes-
sages until you have shifted up.
If the engine oil temperature is below 80 †,
oil temperature ?is shown in blue. Avoid
using the full output of the engine during this time.
If the transmission fluid temperature is below
50 †, oil temperature Bis shown in blue.
Avoid using the full output of the engine dur-
ing this time.
SETUP :
Drive program (C C/SS/MM)
; ESP ®
mode (ON ON/OFFOFF) or SPORT handling
mode (SPORT SPORT)
SETUP shows the drive program, the ESP ®
(Electronic Stability Program) mode and the
SPORT handling mode. X Press the =or; button on the steer-
ing wheel to select the AMG AMGmenu.
X Press the 9button repeatedly until
SETUP is displayed.
RACETIMER Displaying and starting the RACETIMER
:
Lap
; RACETIMER
The RACETIMER is only intended for use on a closed race circuit. Do not use the function on
public roads. Menus and submenus
251On-board computer and displays Z
Page 277 of 401
Display messages
Possible causes/consequences and
M
MSolutions #
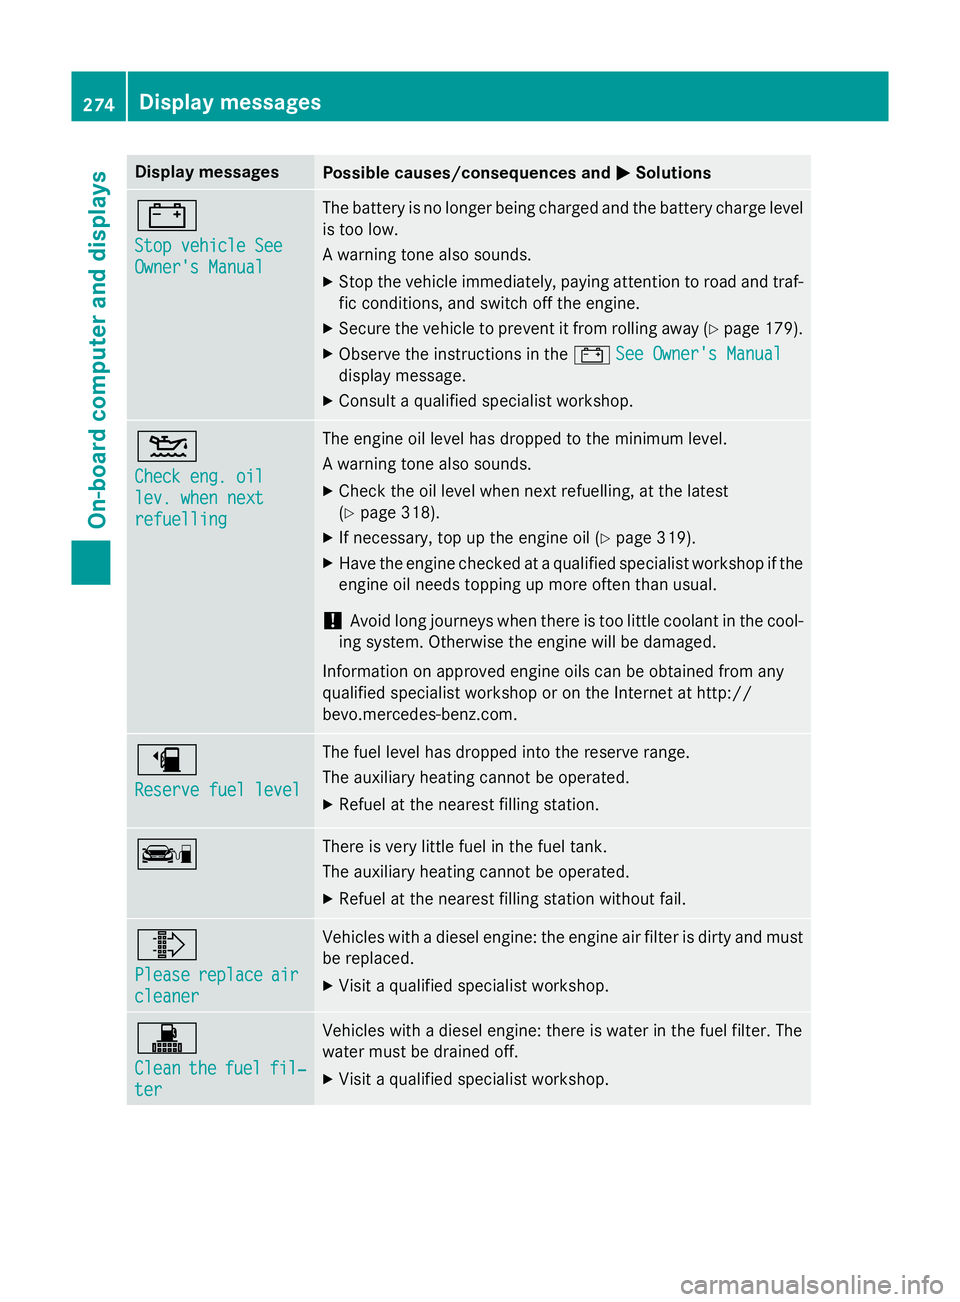
Stop vehicle See Stop vehicle See
Owner's Manual Owner's Manual The battery is no longer being charged and the battery charge level
is too low.
A warning tone also sounds.
X Stop the vehicle immediately, paying attention to road and traf-
fic conditions, and switch off the engine.
X Secure the vehicle to prevent it from rolling away (Y page 179).
X Observe the instructions in the #See Owner's Manual See Owner's Manual
display message.
X Consult a qualified specialist workshop. 4
Check eng. oil Check eng. oil
lev. when next lev. when next
refuelling refuelling The engine oil level has dropped to the minimum level.
A warning tone also sounds.
X Check the oil level when next refuelling, at the latest
(Y page 318).
X If necessary, top up the engine oil (Y page 319).
X Have the engine checked at a qualified specialist workshop if the
engine oil needs topping up more often than usual.
! Avoid long journeys when there is too little coolant in the cool-
ing system. Otherwise the engine will be damaged.
Information on approved engine oils can be obtained from any
qualified specialist workshop or on the Internet at http://
bevo.mercedes-benz.co m.æ
Reserve fuel level Reserve fuel level The fuel level has dropped into the reserve range.
The auxiliary heating cannot be operated.
X Refuel at the nearest filling station. ç There is very little fuel in the fuel tank.
The auxiliary heating cannot be operated.
X Refuel at the nearest filling station without fail. ¸
Please Please
replace
replace air
air
cleaner
cleaner Vehicles with a diesel engine: the engine air filter is dirty and must
be replaced.
X Visit a qualified specialist workshop. !
Clean Clean
the
thefuel
fuel fil‐
fil‐
ter
ter Vehicles with a diesel engine: there is water in the fuel filter. The
water must be drained off.
X Visit a qualified specialist workshop. 274
Display messagesOn-board computer and displays
Page 287 of 401

Display messages
Possible causes/consequences and
M
MSolutions Transmission Mal‐
Transmission Mal‐
function function The automatic transmission is malfunctioning.
X Visit a qualified specialist workshop. Transmission Mal‐
Transmission Mal‐
function Stop function Stop The automatic transmission is malfunctioning.
X Pull over and stop the vehicle safely as soon as possible, paying
attention to road and traffic conditions.
X Secure the vehicle against rolling away (Y page 179).
X Consult a qualified specialist workshop. Stop
Stop
vehicle
vehicle Shift
Shift
to P Leave engine
to P Leave engine
running running The automatic transmission has overheated.
X Drive on carefully.
If the display message disappears, the automatic transmission
is available again.
If the display message continues to be displayed:
X Pull over and stop the vehicle safely as soon as possible, paying
attention to road and traffic conditions.
X Secure the vehicle against rolling away (Y page 179).
X Wait until the automatic transmission has cooled down and the
display message goes out. Clutch overheated Clutch overheated
Avoid Avoid
pulling
pulling away
away
Engage/disengage
Engage/disengage
clutch quickly if clutch quickly if
req. req. The clutch is under considerable load and the permitted operating
temperature has been exceeded. A warning tone also sounds.
Avoid frequent pulling away and driving at walking pace over lon-
ger distances.
X Pull over and stop the vehicle safely as soon as possible, paying
attention to road and traffic conditions.
X Secure the vehicle against rolling away (Y page 179).
X Leave the engine running.
The clutch is cooled more quickly with the engine is running.
or X If possible, continue driving at a steady speed.
X Remove your foot from the clutch pedal and do not allow the
clutch to slip.
The clutch may also cool down during the journey.
It may take several minutes for it to cool down. When the clutch
has cooled down, the display message disappears. The clutch is
fully operational again. Trans. Trans.
oil
oiloverhea‐
overhea‐
ted Drive on with
ted Drive on with
care care AMG vehicles: the transmission oil has overheated.
Manual drive program
Mand the temporarily active manual drive
program are no longer available. Engine power output is reduced.
X Allow the vehicle to cool down. 284
Display
messagesOn-board computer and displays
Page 321 of 401
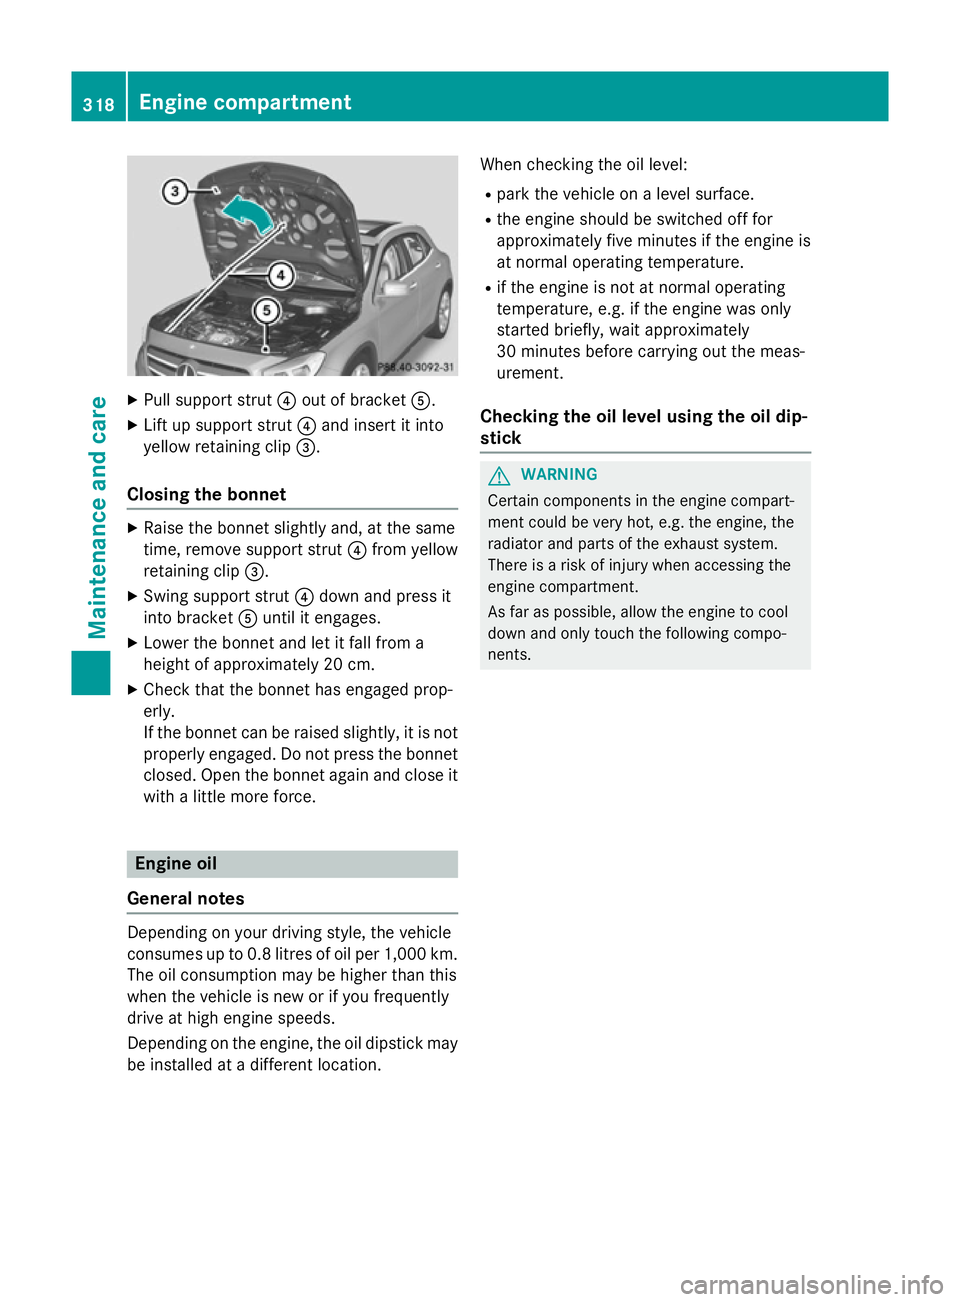
X
Pull support strut ?out of bracket A.
X Lift up support strut ?and insert it into
yellow retaining clip =.
Closing the bonnet X
Raise the bonnet slightly and, at the same
time, remove support strut ?from yellow
retaining clip =.
X Swing support strut ?down and press it
into bracket Auntil it engages.
X Lower the bonnet and let it fall from a
height of approximately 20 cm.
X Check that the bonnet has engaged prop-
erly.
If the bonnet can be raised slightly, it is not
properly engaged. Do not press the bonnet
closed. Open the bonnet again and close it with a little more force. Engine oil
General notes Depending on your driving style, the vehicle
consumes up to 0.8 litres of oil per 1,000 km.
The oil consumption may be higher than this
when the vehicle is new or if you frequently
drive at high engine speeds.
Depending on the engine, the oil dipstick may be installed at a different location. When checking the oil level:
R park the vehicle on a level surface.
R the engine should be switched off for
approximately five minutes if the engine is
at normal operating temperature.
R if the engine is not at normal operating
temperature, e.g. if the engine was only
started briefly, wait approximately
30 minutes before carrying out the meas-
urement.
Checking the oil level using the oil dip-
stick G
WARNING
Certain components in the engine compart-
ment could be very hot, e.g. the engine, the
radiator and parts of the exhaust system.
There is a risk of injury when accessing the
engine compartment.
As far as possible, allow the engine to cool
down and only touch the following compo-
nents. 318
Engine compartmentMaintenance and care
Page 322 of 401
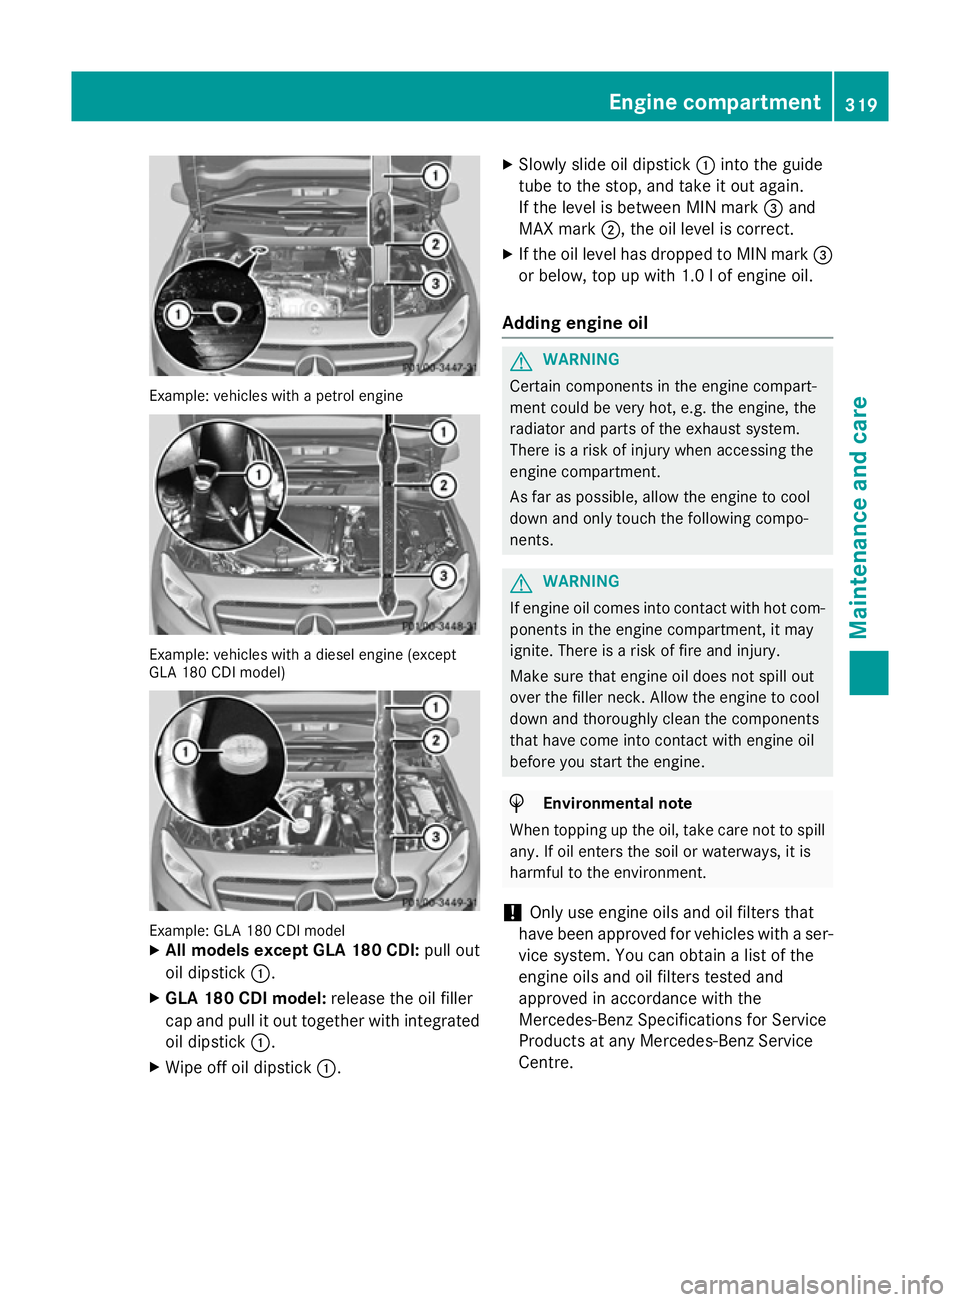
Example: vehicles with a petrol engine
Example: vehicles with a diesel engine (except
GLA 180 CDI model) Example: GLA 180 CDI model
X
All models except GLA 180 CDI: pull out
oil dipstick :.
X GLA 180 CDI model: release the oil filler
cap and pull it out together with integrated
oil dipstick :.
X Wipe off oil dipstick :. X
Slowly slide oil dipstick :into the guide
tube to the stop, and take it out again.
If the level is between MIN mark =and
MAX mark ;, the oil level is correct.
X If the oil level has dropped to MIN mark =
or below, top up with 1.0 l of engine oil.
Adding engine oil G
WARNING
Certain components in the engine compart-
ment could be very hot, e.g. the engine, the
radiator and parts of the exhaust system.
There is a risk of injury when accessing the
engine compartment.
As far as possible, allow the engine to cool
down and only touch the following compo-
nents. G
WARNING
If engine oil comes into contact with hot com- ponents in the engine compartment, it may
ignite. There is a risk of fire and injury.
Make sure that engine oil does not spill out
over the filler neck. Allow the engine to cool
down and thoroughly clean the components
that have come into contact with engine oil
before you start the engine. H
Environmental note
When topping up the oil, take care not to spill
any. If oil enters the soil or waterways, it is
harmful to the environment.
! Only use engine oils and oil filters that
have been approved for vehicles with a ser-
vice system. You can obtain a list of the
engine oils and oil filters tested and
approved in accordance with the
Mercedes-Benz Specifications for Service
Products at any Mercedes-Benz Service
Centre. Engine compartment
319Maintenance and care Z
Page 323 of 401

Damage to the engine or exhaust system is
caused by the following:
R using engine oils and oil filters that have
not been specifically approved for the
service system
R changing the engine oil and oil filter after
missing the change interval required by
the service system
R using engine oil additives
! Do not add too much oil. Topping up with
too much engine oil can result in damage to
the engine or to the catalytic converter.
Have excess engine oil siphoned off. Example: engine oil filler cap
X Turn cap :anti-clockwise and remove it.
X Top up the engine oil.
If the oil level is at or below the MIN mark on
the oil dipstick, top up with 1.0 lof engine
oil.
X Replace cap :on the filler neck and turn
clockwise.
Make sure that the cap locks securely into place.
X Check the oil level again with the oil dip-
stick (Y page 318).
For further information on engine oil, see
(Y page 388). Checking and adding other service
products
Checking the coolant level G
WARNING
The engine cooling system is under pressure, particularly if the engine is warm. You could
be scalded by hot coolant spraying out when
opening the cap. There is a danger of injury.
Allow the engine to cool before opening the
cap. Wear gloves and protective eyewear
when opening. Slowly turn the cap half a turn
to allow pressure to escape.
! The coolant level must only be checked
and corrected when the engine has cooled
down (coolant temperature under 40 †).
Checking the coolant level when the cool-
ant temperature is over 40 † can lead to
damage to the engine or engine cooling
system. Example
X Park the vehicle on a level surface.
Only check the coolant level if the vehicle is
on a level surface and the engine has
cooled down.
X Turn the key to position 2in the ignition
lock (Y page 159).
X Check the coolant temperature display in
the instrument cluster.
The coolant temperature must be below
40 †.
X Turn the key to position 0in the ignition
lock (Y page 159). 320
Engine compartmentMaintenance and care
Page 324 of 401
X
Slowly turn cap :half a turn anti-clock-
wise to allow excess pressure to escape.
X Turn cap :further anti-clockwise and
remove it.
If the coolant is at the level of marker bar =
in the filler neck when cold, there is enough
coolant in coolant expansion tank ;.
X If necessary, top up with coolant that has
been tested and approved by Mercedes-
Benz.
X Replace cap :and turn it clockwise as far
as it will go.
For further information on coolant, see
(Y page 390).
Topping up the windscreen washer sys-
tem/headlamp cleaning system G
WARNING
Certain components in the engine compart-
ment could be very hot, e.g. the engine, the
radiator and parts of the exhaust system.
There is a risk of injury when accessing the
engine compartment.
As far as possible, allow the engine to cool
down and only touch the following compo-
nents. G
WARNING
Windscreen washer concentrate is highly
flammable. If it comes into contact with hot
engine components or the exhaust system it
could ignite. There is a risk of fire and injury.
Make sure that no windscreen washer con-
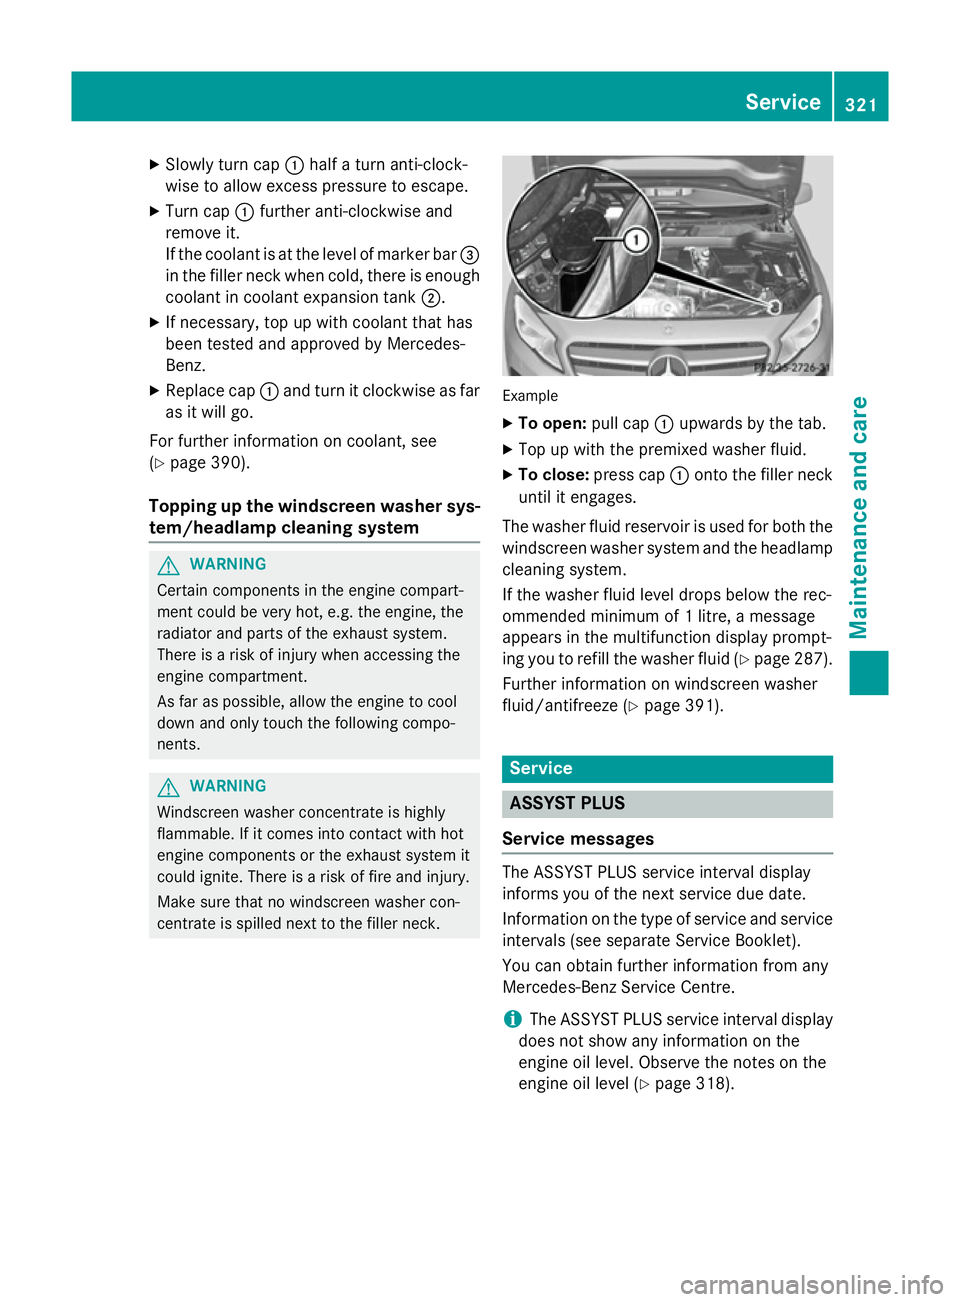
centrate is spilled next to the filler neck. Example
X To open: pull cap:upwards by the tab.
X Top up with the premixed washer fluid.
X To close: press cap :onto the filler neck
until it engages.
The washer fluid reservoir is used for both the
windscreen washer system and the headlamp cleaning system.
If the washer fluid level drops below the rec-
ommended minimum of 1 litre, a message
appears in the multifunction display prompt-
ing you to refill the washer fluid (Y page 287).
Further information on windscreen washer
fluid/antifreeze (Y page 391). Service
ASSYST PLUS
Service messages The ASSYST PLUS service interval display
informs you of the next service due date.
Information on the type of service and service
intervals (see separate Service Booklet).
You can obtain further information from any
Mercedes-Benz Service Centre.
i The ASSYST PLUS service interval display
does not show any information on the
engine oil level. Observe the notes on the
engine oil level (Y page 318). Service
321Maintenance and care Z