2013 MERCEDES-BENZ GL instrument cluster
[x] Cancel search: instrument clusterPage 332 of 454
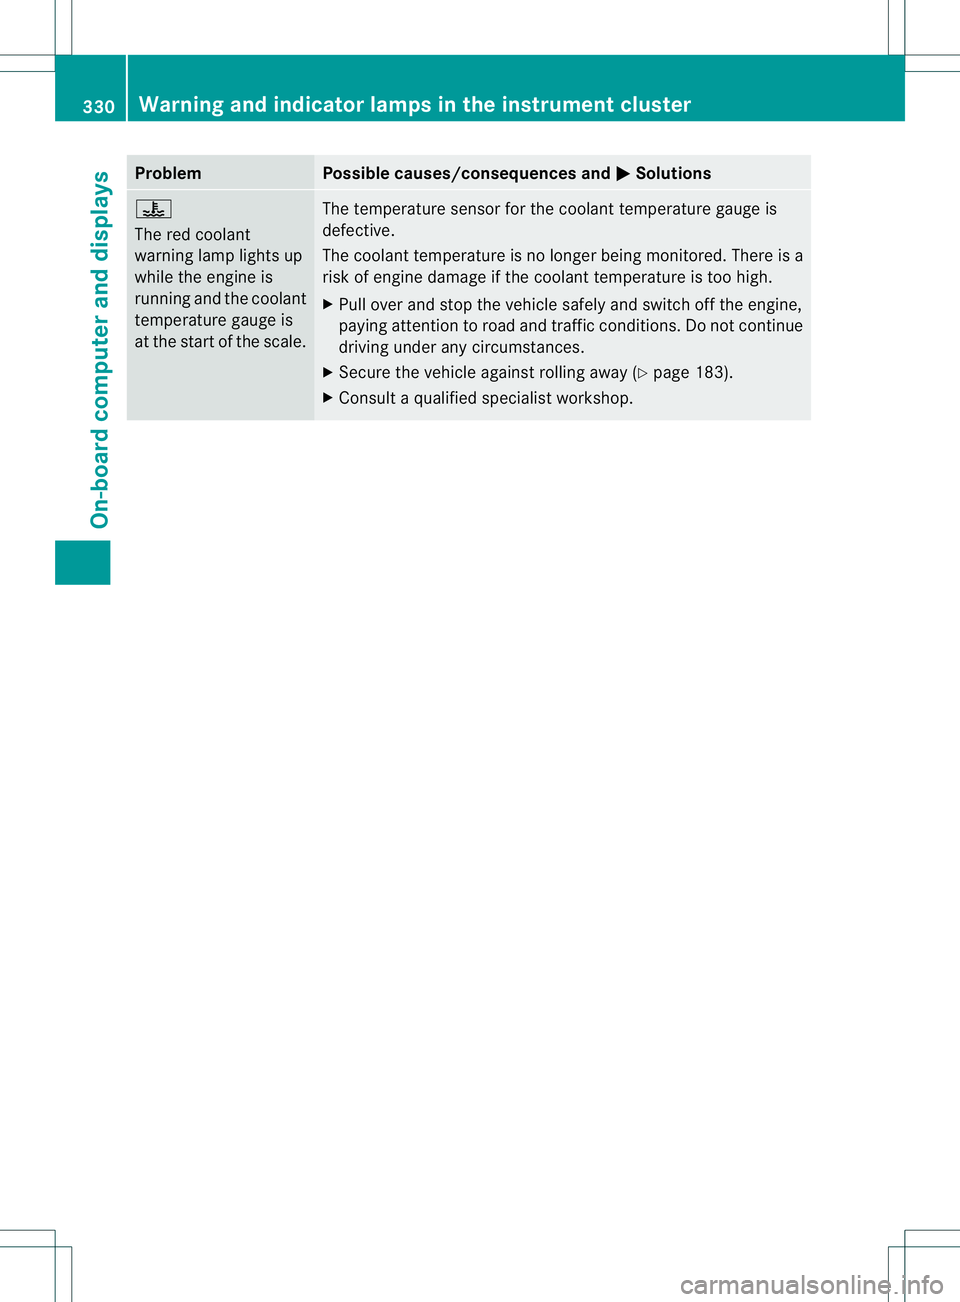
Problem Possible causes/consequences and
0001 Solutions
000E
The red coolant
warning lamp lights up
while the engine is
running and the coolant
temperature gauge is
at the start of the scale. The temperature sensor for the coolant temperature gauge is
defective.
The coolant temperature is no longer being monitored. There is a
risk of engine damage if the coolant temperature is too high.
X
Pull over and stop the vehicle safely and switch off the engine,
paying attention to road and traffic conditions. Do not continue
driving under any circumstances.
X Secure the vehicle against rolling away (Y page 183).
X Consult a qualified specialist workshop. 330
Warning and indicator lamps in the instrument clusterOn-board computer and displays
Page 333 of 454
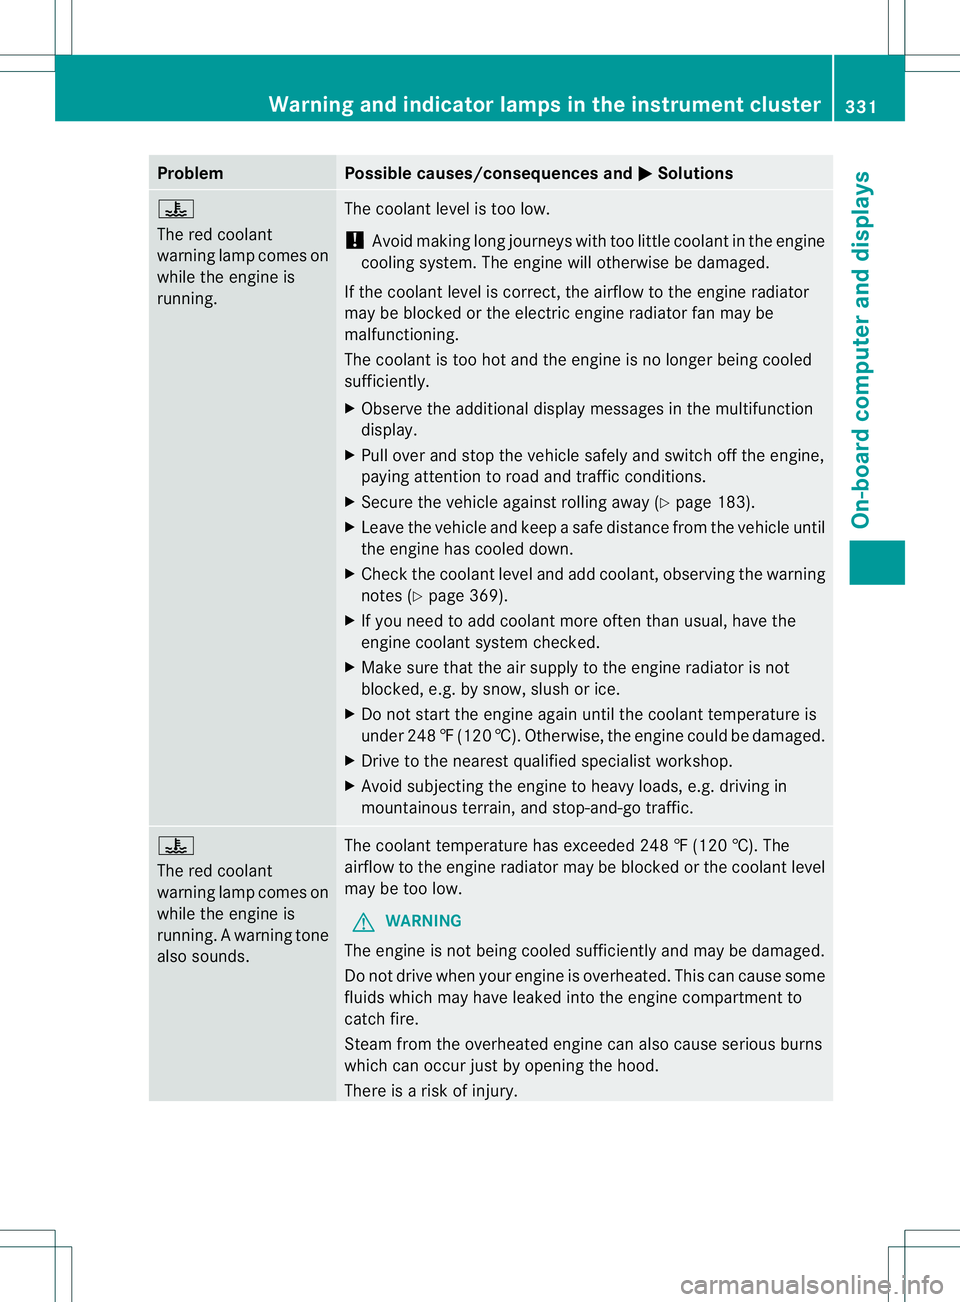
Problem Possible causes/consequences and
0001 Solutions
000E
The red coolant
warning lamp comes on
while the engine is
running. The coolant level is too low.
!
Avoid making long journeys with too little coolant in the engine
cooling system. The engine will otherwise be damaged.
If the coolant level is correct, the airflow to the engine radiator
may be blocked or the electric engine radiator fan may be
malfunctioning.
The coolant is too hot and the engine is no longer being cooled
sufficiently.
X Observe the additional display messages in the multifunction
display.
X Pull over and stop the vehicle safely and switch off the engine,
paying attention to road and traffic conditions.
X Secure the vehicle against rolling away (Y page 183).
X Leave the vehicle and keep a safe distance from the vehicle until
the engine has cooled down.
X Check the coolant level and add coolant, observing the warning
notes (Y page 369).
X If you need to add coolant more often than usual, have the
engine coolant system checked.
X Make sure that the air supply to the engine radiator is not
blocked, e.g. by snow, slush or ice.
X Do not start the engine again until the coolant temperature is
under 248 ‡(120 †). Otherwise, the engine could be damaged.
X Drive to the nearest qualified specialist workshop.
X Avoid subjecting the engine to heavy loads, e.g. driving in
mountainous terrain, and stop-and-go traffic. 000E
The red coolant
warning lamp comes on
while the engine is
running. A warning tone
also sounds.
The coolant temperature has exceeded 248 ‡ (120 †). The
airflow to the engine radiator may be blocked or the coolant level
may be too low.
G WARNING
The engine is not being cooled sufficiently and may be damaged.
Do not drive whe nyour engine is overheated. This can cause some
fluids which may have leaked into the engine compartment to
catch fire.
Steam from the overheated engine can also cause serious burns
which can occur just by opening the hood.
There is a risk of injury. Warning and indicator lamps in the instrument cluster
331On-board computer and displays Z
Page 334 of 454
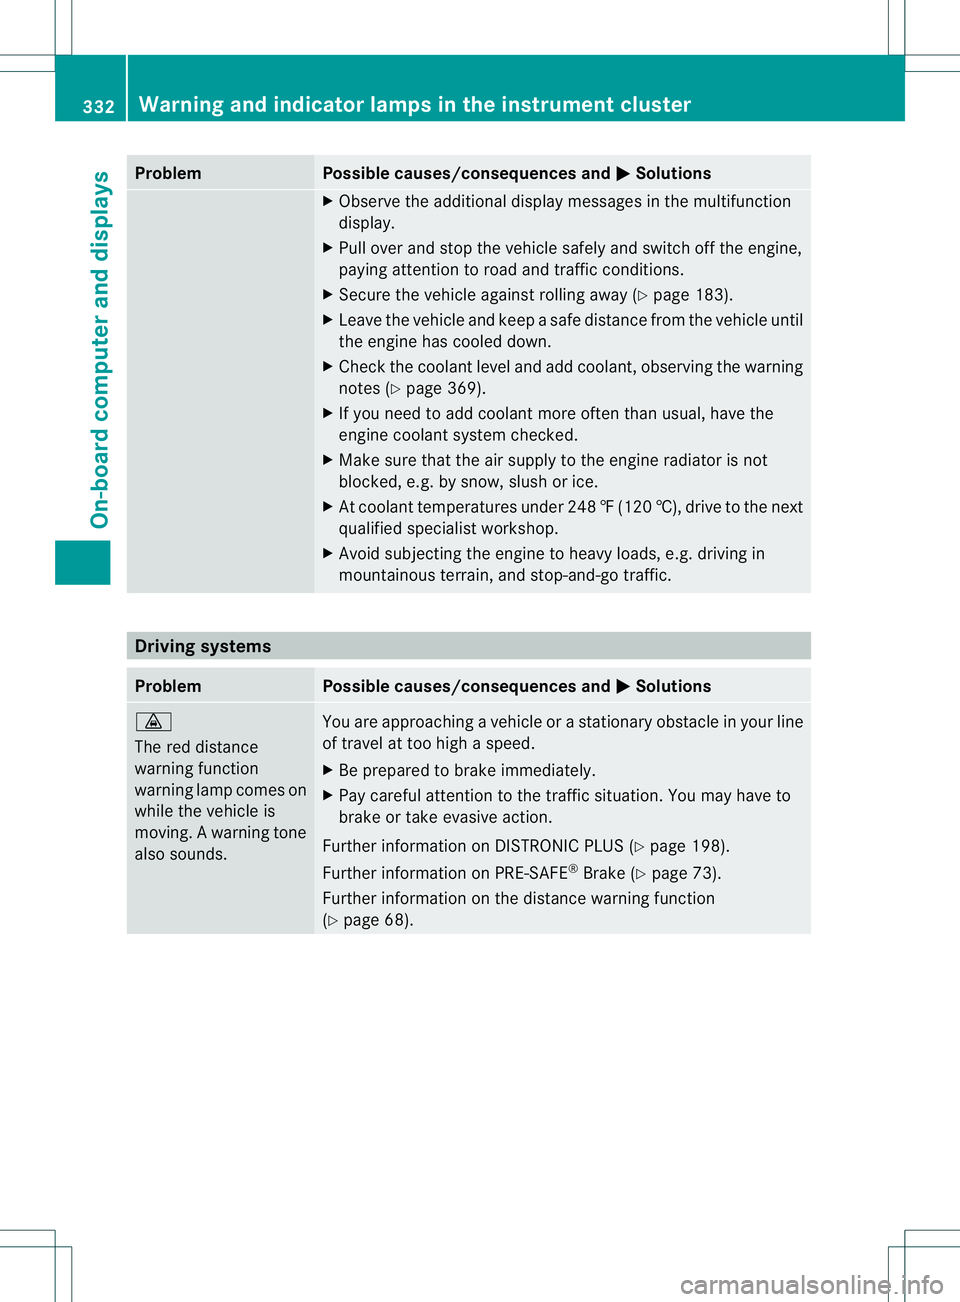
Problem Possible causes/consequences and
0001 Solutions
X
Observe the additional display messages in the multifunction
display.
X Pull over and stop the vehicle safely and switch off the engine,
paying attention to road and traffic conditions.
X Secure the vehicle against rolling away (Y page 183).
X Leave the vehicle and keep a safe distance from the vehicle until
the engine has cooled down.
X Check the coolant level and add coolant, observing the warning
notes (Y page 369).
X If you need to add coolant more often than usual, have the
engine coolant system checked.
X Make sure that the air supply to the engine radiator is not
blocked, e.g. by snow, slush or ice.
X At coolant temperatures under 248 ‡(120 †), drive to the next
qualified specialist workshop.
X Avoid subjecting the engine to heavy loads, e.g. driving in
mountainous terrain, and stop-and-go traffic. Driving systems
Problem Possible causes/consequences and
0001 Solutions
000F
The red distance
warning function
warning lamp comes on
while the vehicle is
moving. A warning tone
also sounds.
You are approaching a vehicle or a stationary obstacle in you
rline
of travel at too high a speed.
X Be prepared to brake immediately.
X Pay careful attention to the traffic situation. You may have to
brake or take evasive action.
Further information on DISTRONIC PLUS (Y page 198).
Further information on PRE-SAFE ®
Brake (Y page 73).
Further information on the distance warning function
(Y page 68). 332
Warning and indicator lamps in the instrument clusterOn-board computer and displays
Page 335 of 454
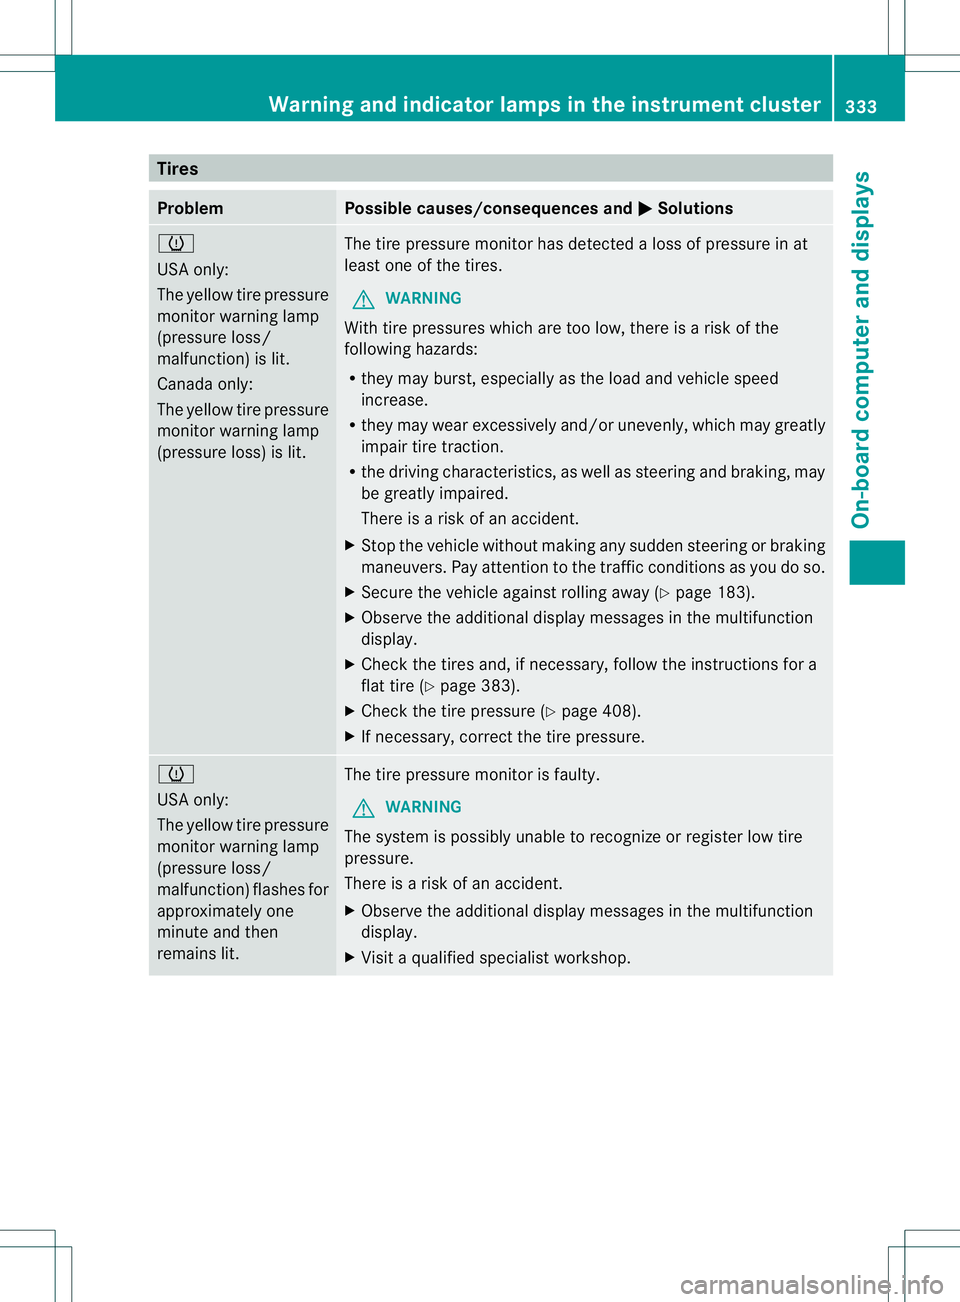
Tires
Problem Possible causes/consequences and
0001 Solutions
0013
USA only:
The yellow tire pressure
monitor warning lamp
(pressure loss/
malfunction) is lit.
Canada only:
The yellow tire pressure
monitor warning lamp
(pressure loss) is lit.
The tire pressure monitor has detected a loss of pressure in at
leas
tone of the tires.
G WARNING
With tire pressures which ar etoo low, there is a risk of the
following hazards:
R they may burst, especially as the load and vehicle speed
increase.
R they may wear excessively and/or unevenly, which may greatly
impair tire traction.
R the driving characteristics, as well as steering and braking, may
be greatly impaired.
There is a risk of an accident.
X Stop the vehicle without making any sudden steering or braking
maneuvers. Pay attention to the traffic conditions as you do so.
X Secure the vehicle against rolling away (Y page 183).
X Observe the additional display messages in the multifunction
display.
X Check the tires and, if necessary, follow the instructions for a
flat tire (Y page 383).
X Check the tire pressure (Y page 408).
X If necessary, correct the tire pressure. 0013
USA only:
The yellow tire pressure
monitor warning lamp
(pressure loss/
malfunction) flashes for
approximately one
minute and then
remains lit.
The tire pressure monitor is faulty.
G WARNING
The system is possibly unable to recognize or register low tire
pressure.
There is a risk of an accident.
X Observe the additional display messages in the multifunction
display.
X Visit a qualified specialist workshop. Warning and indicator lamps in the instrument cluster
333On-board computer and displays Z
Page 389 of 454
!
Residue from the tire sealant may come
out of the filler hose after use. This could
cause stains.
Therefore, place the filler hose in the plastic
bag which contained the TIREFIT kit. H
Environmental note
Have the used tire sealant bottle disposed of
professionally, e.g. at aqualified specialist
workshop.
If a tire pressure of 18 0kPa (1.8 bar/26 psi)
has been attained after five minutes:
X Switch off the tire inflation compressor.
X Unscrew the filler hose from the valve of
the faulty tire.
X Stow the tire sealant bottle and the tire
inflation compressor.
X Pull away immediately.
The maximum speed for a tire sealed with
tire sealant is 50 mph (80 km/h). The upper
part of the TIREFIT sticker must be affixed
to the instrument cluster in the driver's
field of vision.
X Stop after driving for approximately ten
minutes and check the tire pressure with
the tire inflation compressor.
The tire pressure must now be at least
130 kPa (1.3 bar/19 psi). G
WARNING
If the required tire pressure is not reached
after driving for a short period, the tire is too
badly damaged. The tire sealant cannot repair
the tire in this instance. Damaged tires and a
tire pressure that is too low can significantly
impair the vehicle's braking and driving
characteristics. There is a risk of accident.
Do not continue driving. Contact a qualified
specialist workshop.
X Correct the tire pressure if it is still at least
130 kPa (1.3 bar/19 psi) (for the values,
see the Tire and Loading Information placard on the B-pillar on the driver's side
or tire pressure table on the fuel filler flap).
X To increase the tire pressure: switch on
the tire inflation compressor. 0015
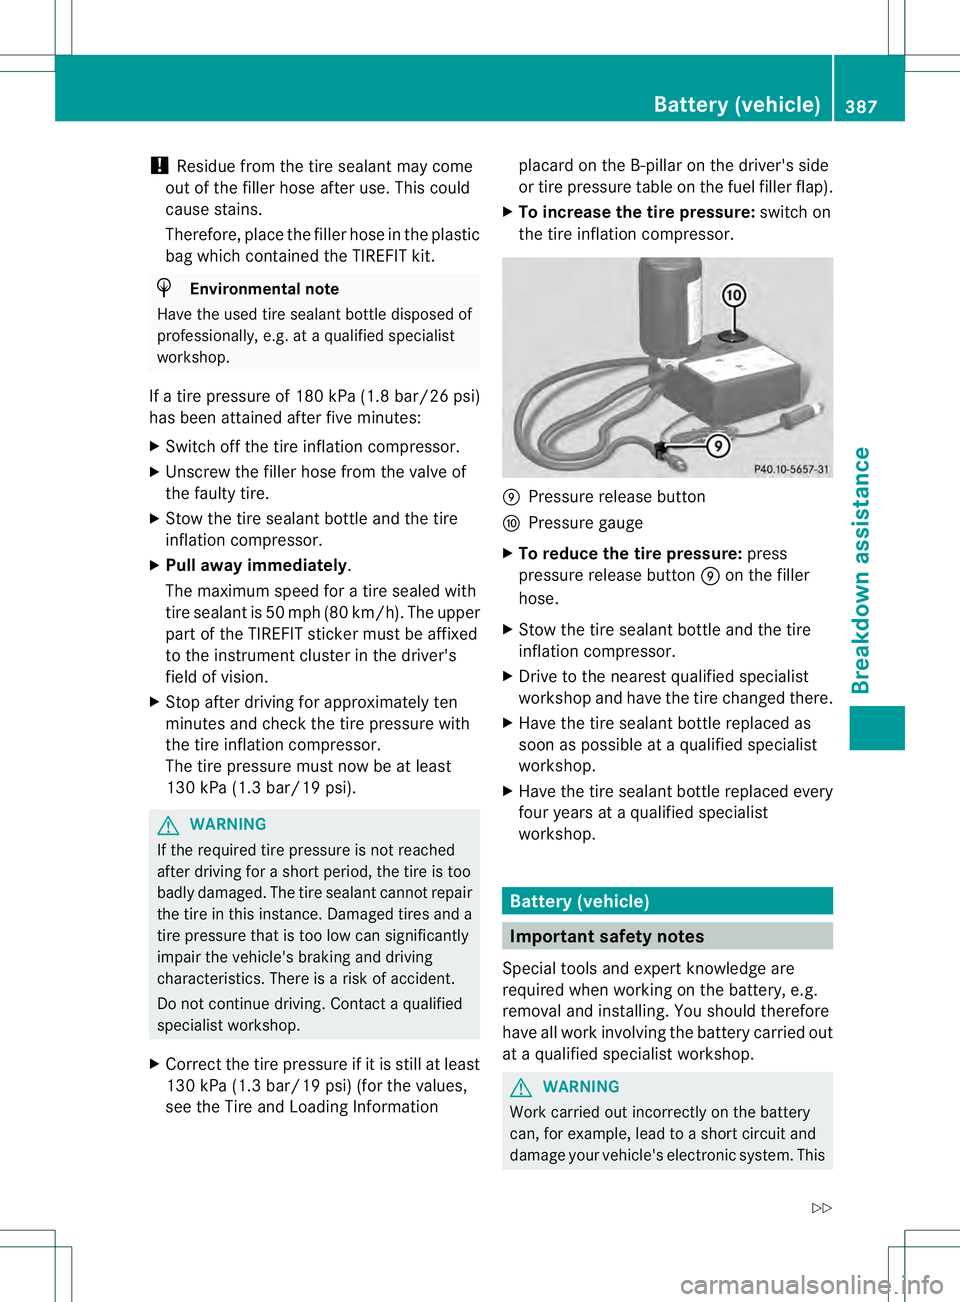
Pressure release button
0016 Pressure gauge
X To reduce the tire pressure: press
pressure release button 0015on the filler
hose.
X Stow the tire sealant bottle and the tire
inflation compressor.
X Drive to the nearest qualified specialist
workshop and have the tire changed there.
X Have the tire sealant bottle replaced as
soon as possible at a qualified specialist
workshop.
X Have the tire sealant bottle replaced every
four years at a qualified specialist
workshop. Battery (vehicle)
Important safety notes
Special tools and expert knowledge are
required when working on the battery, e.g.
removal and installing. You should therefore
have all work involving the battery carried out
at a qualified specialist workshop. G
WARNING
Work carried out incorrectly on the battery
can, for example, lead to a short circuit and
damage your vehicle's electronic system. This Battery (vehicle)
387Breakdown assistance
Z
Page 394 of 454
Do not start the vehicl
eusing a rapid charging device. If your vehicle's battery is discharged,
the engine can be jump-started from another vehicle or from a second battery using jumper
cables. Observe the following points:
R The battery is not accessible in all vehicles. If the other vehicle's battery is not accessible,
jump-start the vehicle using a second battery or ajump-starting device.
R You may only jump-start the vehicle when the engine and exhaust system are cold.
R Do not start the engine if the battery is frozen. Let the battery thaw first.
R Only jump-start from batteries with a 12 V voltage rating.
R Only use jumper cables which have a sufficien tcross-section and insulated terminal clamps.
R If the battery is fully discharged, leave the battery that is being used to jump-start connected
for a few minutes before attempting to start. This charges the battery slightly.
R Make sure that the two vehicles do not touch.
Make sure that:
R the jumper cables are not damaged.
R when the jumper cables are connected to the battery, uninsulated sections of the terminal
clamp do not come into contact with other metal sections.
R the jumper cables cannot come into contact with parts such as the V-belt pulley or the fan.
These parts move when the engine is started and while it is running.
X Secure the vehicle by applying the electric parking brake.
X Shift the transmission to position P.
X Turn the SmartKey to position 0in the ignitio nlock and remove it (Y page 163). On vehicles
with KEYLESS-GO, make sure the ignition is switched off (Y page 163). All indicator lamps
in the instrument cluster must be off.
X Switch off all electrical consumers (e.g. radio, blower, etc.).
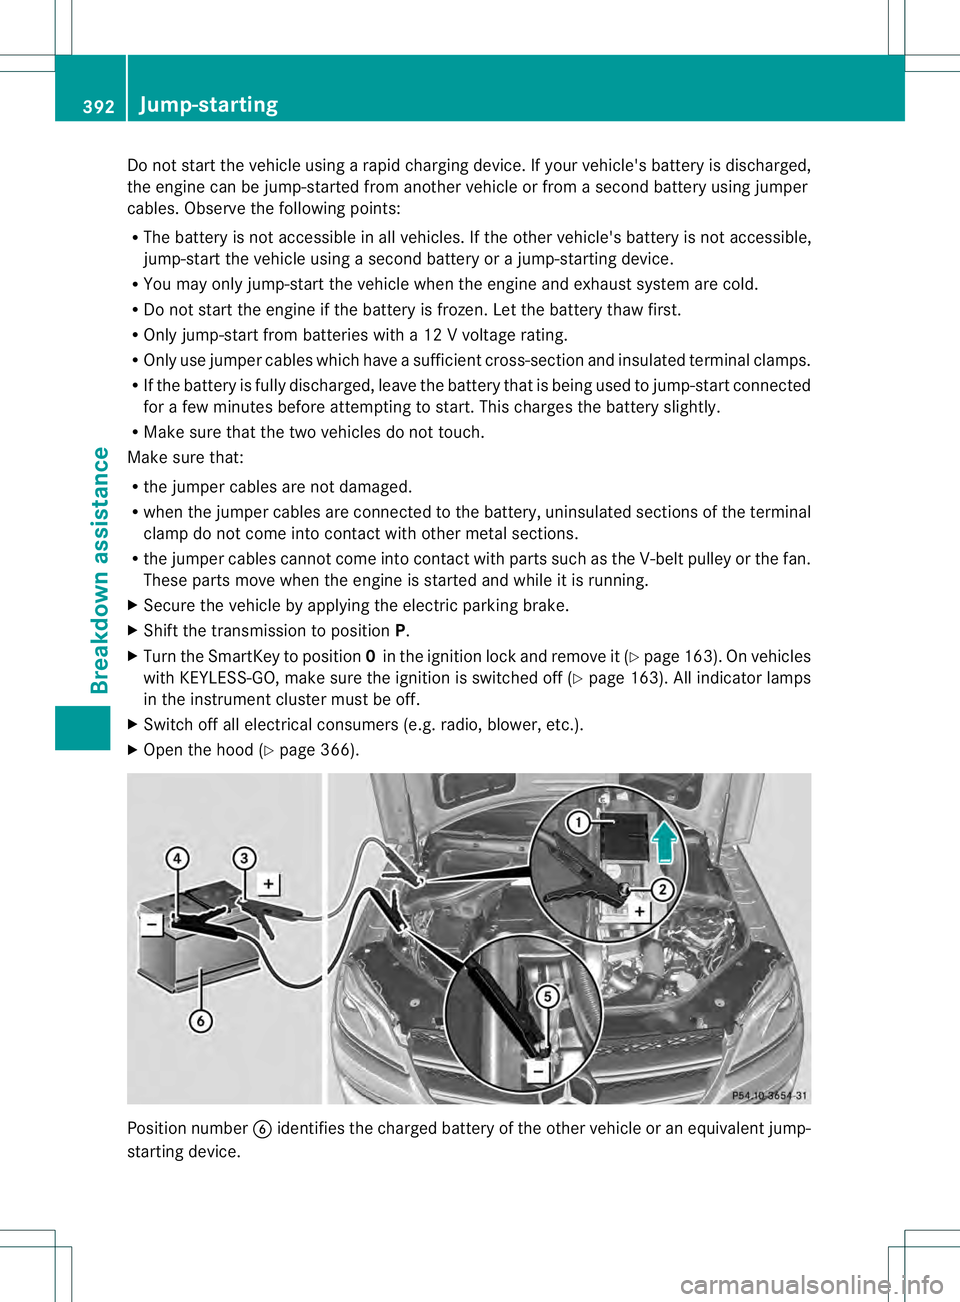
X Open the hood (Y page 366).Position number
001Fidentifies the charged battery of the other vehicle or an equivalent jump-
starting device. 392
Jump-startingBreakdown assistance
Page 398 of 454
Recovering
avehicle that has become
stuck
! Pull away smoothly, slowly, and in a
straigh tline when pulling out a vehicle that
has become stuck. Excessive tractive
power could damage the vehicles.
If the drive wheels get trapped on loose or
muddy ground, recover the vehicle with the
utmost care, especially so if the vehicle is
laden.
Never attempt to recover a vehicle with a
trailer attached.
Pull out the vehicle backwards, if possible,
using the tracks it made when it became
stuck. Tow-starting (emergency engine
starting)
! Vehicles with an automatic transmission
must not be tow-started. You could
otherwise damage the automatic
transmission.
You can find information on "Jump-starting"
at (Y page 391). Fuses
Important safety notes
G
WARNING
Only use fuses that have been approved for
Mercedes-Ben zvehicles and that have the
correct fuse rating for the systems
concerned. Do not attempt to repair or bridge
faulty fuses. Using fuses that have not been
approved or attempting to repair or bridge
faulty fuses could cause the fuse to be
overloaded and result in afire. Have the cause
traced and rectified at a qualified specialist
workshop.
! For the fuse boxes in the engine
compartment and under the rear bench
seat, only use fuses with the suffix "S". Otherwise, components or systems could
be damaged.
The fuses in your vehicle serve to close down
faulty circuits. If afuse blows, all the
components on the circuit and their functions
stop operating.
Blown fuses must be replace dwith fuses of
the same rating, which you can recognize by
the color and value. The fuse ratings are listed
in the fuse allocation chart.
If a newly inserted fuse also blows, have the
cause traced and rectified at a qualified
specialist workshop, e.g. an authorized
Mercedes-Ben zCenter. Before changing a fuse
X Secure the vehicle against rolling away
(Y page 183).
X Switch off all electrical consumers.
X Turn the SmartKey to position 0in the
ignition lock and remove it (Y page 163).
On vehicles with KEYLESS-GO, make sure
the ignition is switched off (Y page 163).
All indicator lamps in the instrument cluster
must be off.
The fuses are located in various fuse boxes:
R fuse box on the front-passenger side of the
dashboard
R fuse box in the engine compartment on the
right-hand side of the vehicle, when viewed
in the direction of travel
R Fuse box under the rear bench seat
The fuse allocation chart is located in the fuse
box under the rear bench seat (Y page 397). Dashboard fuse box
! Do not use a pointed objec tsuch as a
screwdriver to open the cover in the
dashboard. You could damage the
dashboard or the cover.
! Make sure that no moisture can ente rthe
fuse box when the cover is open. 396
FusesBreakdown assistance
Page 412 of 454
vehicle to a haltb
y braking carefully. Avoid
abrupt steering maneuvers.
The tire pressure monitor has a yellow
warning lamp in the instrument cluster for
indicating pressure loss/malfunctions (USA)
or pressure loss (Canada). Whether the
warning lamp flashes or lights up indicates
whether a tire pressure is too low or the tire
pressure monitor is malfunctioning:
R if the warning lamp is lit continuously, the
tire pressure on one or more tires is
significantly too low. The tire pressure
monitor is not malfunctioning.
R US Ao nly:ift he warning lamp flashes for
around a minute and then remains lit
constantly, the tire pressure monitor is
malfunctioning.
USA only: if there is a malfunction with the
tire pressure monitor it can take more than
ten minutes until the malfunction is shown by
the tire pressure warning lamp flashing for
approximately one minute and then lighting
up continuously.W hen the malfunction has
been rectified, the tire pressure warning lamp
goes out after a few minutes of driving.
The tire pressure values indicated by the on-
board computer may differ from those
measured at a gas station with a pressure
gauge. The tire pressures shown by the on-
board computer refer to those measured at
sea level. At high altitudes, the tire pressure
values indicated by a pressure gauge are
higher than those shown by the on-board
computer. In this case, do not reduce the tire
pressures.
The operation of the tire pressure monitor can
be affected by interference from radio
transmitting equipment (e.g. radio
headphones, two-way radios) that may be
being operated in or near the vehicle. Checking the tire pressure
electronically X
Make sure that the SmartKey is in position
2 in the ignition lock (Y page 163).
X Press the 0002or0005 button on the
steering wheel to select the Service menu.
X Press the 0003or0004 button to select
Tire Pressure .
X Press the 000Bbutton.
The current tire pressure of each tire is
shown in the multifunction display.
If the vehicle has been parked for longer than
20 minutes, the Tire pressure will be displayed after driving a few
minutes message appears.
After a teach-in process, the tire pressure
monitor automatically detects new wheels or
new sensors. As long as a clear allocation of
the tire pressure value to the individual
wheels is not possible, the Tire Pressure Monitor Active display message is shown
instead of the tire pressure display. The tire
pressures are already being monitored.
i If an emergency spare wheel is mounted,
the system may continue to show the tire
pressure of the wheel that has been
removed for a few minutes. If this occurs,
note that the value displayed for the
position where the spare wheel is mounted
is not the same as the current tire pressure
of the emergency spare wheel. 410
CheckWheels and tires