2013 MERCEDES-BENZ GL brake light
[x] Cancel search: brake lightPage 166 of 454
The Start/Stop button must be inserted in the
ignition lock and the SmartKey with the
integrated KEYLESS-GO function must be in
the vehicle.
Pressing the Start/Stop button several times
in succession corresponds to the different
key positions in the ignition lock. This is only
the case if you are not depressing the brake
pedal.
If you depress the brake pedal and press the
Start/Stop button, the engine starts
immediately.
The Start/Stop button can be removed from
the ignition lock. Then, you can insert the
SmartKey into the ignition lock.
i
You do not have to remove the Start/Stop
button from the ignition lock when you
leave the vehicle. You should, however,
always take the SmartKey with you when
leaving the vehicle. As long as the
SmartKey is in the vehicle:
R the vehicle can be started using the
Start/Stop button and
R electrically powered equipment can be
operated.
i The engine can be turned off while the
vehicle is in motion by pressing and holding
the Start/Stop button for approximately
three seconds.
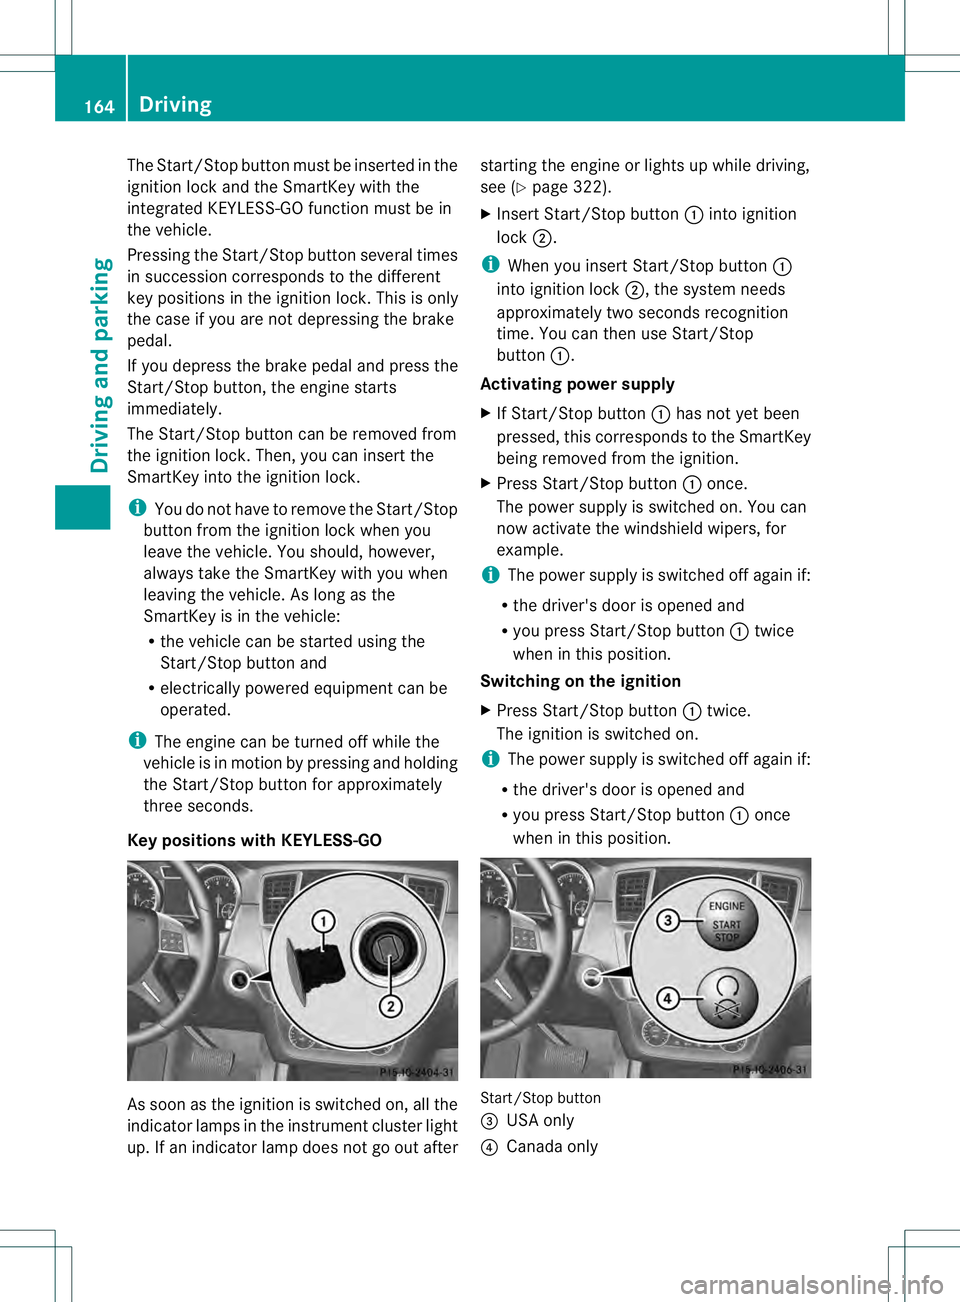
Key positions with KEYLESS-GO As soon as the ignition is switched on, all the
indicator lamps in the instrument cluster light
up. If an indicator lamp does not go out after starting the engine or lights up while driving,
see (Y
page 322).
X Insert Start/Stop button 0002into ignition
lock 0003.
i When you insert Start/Stop button 0002
into ignition lock 0003, the system needs
approximately two seconds recognition
time. You can then use Start/Stop
button 0002.
Activating power supply
X If Start/Stop button 0002has not yet been
pressed, this corresponds to the SmartKey
being removed from the ignition.
X Press Start/Stop button 0002once.
The power supply is switched on. You can
now activate the windshield wipers, for
example.
i The power supply is switched off again if:
R the driver's door is opened and
R you press Start/Stop button 0002twice
when in this position.
Switching on the ignition
X Press Start/Stop button 0002twice.
The ignition is switched on.
i The power supply is switched off again if:
R the driver's door is opened and
R you press Start/Stop button 0002once
when in this position. Start/Stop button
0021
USA only
0020 Canada only 164
DrivingDriving and parking
Page 167 of 454
Starting the engine
Important safety notes G
WARNING
If children are left unsupervised in the vehicle,
they could:
R open the doors, thus endangering other
people or road users.
R get out and disrupt traffic.
R operate the vehicle's equipment.
Additionally, children could set the vehicle in
motion if, for example, they:
R release the parking brake.
R shift the automatic transmission out of
parking position P.
R starting the engine.
There is a risk of an accident and injury.
When leaving the vehicle, always take the
SmartKey with you and lock the vehicle. Never
leave children or animals unattended in the
vehicle. Always keep the SmartKey out of
reach of children. G
WARNING
Combustion engines emit poisonous exhaust
gases such as carbon monoxide. Inhaling
these exhaust gases leads to poisoning. There
is a risk of fatal injury. Therefore never leave
the engine running in enclosed spaces
without sufficient ventilation.
i Vehicles with agasoline engine: the
catalytic converter is preheated for up to
30 seconds after a cold start. The sound of
the engine may change during this time.
Automatic transmission X
Shift the transmission to position
P(Y page 169).
The transmission position displa yinthe
multifunction display shows
P(Y page 169).
i You can also start the engine when the
transmission is in position N.Starting procedure with the SmartKey X
To startag asoline engine: turn the
SmartKey to position 3in the ignition lock
(Y page 163) and release it as soon as the
engine is running.
X To start adiesel engine: turn the
SmartKey to position 2in the ignition lock
(Y page 163).
The 0010 preglow indicator lamp in the
instrumen tcluster lights up.
X When the 0010preglow indicator lamp
goes out, tur nthe SmartKey to position
3(Y page 163) and release it as soon as the
engine is running.
i You can start the engine without preglow
if the engine is warm.
Using KEYLESS-GO to startt he engine X
Depress the brake pedal and keep it
depressed.
X To start agasoline engine: press the
Start/Stop button (Y page 163) once.
The engine starts.
X To start adiesel engine: press the Start/
Stop button (Y page 163) once.
Preglow is activated and the engine starts.
i The Start/Stop button can be used to
star tthe vehicle without inserting the
SmartKey into the ignition lock. The Start/
Stop button must be inserted in the ignition
lock and the SmartKey must be in the
vehicle. Pulling away
Automatic transmission G
WARNING
If the engine speed is above the idling speed
and you engage transmission position Dor
R, the vehicle could pull away suddenly. There
is a risk of an accident. Driving
165Driving and parking
Z
Page 187 of 454
(Canada only) red indicator lamp lights up
in the instrument cluster.
i The electric parking brake can also be
applied when the SmartKey is removed.
X To release: pull handle0002.
The red 0008(USA only) or 000D(Canada
only) indicator lamp in the instrument
cluster goes out.
i The electric parking brake can only be
released:
R if the SmartKey is in position 1in the
ignition lock or
R if the ignition was switched on using the
Start/Stop button.
To ensure that you do not roll backwards
when pulling away on an uphill slope, engage
the electric parking brake (Y page 166).
Applying automatically The electric parking brake is applied
automatically:
R
if DISTRONIC PLUS brings the vehicle to a
standstill or
R if the HOL Dfunction is keeping the vehicle
stationary
In addition, at least on eofthe following
conditions must be fulfilled:
R the engine is switched off.
R the driver's door is open and the seat belt
is not fastened.
R the vehicle is stationary for a lengthy
period.
The red 0008(USA only) or 000D(Canada
only) indicator lamp in the instrumentc luster
lights up.
Releasing automatically The electric parking brake is released
automatically when all of the following
conditions are fulfilled:
R the engine is running.
R the transmission is in position Dor R. R
the seat belt has been fastened.
R you depress the accelerator pedal.
If the transmission is in position R, the trunk
lid must be closed.
If your seat belt is not fastened, the following
conditions must be fulfilled to automatically
release the electric parking brake:
R the driver's door is closed.
R you have shifted out of transmission
position Por you have previously driven
faster than 2 mph (3 km/h)
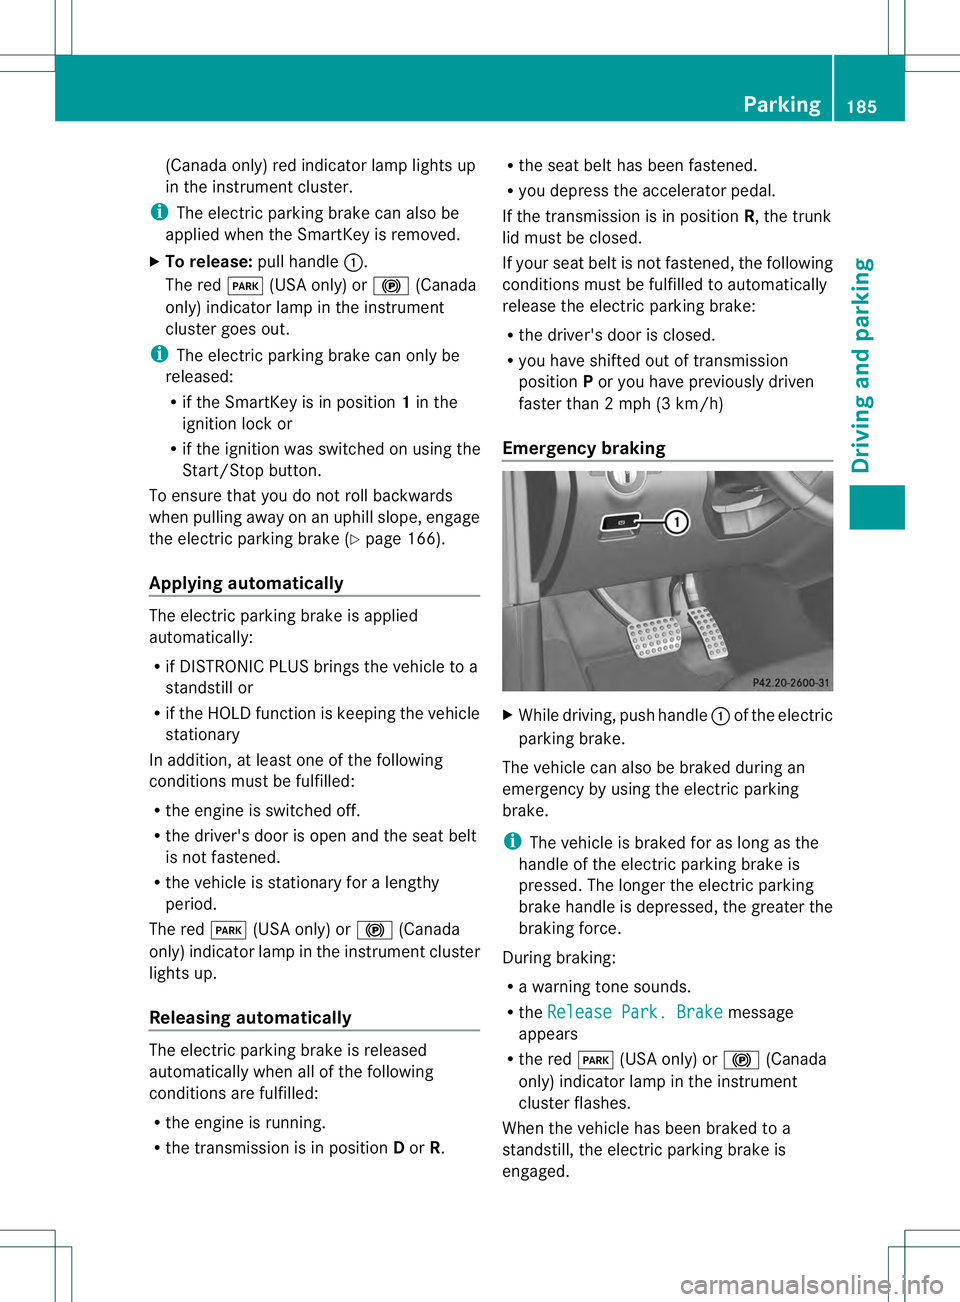
Emergency braking X
While driving, push handle 0002of the electric
parking brake.
The vehicle can also be braked during an
emergency by using the electric parking
brake.
i The vehicle is braked for as long as the
handle of the electric parking brake is
pressed. The longer the electric parking
brake handle is depressed, the greater the
braking force.
During braking:
R a warning tone sounds.
R the Release Park. Brake message
appears
R the red 0008(USA only) or 000D(Canada
only) indicator lamp in the instrument
cluster flashes.
When the vehicle has been braked to a
standstill, the electric parking brake is
engaged. Parking
185Driving and parking Z
Page 189 of 454
these exhaust gases leads to poisoning. There
is a risk of fatal injury. Therefore never leave
the engine running in enclosed spaces
withou tsufficient ventilation.
Certain engine systems are designed to keep
the level of poisonous components in exhaust
fumes within legal limits.
These systems only work at peak efficiency if
they are serviced exactly in accordance with
the manufacturer's specifications. For this
reason, all work on th eengine must be carried
ou tb y qualified and authorized Mercedes-
Benz technicians.
The engine settings mus tnot be changed
under any circumstances. Furthermore, all
specific service work must be carried out at
regular intervals and in accordance with the
Mercedes-Benz service requirements. Details
can be found in the Maintenance Booklet. Braking
Important safety notes G
WARNING
If you shift down on a slippery road surface in
an attempt to increase the engine's braking
effect, the drive wheels could lose their grip.
There is an increased danger of skidding and
accidents.
Do not shift down for additional engine
braking on a slippery road surface.
Downhill gradients !
On long and steep gradients, you must
reduce the load on the brakes by shifting
early to a lower gear. This allows you to take
advantage of the engine braking effect and
helps avoid overheating and excessive
wear of the brakes.
When you take advantage of the engine
braking effect, a drive wheel may not turn
for some time, e.g. on a slippery road
surface. This could cause damage to the drive train. This type of damage is not
covered by the Mercedes-Benz warranty.
Do not depress the brake pedal continuously
while the vehicle is in motion, e.g. causing the
brakes to rub by constantly applying light
pressure to the pedal. This results in
excessive and premature wear to the brake
pads.
Heavy and light loads G
WARNING
If you rest your foot on the brake pedal while
driving, the braking system can overheat. This
increases the stopping distance and can even
cause the braking system to fail. There is a
risk of an accident.
Never use the brake pedal as a footrest. Never
depress the brake pedal and the accelerator
pedal at the same time.
! Depressing the brake pedal constantly
results in excessive and premature wear to
the brake pads.
If the brakes have been subjected to a heavy
load, do not stop the vehicle immediately.
Drive on for a short while. This allows the
airflow to cool the brakes more quickly.
Wet roads If you have driven for a long time in heavy rain
without braking, there may be a delayed
reaction from the brakes when braking for the
first time. This may also occur after the
vehicle has been washed or driven through
deep water.
You then have to depress the brake pedal
more firmly. Maintain a greater distance from
the vehicle in front.
After driving on a wet road or having the
vehicle washed, brake firmly while paying
attention to the traffic conditions. This will
warm up the brake discs, thereby drying them
more quickly and protecting them against
corrosion. Driving tips
187Driving and parking Z
Page 190 of 454
Limited braking performance on salt-
treated roads
If you drive on salted roads, a layer of salt
residue may for
monthe brake discs and
brake pads. This can result in a significantly
longer braking distance.
R Brake occasionally to remove any possible
salt residue. Make sure that you do not
endanger other road users when doing so.
R Carefully depress the brake pedal and the
beginning and end of a journey.
R Maintain a greater distance to the vehicle
ahead.
Servicing the brakes !
If the red brake warning lamp lights up in
the instrumentc luster and you hear a
warning tone while the engine is running,
the brake fluid level may be too low.
Observe additional warning messages in
the multifunction display.
The brake fluid level may be too low due to
brake pad wear or leaking brake lines.
Have the brake system checked
immediately. This work should be carried
out at a qualified specialist workshop.
! A function or performance test should
only be carried out on a2-axle
dynamometer. If you are planning to have
the vehicle tested on such a dynamometer,
contact an authorized Mercedes-Benz
Center to obtain further information first.
Otherwise, you could damage the drive
train or the brake system.
! Because ESP ®
is an automatic system,
the engine and ignition must be switched
off (SmartKey in position 0or 1or Start/
Stop button in position 0or 1) when the
electri cparking brake is being tested on a
brake dynamomete r(maximum
10 seconds).
Braking triggered automatically by ESP ®
may seriously damage the brake system. All checks and maintenance work on the
brake system must be carried out at a
qualified specialist workshop
.Consult a
qualified specialist workshop to arrange this.
Have brake pads installed and brake fluid
replaced at a qualified specialist workshop.
If the brake system has only been subject to
moderate loads, you should test the
functionality of your brakes at regular
intervals. To do so, press firmly on the brake
pedal when driving at a high speed. This
improves the grip of the brake pads.
You can find a description of Brake Assist
(BAS) on (Y page 67) or of BAS PLUS on
(Y page 67).
Mercedes-Benz recommends that you only
have brake pads/linings installed on your
vehicle which have been approved for
Mercedes-Benz vehicles or which correspond
to an equivalent quality standard. Brake
pads/linings which have not been approved
for Mercedes-Benz vehicles or which are not
of an equivalent quality could affect your
vehicle's operating safety.
Mercedes-Benz recommends that you only
use brake fluid that has been specially
approved for your vehicle by Mercedes-Benz,
or which corresponds to an equivalent quality
standard. Brake fluid which has not been
approved for Mercedes-Benz vehicles or
which is not of an equivalent quality could
affect your vehicle's operating safety.
High-performance brake system for
AMG vehicles The high-performance brake system is
designed for heavy loads. This may lead to
noise when braking. This will depend on:
R
Speed
R Braking force
R Environmental conditions, such as
temperature and humidity
The wear of individual components of the
brake system, such as the brake pads/linings 188
Driving tipsDriving and parking
Page 197 of 454
R
When driving down an incline, make use of
the engine's braking effect. Observe the
engine speed; do not overrev the engine.
R Check the brakes after prolonged off-road
driving.
i Hill start assist will aid you when pulling
away on a hill.
For more information, see "Hill start assist"
(Y page 166).
Do not switch to transmission position N
when driving off-road. If you try to brake the
vehicle using the service brake, you could
lose control of the vehicle. If the gradient is
too steep for your vehicle, drive back down in
reverse gear.
Maximum gradient-climbing capability On good road surfaces the maximum
gradient-climbing capability of your vehicle is
100%, which corresponds to an approach/
departure angle of 45°. Note that the
vehicle's gradient-climbing capability
depends on the off-road conditions.
Accelerate carefully and make sure that the
wheels do not spin when driving on steep
terrain.
i If the load on the front axle is reduced
when pulling away on a steep uphill slope,
the fron twheels have a tendency to spin.
4ETS recognizes this and brakes the
wheels accordingly. The rear wheel torque
is increased, making it easier to drive off.
Hilltops When driving up an uphill gradient, slightly
reduce pressure on the accelerator
immediately before reaching the brow of the
hill. Use the vehicle's own impetus to drive
over the top of the hill.
This style of driving prevents:
R the vehicle from lifting off the ground on the
brow of a hill
R the vehicle from traveling too quickly down
the other side Driving downhill R
Drive slowly.
R Do not drive at an angle down steep
inclines. Steer into the line of fall and drive
with the front wheels aligned straight.
Otherwise, the vehicle could slip sideways,
tip and rollover.
R Before tackling steep downhill gradients,
select shift range 1.
R Activate DSR. If this is not sufficient, brake
gently. When doing so, make sure that the
vehicle is facing in the direction of the line
of fall.
R Check that the brakes are working normally
after a long downhill stretch.
i The special off-road ABS setting enables
a precise, brief and repeated locking of the
front wheels. This causes them to dig into
loose earth. Be aware that the front wheels
easily skid across the ground surface if
completely braked and therefore lose their
ability to steer. Driving systems
Cruise control
Important safety notes If you fail to adapt your driving style, cruise
control can neither reduce the risk of an
accident nor override the laws of physics.
Cruise control cannot take into account the
road, traffic and weather conditions. Cruise
control is only an aid. You are responsible for
the distance to the vehicle in front, for vehicle
speed, for braking in good time and for
staying in your lane.
Do not use cruise control:
R in road and traffic conditions which do not
allow you to maintain a constant speed e.g.
in heavy traffic or on winding roads
R on slippery road surfaces. Braking or
accelerating could cause the drive wheels Driving systems
195Driving and parking Z
Page 198 of 454
to lose tractio
nand the vehicle could then
skid
R when there is poor visibility, e.g .due to fog,
heavy rain or snow
If there is a change of drivers, advise the new
driver of the speed stored.
General notes Cruise control maintains a constant road
speed for you. It brakes automatically in order
to avoid exceeding the set speed. On long and
steep downhill gradients, especially if the
vehicle is laden or towing a trailer, you must
select shif trange 1,2or 3in good time. By
doing so, you will make use of the braking
effect of the engine, which relieves the load
on the brake system and prevents the brakes
from overheating and wearing too quickly.
Use cruise control only if road and traffic
conditions make it appropriate to maintain a
steady speed for a prolonged period. You can
store any road speed above 20 mph
(30 km/h).
i Cruise control should no tbeactivated
during off-road driving.
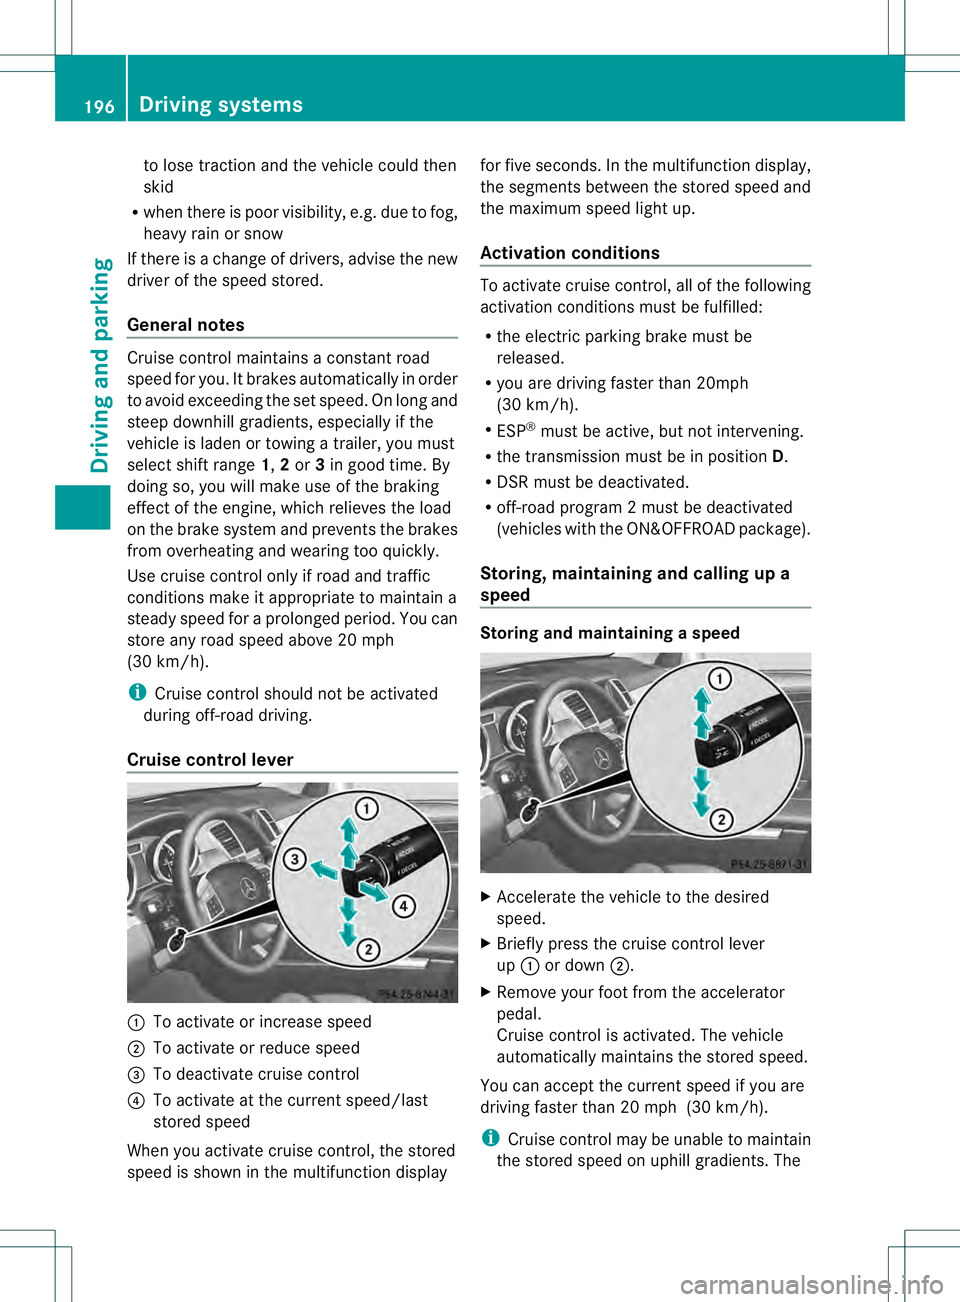
Cruise control lever 0002
To activate or increase speed
0003 To activate or reduce speed
0021 To deactivate cruise control
0020 To activate at the current speed/last
stored speed
Whe nyou activate cruise control, the stored
speed is shown in the multifunction display for five seconds. In the multifunction display,
the segments between the stored speed and
the maximum speed light up.
Activation conditions To activate cruise control, all of the following
activation conditions must be fulfilled:
R
the electric parking brake must be
released.
R you are driving faster than 20mph
(30 km/h).
R ESP ®
must be active, but not intervening.
R the transmission must be in position D.
R DSR must be deactivated.
R off-road program 2 must be deactivated
(vehicles with the ON&OFFROAD package).
Storing, maintaining and calling up a
speed Storing and maintaining
aspeed X
Accelerate the vehicle to the desired
speed.
X Briefly press the cruise control lever
up 0002 or down 0003.
X Remove your foot from the accelerator
pedal.
Cruise control is activated. The vehicle
automatically maintains the stored speed.
You can accept the current speed if you are
driving faster than 20 mph (30 km/h).
i Cruise control may be unable to maintain
the stored speed on uphill gradients. The 196
Driving systemsDriving and parking
Page 201 of 454
front, for vehicle speed, for braking in good
time and for staying in you
rlane.
Do not use DISTRONIC PLUS:
R in road and traffic conditions which do not
allow you to maintain a constan tspeed e.g.
in heavy traffic or on winding roads
R on slippery road surfaces .Braking or
accelerating could cause the drive wheels
to lose traction and the vehicle could then
skid
R when there is poor visibility, e.g. due to fog,
heavy rain or snow
DISTRONIC PLUS may not detect narrow
vehicles driving in front, e.g. motorcycles, or
vehicles driving on a different line.
In particular, the detection of obstacles can
be impaired if:
R dirt on the sensors or anything else
covering the sensors
R snow or heavy rain
R interference by other rada rsources
R strong radar reflections, for example, in
parking garages
If DISTRONIC PLUS no longer detects a
vehicle in front, DISTRONIC PLUS may
unexpectedly accelerate the vehicle to the
stored speed.
This speed may:
R be too high if you are driving in a filter lane
or an exit lane
R be so high when driving in the right-hand
lane that you overtake vehicles in the left-
hand lane
R be so high when driving in the left-hand lane
that you overtake vehicles in the right-hand
lane
If there is a change of drivers, advise the new
driver of the speed stored.
General notes DISTRONIC PLUS regulates the speed and
automatically helps you maintain the
distance to the vehicle detected in front. DISTRONIC PLUS brakes automatically so
that the set speed is not exceeded.
On long and steep downhill gradients,
especially if the vehicle is laden or towing a
trailer, you must select shift range
1,2or 3
in good time. By doing so, you will make use
of the braking effect of the engine, This
relieves the load on the brake system and
prevents the brakes from overheating and
wearing too quickly.
If DISTRONIC PLUS detects a slower-moving
vehicle in front, your vehicle is braked in order
to maintain the preset distance to the vehicle
in front.
If DISTRONIC PLUS detects that there is a risk
of a collision, you will be warned visually and
acoustically. DISTRONIC PLUS cannot
prevent a collision without your intervention.
An intermittent warning tone will then sound
and the distance warning lamp will light up in
the instrument cluster. Brake immediately in
order to increase the distance to the vehicle
in front or take evasive action provided it is
safe to do so.
For DISTRONIC PLUS to assist you when
driving, the radar sensor system must be:
R activated (Y page 281)
R operational
If there is no vehicle in front, DISTRONIC
PLUS operates in the same way as cruise
control in the speed range between 20 mph
(Canada: 30 km/h) and120 mph (Canada:
200 km/h). If a vehicle is driving in front of
you, it operates in the speed range between
0 mph (0 km/h) and 120 mph (Canada:
200 km/h).
Do not use DISTRONIC PLUS while driving on
roads with steep gradients.
As DISTRONIC PLUS transmits radar waves,
it can resemble the radar detectors of the
responsible authorities. You can refer to the
relevant chapter in the Operator's Manual if
questions are asked about this.
i USA only: Driving systems
199Driving and parking Z