2013 MERCEDES-BENZ GL air condition
[x] Cancel search: air conditionPage 195 of 454
X
Chec kwhether twigs or other parts of
plants have become trapped. These
increase the risk of fire and can damage
fuel pipes, brake hoses or the rubber
bellows of the axle joints and propeller
shafts.
X After the trip, examine without fail the
entire undercarriage, wheels, tires, brakes,
bodywork structure, steering, chassis and
exhaust system for damage.
X After driving for extended periods across
sand, mud, gravel, water or in similarly dirty
conditions, have the brake discs, wheels,
brake pads/linings and axle joints checked
and cleaned.
X If you detect strong vibrations after off-road
travel, check for foreign objects in the
wheels and drive train and remove them if
necessary. Foreign objects can disturb the
balance and cause vibrations.
Driving over rough terrain places greater
demands on your vehicle than driving on
normal roads. After driving off-road, check
the vehicle. This allows you to detect damage
promptly and reduce the risk of an accident
to yourself and other road users.
Driving on sand Observe the following rules when driving on
sand:
R vehicles with the AIRMATIC package:
select a raised vehicle level.
R avoid high engine speeds.
R select a shift range appropriate to the
terrain.
R drive quickly to overcome the rolling
resistance. Otherwise the vehicle's wheels
could become stuck in loose ground.
R drive in the tracks of other vehicles if
possible. Make sure that:
-the tire ruts are not too deep.
- the sand is sufficiently firm.
- the ground clearance of the vehicle is
sufficient. Tire ruts and gravel roads !
Check that the ruts are not too deep and
that your vehicle has sufficient clearance.
Otherwise, your vehicle could be damaged
or bottom out and get stuck.
Observe the following rules when driving
along ruts in off-road terrain or on roads with
loose gravel:
R vehicles with the AIRMATIC package:
select a raised vehicle level.
R avoid high engine speeds.
R select shift range 1.
R drive slowly.
R where ruts are too deep, drive with the
wheels of one side on the center grassy
area, if possible.
Driving over obstacles !
Obstacles could damage the floor of the
vehicle or components of the chassis. Ask
passengers for guidance when driving over
large obstacles. The passenger should
always keep a safe distance from the
vehicle when doing so in order to avoid
injury as a result of unexpected vehicle
movements. After driving off-road or over
obstacles, check the vehicle for possible
damage, especially to the underbody and
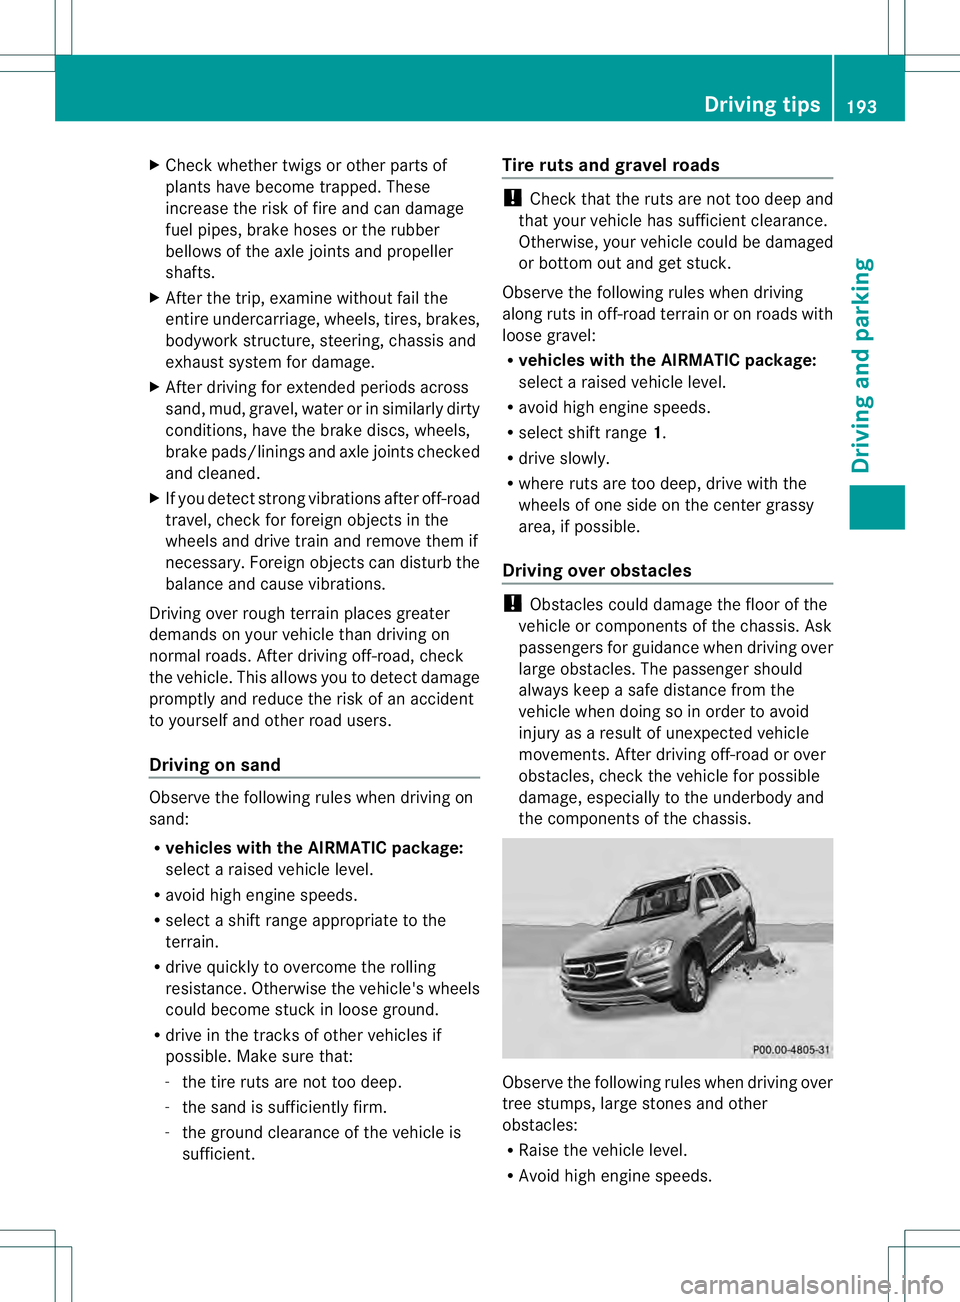
the components of the chassis. Observe the following rules when driving over
tree stumps, large stones and other
obstacles:
R
Raise the vehicle level.
R Avoid high engine speeds. Driving tips
193Driving and parking Z
Page 201 of 454
front, for vehicle speed, for braking in good
time and for staying in you
rlane.
Do not use DISTRONIC PLUS:
R in road and traffic conditions which do not
allow you to maintain a constan tspeed e.g.
in heavy traffic or on winding roads
R on slippery road surfaces .Braking or
accelerating could cause the drive wheels
to lose traction and the vehicle could then
skid
R when there is poor visibility, e.g. due to fog,
heavy rain or snow
DISTRONIC PLUS may not detect narrow
vehicles driving in front, e.g. motorcycles, or
vehicles driving on a different line.
In particular, the detection of obstacles can
be impaired if:
R dirt on the sensors or anything else
covering the sensors
R snow or heavy rain
R interference by other rada rsources
R strong radar reflections, for example, in
parking garages
If DISTRONIC PLUS no longer detects a
vehicle in front, DISTRONIC PLUS may
unexpectedly accelerate the vehicle to the
stored speed.
This speed may:
R be too high if you are driving in a filter lane
or an exit lane
R be so high when driving in the right-hand
lane that you overtake vehicles in the left-
hand lane
R be so high when driving in the left-hand lane
that you overtake vehicles in the right-hand
lane
If there is a change of drivers, advise the new
driver of the speed stored.
General notes DISTRONIC PLUS regulates the speed and
automatically helps you maintain the
distance to the vehicle detected in front. DISTRONIC PLUS brakes automatically so
that the set speed is not exceeded.
On long and steep downhill gradients,
especially if the vehicle is laden or towing a
trailer, you must select shift range
1,2or 3
in good time. By doing so, you will make use
of the braking effect of the engine, This
relieves the load on the brake system and
prevents the brakes from overheating and
wearing too quickly.
If DISTRONIC PLUS detects a slower-moving
vehicle in front, your vehicle is braked in order
to maintain the preset distance to the vehicle
in front.
If DISTRONIC PLUS detects that there is a risk
of a collision, you will be warned visually and
acoustically. DISTRONIC PLUS cannot
prevent a collision without your intervention.
An intermittent warning tone will then sound
and the distance warning lamp will light up in
the instrument cluster. Brake immediately in
order to increase the distance to the vehicle
in front or take evasive action provided it is
safe to do so.
For DISTRONIC PLUS to assist you when
driving, the radar sensor system must be:
R activated (Y page 281)
R operational
If there is no vehicle in front, DISTRONIC
PLUS operates in the same way as cruise
control in the speed range between 20 mph
(Canada: 30 km/h) and120 mph (Canada:
200 km/h). If a vehicle is driving in front of
you, it operates in the speed range between
0 mph (0 km/h) and 120 mph (Canada:
200 km/h).
Do not use DISTRONIC PLUS while driving on
roads with steep gradients.
As DISTRONIC PLUS transmits radar waves,
it can resemble the radar detectors of the
responsible authorities. You can refer to the
relevant chapter in the Operator's Manual if
questions are asked about this.
i USA only: Driving systems
199Driving and parking Z
Page 210 of 454
G
WARNING
When you drive with the chassis lowered or
raised, the vehicle's braking and driving
characteristics can be significantly impaired.
You could also exceed the permissible vehicle
height if the chassis is raised. There is a risk
of an accident.
Adjust the vehicle level before pulling away. G
WARNING
Due to the high center of gravity, the vehicle
may start to skid and roll over in the event of
an abrupt steering maneuver and/or when
the vehicle's speed is not adapted to the road
conditions. There is a risk of an accident.
Always adapt yours peed and driving style to
the vehicle's driving characteristics and to the
prevailing road and weather conditions.
! When driving on extremely rough terrain,
select a high vehicle level in good time.
Make sure there is always sufficien tground
clearance. You will otherwise damage the
vehicle.
R Utility vehicles have a significantly higher
rollover rate than other types of vehicles.
Failure to operate this vehicle safely may
result in an accident, rollover of the vehicle,
and severe or fatal injury.
R In a rollover crash, an unbelted person is
significantly more likely to die than a
person wearing a seat belt.
You and all vehicle occupants should
always weary our seat belts.
Level control adapts the vehicle level
automatically to the current operating and
driving situation. This results in reduced fuel
consumption and improved handling.
Make changes to the vehicle level while the
vehicle is in motion .This enables the vehicle
to adjust to the new level as quickly as
possible.
The vehicle level may change visibly if you
park the vehicle and the outside temperature
changes. If the temperature drops, the vehicle level is lower; with an increase in
temperature, the vehicle level rises.
If you unlock the vehicle or open a door, the
vehicle begins to compensate for load
discrepancies while still parked. However, for
significant level changes, such as after the
vehicle has been stationary for a long period,
the engine must be on. For safety reasons,
the vehicle is only lowered when the doors are
closed. Lowering is interrupted if a door is
opened, and it continues once the door has
been closed.
For information about driving off-road, see
(Y
page 191).
Basic settings The extentt
o which the vehicle is raised or
lowered depends on the basic setting
selected.
Select:
R highway/high-speed level for driving on
normal roads
R off-road level 1for driving on easily
negotiable off-road terrain
R off-road level 2 for driving on normal off-
road terrain
R off-road level 3for freeing the vehicle in
particularly rough terrain at low speeds
only
The individual vehicle levels differ from
highway level as follows:
R highway level: +/–0 in (+/–0 mm)
R high-speed level: –0.6 in (–15 mm)
R off-road level 1: + 1.2 in (+30 mm)
R off-road level 2: + 2.3 in (+60 mm)
R off-road level 3: + 3.6 in (+ 90 mm)
Highway/high-speed level !
Make sure that there is enough ground
clearance when the vehicle is being
lowered. It could otherwise hit the ground,
damaging the underbody. 208
Driving systemsDriving and parking
Page 214 of 454
Activating the HOLD function
X
Make sure that the activation conditions
are met.
X Depress the brake pedal.
X Quickly depress the brake pedal further
until 0001 appears in the multifunction
display.
The HOLD function is activated. You can
release the brake pedal.
i If depressing the brake pedal the first
time does not activate the HOLD function,
wait briefly and then try again.
Deactivating the HOLD function The HOLD function is deactivated
automatically if:
R you accelerate and the transmission is in
position Dor R
R you shif tthe transmission to position P
R you depress the brake pedal again with a
certain amount of pressure until 0001
disappears from the multifunction display
R you secure the vehicle using the electric
parking brake
R you activate DISTRONIC PLUS
i After a time, the electric parking brake
secures the vehicle and relieves the service
brake.
The electric parking brake automatically
secures the vehicle if the HOLD function is
activated and:
R the driver's door is open and the driver's
seat belt is unfastened.
R the engine is switched off.
R a system malfunction occurs.
R the power supply is not sufficient.
On steep uphill or downhill inclines or if there
is a malfunction, the transmission may also
be automatically shifted into position P. AIRMATIC package
General notes AIRMATIC regulates the level of your vehicle.
As well as level control (Y
page 213), your
vehicle can be equipped with ADS (Adaptive
Damping System) (Y page 212) and ACTIVE
CURVE SYSTEM (Y page 213).
Observe the notes on driving with a trailer
(Y page 257).
ADS (Adaptive Damping System) General notes
ADS adapts the damping characteristics to
the current operating and driving situation.
This depends on:
R
your driving style
R the road surface conditions
R the ADS setting
R the vehicle level setting
Your selection remains stored even if you
remove the SmartKey from the ignition lock.
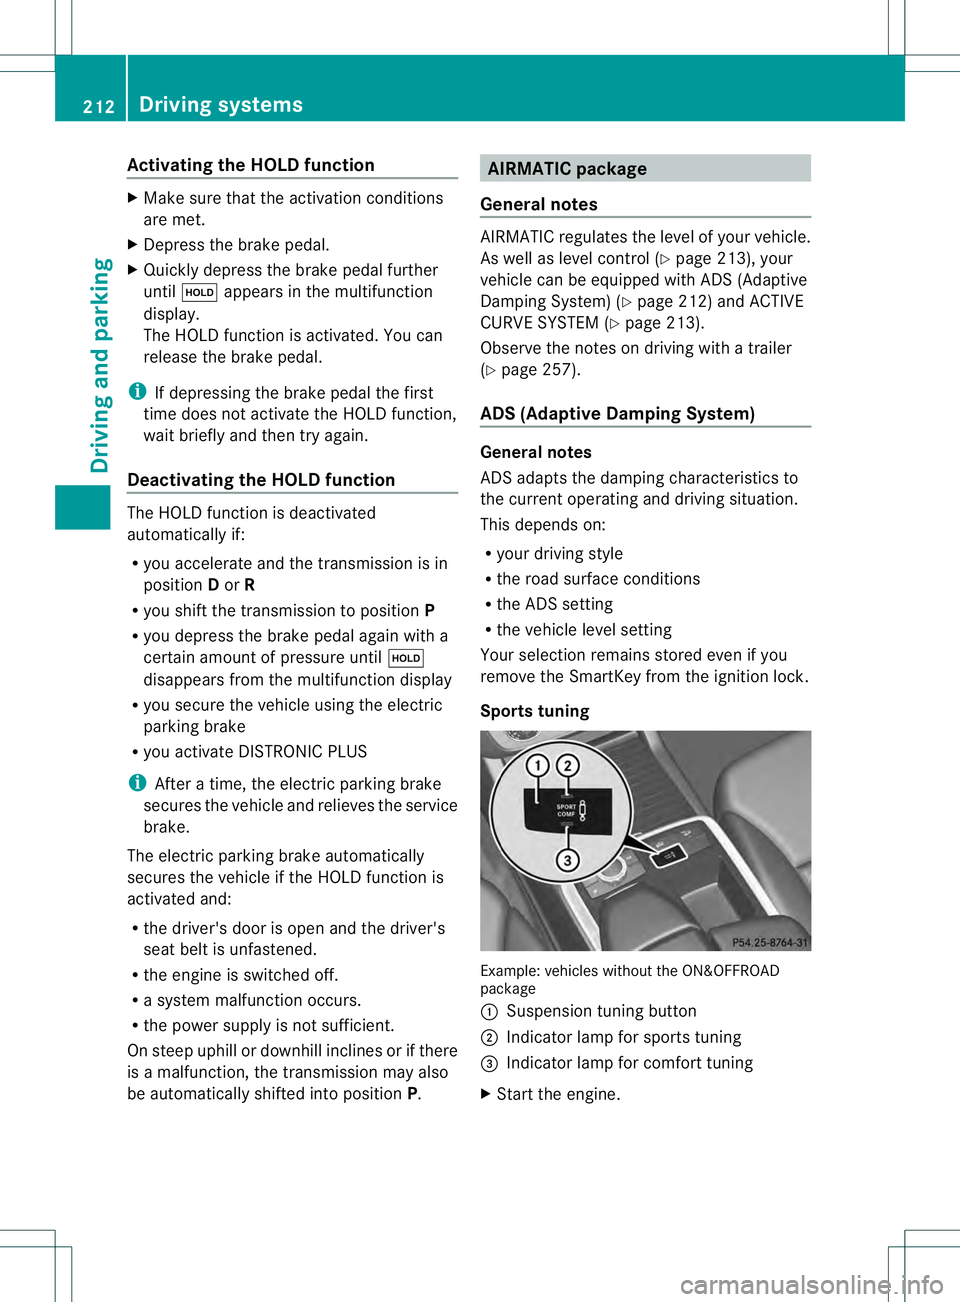
Sports tuning Example: vehicles without the ON&OFFROAD
package
0002
Suspension tuning button
0003 Indicator lamp for sports tuning
0021 Indicator lamp for comfort tuning
X Start the engine. 212
Driving systemsDriving and parking
Page 237 of 454
ATTENTION ASSIST is reset when you
continue your journey and starts assessing
your tiredness agai nif:
R you switch off the engine.
R you take off you rseat belt and open the
driver's door, e.g. for a change of drivers or
to take a break. Night View Assist Plus
Important safety notes Night View Assist Plus is only an aid and is not
a substitute for attentive driving. Do not rely
on the Night View Assist Plus display. You are
responsible for the distance to the vehicle in
front, for vehicle speed and for braking in
good time. Drive carefully and always adapt
your driving style to suit the prevailing road
and traffic conditions.
The system may be impaired or may not
function if:
R there is poor visibility, e.g. due to snow,
rain, fog or spray
R the windshield is dirty, fogged up or
covered, for instance by a sticker, in the
vicinity of the camera
R on bends, on uphill gradient sordownhill
gradients
Pedestrian recognition may be impaired or
inoperative if:
R pedestrians are partially or entirely
obscured by objects, e.g. parked vehicles
R the silhouette of the pedestrian in the Night
View Assist Plus display is incomplete or
interrupted, e.g. by powerful light
reflections
R pedestrians do not contrast adequately
from the background
R pedestrians are not in an upright position,
e.g. sitting, squatting or lying General notes
In addition to the illumination provided by the
normal headlamps, Night View Assist Plus
uses infrared light to illuminate the road.
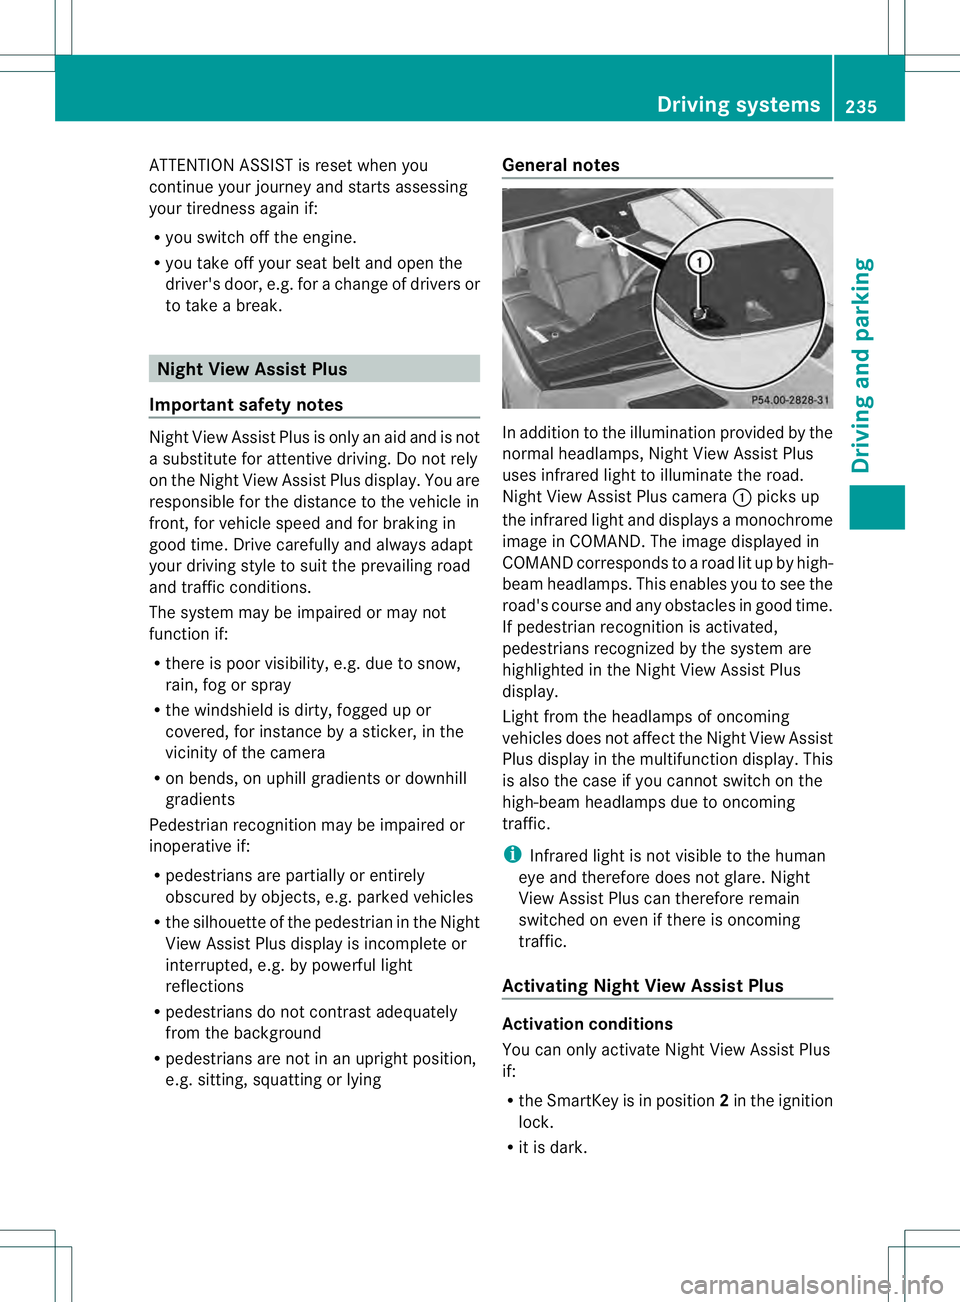
Night View Assist Plus camera
0002picks up
the infrared light and displays a monochrome
image in COMAND. The image displayed in
COMAND corresponds to a road lit up by high-
beam headlamps. This enables you to see the
road's course and any obstacles in good time.
If pedestrian recognition is activated,
pedestrians recognized by the system are
highlighted in the Night View Assist Plus
display.
Light from the headlamps of oncoming
vehicles does not affect the Night View Assist
Plus display in the multifunction display .This
is also the case if you cannot switch on the
high-beam headlamps due to oncoming
traffic.
i Infrared light is not visible to the human
eye and therefore does not glare. Night
View Assist Plus can therefore remain
switched on even if there is oncoming
traffic.
Activating Night View Assist Plus Activation conditions
You can only activate Night View Assist Plus
if:
R
the SmartKey is in position 2in the ignition
lock.
R it is dark. Driving systems
235Driving and parking Z
Page 238 of 454
R
the ligh tswitch is in the 0006or000D
position.
R reverse gear has not been engaged.
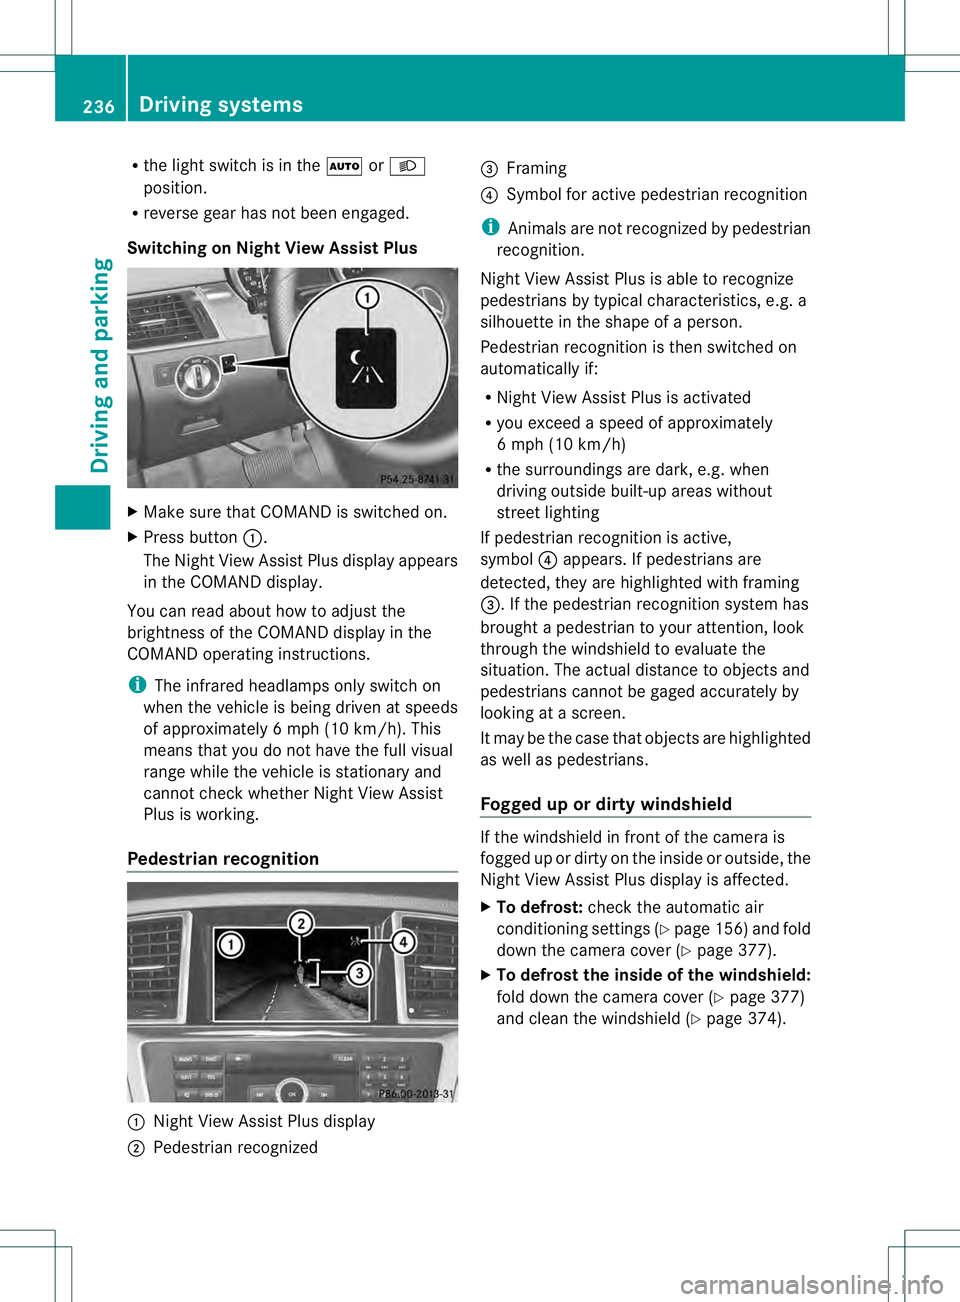
Switching on Nigh tView Assist Plus X
Make sure that COMAN Dis switched on.
X Press button 0002.
The Night View Assist Plus display appears
in the COMAND display.
You can read abouth ow to adjust the
brightness of the COMAND display in the
COMAND operating instructions.
i The infrared headlamps only switch on
when the vehicle is being driven at speeds
of approximately 6 mph (10 km/h). This
means that you do not have the full visual
range while the vehicle is stationary and
cannot check whether Night View Assist
Plus is working.
Pedestrian recognition 0002
Night View Assist Plus display
0003 Pedestrian recognized 0021
Framing
0020 Symbol for active pedestrian recognition
i Animals are not recognized by pedestrian
recognition.
Night View Assist Plus is able to recognize
pedestrians by typical characteristics, e.g. a
silhouette in the shape of aperson.
Pedestrian recognition is then switched on
automatically if:
R Night View Assist Plus is activated
R you exceed a speed of approximately
6 mph (10 km/h)
R the surroundings are dark, e.g. when
driving outside built-up areas without
street lighting
If pedestrian recognition is active,
symbol 0020appears. If pedestrians are
detected, they are highlighted with framing
0021.Ift he pedestrian recognition system has
brought a pedestrian to your attention, look
through the windshield to evaluate the
situation. The actual distance to objects and
pedestrians cannot be gaged accurately by
looking at a screen.
It may be the case that objects are highlighted
as well as pedestrians.
Fogged up or dirtyw indshield If the windshield in front of the camera is
fogged up or dirty on the inside or outside, the
Night View Assist Plus display is affected.
X
To defrost: check the automatic air
conditioning settings (Y page 156)and fold
down the camera cover (Y page 377).
X To defrost the inside of the windshield:
fold down the camera cover (Y page 377)
and clean the windshield (Y page 374).236
Driving systemsDriving an
d parking
Page 240 of 454
monitored area. If you then switch on the
corresponding turn signal to change lanes,
you will also receive a visual and audible
collision warning. Blind Spot Assist uses
sensors in the rear bumper for monitoring
purposes.
For Blind Spot Assist to assist you when
driving, the rada rsensor system must be:
R activated (Y page 281)
R operational
Monitoring range of the sensors
In particular, the detection of obstacles can
be impaired if:
R dirt on the sensors or anything else
covering the sensors
R poor visibility, e.g. due to fog, heavy rain,
snow or spray
R narrow vehicles, e.g. motorcycles or
bicycles
R the road has very wide lanes
R the road has narrow lanes
R you are not driving in the middle of the lane
R there are barriers or similar lane borders
Vehicles in the monitoring range are then not
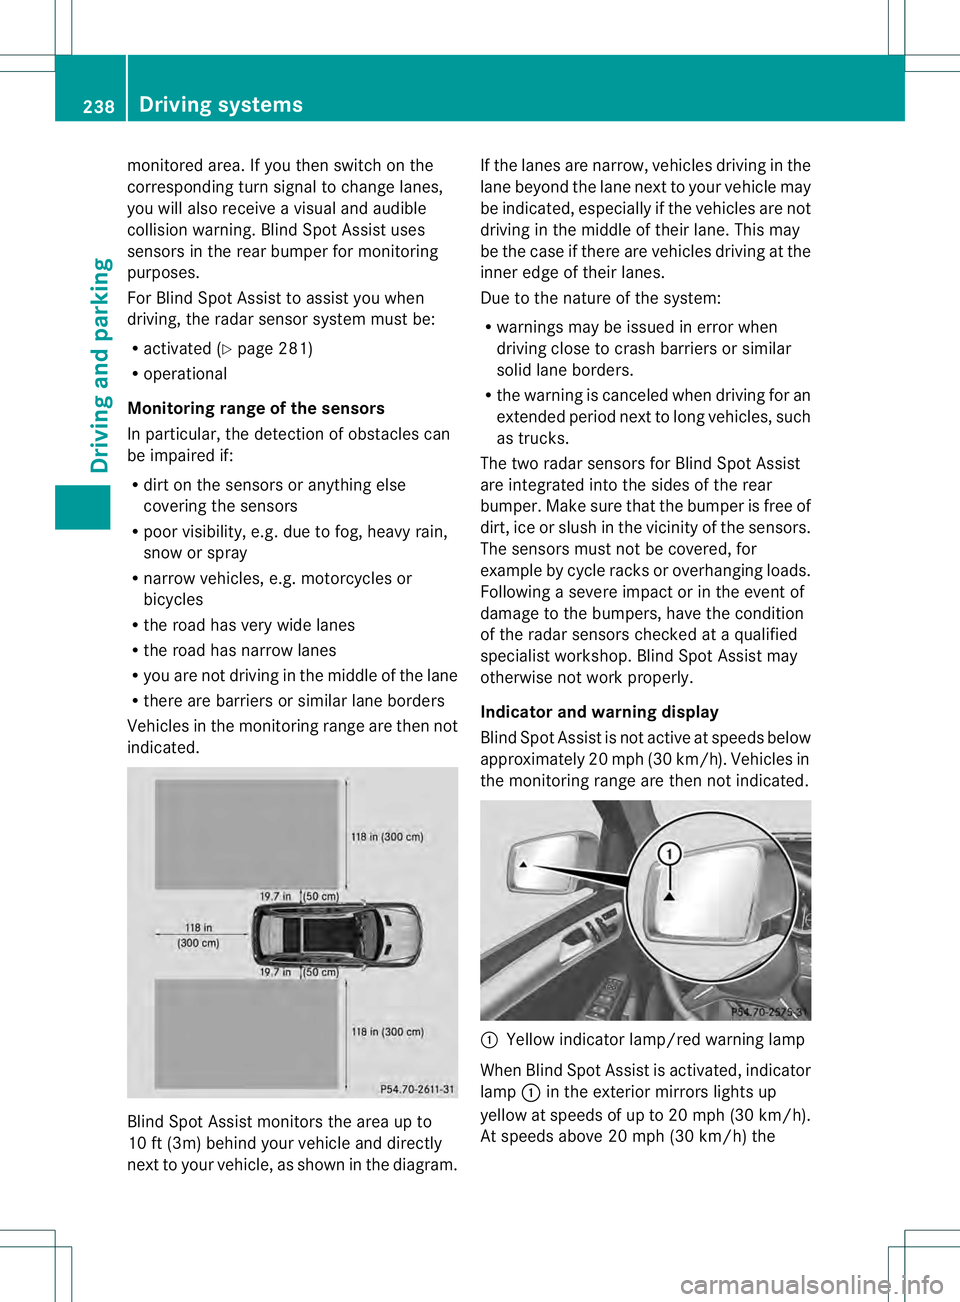
indicated. Blind Spot Assist monitors the area up to
10 ft (3m) behind your vehicle and directly
nextt
o your vehicle, as shown in the diagram. If the lanes are narrow, vehicles driving in the
lane beyond the lane next to your vehicle may
be indicated, especially if the vehicles are not
driving in the middle of their lane. This may
be the case if there are vehicles driving at the
inner edge of their lanes.
Due to the nature of the system:
R warnings may be issued in error when
driving close to crash barriers or similar
solid lane borders.
R the warning is canceled when driving for an
extended period next to long vehicles, such
as trucks.
The two radar sensors for Blind Spot Assist
are integrated into the sides of the rear
bumper. Make sure that the bumper is free of
dirt, ice or slush in the vicinity of the sensors.
The sensors must not be covered, for
example by cycle racks or overhanging loads.
Following a severe impact or in the event of
damage to the bumpers, have the condition
of the radar sensors checked at a qualified
specialist workshop. Blind Spot Assist may
otherwise not work properly.
Indicator and warning display
Blind Spot Assist is not active at speeds below
approximately 20 mph (30 km/h) .Vehicles in
the monitoring range are then not indicated. 0002
Yellow indicator lamp/red warning lamp
When Blind Spot Assist is activated, indicator
lamp 0002in the exterior mirrors lights up
yellow at speeds of up to 20 mph (30k m/h).
At speeds above 20 mph (30 km/h) the 238
Driving systemsDriving and parking
Page 242 of 454
G
WARNING
The Lane Keeping Assist warning does not
return the vehicle to the original lane. There
is a risk of an accident.
You should always steer, brake or accelerate
yourself, in particular if warned by Lane
Keeping Assist.
If you fail to adapt yourd riving style, Lane
Keeping Assist can neither reduce the risk of
an accident nor overrid ethe laws of physics.
Lane Keeping Assist cannot take into account
the road, traffic and weather conditions. Lane
Keeping Assist is merely an aid. You are
responsible for the distance to the vehicle in
front, for vehicle speed, for braking in good
time and for staying in your lane.
The Lane Keeping Assist does not keep the
vehicle in the lane.
The system may be impaired or may not
function if:
R there is poor visibility, e.g. due to
insufficient illumination of the road, or due
to snow, rain, fog or spray
R there is glare, e.g. from oncoming traffic,
the sun or reflections (e.g. when the road
surface is wet)
R the windshield is dirty, fogged up, damaged
or covered, for instance by a sticker, in the
vicinity of the camera
R there are no, several or unclear lane
markings for a lane, e.g. in areas with road
construction work
R the lane markings are worn away, dark or
covered up, e.g. by dirt or snow
R the distance to the vehicle in front is too
small and the lane markings thus cannot be
detected
R the lane markings change quickly, e.g.
lanes branch off, cross one another or
merge
R the road is narrow and winding
R there are strong shadows cast on the lane General notes
Lane Keeping Assist monitors the area in
front of your vehicle by means of a camera at
the top of the windshield. Lane Keeping Assist
detects lane markings on the road and warns
you before you leave your lane
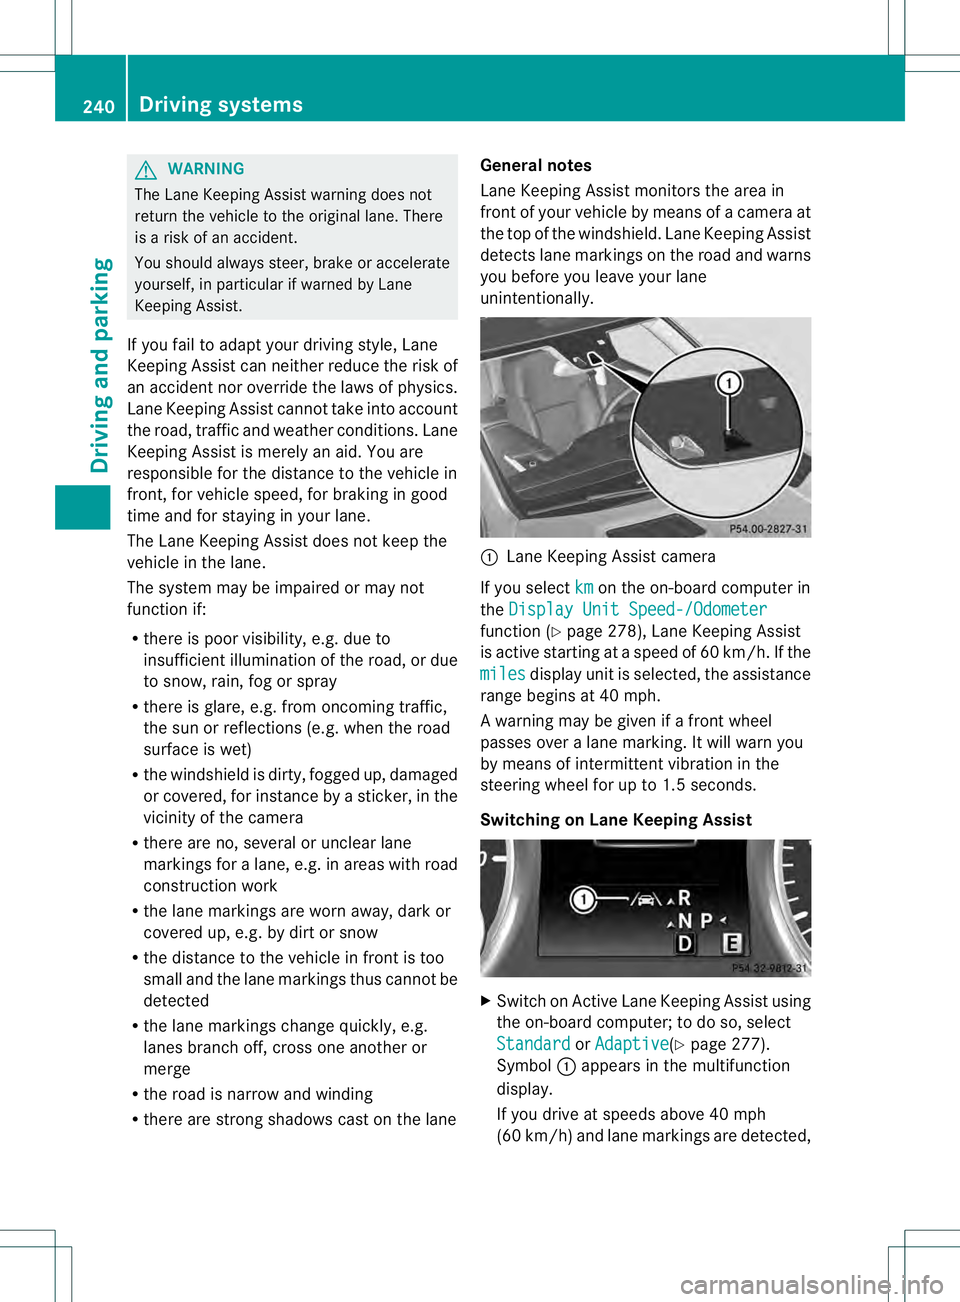
unintentionally. 0002
Lane Keeping Assist camera
If you select km on the on-board computer in
the Display Unit Speed-/Odometer function (Y
page 278), Lane Keeping Assist
is active starting at aspeed of 60 km/h. If the
miles display unit is selected, the assistance
range begins at 40 mph.
A warning may be given if a front wheel
passes over a lane marking. It will warn you
by means of intermittent vibration in the
steering wheel for up to 1.5 seconds.
Switching on Lane Keeping Assist X
Switch on Active Lane Keeping Assist using
the on-board computer; to do so, select
Standard or
Adaptive (Y
page 277).
Symbol 0002appears in the multifunction
display.
If you drive at speeds above 40 mph
(60 km/h) and lane markings are detected, 240
Driving systemsDriving and parking