2013 MERCEDES-BENZ GL oil
[x] Cancel search: oilPage 193 of 454
i
For more information on driving with
snow chains, see (Y page 403).
Drive particularly carefully on slippery road
surfaces. Avoid sudde nacceleration, steering
and braking maneuvers. Do not use the cruise
control or DISTRONIC PLUS.
The outside temperature indicator is not
designed to serve as an ice-warning device
and is therefore unsuitable for that purpose.
Changes in the outside temperature are
displayed afte rashort delay.
Indicated temperatures just above the
freezing point do not guarantee that the road
surface is free of ice. The road may still be icy,
especially in wooded areas or on bridges. You
should pay special attention to road
conditions when temperatures are around
freezing point. Off-road driving
Important safety notes G
WARNING
If you drive on a steep incline at an angle or
turn when driving on an incline, the vehicle
could slip sideways, tip and rollover. There is
a risk of an accident.
Always drive on a steep incline in the line of
fall (straight up or down) and do not turn the
vehicle. G
WARNING
If the vehicle level is high, the vehicle center
of gravity is raised. This could cause the
vehicle to tip over more easily on uphill or
downhill gradients. There is arisk of an
accident.
Selec tthe lowest possible vehicle level.
When driving off-road, sand, mud and water,
possibly mixed with oil, for example, could get
into the brakes. This could result in a reduced
braking effect or in total brake failure and also
in increased wear and tear. The braking
characteristics change depending on the material ingressing the brakes. Cleant
he
brakes after driving off-road. If you detect a
reduced braking effect or grinding noises,
have the brake system checked in a qualified
specialist workshop as soon as possible.
Adapt your driving style to the different
braking characteristics.
Driving off-road increases the likelihood of
damage to the vehicle, which, in turn, can lead
to failure of the mechanical assembly or
systems. Adapt your driving style to suit the
terrain conditions. Drive carefully. Have
damage to the vehicle rectified immediately
at a qualified specialist workshop.
Do not switch to transmission position N
when driving off-road. You could lose control
of the vehicle if you attempt to brake using
the service brake. If the gradient is too steep,
drive backwards in reverse gear.
General notes Read this section carefully before driving your
vehicle off-road. Practice by driving over more
gentle off-road terrain first.
Familiarize yourself with the characteristics
of your vehicle and the gear shift operation
before driving through difficult terrain.
The following driving systems are specially
adapted to off-road driving:
R
Off-road ABS (Y page 67)
R AIRMATIC package (vehicle level)
(Y page 212)
R DSR (Downhill Speed Regulation)
(Y page 250)
Observe the following notes:
R Stop the vehicle before starting to drive
along an off-road route.
R For vehicles with the AIRMATIC
package: select a vehicle level that is
suitable for the off-road terrain. To avoid
damaging the vehicle, make sure there is
always sufficient ground clearance.
R Check that items of luggage and loads are
stowed safely and are well secured
(Y page 341). Driving tips
191Driving and parking Z
Page 194 of 454
R
Always keep the engine running and in gear
when driving on a downhill gradient.
Activate DSR (Y page 250).
R Always keep the doors, tailgate, windows
and sliding sunroo fclosed while driving.
R Adapt your speed to the terrain. The
rougher, steeper or more ruts on the
terrain, the slower your speed should be.
R Drive slowly and at an even speed through
the water .Ensure tha tabow wave does not
form as you drive.
R Drive with extreme care on unfamiliar off-
road routes where visibility is poor. For
safety reasons, get out of the vehicle first
and survey the off-road route.
R Look out for obstacles, such as rocks,
holes, tree stumps and furrows.
R Check the depth of water before fording
rivers and streams.
R When fording, do not stop and do not
switch off the engine.
R On sand, drive quickly to overcome the
rolling resistance. Otherwise the vehicle's
wheels could become stuc kinloose
ground.
R Do not jump with the vehicle as this will
interrupt the vehicle's propulsion.
R Always keep the engine running and in gear
when driving on a slope.
R Do not shift the automatic transmission to
transmission position N.
i Do not use the HOLD function when
driving off-road, on steep uphill or downhill
gradients or on slippery or loose surfaces.
The HOLD function cannot hold the vehicle
on such surfaces.
Checklist before driving off-road !
If the engine oil warning lamp lights up
while the vehicle is in motion, stop the
vehicle in a safe place as soon as possible.
Check the engine oil level. The engine oil
warning lamp warning must not be ignored.
Continuing the journey while the symbol is
displayed could lead to engine damage. X
Engine oil level: check the engine oil level
and add oil if necessary.
When driving on steep gradients, the
engine oil level must be sufficiently high to
ensure a correc toil supply in the vehicle.
X DEF tank (BlueTEC vehicles): check the
fluid level and, if necessary, refill to the
maximum (13 l) (Y page 181).
X Wheel-changing tool kit: check that the
jac kis working and make sure you have the
lug wrench, a robust tow cable and a folding
spade in the vehicle.
X Wheels and tires: check the tire tread
depth and tire pressure.
X Check for damage and remove any foreign
objects, e.g. small stones, from the
wheels/tires.
X Replace any missing valve caps.
X Replace dented or damaged wheels.
X Rims: dented or bent rims can result in a
loss of tire pressure and damage the tire
bead. Therefore, check your rims before
driving off-road and replace them as
required.
Checklist after driving off-road !
If you detect damage to the vehicle after
driving off-road, have the vehicle checked
immediately at a qualified specialist
workshop.
X Deactivate DSR (Y page 250).
X Vehicles with the AIRMATIC package:
lower the vehicle to a ride height suitable
for the road conditions, e.g. to the
highway/high-speed level.
X Cleant he headlamps and rear lights and
check for damage.
X Cleant he front and rear license plates.
X Cleant he wheels/tires with a water jet and
remove any foreign objects.
X Cleant he wheels, wheel housings and the
vehicle underside with a water jet; check
for any foreign objects and damage. 192
Driving tipsDriving and parking
Page 284 of 454
X
Press 0004or0003 to select the Auto. Mirror Folding function.
If the Auto. Mirror Folding function is
activated, the vehicle's exterior mirror is
displayed in red in the multifunction
display.
X Press the 000Bbutton to save the setting. 0002
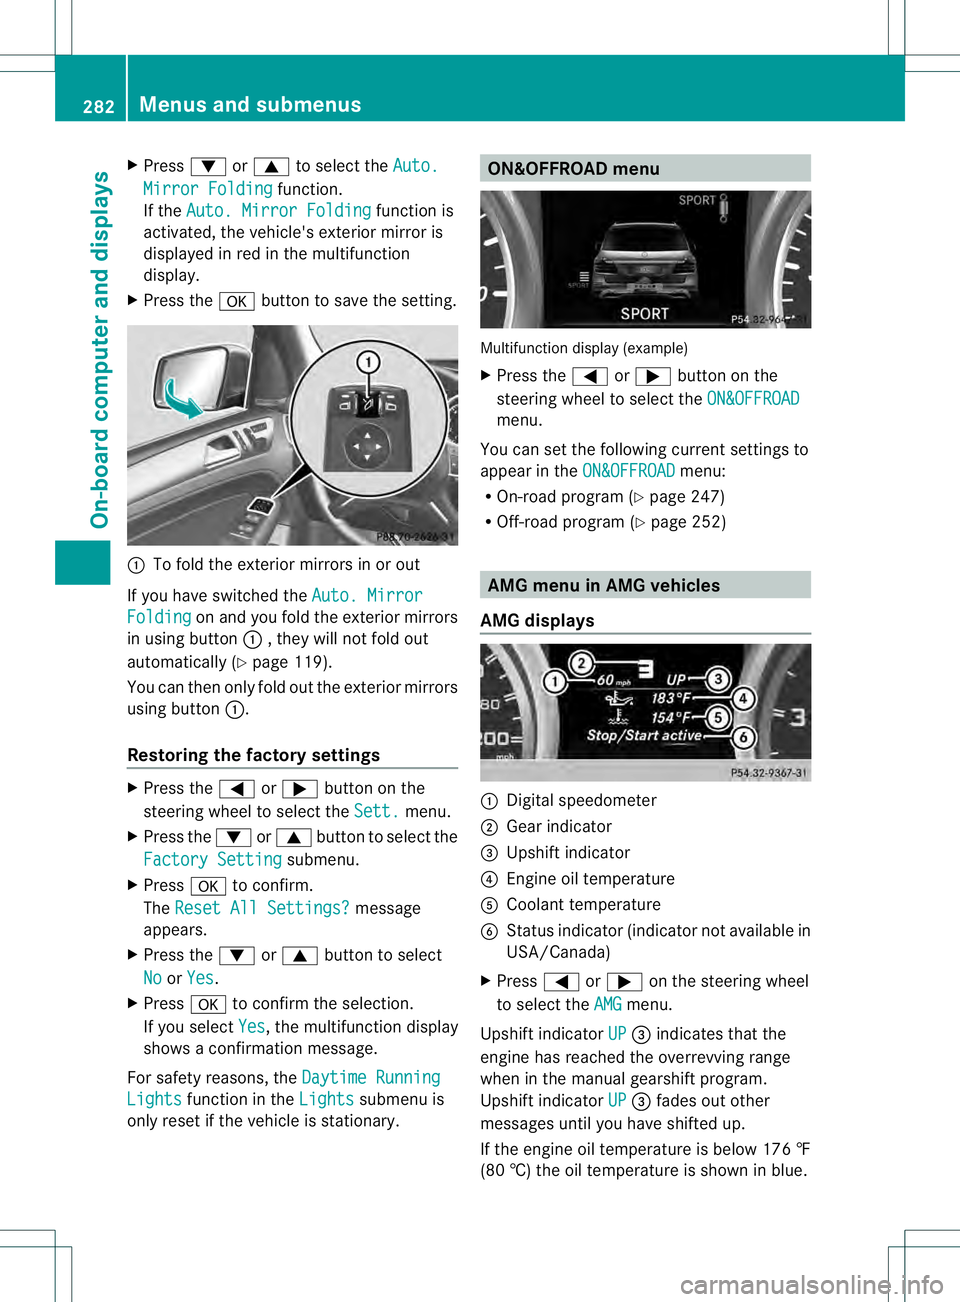
To fold the exterior mirrors in or out
If you have switched the Auto. MirrorFolding on and you fold the exterior mirrors
in using button 0002, they will not fold out
automatically (Y page 119).
You can then only fold out the exterior mirrors
using button 0002.
Restoring the factory settings X
Press the 0002or0005 button on the
steering wheel to select the Sett. menu.
X Press the 0004or0003 button to select the
Factory Setting submenu.
X Press 000Bto confirm.
The Reset All Settings? message
appears.
X Press the 0004or0003 button to select
No or
Yes .
X Press 000Bto confirm the selection.
If you select Yes , the multifunction display
shows a confirmation message.
For safety reasons, the Daytime RunningLights function in the
Lights submenu is
only reset if the vehicle is stationary. ON&OFFROAD menu
Multifunction display (example)
X
Press the 0002or0005 button on the
steering wheel to select the ON&OFFROAD menu.
You can set the following curren tsettings to
appear in the ON&OFFROAD menu:
R On-road program (Y page 247)
R Off-road program (Y page 252) AMG menu in AMG vehicles
AMG displays 0002
Digital speedometer
0003 Gear indicator
0021 Upshift indicator
0020 Engine oil temperature
001E Coolant temperature
001F Status indicator (indicator not available in
USA/Canada)
X Press 0002or0005 on the steering wheel
to select the AMG menu.
Upshift indicator UP 0021
indicates that the
engine has reached the overrevving range
when in the manual gearshift program.
Upshift indicator UP 0021
fades out other
messages until you have shifted up.
If the engine oil temperature is below 176 ‡
(80 †) the oil temperature is shown in blue. 282
Menus and submenusOn-board computer and displays
Page 306 of 454
Display messages Possible causes/consequences and
0001 Solutions
000B The battery is no
tbeing charged.
Aw arning tone also sounds.
Possible causes are:
R a defective alternator
R a torn poly-V-belt
R a malfunction in the electronics
X Pull ove rand stop the vehicle safely and switch off the engine,
paying attention to road and traffic conditions.
X Ope nthe hood.
X Check whether the poly-V-belt is torn.
If the poly-V-belt is torn:
! Do not continue driving. The engine could otherwise overheat.
X Consult a qualified specialist workshop.
If the poly-V-belt is not damaged:
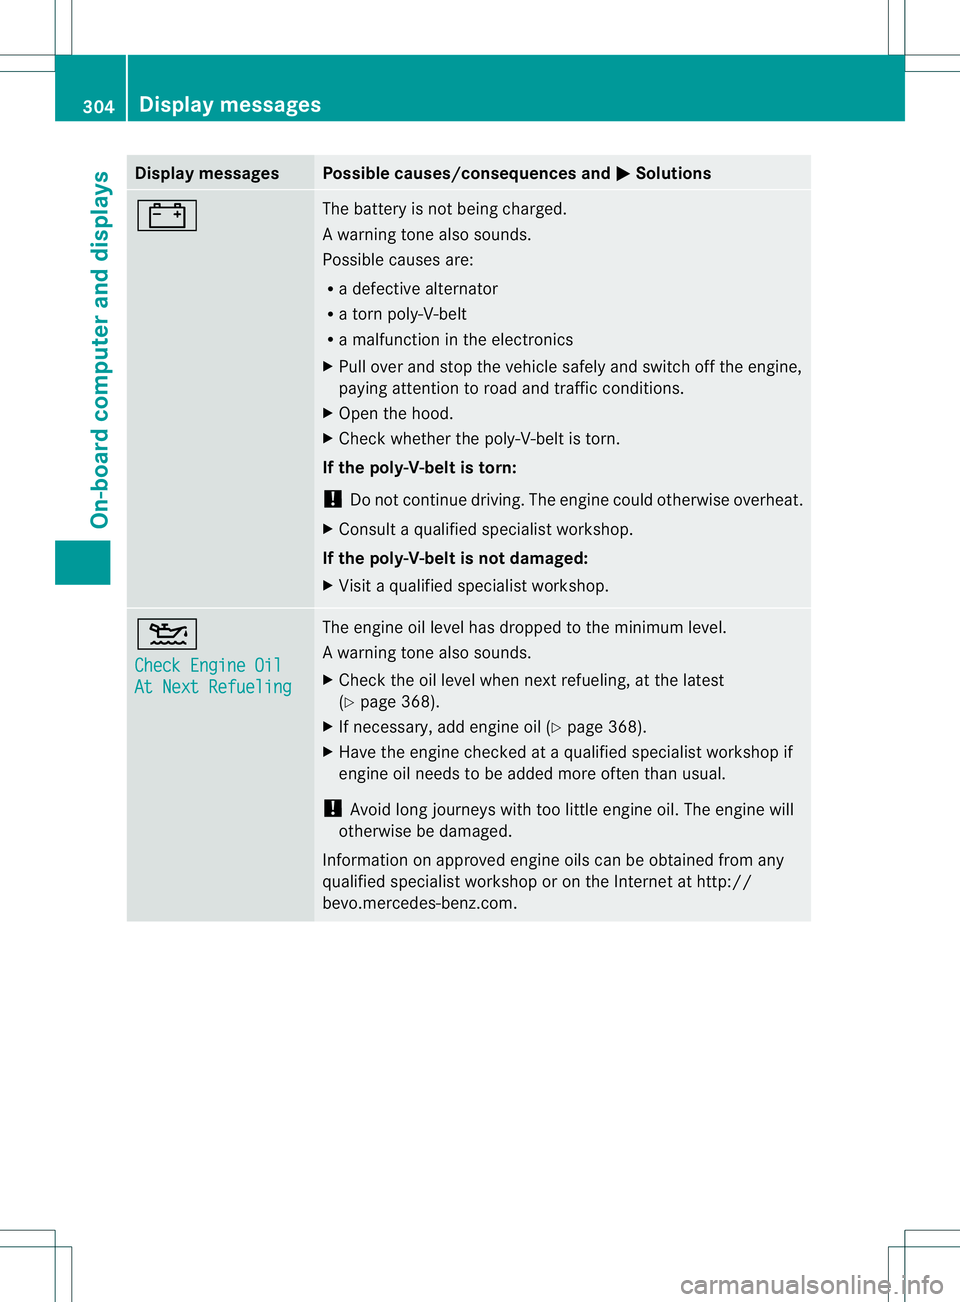
X Visit a qualified specialist workshop. 0013
Check Engine Oil
At Next Refueling The engine oil level has dropped to the minimum level.
Aw
arning tone also sounds.
X Chec kthe oil level when next refueling, at the latest
(Y page 368).
X If necessary, add engine oil (Y page 368).
X Have the engine checked at a qualified specialist workshop if
engine oil needs to be added more often than usual.
! Avoid long journeys with too little engine oil. The engine will
otherwise be damaged.
Information on approved engine oils can be obtained from any
qualified specialist workshop or on the Internet at http://
bevo.mercedes-benz.com. 304
Display messagesOn-board computer and displays
Page 307 of 454
Display messages Possible causes/consequences and
0001 Solutions
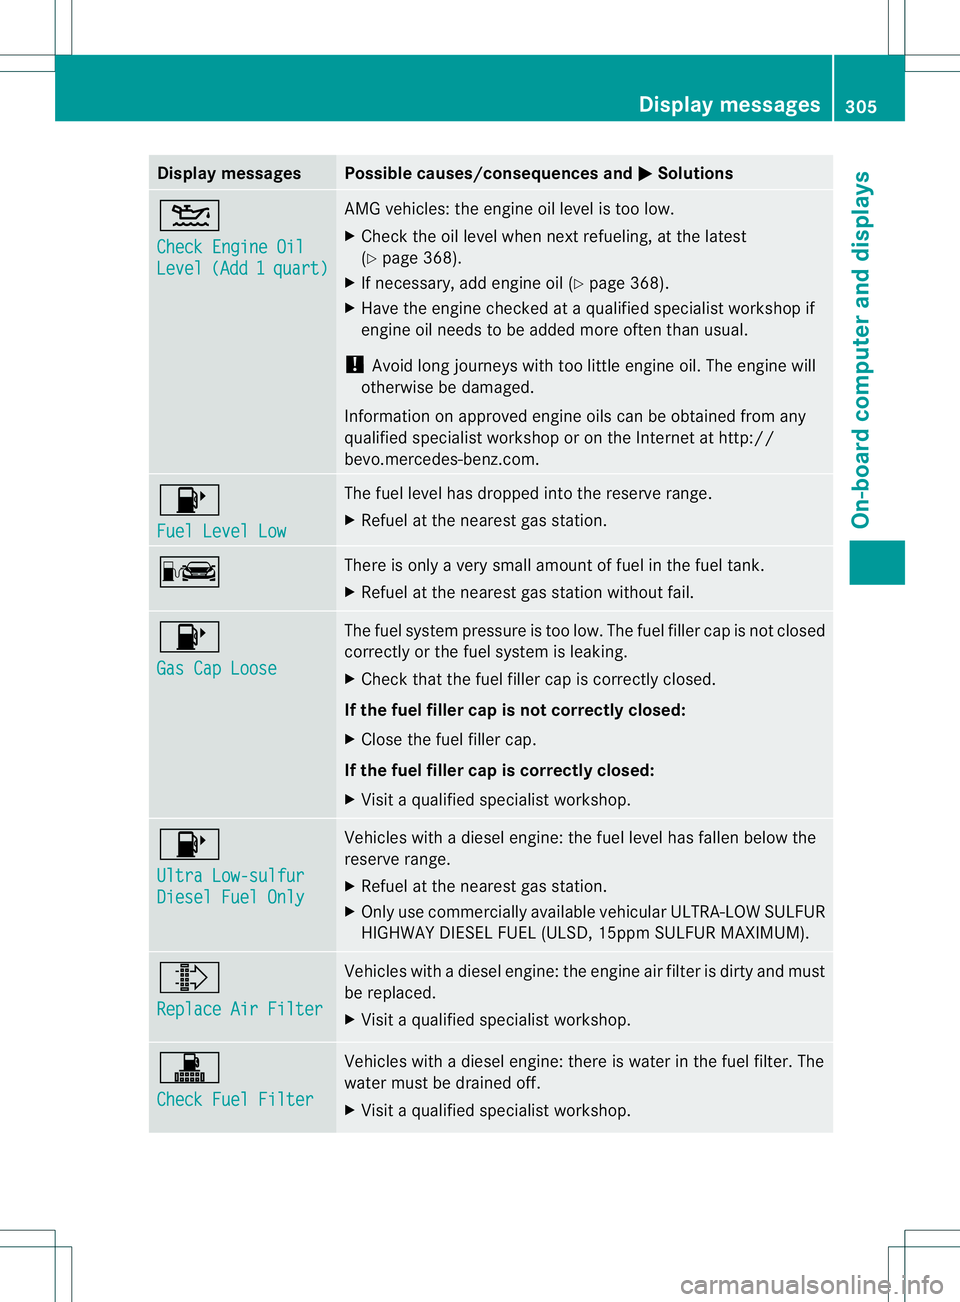
0013
Check Engine Oil
Level (Add 1 quart) AMG vehicles: the engine oil level is too low.
X
Chec kthe oil level when next refueling, at the latest
(Y page 368).
X If necessary, add engine oil (Y page 368).
X Have the engine checked at a qualified specialist workshop if
engine oil needs to be added more often than usual.
! Avoid long journeys with too little engine oil. The engine will
otherwise be damaged.
Information on approved engine oils can be obtained from any
qualified specialist workshop or on the Internet at http://
bevo.mercedes-benz.com. 0012
Fuel Level Low The fuel level has dropped into the reserve range.
X
Refuel at the nearest gas station. 000A There is only a very small amount of fuel in the fuel tank.
X
Refuel at the nearest gas station without fail. 0012
Gas Cap Loose The fuel system pressure is too low. The fuel filler cap is not closed
correctly or the fuel system is leaking.
X
Check that the fuel filler cap is correctly closed.
If the fuel filler cap is not correctly closed:
X Close the fuel filler cap.
If the fuel filler cap is correctly closed:
X Visit a qualified specialist workshop. 0012
Ultra Low-sulfur
Diesel Fuel Only Vehicles with a diesel engine: the fuel level has fallen below the
reserve range.
X Refuel at the nearest gas station.
X Only use commercially available vehicular ULTRA-LOW SULFUR
HIGHWAY DIESEL FUEL (ULSD, 15ppm SULFUR MAXIMUM). 0004
Replace Air Filter Vehicles with a diesel engine: the engine air filter is dirty and must
be replaced.
X
Visit a qualified specialist workshop. 0001
Check Fuel Filter Vehicles with a diesel engine: there is water in the fuel filter. The
water must be drained off.
X
Visit a qualified specialist workshop. Display messages
305On-board computer and displays Z
Page 361 of 454
about various special offers at your
workshop.
R monthly status informatio nE-Mail on oil
level, ai rpressure, maintenance, brakes,
etc. If applicable, you will receive
information on special offers in the E-Mail.
USA only: this information can also be
called up under "Owners Online" at http://
www.mbusa.com.
Information on the data stored in the vehicle
(Y page 29).
Information on roadside assistance
(Y page 25).
Downloading routes Downloading routes allows you to transfer
and save predefined routes in the navigation
system. To do this, an SD memory card must
be inserted into the COMAND system. If no
SD memory card is inserted, you must insert
the card into the card slot on the COMAND
system before saving.
Ar oute can be prepared and sent either by a
customer service representative or via the
mbrace portal on the Internet. Each route can
include up to 20 way points. When a route has
been received by the navigation system, the
'Route name' has been saved to memory card. Do you want to start
route guidance? message appears on the
COMAND display .The route is saved to the
SD memory card.
X To start route guidance: selectYes .
An overview of the route is shown in the
display.
i If you select No , the saved route can be
called up later in the navigation menu.
X Select Start .
Route guidance is started.
i Downloaded and saved data can be called
up again in COMAND.
You can find further information in the
separate COMAND operating instructions. Speed alert You can define the upper speed limit, which
must not be exceeded by the vehicle. If this
selected speed is exceeded by the vehicle, a
message will be sent to the Customer
Assistance center. The Customer Assistance
center then forwards this information to you.
You can select the way in which you receive
this information beforehand. Possible options
include SMS, E-Mail or an automated call.
The data which is sent to the Customer
Assistance center contains the following
information:
R
the location where the speed limit was
exceeded
R the time at which the speed limit was
exceeded
R the selected speed limit which was
exceeded
Geo fencing Geo fencing allows you to select areas which
the vehicle should not enter or leave. You will
be informed if the vehicle crosses the
boundaries of the selected areas. You can
select the way in which you receive this
information beforehand. Possible options
include SMS, E-Mail or an automated call.
The area can be determined as either a circle
or a polygon with a maximum of ten corners.
You can specify up to ten areas
simultaneously
.Differen tsettings are
possible for each area.
USA only: these settings can be called up
under "Owners Online" at http://
www.mbusa.com.
Alternatively, you can trigger an MB Info call
and inform the customer service
representative that you wish to activate geo
fencing.
Currently inactive areas can be activated by
SMS. Features
359Stowage and features Z
Page 369 of 454
!
Make sure that the windshieldw ipers are
not folded away fro mthe windshield. You
could otherwise damage the windshield
wipers or the hood. X
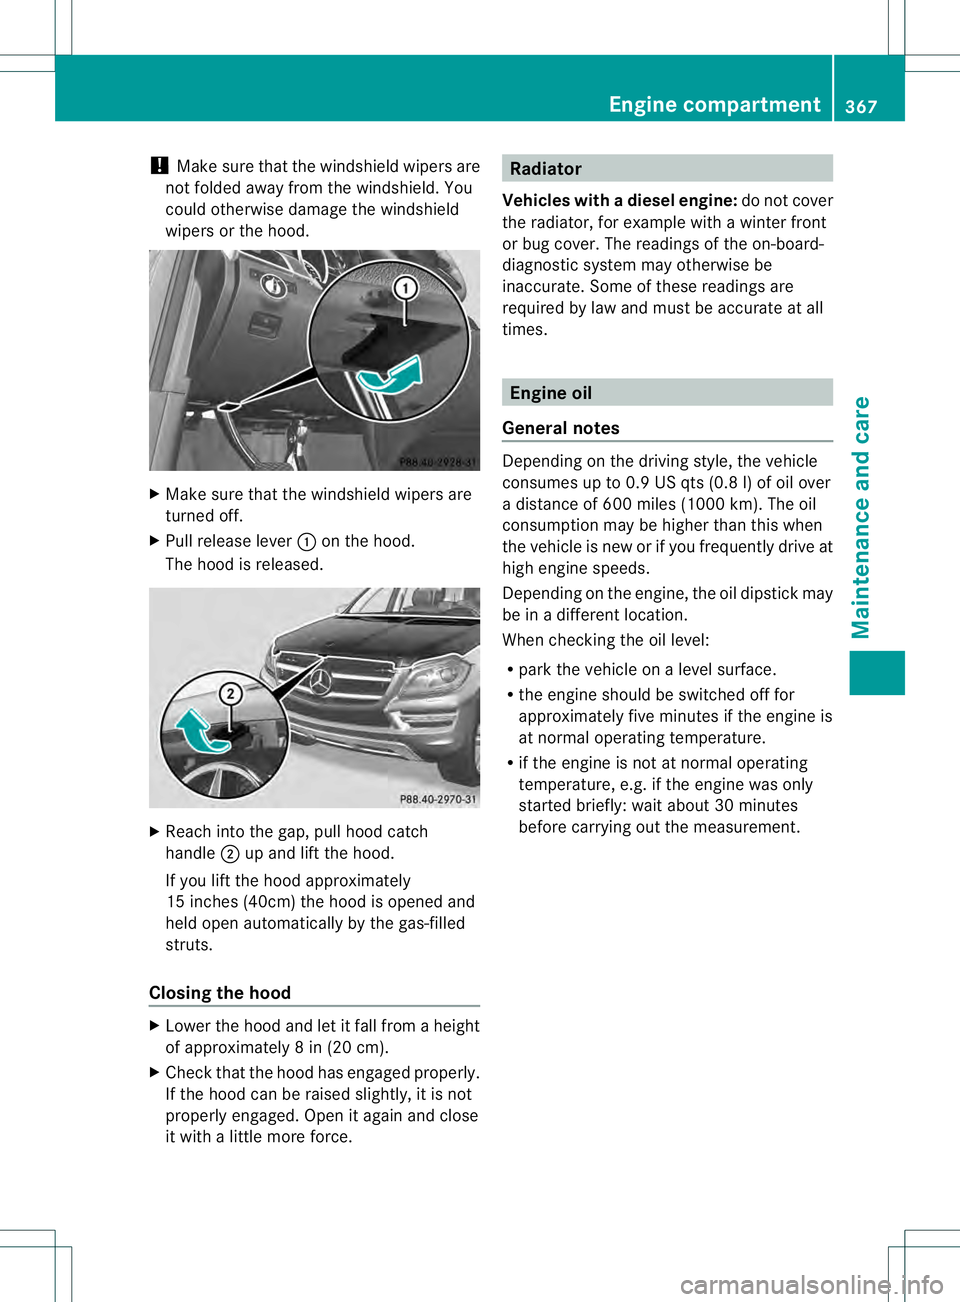
Make sure that the windshield wipers are
turned off.
X Pull release lever 0002on the hood.
The hood is released. X
Reach into the gap, pull hood catch
handle 0003up and lift the hood.
If you lift the hood approximately
15 inches (40cm) the hood is opened and
held open automatically by the gas-filled
struts.
Closing the hood X
Lower the hood and let it fall from a height
of approximately 8 in (20 cm).
X Check that the hood has engaged properly.
If the hood can be raised slightly, it is not
properly engaged. Open it again and close
it with a little more force. Radiator
Vehicles with adiesel engine: do not cover
the radiator, for example with a winter front
or bug cover. The reading softhe on-board-
diagnostic system may otherwise be
inaccurate. Some of these readings are
required by law and must be accurate at all
times. Engine oil
General notes Depending on the driving style, the vehicle
consumes up to 0.9 US qts (0.8 l) of oil over
a distance of 600 miles (1000 km). The oil
consumption may be higher than this when
the vehicle is new or if you frequently drive at
high engine speeds.
Depending on the engine, the oil dipstick may
be in a different location.
When checking the oil level:
R park the vehicle on a level surface.
R the engine should be switched off for
approximately five minutes if the engine is
at normal operating temperature.
R if the engine is not at normal operating
temperature, e.g. if the engine was only
started briefly: wait about 30 minutes
before carrying out the measurement. Engine compartment
367Maintenance and care Z
Page 370 of 454
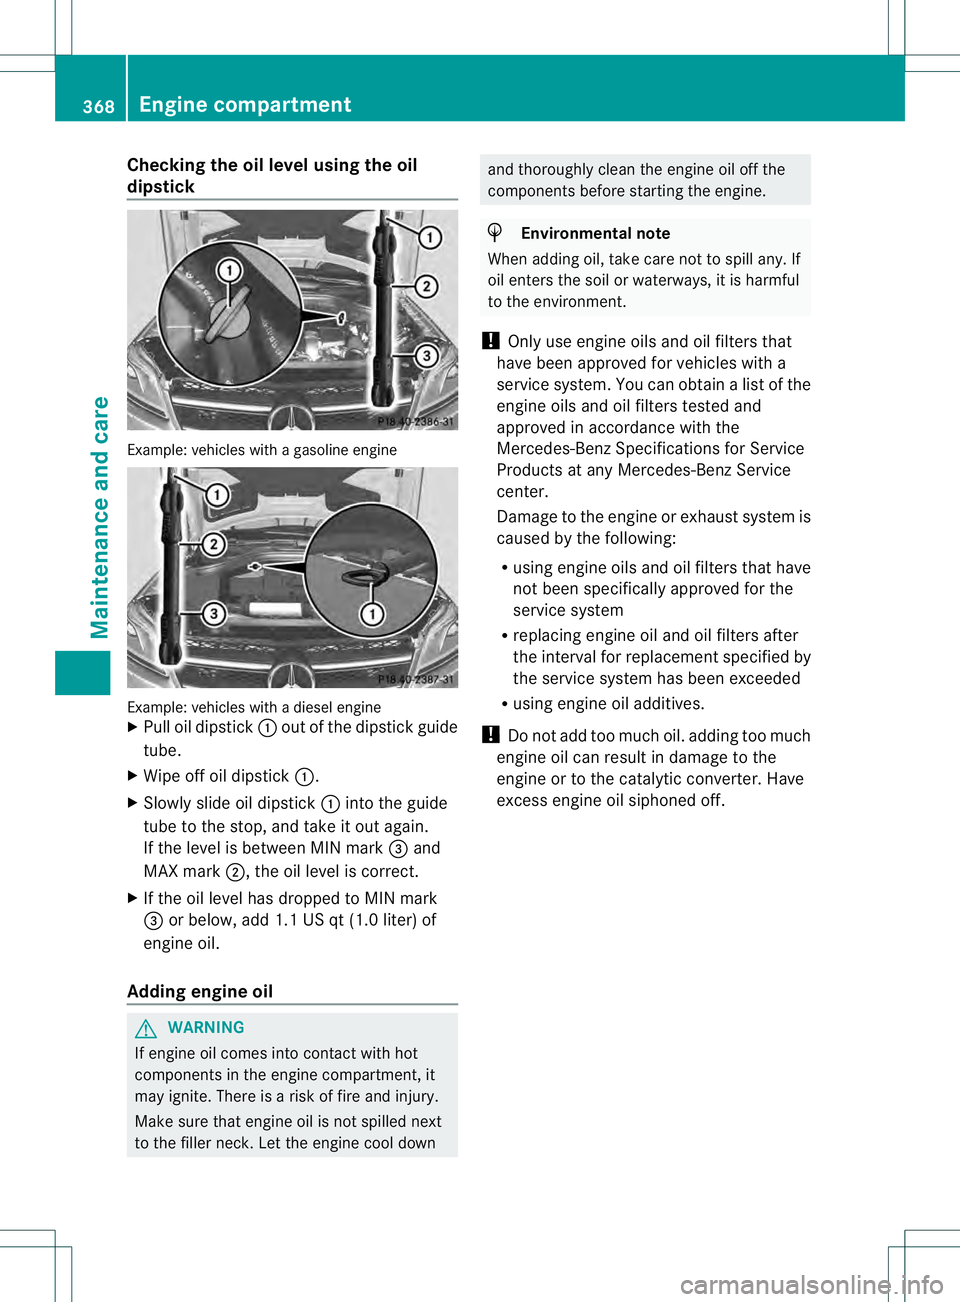
Checking the oil level using the oil
dipstick
Example
:vehicles with a gasoline engine Example: vehicles with a diesel engine
X Pull oil dipstick 0002out of the dipstick guide
tube.
X Wipe off oil dipstick 0002.
X Slowly slide oil dipstick 0002into the guide
tube to the stop, and take it out again.
If the level is between MIN mark 0021and
MAX mark 0003, the oil level is correct.
X If the oil level has dropped to MIN mark
0021 or below, add 1.1 US qt (1.0 liter) of
engine oil.
Adding engine oil G
WARNING
If engine oil comes into contact with hot
components in the engine compartment, it
may ignite. There is a risk of fire and injury.
Make sure that engine oil is not spilled next
to the filler neck. Let the engine cool down and thoroughly clean the engine oil off the
components before starting the engine. H
Environmental note
When adding oil, take care not to spill any. If
oil enters the soil or waterways, it is harmful
to the environment.
! Only use engine oils and oil filters that
have been approved for vehicles with a
service system. You can obtain a list of the
engine oils and oil filters tested and
approved in accordance with the
Mercedes-Benz Specifications for Service
Products at any Mercedes-Benz Service
center.
Damage to the engine or exhaust system is
caused by the following:
R using engine oils and oil filters that have
not been specifically approved for the
service system
R replacing engine oil and oil filters after
the interval for replacemen tspecified by
the service system has been exceeded
R using engine oil additives.
! Do not add too much oil. adding too much
engine oil can result in damage to the
engine or to the catalytic converter. Have
excess engine oil siphoned off. 368
Engine compartmentMaintenance and care