2013 MERCEDES-BENZ GL height
[x] Cancel search: heightPage 108 of 454
Rear seat head restraints
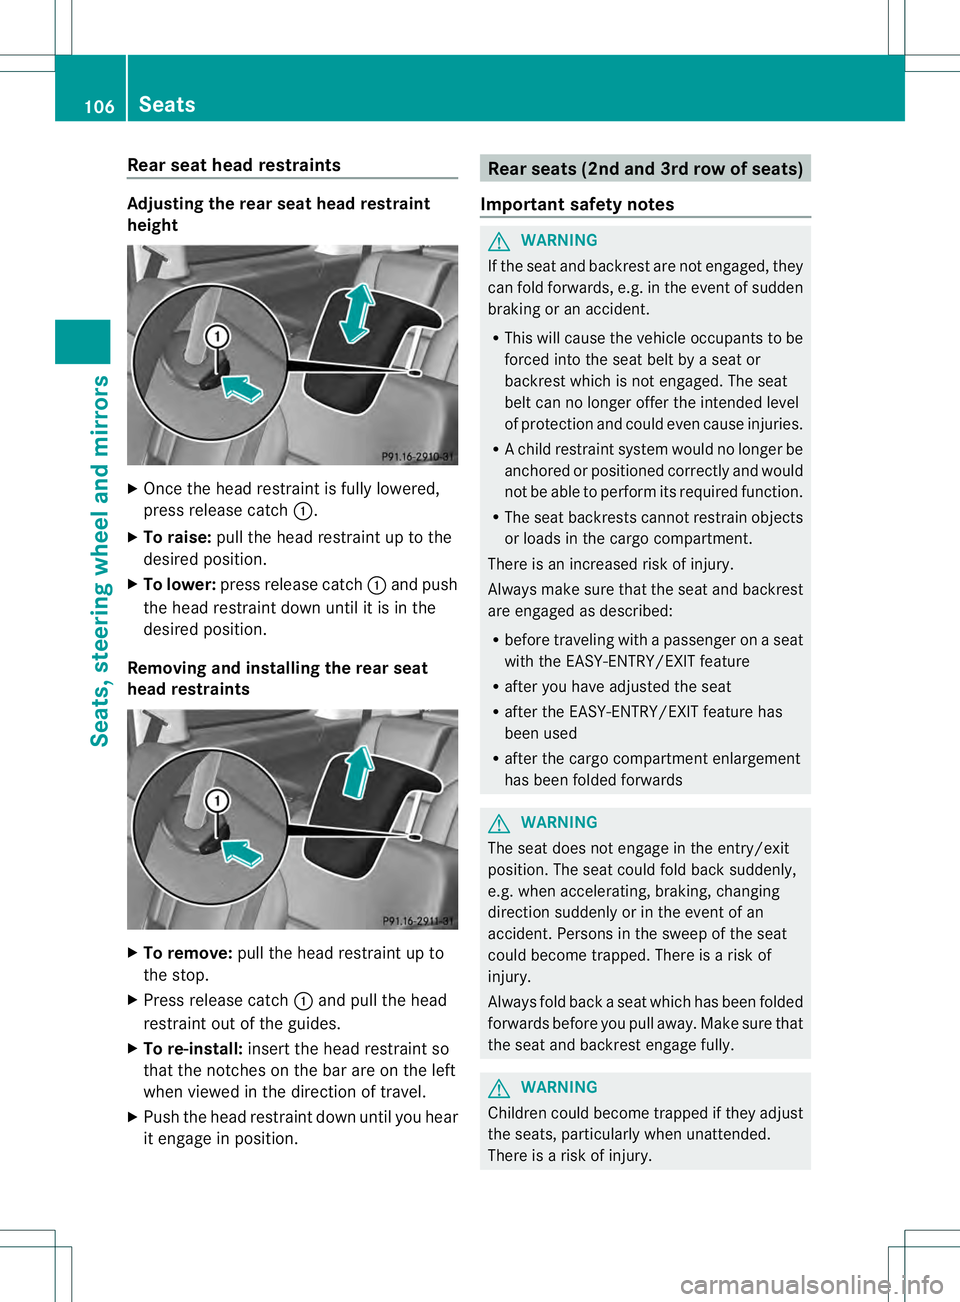
Adjusting the rear seat head restraint
height
X
Once the head restraint is fully lowered,
press release catch 0002.
X To raise: pull the head restraint up to the
desired position.
X To lower: press release catch 0002and push
the head restraint dow nuntil it is in the
desired position.
Removing and installing the rear seat
head restraints X
To remove: pull the head restraint up to
the stop.
X Press release catch 0002and pull the head
restraint ou tofthe guides.
X To re-install: insert the head restraint so
that the notches on the bar are on the left
when viewed in the direction of travel.
X Push the head restraint down until you hear
it engage in position. Rear seats (2nd and 3rd row of seats)
Important safety notes G
WARNING
If the seat and backrest are not engaged, they
can fold forwards, e.g. in the event of sudden
braking or an accident.
R This will cause the vehicle occupants to be
forced into the seat belt by a seat or
backrest which is not engaged. The seat
belt can no longer offer the intended level
of protection and could even cause injuries.
R Ac hild restraint system would no longer be
anchored or positioned correctly and would
not be able to perform its required function.
R The seat backrests cannot restrain objects
or loads in the cargo compartment.
There is an increased risk of injury.
Always make sure that the seat and backrest
are engaged as described:
R before traveling with a passenger on a seat
with the EASY-ENTRY/EXIT feature
R after you have adjusted the seat
R after the EASY-ENTRY/EXIT feature has
been used
R after the cargo compartment enlargement
has been folded forwards G
WARNING
The seat does not engage in the entry/exit
position. The seat could fold back suddenly,
e.g. when accelerating, braking, changing
direction suddenly or in the event of an
accident. Persons in the sweep of the seat
could become trapped. There is a risk of
injury.
Always fold back a seat which has been folded
forwards before you pull away.M ake sure that
the seat and backres tengage fully. G
WARNING
Childre ncould become trapped if they adjust
the seats, particularly when unattended.
There is a risk of injury. 106
SeatsSeats, steering wheel and mirrors
Page 117 of 454
Problems with the seat ventilation
Problem Possible causes/consequences and
0001 Solutions
The seat ventilation has
switched off
prematurely or cannot
be switched on. The on-board voltage is too low because too many electrical
consumers are switched on.
X
Switch off electrical consumers that you do not need, such as
the rear window defroster or interior lighting.
Once the battery is sufficiently charged, the seat ventilation will
switch back on automatically. Steering wheel
Important safety notes
G
WARNING
You could lose control of your vehicle if you
do the following while driving:
R adjust the driver's seat, head restraint,
steering wheel or mirrors
R fasten the seat belt
There is a risk of an accident.
Adjust the driver's seat, head restraint,
steering wheel and mirror and fasten your
seat belt before starting the engine. G
WARNING
Children could injure themselves if they
adjust the steering wheel. There is a risk of
injury.
When leaving the vehicle, always take the
SmartKey with you and lock the vehicle. Never
leave children unsupervised in the vehicle. Adjusting the steering wheel
manually
G
WARNING
If the steering wheel is unlocked while the
vehicle is in motion, it could change position
unexpectedly. This could cause you to lose
control of the vehicle. There is a risk of an
accident. Before starting off, make sure the steering
wheel is locked. Never unlock the steering
wheel while the vehicle is in motion.
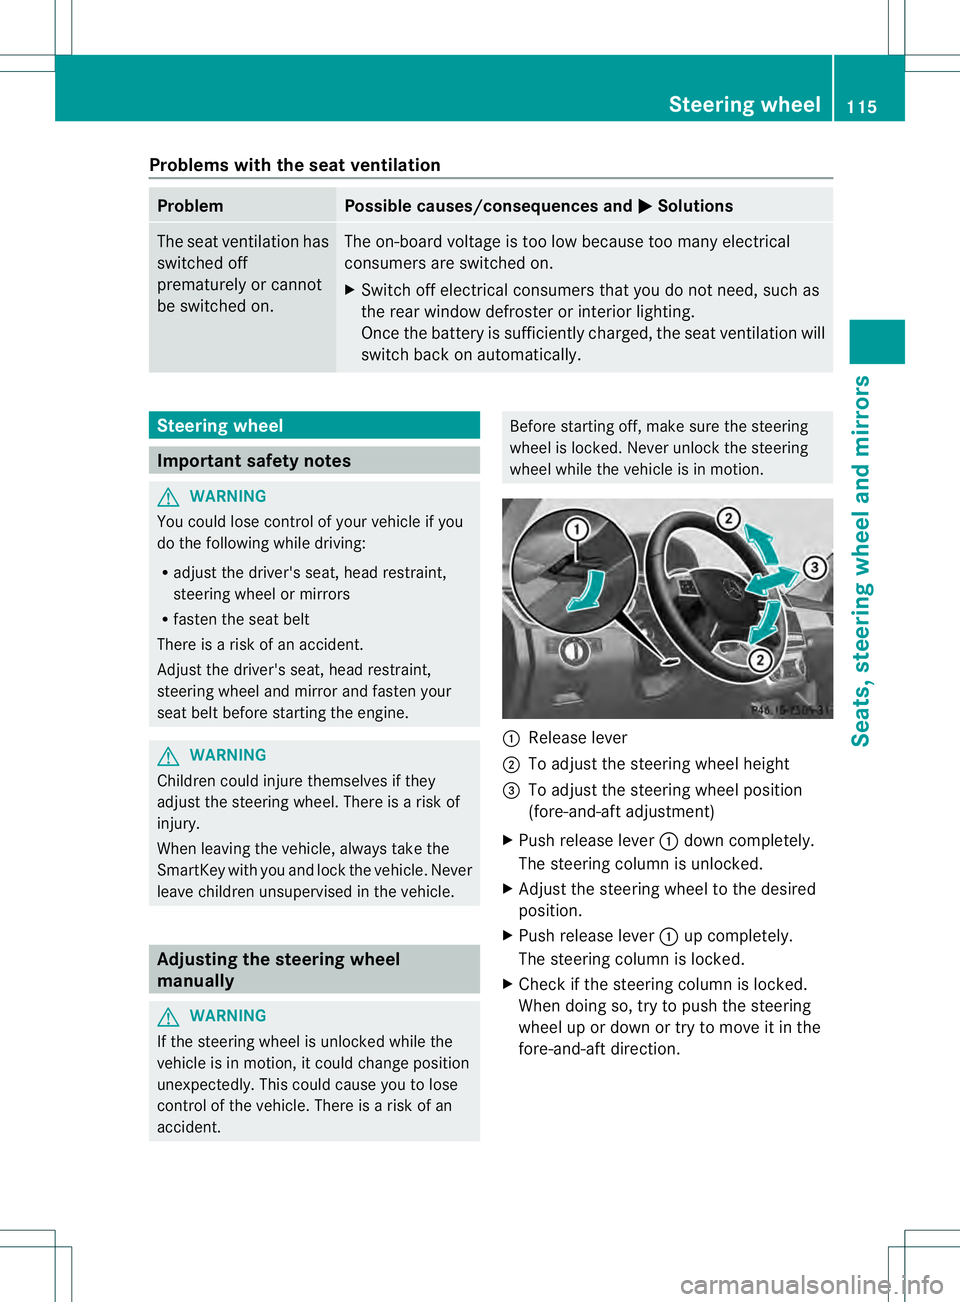
0002
Release lever
0003 To adjust the steering wheel height
0021 To adjust the steering wheel position
(fore-and-aft adjustment)
X Push release lever 0002down completely.
The steering column is unlocked.
X Adjust the steering wheel to the desired
position.
X Push release lever 0002up completely.
The steering column is locked.
X Check if the steering column is locked.
When doing so, try to push the steering
wheel up or down or try to move it in the
fore-and-aft direction. Steering wheel
115Seats, steering wheel and mirrors Z
Page 118 of 454
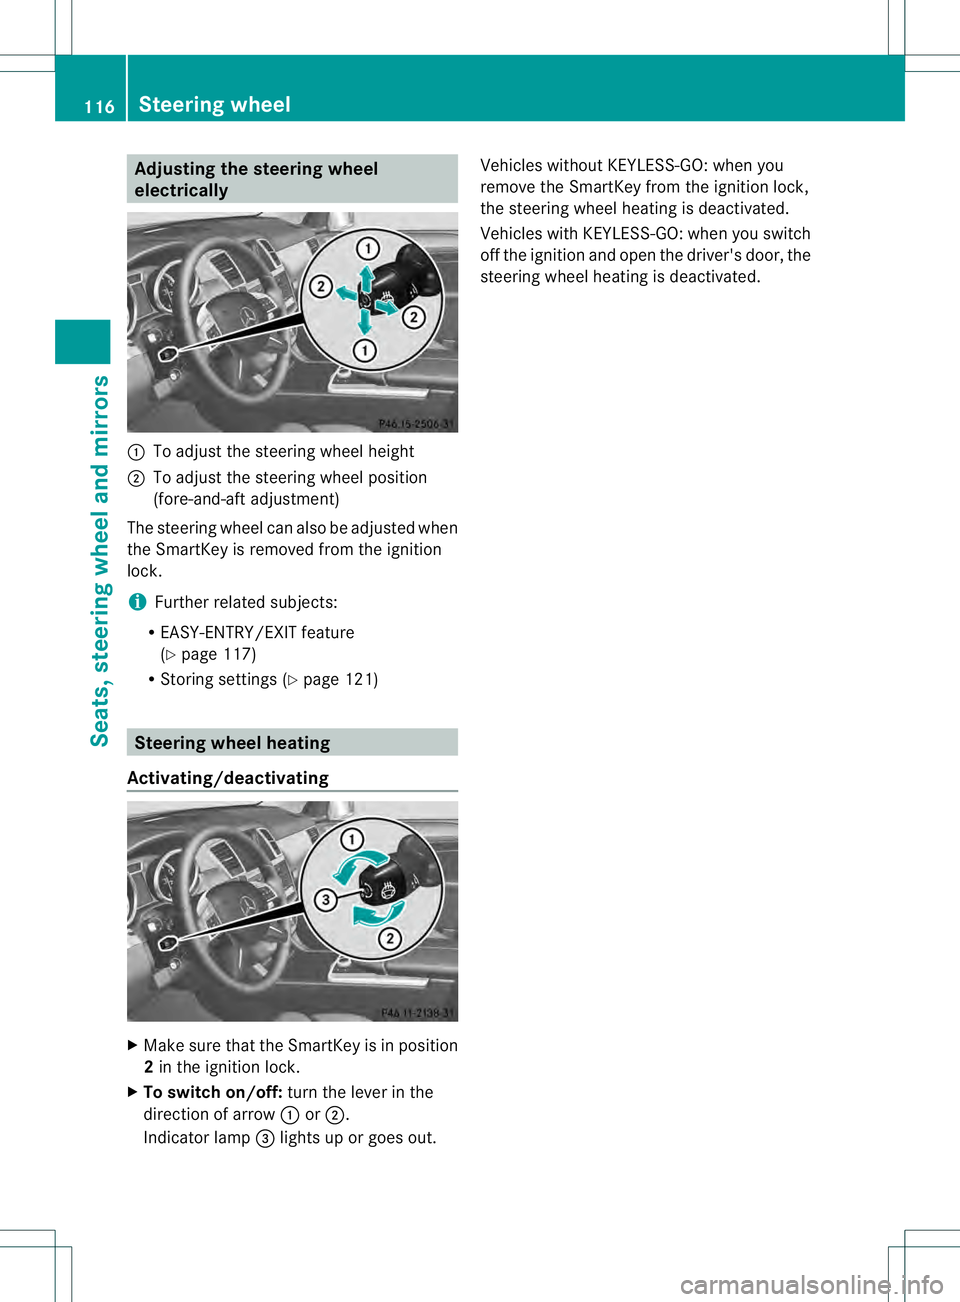
Adjusting the steering wheel
electrically
0002
To adjust the steering wheel height
0003 To adjust the steering wheel position
(fore-and-aft adjustment)
The steering wheel can also be adjusted when
the SmartKey is removed from the ignition
lock.
i Further related subjects:
R EASY-ENTRY/EXIT feature
(Y page 117)
R Storing settings (Y page 121)Steering wheel heating
Activating/deactivating X
Make sure that the SmartKey is in position
2in the ignition lock.
X To switch on/off: turn the lever in the
direction of arrow 0002or0003.
Indicato rlamp 0021lights up or goes out. Vehicles without KEYLESS-GO
:when you
remove the SmartKey from the ignition lock,
the steering wheel heating is deactivated.
Vehicles with KEYLESS-GO: when you switch
off the ignition and open the driver's door, the
steering wheel heating is deactivated. 116
Steering wheelSeats, steering wheel and mirrors
Page 194 of 454
R
Always keep the engine running and in gear
when driving on a downhill gradient.
Activate DSR (Y page 250).
R Always keep the doors, tailgate, windows
and sliding sunroo fclosed while driving.
R Adapt your speed to the terrain. The
rougher, steeper or more ruts on the
terrain, the slower your speed should be.
R Drive slowly and at an even speed through
the water .Ensure tha tabow wave does not
form as you drive.
R Drive with extreme care on unfamiliar off-
road routes where visibility is poor. For
safety reasons, get out of the vehicle first
and survey the off-road route.
R Look out for obstacles, such as rocks,
holes, tree stumps and furrows.
R Check the depth of water before fording
rivers and streams.
R When fording, do not stop and do not
switch off the engine.
R On sand, drive quickly to overcome the
rolling resistance. Otherwise the vehicle's
wheels could become stuc kinloose
ground.
R Do not jump with the vehicle as this will
interrupt the vehicle's propulsion.
R Always keep the engine running and in gear
when driving on a slope.
R Do not shift the automatic transmission to
transmission position N.
i Do not use the HOLD function when
driving off-road, on steep uphill or downhill
gradients or on slippery or loose surfaces.
The HOLD function cannot hold the vehicle
on such surfaces.
Checklist before driving off-road !
If the engine oil warning lamp lights up
while the vehicle is in motion, stop the
vehicle in a safe place as soon as possible.
Check the engine oil level. The engine oil
warning lamp warning must not be ignored.
Continuing the journey while the symbol is
displayed could lead to engine damage. X
Engine oil level: check the engine oil level
and add oil if necessary.
When driving on steep gradients, the
engine oil level must be sufficiently high to
ensure a correc toil supply in the vehicle.
X DEF tank (BlueTEC vehicles): check the
fluid level and, if necessary, refill to the
maximum (13 l) (Y page 181).
X Wheel-changing tool kit: check that the
jac kis working and make sure you have the
lug wrench, a robust tow cable and a folding
spade in the vehicle.
X Wheels and tires: check the tire tread
depth and tire pressure.
X Check for damage and remove any foreign
objects, e.g. small stones, from the
wheels/tires.
X Replace any missing valve caps.
X Replace dented or damaged wheels.
X Rims: dented or bent rims can result in a
loss of tire pressure and damage the tire
bead. Therefore, check your rims before
driving off-road and replace them as
required.
Checklist after driving off-road !
If you detect damage to the vehicle after
driving off-road, have the vehicle checked
immediately at a qualified specialist
workshop.
X Deactivate DSR (Y page 250).
X Vehicles with the AIRMATIC package:
lower the vehicle to a ride height suitable
for the road conditions, e.g. to the
highway/high-speed level.
X Cleant he headlamps and rear lights and
check for damage.
X Cleant he front and rear license plates.
X Cleant he wheels/tires with a water jet and
remove any foreign objects.
X Cleant he wheels, wheel housings and the
vehicle underside with a water jet; check
for any foreign objects and damage. 192
Driving tipsDriving and parking
Page 210 of 454
G
WARNING
When you drive with the chassis lowered or
raised, the vehicle's braking and driving
characteristics can be significantly impaired.
You could also exceed the permissible vehicle
height if the chassis is raised. There is a risk
of an accident.
Adjust the vehicle level before pulling away. G
WARNING
Due to the high center of gravity, the vehicle
may start to skid and roll over in the event of
an abrupt steering maneuver and/or when
the vehicle's speed is not adapted to the road
conditions. There is a risk of an accident.
Always adapt yours peed and driving style to
the vehicle's driving characteristics and to the
prevailing road and weather conditions.
! When driving on extremely rough terrain,
select a high vehicle level in good time.
Make sure there is always sufficien tground
clearance. You will otherwise damage the
vehicle.
R Utility vehicles have a significantly higher
rollover rate than other types of vehicles.
Failure to operate this vehicle safely may
result in an accident, rollover of the vehicle,
and severe or fatal injury.
R In a rollover crash, an unbelted person is
significantly more likely to die than a
person wearing a seat belt.
You and all vehicle occupants should
always weary our seat belts.
Level control adapts the vehicle level
automatically to the current operating and
driving situation. This results in reduced fuel
consumption and improved handling.
Make changes to the vehicle level while the
vehicle is in motion .This enables the vehicle
to adjust to the new level as quickly as
possible.
The vehicle level may change visibly if you
park the vehicle and the outside temperature
changes. If the temperature drops, the vehicle level is lower; with an increase in
temperature, the vehicle level rises.
If you unlock the vehicle or open a door, the
vehicle begins to compensate for load
discrepancies while still parked. However, for
significant level changes, such as after the
vehicle has been stationary for a long period,
the engine must be on. For safety reasons,
the vehicle is only lowered when the doors are
closed. Lowering is interrupted if a door is
opened, and it continues once the door has
been closed.
For information about driving off-road, see
(Y
page 191).
Basic settings The extentt
o which the vehicle is raised or
lowered depends on the basic setting
selected.
Select:
R highway/high-speed level for driving on
normal roads
R off-road level 1for driving on easily
negotiable off-road terrain
R off-road level 2 for driving on normal off-
road terrain
R off-road level 3for freeing the vehicle in
particularly rough terrain at low speeds
only
The individual vehicle levels differ from
highway level as follows:
R highway level: +/–0 in (+/–0 mm)
R high-speed level: –0.6 in (–15 mm)
R off-road level 1: + 1.2 in (+30 mm)
R off-road level 2: + 2.3 in (+60 mm)
R off-road level 3: + 3.6 in (+ 90 mm)
Highway/high-speed level !
Make sure that there is enough ground
clearance when the vehicle is being
lowered. It could otherwise hit the ground,
damaging the underbody. 208
Driving systemsDriving and parking
Page 215 of 454
X
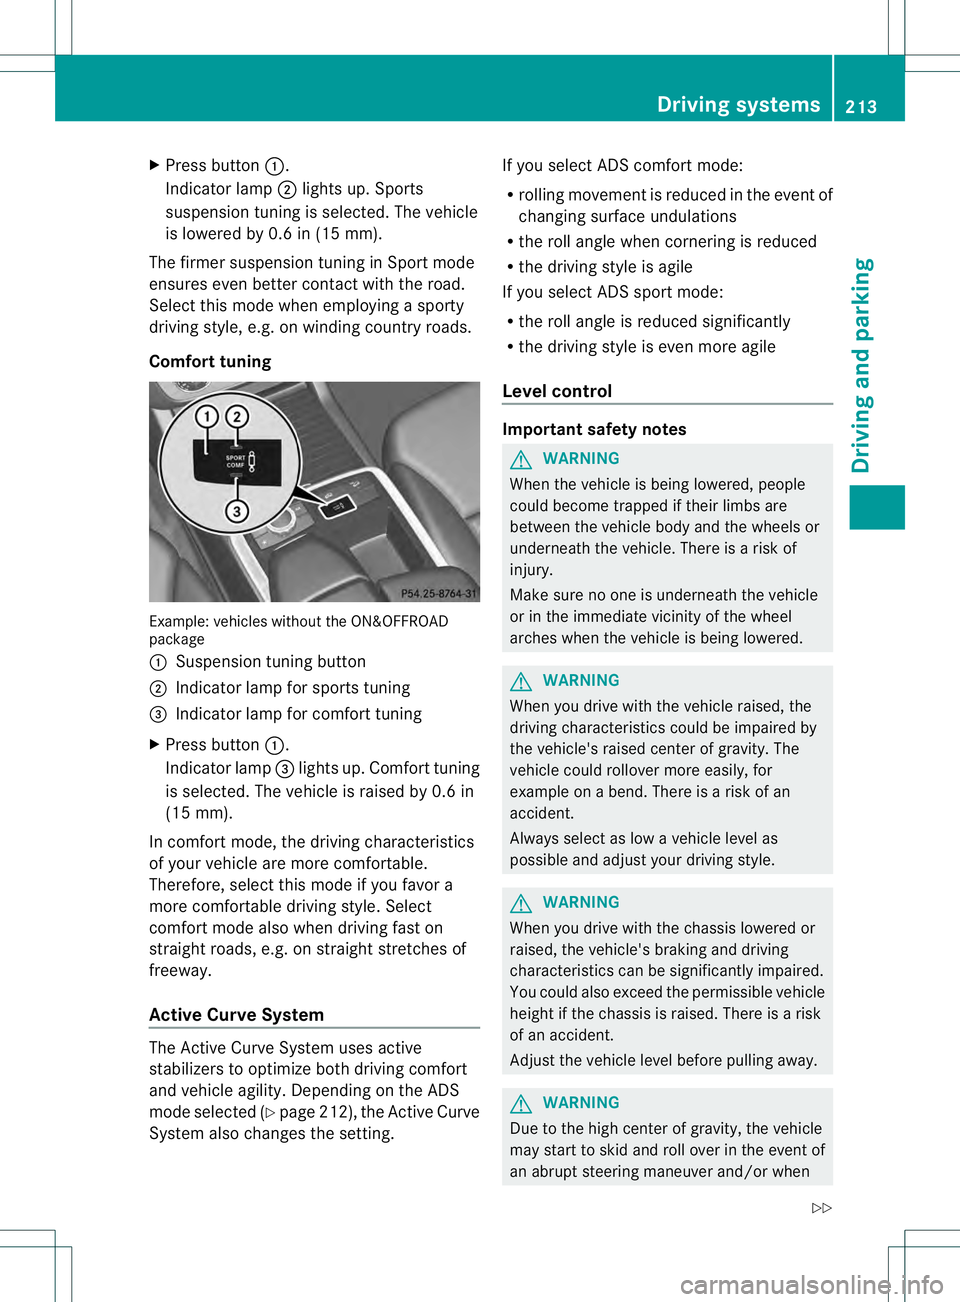
Press button 0002.
Indicator lamp 0003lights up. Sports
suspension tuning is selected. The vehicle
is lowered by 0.6 in (15 mm).
The firmer suspension tunin ginSport mode
ensures even better contact with the road.
Select this mode when employing a sporty
driving style, e.g. on winding country roads.
Comfort tuning Example: vehicles without the ON&OFFROAD
package
0002 Suspension tuning button
0003 Indicator lamp for sports tuning
0021 Indicator lamp for comfort tuning
X Press button 0002.
Indicator lamp 0021lights up. Comfort tuning
is selected. The vehicle is raised by 0.6 in
(15 mm).
In comfort mode, the driving characteristics
of your vehicle are more comfortable.
Therefore, select this mode if you favor a
more comfortable driving style. Select
comfort mode also when driving fast on
straight roads, e.g. on straight stretches of
freeway.
Active Curve System The Active Curve System uses active
stabilizers to optimize both driving comfort
and vehicle agility. Depending on the ADS
mode selected (Y page 212), the Active Curve
System also changes the setting. If you select ADS comfort mode:
R
rolling movement is reduced in the event of
changing surface undulations
R the roll angle when cornering is reduced
R the driving style is agile
If you select ADS sport mode:
R the roll angle is reduced significantly
R the driving style is even more agile
Level control Important safety notes
G
WARNING
When the vehicle is being lowered, people
could become trapped if their limbs are
between the vehicle body and the wheels or
underneath the vehicle. There is a risk of
injury.
Make sure no one is underneath the vehicle
or in the immediate vicinity of the wheel
arches when the vehicle is being lowered. G
WARNING
When you drive with the vehicle raised, the
driving characteristics could be impaired by
the vehicle's raised center of gravity. The
vehicle could rollover more easily, for
example on a bend. There is a risk of an
accident.
Always select as low a vehicle level as
possible and adjust your driving style. G
WARNING
When you drive with the chassis lowered or
raised, the vehicle's braking and driving
characteristics can be significantly impaired.
You could also exceed the permissible vehicle
height if the chassis is raised. There is a risk
of an accident.
Adjust the vehicle level before pulling away. G
WARNING
Due to the high center of gravity, the vehicle
may start to skid and roll over in the event of
an abrupt steering maneuver and/or when Driving systems
213Driving and parking
Z
Page 224 of 454
Parking tips:
R
On narrow roads, drive as close to the
parking space as possible.
R Parking spaces that are littered, overgrown
or partially occupied by trailer drawbars
might be identified incorrectly or not at all.
R Snowfall or heavy rain may lead to a parking
space being measured inaccurately.
R Pay attention to the PARKTRONIC
(Y page 219) warning messages during the
parking procedure.
R When transporting a load which protrudes
from your vehicle, you should not use
Active Parking Assist.
R Never use Active Parking Assist when snow
chains are installed.
R Make sure that the tire pressures are
always correct. This has adirec tinfluence
on the parking characteristics of the
vehicle.
General notes Active Parking Assist is an electronic parking
aid with ultrasound. Ultrasound is used to
measure the road on both sides of the vehicle.
As
uitable parking space is indicated by the
parking symbol. Active steering intervention
can assis tyou during parking.
You may also use PARKTRONIC
(Y page 217). When PARKTRONIC is switched
off, Active Parking Assist is also unavailable.
Use Active Parking Assist for parking spaces:
R that are parallel to the direction of travel
R that are on straight roads, not bends
R that are on the same level as the road, e.g.
not on the pavement
Detecting parking spaces G
WARNING
If there are objects above the detection range,
Active Parking Assist may turn prematurely.
You may cause a collision as a result. There is
a risk of an accident. If there are objects above the detection range,
stop and deactivate Active Parking Assist.
Objects located above the height range of
Active Parking Assist will not be detected
when the parking space is measured. These
are not taken into account when the parking
procedure is calculated, e.g. overhanging
loads, tail sections or loading ramps of goods
vehicles. In some circumstances, Active
Parking Assist may therefore guide you into
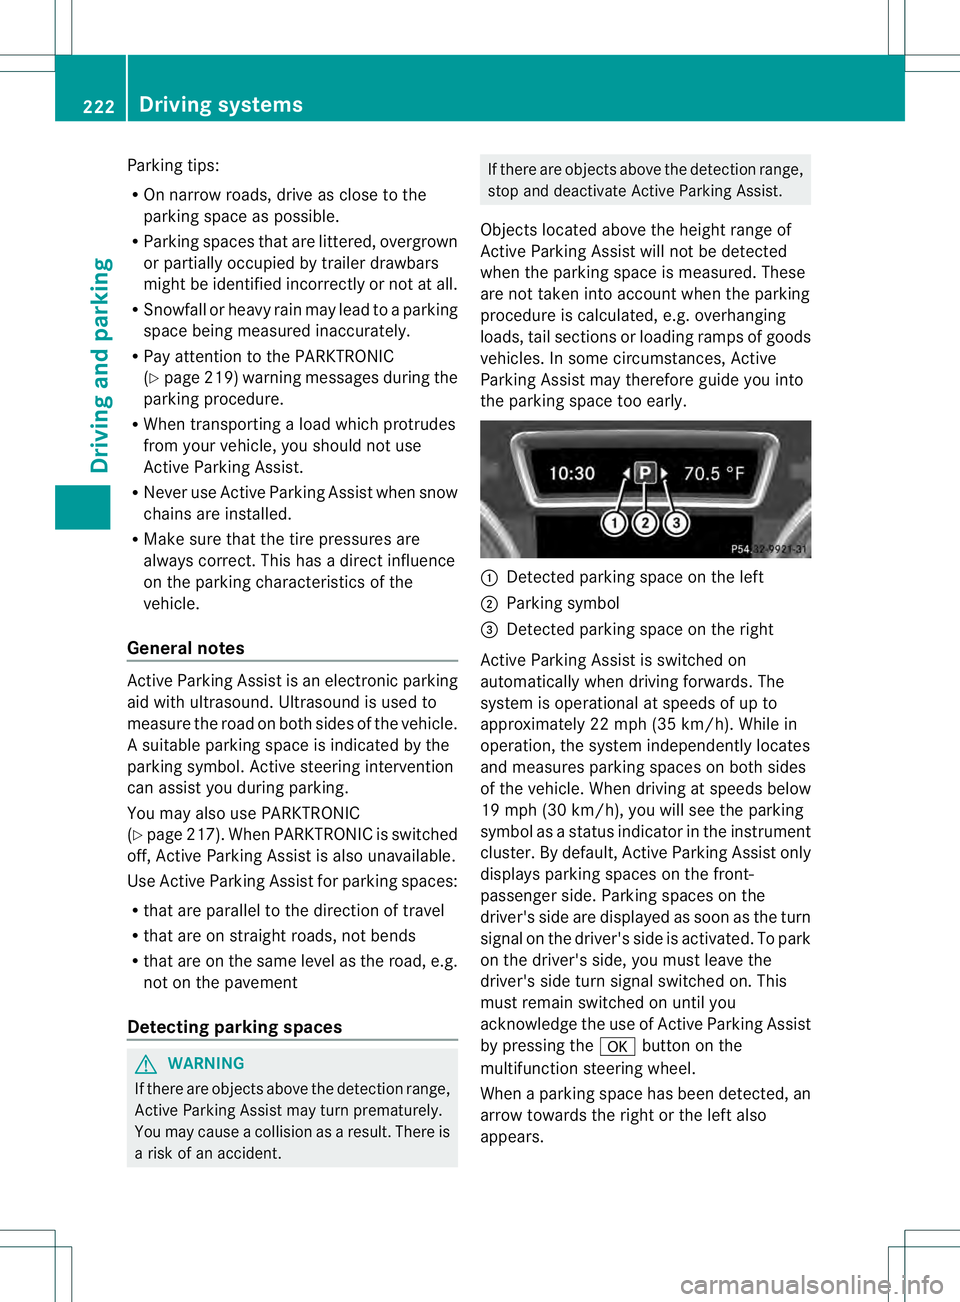
the parking space too early. 0002
Detected parking space on the left
0003 Parking symbol
0021 Detected parking space on the right
Active Parking Assist is switched on
automatically when driving forwards. The
system is operational at speeds of up to
approximately 22 mph (35 km/h) .While in
operation, the system independently locates
and measures parking spaces on both sides
of the vehicle. When driving at speeds below
19 mph (30 km/h), you will see the parking
symbol as a status indicator in the instrument
cluster. By default, Active Parking Assist only
displays parking spaces on the front-
passenger side. Parking spaces on the
driver's side are displayed as soon as the turn
signal on the driver's side is activated. To park
on the driver's side, you must leave the
driver's side turn signal switched on. This
must remain switched on until you
acknowledge the use of Active Parking Assist
by pressing the 000Bbutton on the
multifunction steering wheel.
When a parking space has been detected, an
arrow towards the right or the left also
appears. 222
Driving systemsDriving and parking
Page 231 of 454
"Coupling up a trailer" function
!
The following distance specifications
refer to trailer tow hitches with ball
coupling that have been approved for this
vehicle by Mercedes-Benz.D istances may
differ if you use other ball couplings. In this
case, take into account that actual
distances will not match the following
distance specifications. Otherwise you
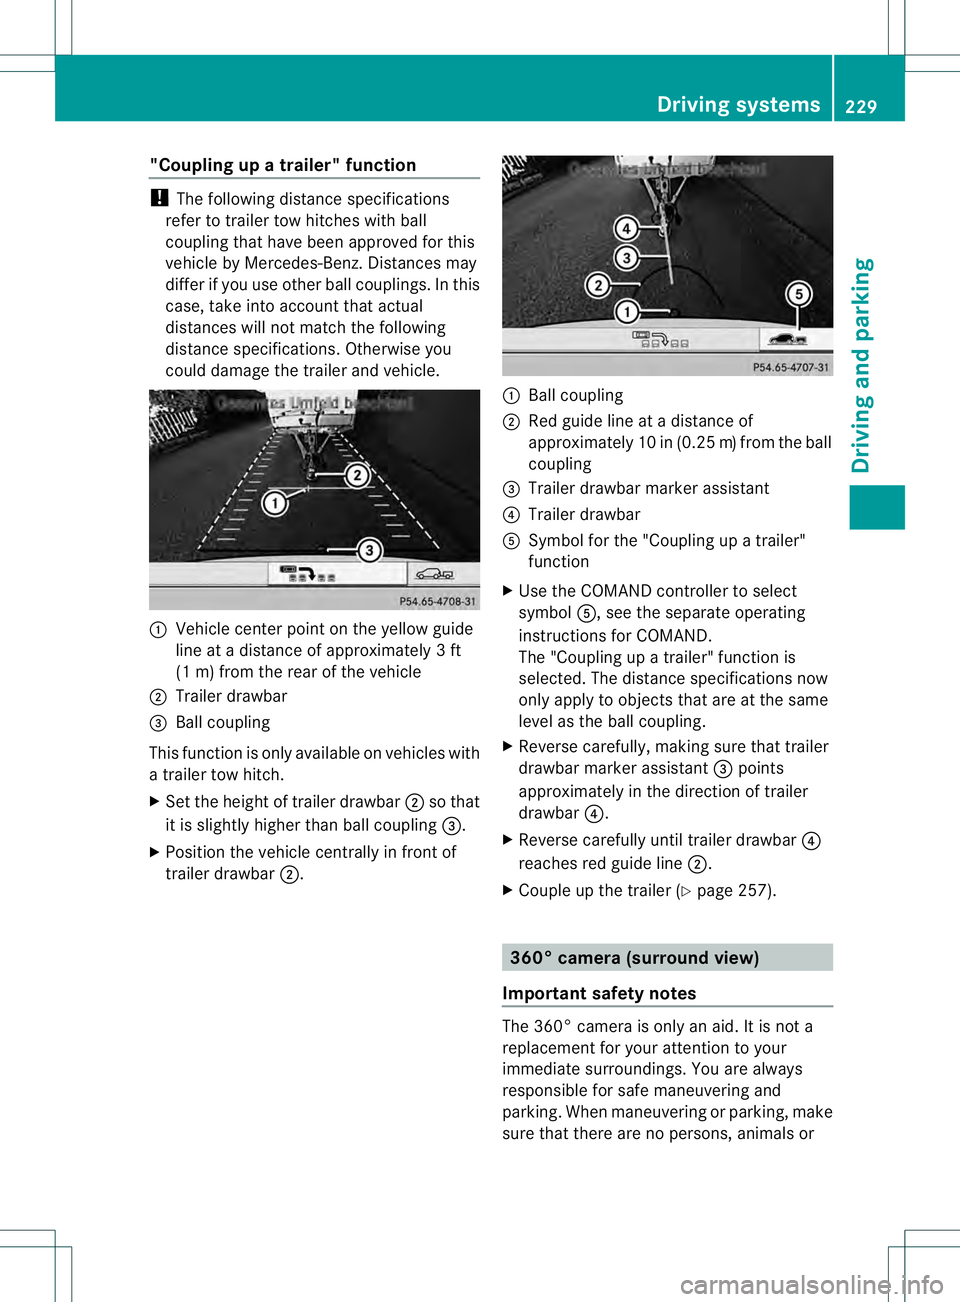
could damage the trailer and vehicle. 0002
Vehicle center point on the yellow guide
line at a distance of approximately 3ft
(1 m) from the rear of the vehicle
0003 Trailer drawbar
0021 Ball coupling
This function is only available on vehicles with
a trailer tow hitch.
X Set the height of trailer drawbar 0003so that
it is slightly higher than ball coupling 0021.
X Position the vehicle centrally in fron tof
trailer drawbar 0003. 0002
Ball coupling
0003 Red guide line at a distance of
approximately 10 in (0.25 m)from the ball
coupling
0021 Trailer drawbar marker assistant
0020 Trailer drawbar
001E Symbol for the "Coupling up a trailer"
function
X Use the COMAND controlle rto select
symbol 001E, see the separate operating
instructions for COMAND.
The "Coupling up a trailer" function is
selected. The distance specifications now
only apply to objects that are at the same
level as the ball coupling.
X Reverse carefully, making sure that trailer
drawbar marker assistant 0021points
approximately in the direction of trailer
drawbar 0020.
X Reverse carefully until trailer drawbar 0020
reaches red guide line 0003.
X Couple up the trailer (Y page 257). 360° camera (surround view)
Important safety notes The 360° camera is only an aid. It is not a
replacement for your attention to your
immediate surroundings. You are always
responsible for safe maneuvering and
parking. When maneuvering or parking, make
sure that there are no persons, animals or Driving systems
229Driving and parking Z