2013 MERCEDES-BENZ G-CLASS SUV center console
[x] Cancel search: center consolePage 148 of 364
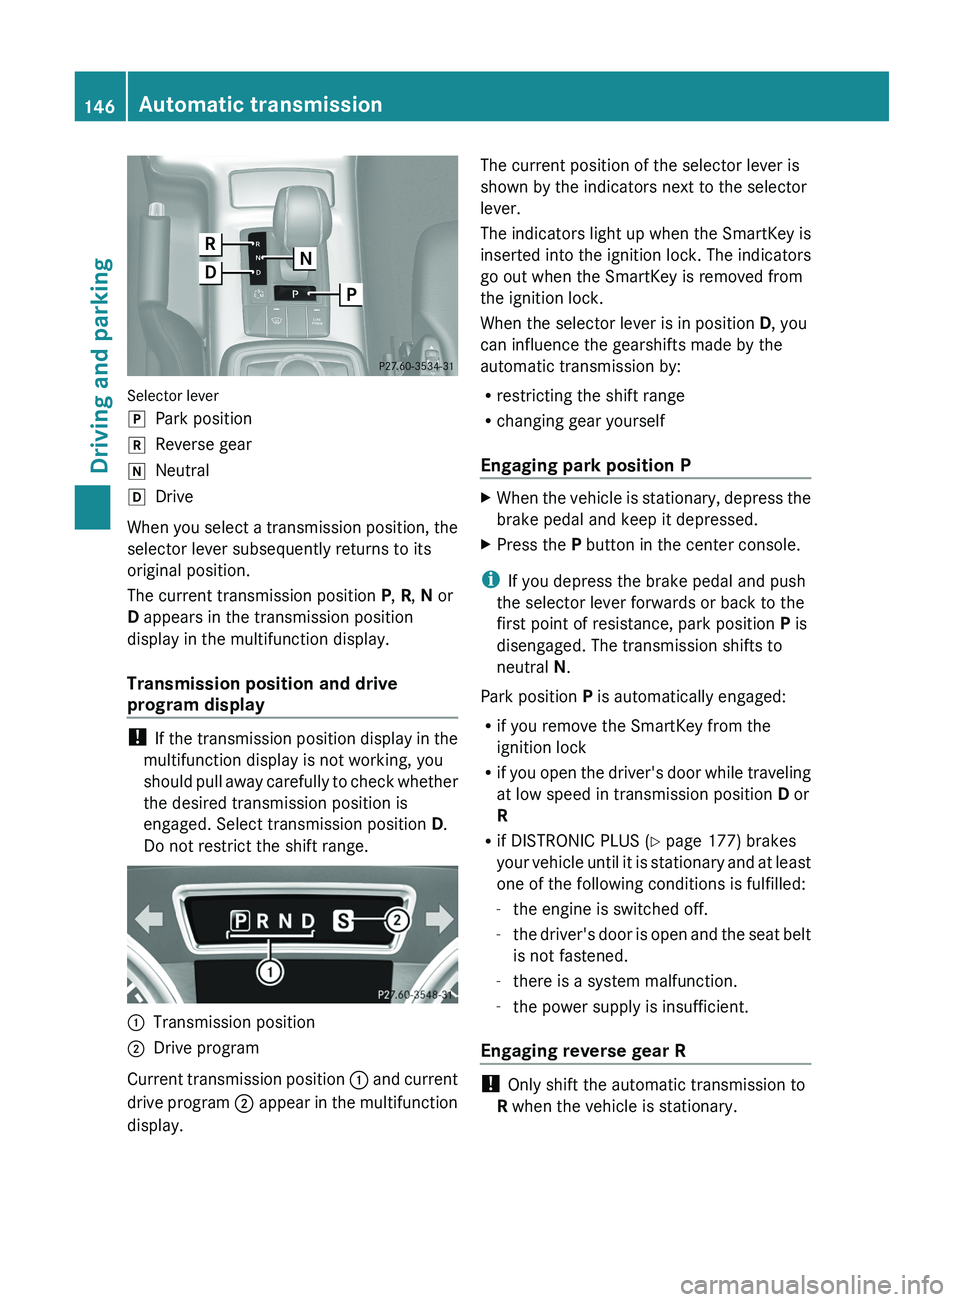
Selector lever
005D
Park position
005E Reverse gear
005C Neutral
005B Drive
When you select a transmission position, the
selector lever subsequently returns to its
original position.
The current transmission position P, R, N or
D appears in the transmission position
display in the multifunction display.
Transmission position and drive
program display !
If the transmission position
display in the
multifunction display is not working, you
should pull away carefully to check whether
the desired transmission position is
engaged. Select transmission position D.
Do not restrict the shift range. 0043
Transmission position
0044 Drive program
Current transmission position 0043 and current
drive program 0044
appear in the multifunction
display. The current position of the selector lever is
shown by the indicators next to the selector
lever.
The
indicators
light up
when the SmartKey is
inserted into the ignition lock. The indicators
go out when the SmartKey is removed from
the ignition lock.
When the selector lever is in position D, you
can influence the gearshifts made by the
automatic transmission by:
R restricting the shift range
R changing gear yourself
Engaging park position P X
When the vehicle is stationary, depress the
brake pedal and keep it depressed.
X Press the P button in the center console.
i If you depress the brake pedal and push
the selector lever forwards or back to the
first point of resistance, park position P is
disengaged. The transmission shifts to
neutral N.
Park position P is automatically engaged:
R if you remove the SmartKey from the
ignition lock
R if you open the
driver's door while traveling
at low speed in transmission position D or
R
R if DISTRONIC PLUS (Y page 177) brakes
your vehicle until it is stationary and at least
one of the following conditions is fulfilled:
-the engine is switched off.
- the driver's door is open and the seat belt
is not fastened.
- there is a system malfunction.
- the power supply is insufficient.
Engaging reverse gear R !
Only shift the automatic transmission to
R when the vehicle is stationary. 146
Automatic transmission
Driving and parking
Page 204 of 364
R
a central differential lock for the transfer
case,
R a differential lock for the front axle and
R a differential lock for the rear axle.
Each differential lock can
be engaged with the
respective switch on the center console. If
the transfer case differential is disabled, the
front and rear wheels turn at the same speed.
If the differential for the rear axle is locked,
both rear wheels turn at the same speed,
regardless of their individual torques. Please
note that activating the differential locks
severely restricts the vehicle's steerability.
Please note that the functions of the
differential are absolutely necessary for
driving on paved roads. The differential locks
must never be engaged when driving on
paved roads. Otherwise, the vehicle may not
be steerable and you could lose control of the
vehicle. The differential locks must therefore
only be engaged when driving off-road. You
may only engage the differential locks if the
functions of the 4ETS and ESP ®
driving
systems and the LOW RANGE off-road gear
are insufficient.
i The differential locks are only available in
the LOW RANGE off-road gear.
Activating the differential lock Important safety notes
G
WARNING
When differential locks are engaged on a firm,
high-grip surface, the vehicle's steerability is
greatly impaired. In particular, engaging the
differential locks when cornering could lead
to you losing control
of the vehicle. There is a
risk of an accident.
Disengage the differential locks immediately
on firm, high-grip surfaces. G
WARNING
ABS, 4ETS, ESP ®
and BAS are deactivated
while the differential locks are engaged. As a
result, the wheels could lock when braking and the braking distance is increased. There
is a risk of an accident.
Disengage the differential locks immediately
on firm, high-grip surfaces.
! Only activate the differential locks when:
R you are driving at walking pace.
R the driven wheels are not spinning.
R you are not driving
on a firm road surface.
General notes
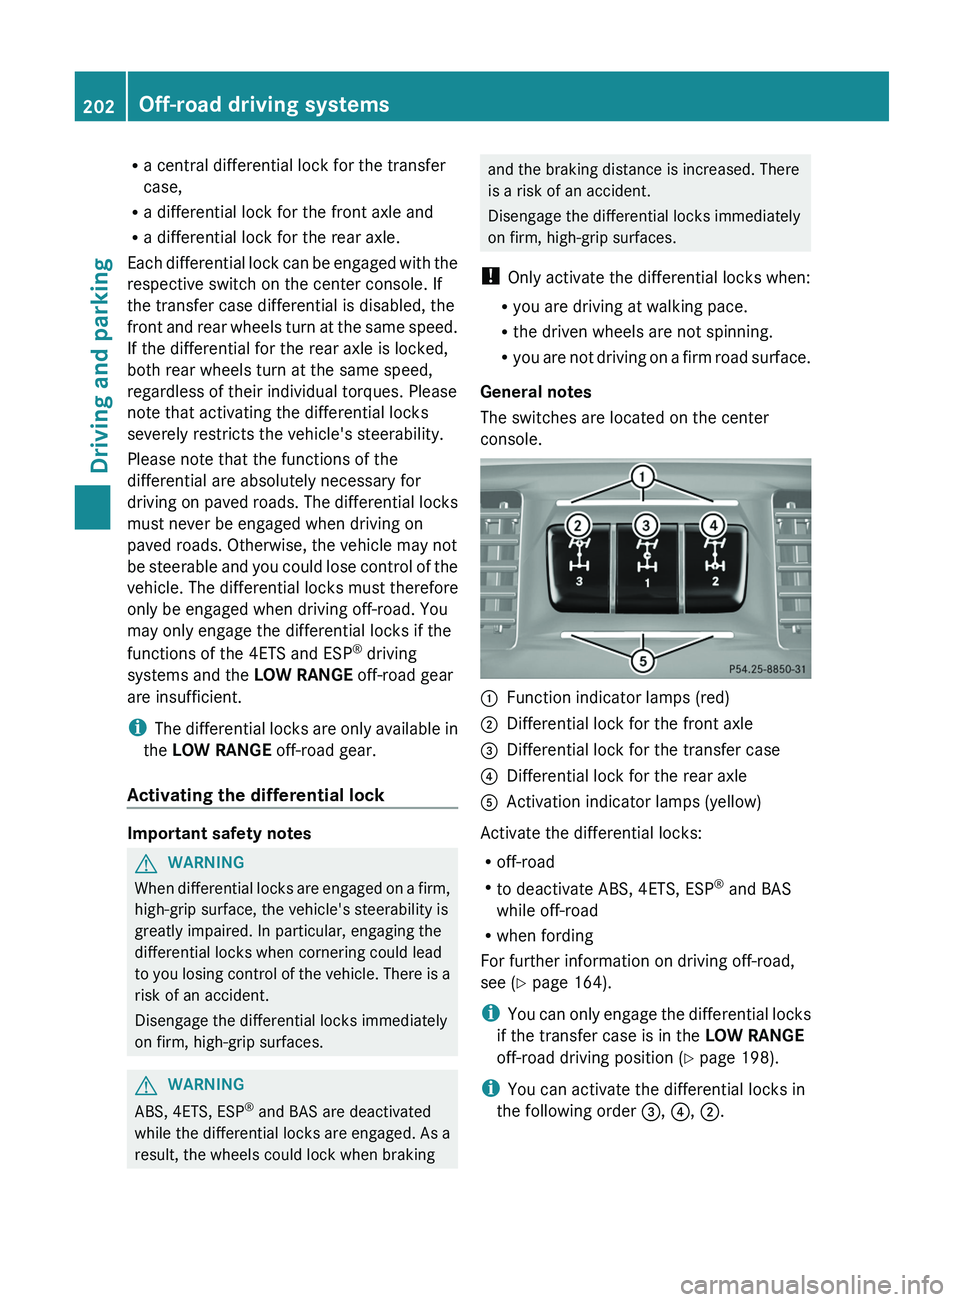
The switches are located on the center
console. 0043
Function indicator lamps (red)
0044 Differential lock for the front axle
0087 Differential lock for the transfer case
0085 Differential lock for the rear axle
0083 Activation indicator lamps (yellow)
Activate the differential locks:
R off-road
R to deactivate ABS, 4ETS, ESP ®
and BAS
while off-road
R when fording
For further information on driving off-road,
see ( Y page 164).
i You can only engage
the differential locks
if the transfer case is in the LOW RANGE
off-road driving position (Y page 198).
i You can activate the differential locks in
the following order 0087, 0085, 0044.202
Off-road driving systems
Driving and parking
Page 265 of 364
If the rear bench seat is not occupied:
X
Insert the belt tongue on the outer seat
belts into the buckle of opposite seat
belt 0043.
X Secure the load with sufficiently strong and
wear-resistant tie downs.
X Pad sharp edges for protection. Stowage areas
Stowage space
Important safety notes G
WARNING
To help avoid personal injury during a collision
or sudden maneuver, exercise care when
storing objects in the vehicle. Put luggage or
cargo in the cargo compartment if possible.
Do not pile luggage or cargo higher than the
seat backrests.
Keep compartment lids closed. This will help
to prevent stored objects from being thrown
about and injuring vehicle occupants during
R braking
R vehicle maneuvers
R an accident
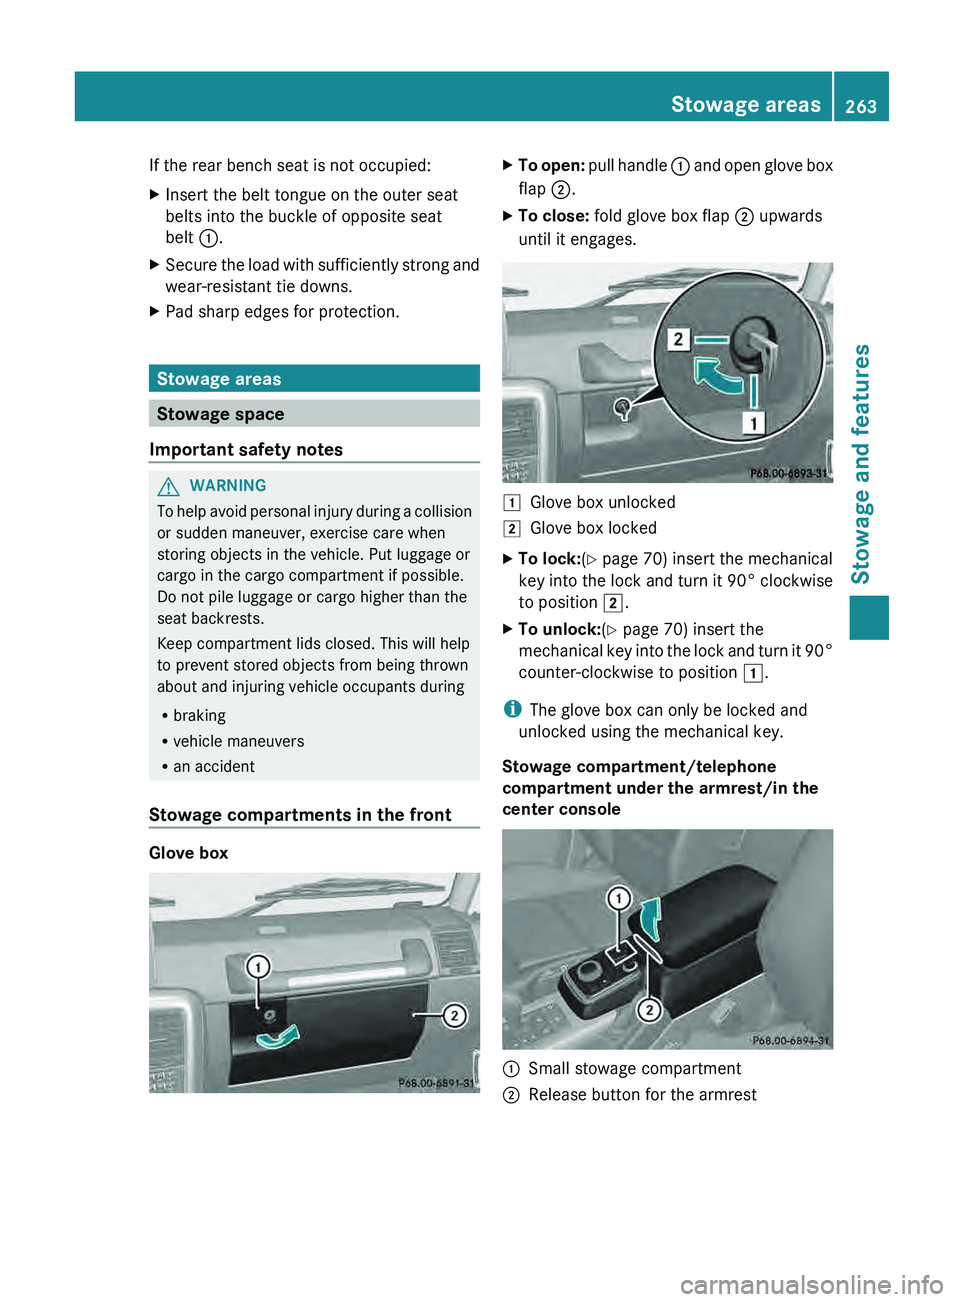
Stowage compartments in the front Glove box X
To open: pull handle 0043 and open glove box
flap 0044.
X To close: fold glove box flap 0044 upwards
until it engages. 0047
Glove box unlocked
0048 Glove box locked
X To lock:(Y page 70) insert the mechanical
key into the lock
and turn it 90° clockwise
to position 0048.
X To unlock:(Y page 70) insert the
mechanical key into the
lock and turn it 90°
counter-clockwise to position 0047.
i The glove box can only be locked and
unlocked using the mechanical key.
Stowage compartment/telephone
compartment under the armrest/in the
center console 0043
Small stowage compartment
0044 Release button for the armrest Stowage areas
263
Stowage and features Z
Page 270 of 364
The roof is not suited for transporting loads.
Never use roof rails or other accessories
mounted on the roof.
Features
Cup holders
Important safety notes G
WARNING
In order to help prevent spilling liquids on
vehicle occupants and/or vehicle
equipment,
only use containers that fit into the cup
holder. Use lids on open containers and do
not fill containers to a height where the
contents, especially hot liquids, could spill
during braking, vehicle maneuvers, or in an
accident. Liquids spilled on vehicle occupants
may cause serious personal injury. Liquids
spilled on vehicle equipment may cause
damage not covered by the Mercedes-Benz
Limited Warranty.
When not in use, keep the cup holder closed.
An open cup holder may cause injury to you
or others when contacted during braking,
vehicle maneuvers, or in an accident.
Keep in mind that objects placed in the cup
holder may come loose during braking,
vehicle maneuvers, or in an accident and be
thrown around in the vehicle interior. Objects
thrown around in the vehicle interior may
cause an accident and/or serious personal
injury.
Cup holder on the center console X
Fold cup holder 0043 all the way up.
Cup holders in the rear compartment !
Ensure that you remove all containers
from the cup holder in the rear before
folding the seat backrest and the seat
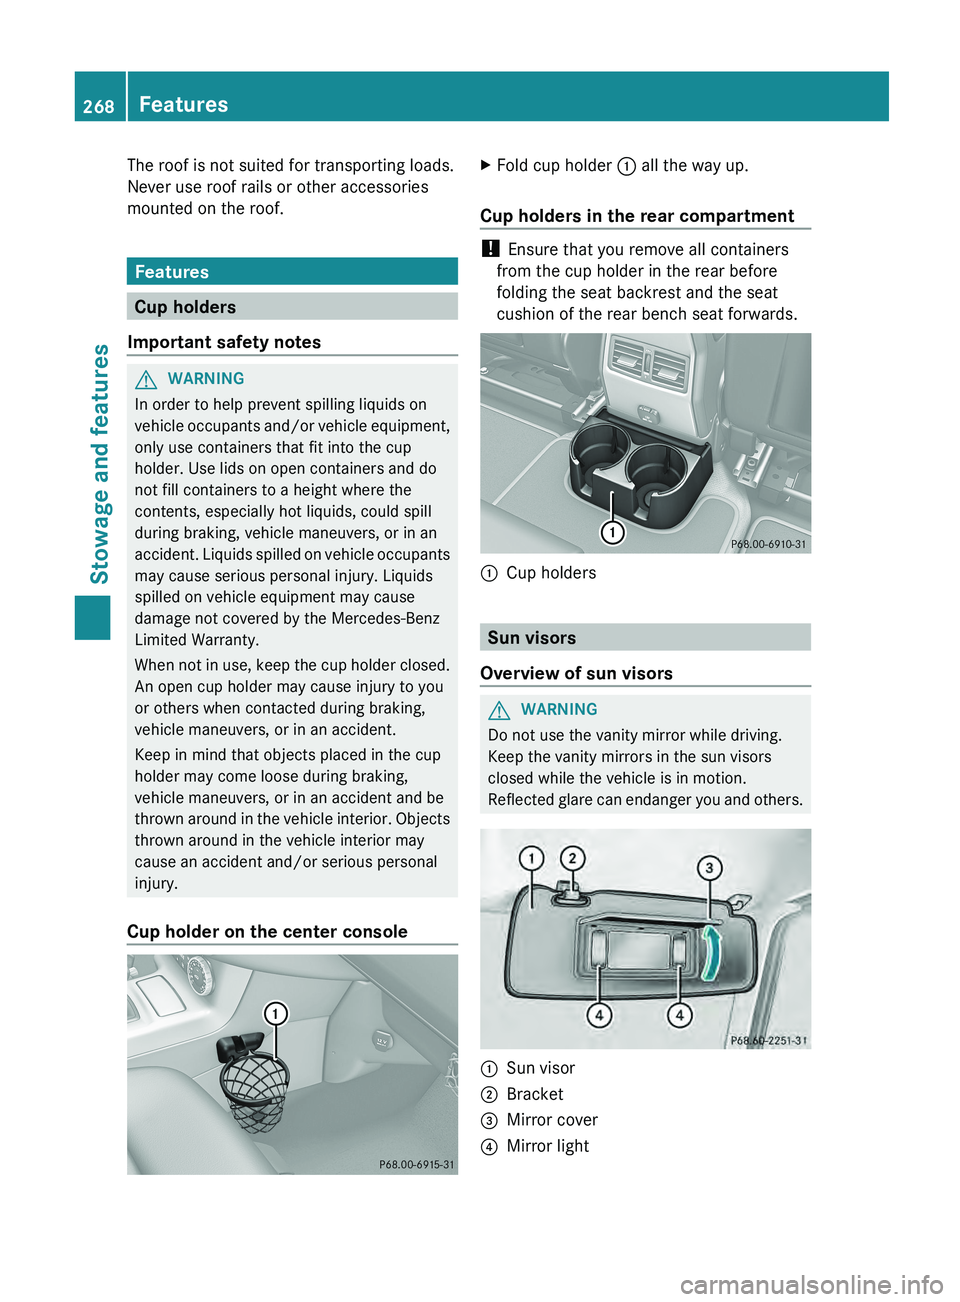
cushion of the rear bench seat forwards. 0043
Cup holders Sun visors
Overview of sun visors G
WARNING
Do not use the vanity mirror while driving.
Keep the vanity mirrors in the sun visors
closed while the vehicle is in motion.
Reflected glare can endanger
you and others. 0043
Sun visor
0044 Bracket
0087 Mirror cover
0085 Mirror light268
Features
Stowage and features
Page 271 of 364
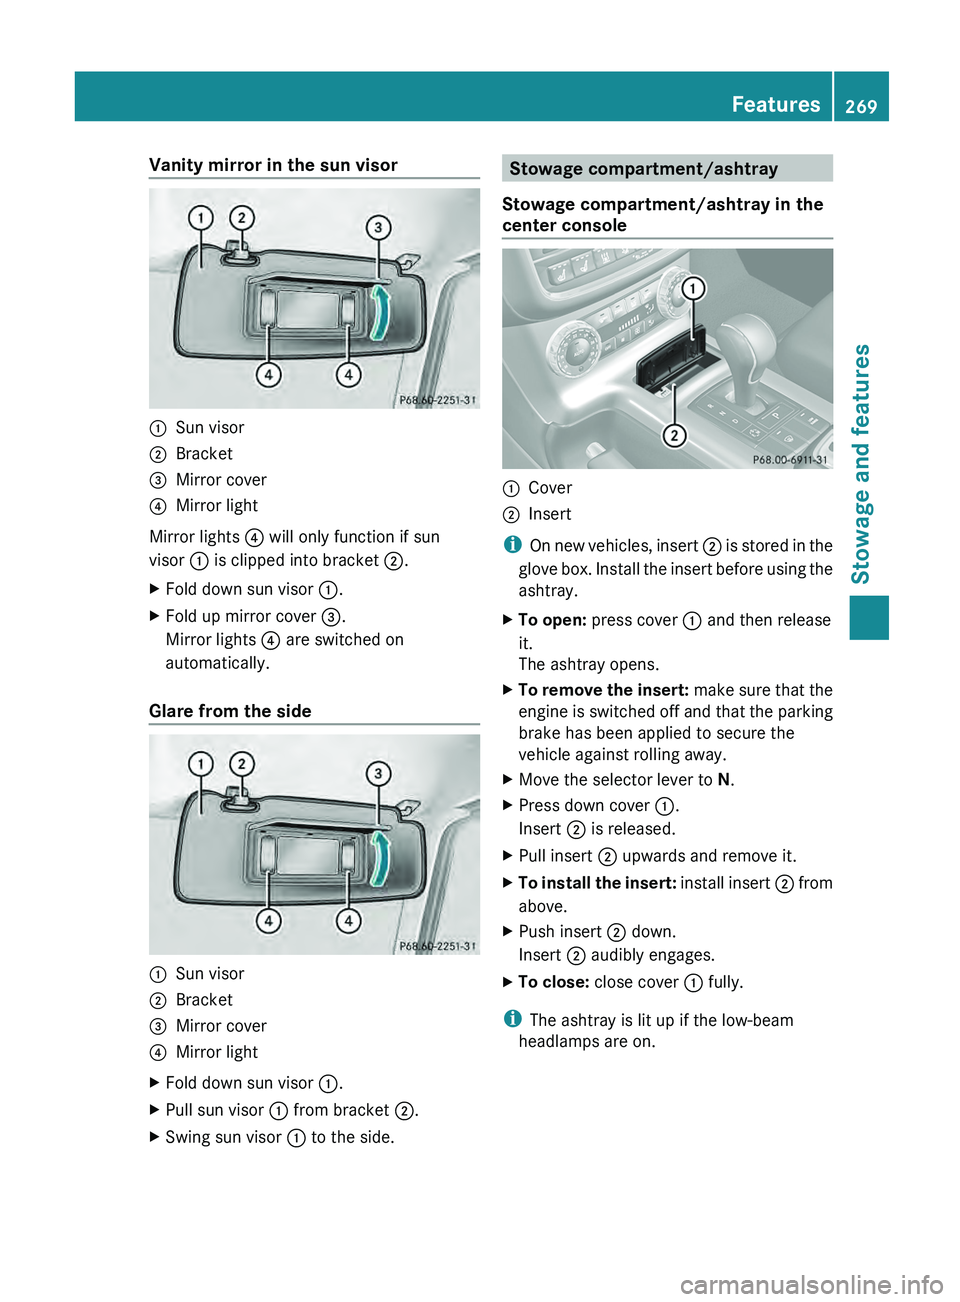
Vanity mirror in the sun visor
0043
Sun visor
0044 Bracket
0087 Mirror cover
0085 Mirror light
Mirror lights 0085 will only function if sun
visor 0043 is clipped into bracket 0044.
X Fold down sun visor 0043.
X Fold up mirror cover 0087.
Mirror lights 0085 are switched on
automatically.
Glare from the side 0043
Sun visor
0044 Bracket
0087 Mirror cover
0085 Mirror light
X Fold down sun visor 0043.
X Pull sun visor 0043 from bracket 0044.
X Swing sun visor 0043 to the side. Stowage compartment/ashtray
Stowage compartment/ashtray in the
center console 0043
Cover
0044 Insert
i On new vehicles,
insert 0044
is stored in the
glove box. Install the insert before using the
ashtray.
X To open: press cover 0043 and then release
it.
The ashtray opens.
X To remove the insert: make
sure that
the
engine is switched off and that the parking
brake has been applied to secure the
vehicle against rolling away.
X Move the selector lever to N.
X Press down cover 0043.
Insert 0044 is released.
X Pull insert 0044 upwards and remove it.
X To install the insert: install insert 0044
from
above.
X Push insert 0044 down.
Insert 0044 audibly engages.
X To close: close cover 0043 fully.
i The ashtray is lit up if the low-beam
headlamps are on. Features
269
Stowage and features Z
Page 273 of 364
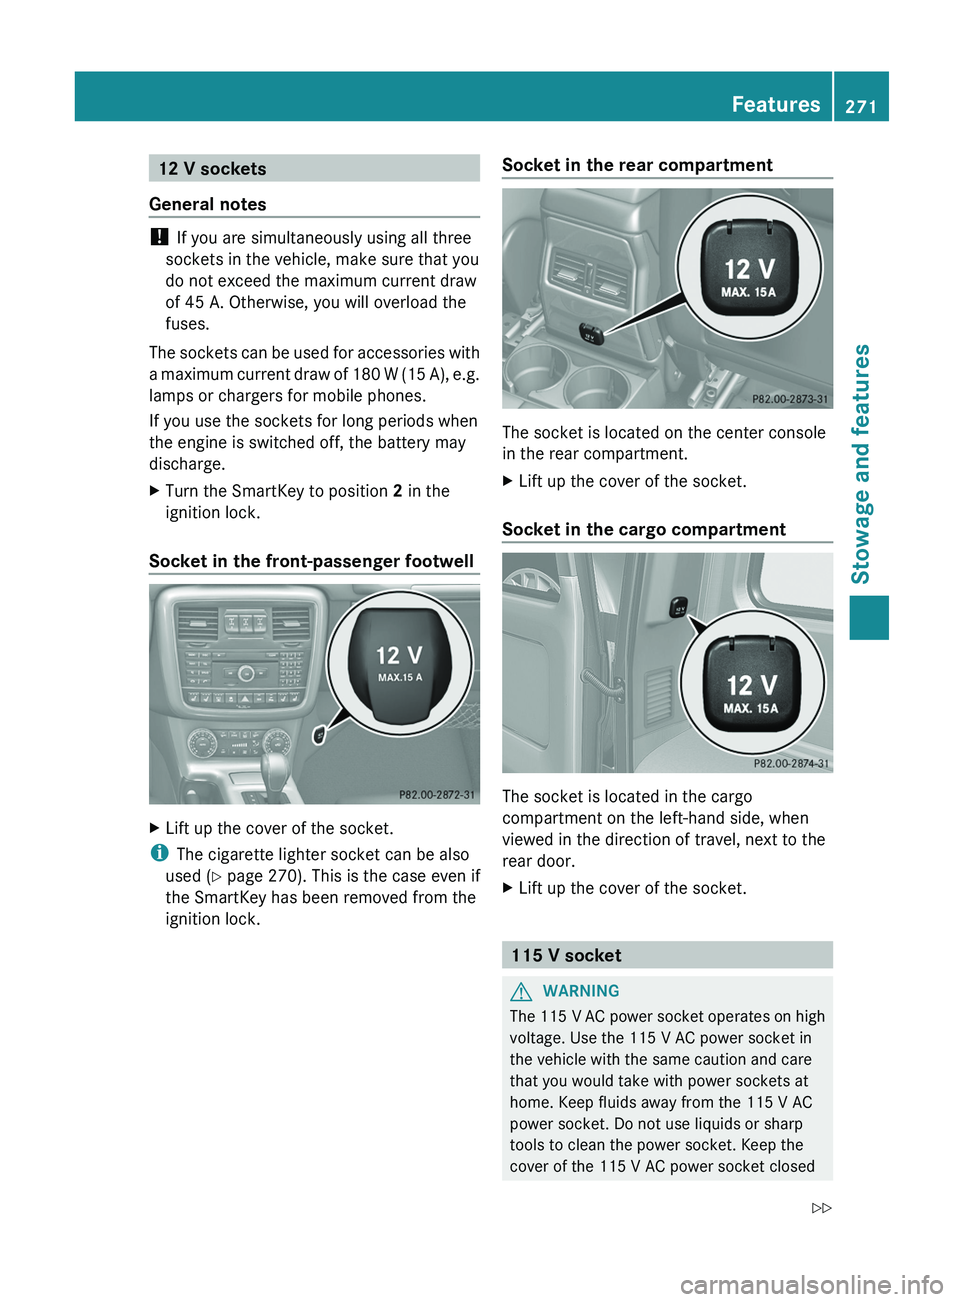
12 V sockets
General notes !
If you are simultaneously using all three
sockets in the vehicle, make sure that you
do not exceed the maximum current draw
of 45 A. Otherwise, you will overload the
fuses.
The sockets can be
used for accessories with
a maximum current draw of 180 W (15 A), e.g.
lamps or chargers for mobile phones.
If you use the sockets for long periods when
the engine is switched off, the battery may
discharge.
X Turn the SmartKey to position 2 in the
ignition lock.
Socket in the front-passenger footwell X
Lift up the cover of the socket.
i The cigarette lighter socket can be also
used ( Y page 270). This is the case even if
the SmartKey has been removed from the
ignition lock. Socket in the rear compartment The socket is located on the center console
in the rear compartment.
X
Lift up the cover of the socket.
Socket in the cargo compartment The socket is located in the cargo
compartment on the left-hand side, when
viewed in the direction of travel, next to the
rear door.
X
Lift up the cover of the socket. 115 V socket
G
WARNING
The 115 V AC power socket operates on high
voltage. Use the 115 V AC power socket in
the vehicle with the same caution and care
that you would take with power sockets at
home. Keep fluids away from the 115 V AC
power socket. Do not use liquids or sharp
tools to clean the power socket. Keep the
cover of the 115 V AC power socket closed Features
271
Stowage and features
Z
Page 317 of 364

X
Fold down the cup holder on the center
console (Y page 268).
X Adjust the front-passenger seat to its
foremost position (Y page 86).
X To open: remove screws 0043.
X Remove cover 0044 in the direction of the
arrow.
X To close: clip in cover 0044.
X Install cover 0044 with screws 0043. Fuse box in the battery case
The fuses in the battery case do not usually
need to be replaced. If a fuse change is
necessary, consult a qualified specialist
workshop. Fuses
315Breakdown assistance Z
Page 350 of 364
Useful information
i This Operator's Manual describes all
models and all standard and optional
equipment of your vehicle available at the
time of publication of the Operator's
Manual. Country-specific differences are
possible. Please note that
your vehicle may
not be equipped with all features
described. This also applies to safety-
related systems and functions.
i Read the information on qualified
specialist workshops: ( Y page 23).Genuine Mercedes-Benz parts
G
WARNING
Driving safety may be impaired if non-
approved parts, tires and wheels or safety-
relevant accessories are used.
This could lead to malfunctions in safety-
relevant systems, e.g. the
brake system. This
could cause you to lose control of your vehicle
and cause an accident.
For this reason, Mercedes-Benz recommends
that you use genuine Mercedes-Benz parts or
parts of equal quality. Only use tires, wheels
and accessories that have been specifically
approved for your vehicle. H
Environmental note
Daimler AG also supplies reconditioned major
assemblies and parts which are of the same
quality as new parts.
They are covered by the
same Limited Warranty entitlements as new
parts.
! The use of non-approved parts could
impair the vehicle's safety. For this reason,
Mercedes-Benz recommends genuine
Mercedes-Benz parts and approved
conversion parts and accessories for your
vehicle model. !
Air bags and Emergency Tensioning
Devices, as well as control units and
sensors for these restraint
systems, may be
installed in the following areas of your
vehicle:
R doors
R door pillars
R door sills
R seats
R cockpit
R instrument cluster
R center console
Do not install accessories such as audio
systems in these areas. Do not carry out
repairs or welding. You could impair the
operating efficiency of the restraint
systems.
Have aftermarket accessories installed at
a qualified specialist workshop.
Genuine Mercedes-Benz parts are subject to
strict quality control. Each part has been
specially developed, manufactured or
selected for Mercedes-Benz vehicles and
fine-tuned for them. Only genuine Mercedes-
Benz parts should therefore be used.
More than 300,000 different genuine parts
are available for Mercedes-Benz models.
All Mercedes-Benz Centers maintain a supply
of genuine Mercedes-Benz parts for
necessary service and repair work. In
addition, strategically located parts delivery
centers provide quick and reliable parts
service.
Always specify the vehicle identification
number (VIN) ( Y page 349) and the engine
number (Y page 350) when ordering genuine
Mercedes-Benz parts. Warranty
Your vehicle is covered
under the terms of the
warranties printed in the Service and
Warranty Information booklet. 348
Warranty
Technical data