2013 MERCEDES-BENZ G-CLASS SUV ECO mode
[x] Cancel search: ECO modePage 122 of 364
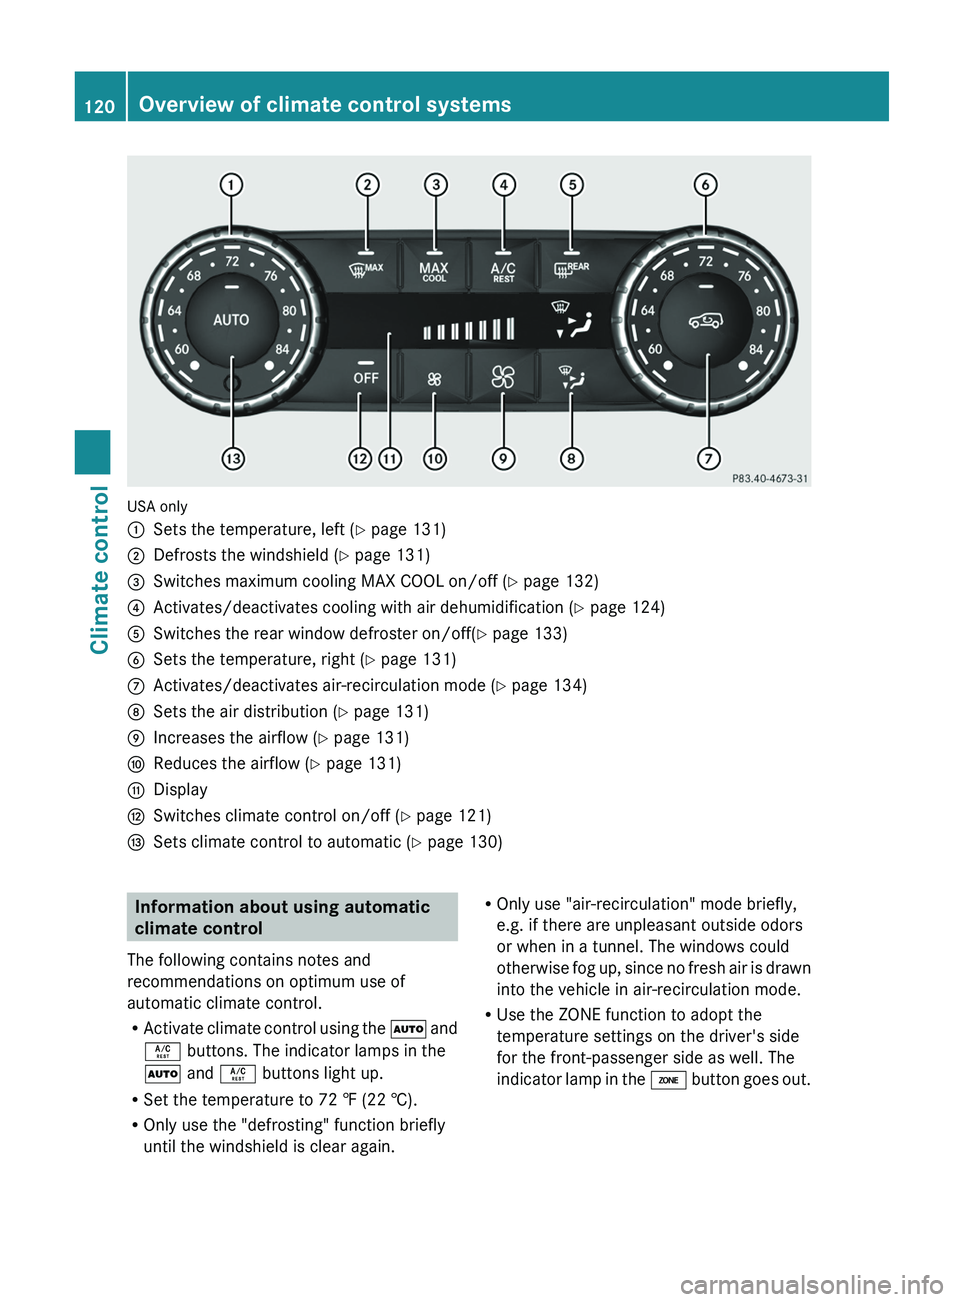
USA only
0043
Sets the temperature, left ( Y page 131)
0044 Defrosts the windshield ( Y page 131)
0087 Switches maximum cooling MAX COOL on/off ( Y page 132)
0085 Activates/deactivates cooling with air dehumidification ( Y page 124)
0083 Switches the rear window defroster on/off( Y page 133)
0084 Sets the temperature, right ( Y page 131)
006B Activates/deactivates air-recirculation mode (Y page 134)
006C Sets the air distribution (Y page 131)
006D Increases the airflow ( Y page 131)
006E Reduces the airflow ( Y page 131)
006F Display
0070 Switches climate control on/off ( Y page 121)
0071 Sets climate control to automatic (Y page 130) Information about using automatic
climate control
The following contains notes and
recommendations on optimum use of
automatic climate control.
R Activate climate control using
the 0058 and
0056 buttons. The indicator lamps in the
0058 and 0056 buttons light up.
R Set the temperature to 72 ‡ (22 †).
R Only use the "defrosting" function briefly
until the windshield is clear again. R
Only use "air-recirculation" mode briefly,
e.g. if there are unpleasant outside odors
or when in a tunnel. The windows could
otherwise fog up, since
no fresh air is drawn
into the vehicle in air-recirculation mode.
R Use the ZONE function to adopt the
temperature settings on the driver's side
for the front-passenger side as well. The
indicator lamp in the 00D6 button goes out.120
Overview of climate control systems
Climate control
Page 140 of 364
Useful information
i This Operator's Manual describes all
models and all standard and optional
equipment of your vehicle available at the
time of publication of the Operator's
Manual. Country-specific differences are
possible. Please note that
your vehicle may
not be equipped with all features
described. This also applies to safety-
related systems and functions.
i Read the information on qualified
specialist workshops: ( Y page 23).Breaking-in notes
Important safety notes
New and replaced brake pads and discs only
reach their optimum braking effect after
several hundred kilometers of driving.
Compensate for this by
applying greater force
to the brake pedal. The first 1,000 miles (1,500 km)
The more you look
after the engine when it is
new, the more satisfied you will be with its
performance in the future.
R You should therefore drive at varying
vehicle and engine speeds for the first
1,000 miles (1,500 km).
R Avoid heavy loads, e.g. driving at full
throttle, during this period.
R Change gear in good time, before the
tachometer needle is 00C3 of the way to the
red area of the tachometer.
R Do not manually shift to a lower gear to
brake the vehicle.
R If possible, do not depress the accelerator
pedal past the point of resistance
(kickdown).
R Only select shift ranges 3, 2 or 1 when
driving slowly, e.g. in mountainous terrain. After 1,000 miles (1,500 km), you can
increase the engine
speed
gradually and bring
the vehicle up to full speed.
Additional breaking-in notes for AMG
vehicles:
R Do not drive faster than 85 mph
(140 km/h for the first 1,000 miles
(1,500 km)
R Only allow the engine to reach a maximum
engine speed of 4,500 rpm briefly.
R Change gear in good time.
R Avoid driving off-road before the
differential oil change at 2,000 miles
(3,000 km).
R Ideally, drive for the first
1,000 miles(1,500 km) in drive program C.
i You should also observe these breaking-
in notes if the engine or parts of the drive
train on your vehicle have been replaced.
i Always observe the respective speed
limits. AMG vehicles with rear axle locking
differential
To improve the protection of the differential,
change the oil after a break-in distance of
2,000 miles (3,000 km). This oil change will
lengthen the service life of the differential.
Have the oil change
carried out at a qualified
specialist workshop. Mercedes-Benz
recommends that you use an authorized
Mercedes-Benz Center for this purpose. Driving
Important safety notes
G
WARNING
Objects in the driver's footwell can restrict the
pedal travel or obstruct a depressed pedal.
The operating and road safety of the vehicle
is jeopardized. There is a risk of an accident. 138
Driving
Driving and parking
Page 155 of 364
Problems with the automatic transmission
Problem Possible causes/consequences and
0050 SolutionsThe acceleration ability
is deteriorating.
The transmission no
longer changes gear. The transmission is in emergency mode.
It is only possible to shift into second
gear and reverse gear.
X Stop the vehicle.
X Shift the transmission to position P.
X Turn the SmartKey to position 0 in the ignition lock.
X Wait at least ten seconds before restarting the engine.
X Shift the transmission to position D or R.
If D
is selected, the
transmission shifts into second gear; if R is
selected, the transmission shifts into reverse gear.
X Have the transmission checked at a qualified specialist
workshop immediately. You hear a warning
tone. You have:
R
switched off the engine
R opened the driver's door
R not moved the selector lever to position P
X Move the selector lever to position P. Refueling
Important safety notes
G
WARNING
Gasoline is highly flammable and poisonous.
It burns violently and can cause serious
personal injury.
Never allow sparks, flames or smoking
materials near gasoline.
Turn off the engine before refueling.
Whenever you are around gasoline, avoid
inhaling fumes and any skin or clothing
contact.
Direct skin contact with fuels and the
inhalation of fuel vapors
are damaging to your
health.
! Do not use diesel to refuel vehicles with a
gasoline engine. Even small amounts of the
wrong fuel result in damage to the fuel
system and engine. !
Do not switch on the ignition if you
accidentally refuel with the wrong fuel.
Otherwise, the fuel will
enter the fuel lines.
Notify a qualified specialist workshop and
have the fuel tank and fuel lines drained
completely.
! Overfilling the fuel tank could damage the
fuel system.
! Take care not to spill any fuel on painted
surfaces. You could otherwise damage the
paintwork.
! Use a filter when refueling from a fuel can.
Otherwise, the fuel lines and/or injection
system could be blocked by particles from
the fuel can.
If you overfill the fuel tank, pressure may build
up in the fuel tank. This could cause fuel to
spray out when the fuel pump nozzle is
removed. There is a risk of injury. The fuel
tank is full when the fuel pump nozzle first
switches off. End the refueling process. Refueling
153
Driving and parking Z
Page 163 of 364
!
As the ESP ®
system operates
automatically, the engine and the ignition
must be switched off (the SmartKey must
be in position 0 or 1 in the ignition lock) if
the parking brake is tested on a brake
dynamometer (for a maximum of ten
seconds).
Braking applications triggered
automatically by ESP ®
may otherwise
seriously damage the brake system.
Mercedes-Benz recommends that you only
have brake pads/linings installed on your
vehicle which have been approved for
Mercedes-Benz vehicles or
which
correspond
to an equivalent quality standard. Brake
pads/linings which have not been approved
for Mercedes-Benz vehicles or which are not
of an equivalent quality could affect your
vehicle's operating safety.
Mercedes-Benz recommends that you only
use brake fluid that has been specially
approved for your vehicle by Mercedes-Benz,
or which corresponds to an equivalent quality
standard. Brake fluid which has not been
approved for Mercedes-Benz vehicles or
which is not of an equivalent quality could
affect your vehicle's operating safety.
All checks and maintenance work on the
brake system must be carried out at a
qualified specialist workshop.
Have brake pads installed and brake fluid
replaced at a qualified specialist workshop.
If your brake system is subject only to
moderate loads, you should test the
functionality of your brakes at regular
intervals by pressing firmly on the brake pedal
at high speeds. This improves the grip of the
brake pads.
You can find a description of Brake Assist
(BAS) on ( Y page 61).
High-performance brake system for
AMG vehicles The high-performance brake system is only
installed on the
G
63 AMG and the G 65 AMG. The high-performance brake system is
designed for heavy loads. This may lead to
noise when braking. This will depend on:
R
Speed
R Braking force
R Environmental conditions, such as
temperature and humidity
The wear of individual components of the
brake system, such as
the brake pads/linings
or brake discs, depends on the individual
driving style and operating conditions.
For this reason, it is impossible to state a
mileage that will be valid under all
circumstances. An aggressive driving style
will lead to high wear. You can obtain further
information about this from your authorized
Mercedes-Benz Center.
New and replaced brake pads and discs only
reach their optimum braking effect after
several hundred kilometers of driving.
Compensate for this by applying greater force
to the brake pedal. Keep this in mind, and
adapt your driving and braking accordingly
during this break-in period.
Excessive heavy braking results in
correspondingly high brake wear. Observe
the brake system warning lamp in the
instrument cluster and note any brake status
messages in the multifunction display. For
high-performance driving in particular, it is
important to maintain and have the brake
system checked regularly.
Parking brake G
WARNING
If you must brake the vehicle with the parking
brake, the braking distance is considerably
longer and the wheels
could lock. There is an
increased danger of skidding and accidents.
Only use the parking brake to brake the
vehicle when the service brake is faulty. Do
not apply the parking brake too firmly. If the
wheels lock, release the parking brake until
the wheels begin turning again. Driving tips
161
Driving and parking Z
Page 200 of 364
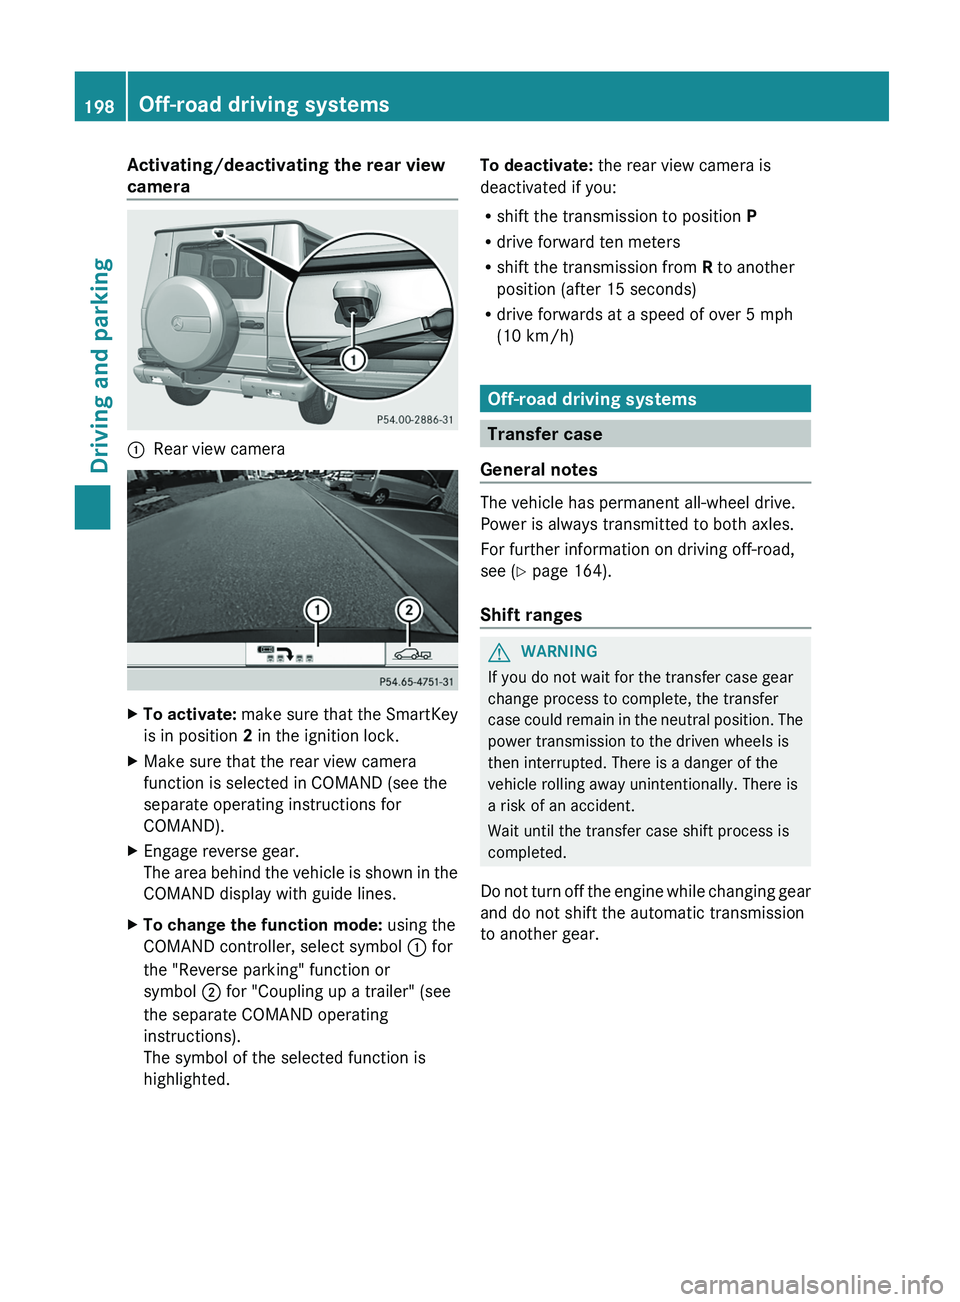
Activating/deactivating the rear view
camera
0043
Rear view camera X
To activate: make sure that the SmartKey
is in position 2 in the ignition lock.
X Make sure that the rear view camera
function is selected in COMAND (see the
separate operating instructions for
COMAND).
X Engage reverse gear.
The area behind the
vehicle is shown in the
COMAND display with guide lines.
X To change the function mode: using the
COMAND controller, select symbol 0043 for
the "Reverse parking" function or
symbol 0044 for "Coupling up a trailer" (see
the separate COMAND operating
instructions).
The symbol of the selected function is
highlighted. To deactivate:
the rear view camera is
deactivated if you:
R shift the transmission to position P
R drive forward ten meters
R shift the transmission from R to another
position (after 15 seconds)
R drive forwards at a speed of over 5 mph
(10 km/h) Off-road driving systems
Transfer case
General notes The vehicle has permanent all-wheel drive.
Power is always transmitted to both axles.
For further information on driving off-road,
see (
Y page 164).
Shift ranges G
WARNING
If you do not wait for the transfer case gear
change process to complete, the transfer
case could remain
in
the neutral position. The
power transmission to the driven wheels is
then interrupted. There is a danger of the
vehicle rolling away unintentionally. There is
a risk of an accident.
Wait until the transfer case shift process is
completed.
Do not turn off the engine while changing gear
and do not shift the automatic transmission
to another gear. 198
Off-road driving systems
Driving and parking
Page 210 of 364
Useful information
i This Operator's Manual describes all
models and all standard and optional
equipment of your vehicle available at the
time of publication of the Operator's
Manual. Country-specific differences are
possible. Please note that
your vehicle may
not be equipped with all features
described. This also applies to safety-
related systems and functions.
i Read the information on qualified
specialist workshops: ( Y page 23).Important safety notes
G
WARNING
The driver's concentration must always be
directed primarily at road traffic.
For your safety and the safety of others,
selecting features through the multifunction
steering wheel should only be done by the
driver when traffic and
road conditions permit
it to be done safely.
Bear in mind that at a speed of only 30 mph
(approximately 50 km/h), the vehicle covers
a distance of 44 feet (approximately 14 m) per
second. G
WARNING
No messages will be displayed if either the
instrument cluster or the multifunction
display is inoperative.
As a result, you will not be able to see
information about your driving conditions,
such as
R speed
R outside temperature
R warning/indicator lamps
R malfunction/warning messages
R failure of any systems
Driving characteristics may be impaired. If you must continue to drive, do so with added
caution. Contact an authorized Mercedes-
Benz Center as soon as possible.
G
WARNING
Malfunction and warning messages are only
displayed for certain systems and are
intentionally not very detailed. The
malfunction and warning messages are
simply a reminder with respect to the
operation of certain systems. They do not
replace the owner's and/or driver's
responsibility to maintain the vehicle's
operating safety. Have all required
maintenance services and safety checks
performed on the vehicle.
Bring the vehicle to
an authorized Mercedes-Benz Center to
address the malfunction and warning
messages. G
WARNING
All categories of messages contain important
information which should be taken note of
and, where a malfunction is indicated,
addressed as soon as possible at an
authorized Mercedes-Benz Center.
Failure to repair the condition noted may
cause damage not covered
by the Mercedes-
Benz Limited Warranty, or result in property
damage or personal injury.
For an illustration of the instrument cluster,
see ( Y page 209).208
Important safety notes
On-board computer and displays
Page 218 of 364
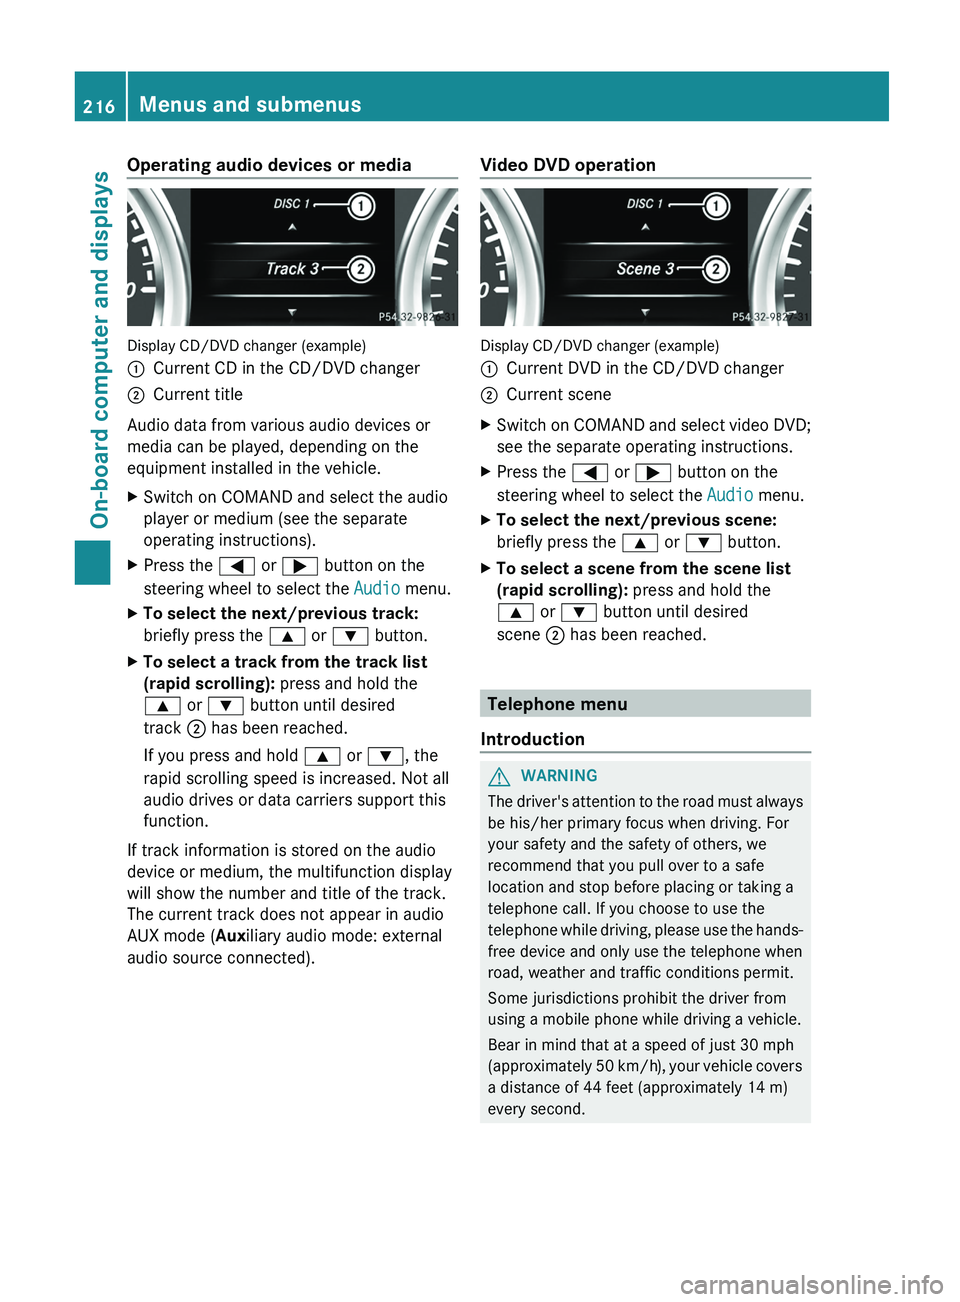
Operating audio devices or media
Display CD/DVD changer (example)
0043
Current CD in the CD/DVD changer
0044 Current title
Audio data from various audio devices or
media can be played, depending on the
equipment installed in the vehicle.
X Switch on COMAND and select the audio
player or medium (see the separate
operating instructions).
X Press the 0059 or 0065 button on the
steering wheel to select the Audio menu.
X To select the next/previous track:
briefly press the 0063 or 0064 button.
X To select a track from the track list
(rapid scrolling): press and hold the
0063 or 0064 button until desired
track 0044 has been reached.
If you press and hold 0063 or 0064, the
rapid scrolling speed is increased. Not all
audio drives or data carriers support this
function.
If track information is stored on the audio
device or medium, the multifunction display
will show the number and title of the track.
The current track does not appear in audio
AUX mode (Auxiliary audio mode: external
audio source connected). Video DVD operation Display CD/DVD changer (example)
0043
Current DVD in the CD/DVD changer
0044 Current scene
X Switch on COMAND and select video DVD;
see the separate operating instructions.
X Press the 0059 or 0065 button on the
steering wheel to select the Audio menu.
X To select the next/previous scene:
briefly press the 0063 or 0064 button.
X To select a scene from the scene list
(rapid scrolling): press and hold the
0063 or 0064 button until desired
scene 0044 has been reached. Telephone menu
Introduction G
WARNING
The driver's attention to the road must always
be his/her primary focus when driving. For
your safety and the safety of others, we
recommend that you pull over to a safe
location and stop before placing or taking a
telephone call. If you choose to use the
telephone while driving, please
use the hands-
free device and only use the telephone when
road, weather and traffic conditions permit.
Some jurisdictions prohibit the driver from
using a mobile phone while driving a vehicle.
Bear in mind that at a speed of just 30 mph
(approximately 50 km/h), your vehicle covers
a distance of 44 feet (approximately 14 m)
every second. 216
Menus and submenus
On-board computer and displays
Page 222 of 364
X
Press 0064 or 0063 to select the
Surround Lighting function.
When the Surround Lighting function is
activated, the cone of light in the
multifunction display is shown in red.
X Press the 0076 button to save the setting.
Deactivating delayed switch-off of the
exterior lighting temporarily:
X Before leaving the vehicle, turn the
SmartKey to position 0(Y page 139) in the
ignition lock.
X Turn the SmartKey to position 2 in the
ignition lock ( Y
page 139).
The exterior lighting delayed switch-off is
deactivated.
Delayed switch-off of the exterior lighting is
reactivated the next time you start the
engine.
If you have activated the Surround
Lighting function and
the
light switch is set
to 0058, the following functions are activated
when it is dark:
R Surround lighting: the exterior lighting
remains lit for 40 seconds after unlocking
with the SmartKey. If you start the engine,
the surround lighting is switched off and
automatic headlamp mode is activated
(Y page 100).
R Exterior lighting delayed switch-off: the
exterior lighting remains lit for
60 seconds after the engine is switched off.
If you close all the doors and the trunk lid,
the exterior lighting goes off after
15 seconds.
i Depending on your vehicle's equipment,
when the surround lighting and delayed
switch-off exterior lighting are on, the
following light up:
R Parking lamps
R Front fog lamps
R Low-beam headlamps
R Daytime running lamps
R Side marker lamps
R Surround lighting in the exterior mirrors Activating/deactivating the interior
lighting delayed switch-off
If you activate the Interior Lighting
Delay function, the interior lighting remains
on for 20 seconds
after you remove the
SmartKey from the ignition lock.
X Press the 0059 or
0065 button on the
steering wheel to select the Sett. menu.
X Press the 0064
or 0063
button
to select the
Lights submenu.
X Press 0076 to confirm.
X Press 0064 or 0063 to select the
Interior Lighting Delay function.
When the Interior Lighting Delay
function is activated,
the
vehicle interior is
displayed in red in the multifunction
display.
X Press the 0076 button to save the setting.
Vehicle Activating/deactivating the automatic
door locking mechanism
If you activate the Automatic Door Lock
function, the vehicle
is
centrally locked above
a speed of around 9 mph (15 km/h).
X Press the 0059 or 0065 button on the
steering wheel to select the Sett. menu.
X Press the 0064 or 0063 button
to select the
Vehicle submenu.
X Press 0076 to confirm.
X Press 0064 or 0063 to select the
Automatic Door Lock function.
When the Automatic Door
Lock function
is
activated, the vehicle doors are displayed
in red in the multifunction display.
X Press the 0076 button to save the setting.
For further information on the automatic
locking feature, see ( Y page 75).220
Menus and submenus
On-board computer and displays