2013 MERCEDES-BENZ G-CLASS SUV ignition
[x] Cancel search: ignitionPage 280 of 364
R
USA: Mercedes-Benz Customer
Assistance Center at 1-800-FOR-
MERCedes (1-800-367-6372) or
1-888-990-9007
R Canada: Customer Service at
1-888-923-8367
You will be asked for your PIN.
The next time you are inside the vehicle and
you switch on the ignition, the Tele Aid
Doors Locked Remotely message appears
in the multifunction display.
USA only: alternatively, the vehicle can be
locked via:
R the Internet, under the "Owners Online"
section
R the telephone application (e.g. iPhone ®
,
Blackberry)
To do this, you will need your identification
number and password.
i The vehicle remote closing feature is
available when the relevant mobile phone
network is available
and
data connection is
possible.
Stolen vehicle recovery service If your vehicle has been stolen:
X
Contact the police.
The police will issue
an incident report. This
report has a number.
X Forward this number to the Response
Center together with your PIN.
The Response Center will then attempt to
covertly contact the mbrace system. The
Response Center contacts you and the
local law enforcement authority if the
vehicle is located. However, only the law
enforcement agency is informed of the
location of the vehicle.
i If the anti-theft alarm
system is active for
longer than 30 seconds, mbrace is
automatically connected with the
Customer Assistance center. Vehicle remote malfunction diagnosis With the vehicle remote malfunction
diagnosis (Vehicle Health Check), the
Customer Assistance center can provide
improved support for problems with your
vehicle. During an existing call, vehicle data
is transferred to the Customer Assistance
center. The customer service representative
can use the
received
data to decide what kind
of assistance is required. You are then, for
example, guided to the nearest Mercedes-
Benz Service center or a recovery vehicle is
called.
If vehicle data needs to be transferred during
an MB Info call or a Roadside Assistance call,
this is initiated by the Customer Assistance
center. You will see the Roadside
Assistance Connected message in the
COMAND display. If the vehicle remote
malfunction diagnosis is able to be started,
the Request for vehicle diagnosis
received. Start vehicle diagnosis?
message appears in the display.
X Press Yes to confirm the message.
X If the Vehicle Diagnosis: Please
start ignition message appears: turn
the SmartKey to position 2 in the ignition
lock.
X If the Please follow the
instructions received by
phone
and
move your vehicle into a safe
position message appears: follow the
instructions of the customer service
representative.
The message in the display disappears.
If you select Cancel, the vehicle remote
malfunction diagnosis is canceled
completely.
The vehicle operating state check begins.
Meanwhile, the Vehicle diagnosis
activated message appears.
When the check is finished, the Sending
vehicle diagnosis data... (Voice
connection may be interrupted
during data transfer)
message
appears.278
Features
Stowage and features
Page 283 of 364
i
Certain garage door drives are
incompatible with the integrated garage
door opener. If you have difficulty
programming the integrated garage door
opener, contact an authorized Mercedes-
Benz Center. You can also contact the
following service hotlines:
R USA: Mercedes-Benz Customer
Assistance Center at
1-800-FOR-MERCedes
R Canada: Customer Service at
1-800-387-0100
i USA only:
This device complies with Part 15 of the
FCC Rules. Operation is subject to the
following two conditions:
1. This device may not cause harmful
interference, and
2. this device
must accept any interference
received, including interference that may
cause undesired operation.
Any unauthorized modification to this
device could void the user's authority to
operate the equipment.
i Canada only:
This device complies with the RSS-210
Rules of Industry Canada. Operation is
subject to the following two conditions:
1. This device may not cause harmful
interference, and
2. this device must accept any interference
received, including interference that may
cause undesired operation of the device.
Any unauthorized modification to this
device could void the user's authority to
operate the equipment.
Programming the remote control Programming
G
WARNING
Only press the button on the integrated
garage door opener if
there are no persons or
objects present within the sweep of the garage door. Persons could otherwise be
injured as the door moves.
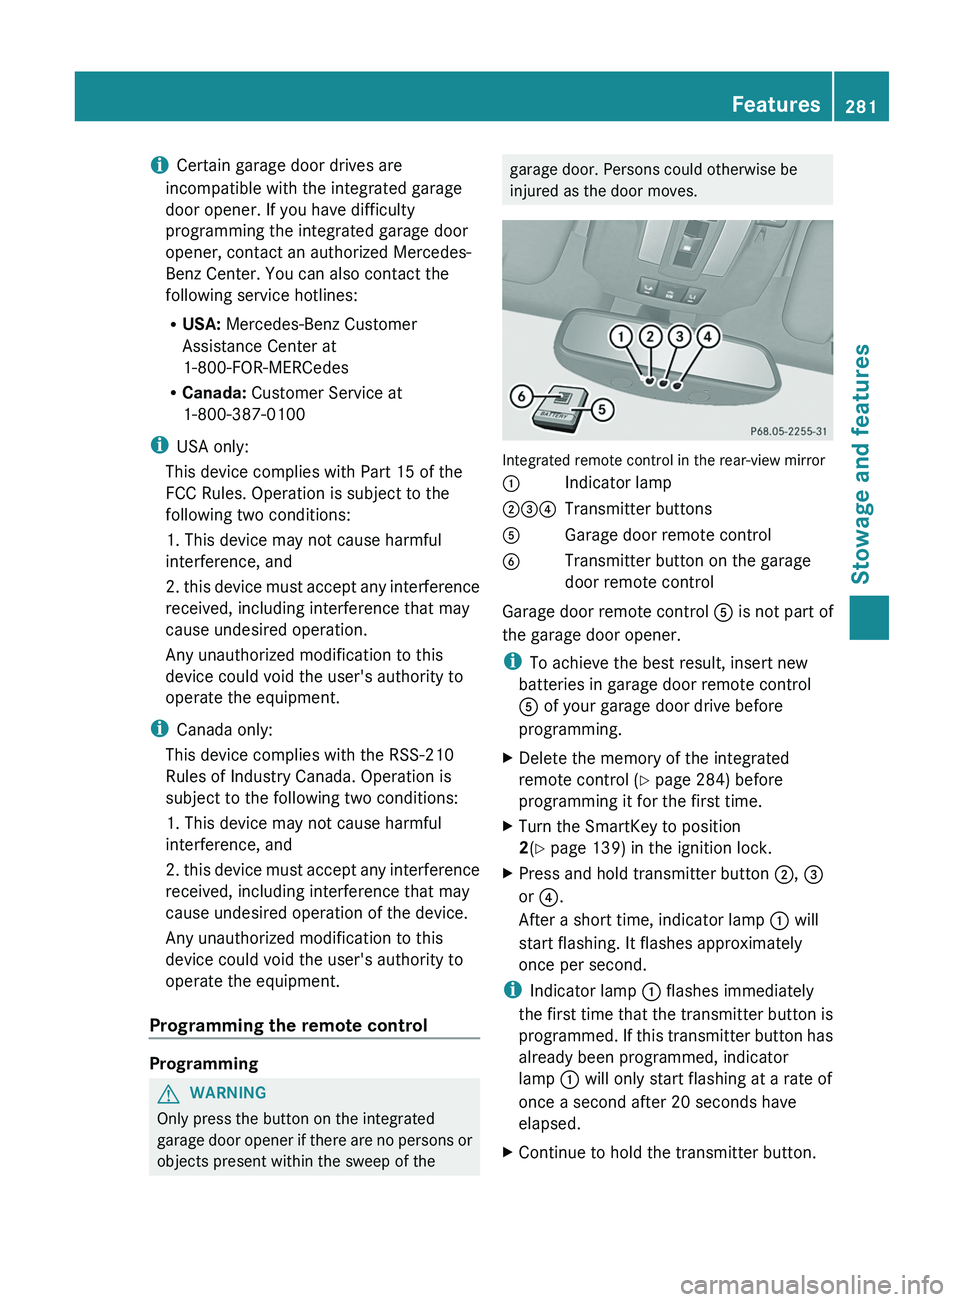
Integrated remote control in the rear-view mirror
0043
Indicator lamp
004400870085 Transmitter buttons
0083 Garage door remote control
0084 Transmitter button on the garage
door remote control
Garage door remote control 0083 is not part of
the garage door opener.
i To achieve the best result, insert new
batteries in garage door remote control
0083 of your garage door drive before
programming.
X Delete the memory of the integrated
remote control (Y
page 284) before
programming it for the first time.
X Turn the SmartKey to position
2
(Y page 139) in the ignition lock.
X Press and hold transmitter button 0044, 0087
or 0085.
After a short time, indicator lamp 0043 will
start flashing. It flashes approximately
once per second.
i Indicator lamp 0043 flashes immediately
the first time
that
the transmitter button is
programmed. If this transmitter button has
already been programmed, indicator
lamp 0043 will only start flashing at a rate of
once a second after 20 seconds have
elapsed.
X Continue to hold the transmitter button. Features
281
Stowage and features Z
Page 284 of 364
X
Point transmitter button 0083 of garage door
remote control 0084
towards the transmitter
buttons on the rear-view mirror at a
distance of 2 to 12 inches (5 to 30 cm).
i The distance between garage door
remote control 0083 and the integrated
garage door opener
depends
on the system
of the garage door drive. Several attempts
might be necessary. You should test every
position for at least 20 seconds before
trying another position.
X Keep transmitter button 0084 on garage door
remote control 0083
pressed until indicator
lamp 0043 starts to flash rapidly.
The programming has been successful if
indicator lamp 0043 flashes rapidly.
X Release transmitter buttons 0044, 0087 or 0085
on the integrated remote control and
transmitter button 0084 on the garage door
remote control.
If indicator lamp 0043 goes out after
approximately 20 seconds and has not
flashed rapidly:
X Release transmitter buttons 0044 ,
0087 or 0085
on the integrated remote control and
transmitter button 0084 on the garage door
remote control.
X Repeat the procedure for the other
transmitter buttons. When doing so, vary
the distance between the garage door's
remote control and
the
transmitter buttons
in the rear-view mirror.
i If the garage door system works with a
rolling code, you must synchronize the
remote control integrated in the rear-view
mirror with the garage door system
receiver after programming.
You will find further information in the
garage door opening system's operating
instructions, e.g. the sections on
"Synchronizing the transmitter" or
"Registering a new transmitter". You can
also call the hotline mentioned above. Synchronizing the rolling code
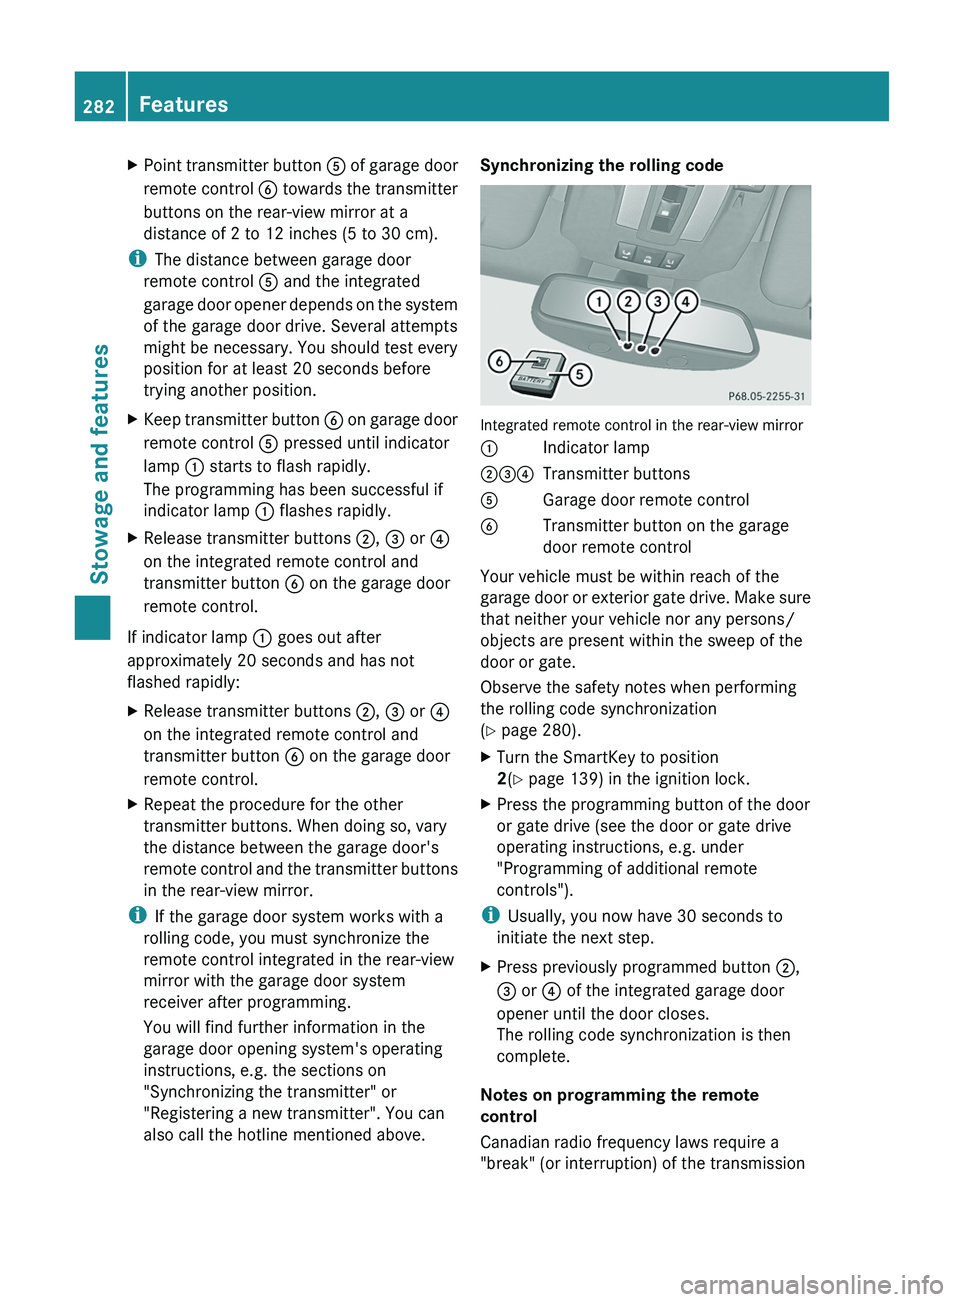
Integrated remote control in the rear-view mirror
0043
Indicator lamp
004400870085 Transmitter buttons
0083 Garage door remote control
0084 Transmitter button on the garage
door remote control
Your vehicle must be within reach of the
garage door or
exterior
gate drive. Make sure
that neither your vehicle nor any persons/
objects are present within the sweep of the
door or gate.
Observe the safety notes when performing
the rolling code synchronization
(Y page 280).
X Turn the SmartKey to position
2(Y page 139) in the ignition lock.
X Press the programming button of the door
or gate drive (see the door or gate drive
operating instructions, e.g. under
"Programming of additional remote
controls").
i Usually, you now have 30 seconds to
initiate the next step.
X Press previously programmed button 0044,
0087 or
0085 of the integrated garage door
opener until the door closes.
The rolling code synchronization is then
complete.
Notes on programming the remote
control
Canadian radio frequency laws require a
"break" (or interruption) of the transmission 282
Features
Stowage and features
Page 286 of 364
door opener. Before performing these
steps, make sure that new batteries have
been inserted in the garage door remote
control.
R Align the antenna cable
of the garage door
opener unit. This can improve signal
reception/transmission.
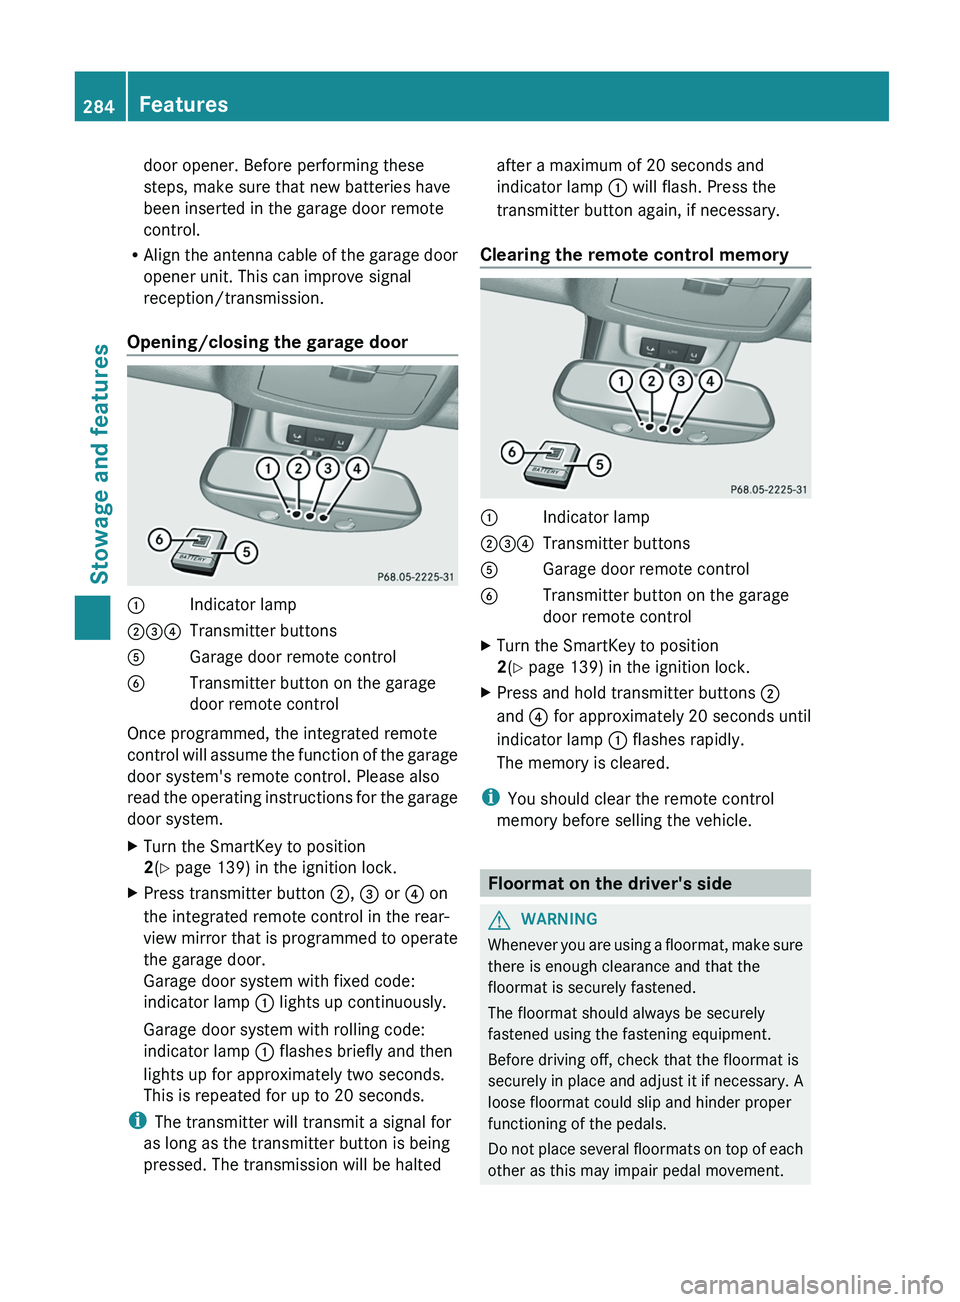
Opening/closing the garage door 0043
Indicator lamp
004400870085 Transmitter buttons
0083 Garage door remote control
0084 Transmitter button on the garage
door remote control
Once programmed, the integrated remote
control will assume
the
function of the garage
door system's remote control. Please also
read the operating instructions for the garage
door system.
X Turn the SmartKey to position
2(Y page 139) in the ignition lock.
X Press transmitter button 0044, 0087 or 0085 on
the integrated remote control in the rear-
view mirror that is
programmed to operate
the garage door.
Garage door system with fixed code:
indicator lamp 0043 lights up continuously.
Garage door system with rolling code:
indicator lamp 0043 flashes briefly and then
lights up for approximately two seconds.
This is repeated for up to 20 seconds.
i The transmitter will transmit a signal for
as long as the transmitter button is being
pressed. The transmission will be halted after a maximum of 20 seconds and
indicator lamp
0043 will flash. Press the
transmitter button again, if necessary.
Clearing the remote control memory 0043
Indicator lamp
004400870085 Transmitter buttons
0083 Garage door remote control
0084 Transmitter button on the garage
door remote control
X Turn the SmartKey to position
2(Y page 139) in the ignition lock.
X Press and hold transmitter buttons 0044
and 0085 for approximately 20 seconds until
indicator lamp 0043 flashes rapidly.
The memory is cleared.
i You should clear the remote control
memory before selling the vehicle. Floormat on the driver's side
G
WARNING
Whenever you are using a floormat, make sure
there is enough clearance and that the
floormat is securely fastened.
The floormat should always be securely
fastened using the fastening equipment.
Before driving off, check that the floormat is
securely in place and
adjust it if necessary. A
loose floormat could slip and hinder proper
functioning of the pedals.
Do not place several floormats on top of each
other as this may impair pedal movement. 284
Features
Stowage and features
Page 290 of 364
Useful information
i This Operator's Manual describes all
models and all standard and optional
equipment of your vehicle available at the
time of publication of the Operator's
Manual. Country-specific differences are
possible. Please note that
your vehicle may
not be equipped with all features
described. This also applies to safety-
related systems and functions.
i Read the information on qualified
specialist workshops: ( Y page 23).Engine compartment
Hood
Important safety notes G
WARNING
Do not pull the release lever while the vehicle
is in motion. Otherwise, the hood could be
forced open by passing air flow.
This could cause the
hood to come loose and
injure you and/or others. G
WARNING
Do not open the hood when the engine is
overheated. You could be seriously injured.
Observe the coolant temperature gauge to
determine whether the engine may be
overheated. If you see flames or smoke
coming from the engine compartment, move
away from the vehicle. Wait until the engine
has cooled. If necessary, call the fire
department. G
WARNING
You could be injured when the hood is open –
even when the engine is turned off.
Parts of the engine can become very hot. To
prevent burns, let
the
engine cool completely
before touching any components on the
vehicle. Comply with all relevant safety
precautions. G
WARNING
To avoid injury, stay clear of moving parts
when the hood is open and the engine is
running.
The radiator fan may continue to run for
approximately 30seconds or may even
restart
after the engine has been switched off. For
this reason, you must not reach into the fan
rotation area. G
WARNING
The engine is equipped with a transistorized
ignition system. Because of the high voltage,
it is dangerous to touch any components
(ignition coils, spark plug sockets, diagnostic
socket) of the ignition system:
R with the engine running
R while starting the engine
R when the ignition is switched on and the
engine is turned manually G
WARNING
The windshield wipers and wiper linkage
could be set in motion.
When the hood is open, you or others could
be injured by the wiper linkage.
Make sure that the windshield wipers are
switched off and that
the SmartKey has been
pulled out of the ignition lock before opening
the hood.
! Make sure that the windshield wipers are
not folded away from the windshield. You
could otherwise damage the windshield
wipers or the hood. 288
Engine compartment
Maintenance and care
Page 292 of 364
X
Pull oil dipstick 0043 out of the dipstick guide
tube.
X Wipe off oil dipstick 0043.
X Slowly slide oil dipstick 0043 into the guide
tube to the stop, and take it out again.
The oil level
is
correct if the level is between
MIN mark 0087 and MAX mark 0044.
X Add oil if necessary.
Checking the oil level using the on-
board computer !
Do not add too
much oil. adding too much
engine oil can result in damage to the
engine or to the catalytic converter. Have
excess engine oil siphoned off.
G 65 AMG: the oil level can be checked using
the on-board computer only.
On all other models, the oil dipstick must be
used to check the engine oil level.
When checking the oil level:
R park the vehicle on a level surface.
R the engine should be switched off for
approximately five minutes if the engine is
at normal operating temperature.
X Make sure that the SmartKey is in position
2 in the ignition lock.
X Press the 0041 or 0068 button on the
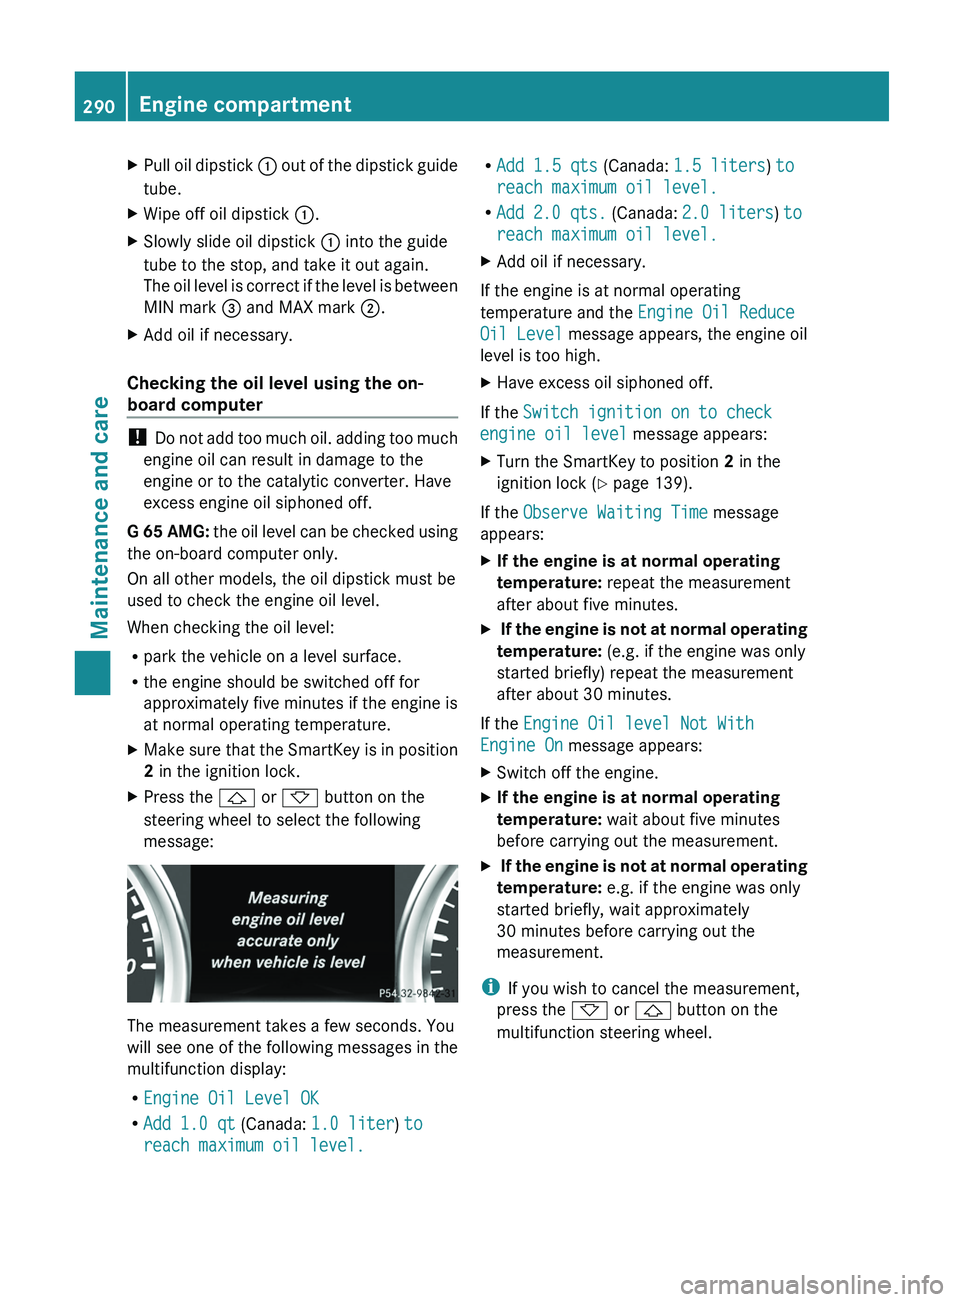
steering wheel to select the following
message: The measurement takes a few seconds. You
will see one
of
the following messages in the
multifunction display:
R Engine Oil Level OK
R Add 1.0 qt (Canada: 1.0 liter) to
reach maximum oil level. R
Add 1.5 qts (Canada: 1.5 liters) to
reach maximum oil level.
R Add 2.0 qts.
(Canada: 2.0 liters ) to
reach maximum oil level.
X Add oil if necessary.
If the engine is at normal operating
temperature and the Engine Oil Reduce
Oil Level message appears, the engine oil
level is too high.
X Have excess oil siphoned off.
If the Switch ignition on to check
engine oil level
message appears:
X Turn the SmartKey to position 2 in the
ignition lock (Y page 139).
If the Observe Waiting Time message
appears:
X If the engine is at normal operating
temperature: repeat the measurement
after about five minutes.
X If the engine is not at normal operating
temperature: (e.g. if the engine was only
started briefly) repeat the measurement
after about 30 minutes.
If the Engine Oil level Not With
Engine On message appears:
X Switch off the engine.
X If the engine is at normal operating
temperature: wait about five minutes
before carrying out the measurement.
X If the engine is not at normal operating
temperature: e.g. if the engine was only
started briefly, wait approximately
30 minutes before carrying out the
measurement.
i If you wish to cancel the measurement,
press the 0068 or 0041 button on the
multifunction steering wheel. 290
Engine compartment
Maintenance and care
Page 294 of 364
X
Park the vehicle on a level surface.
Only check the coolant level when the
vehicle is on a
level surface and the engine
has cooled down.
X Turn the SmartKey to position
2 (Y page 139) in the ignition lock.
X Check the coolant temperature display in
the instrument cluster.
The coolant temperature must be below
158 ‡ (70 †).
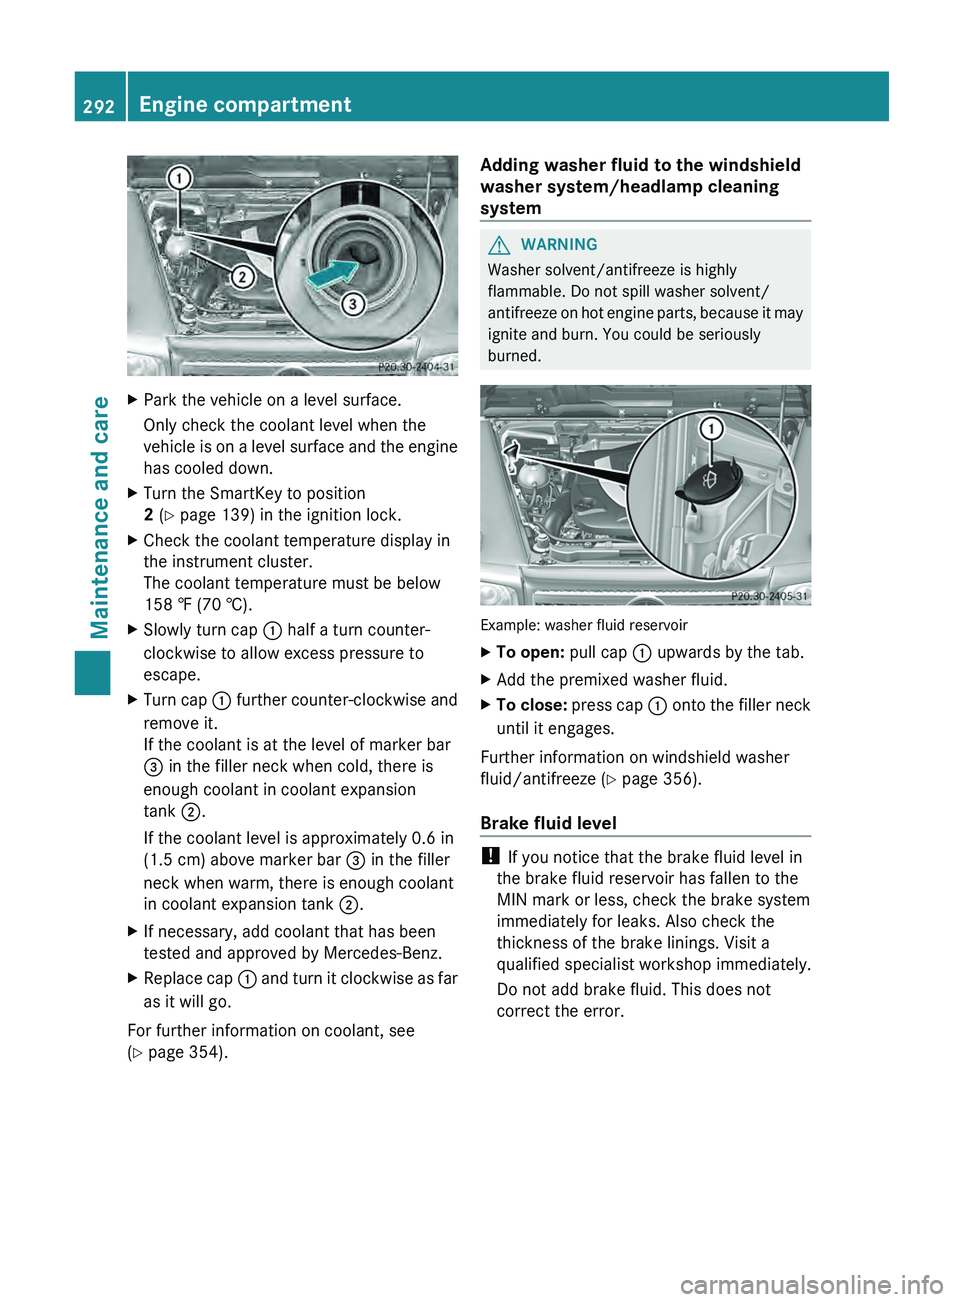
X Slowly turn cap 0043 half a turn counter-
clockwise to allow excess pressure to
escape.
X Turn cap 0043
further counter-clockwise and
remove it.
If the coolant is at the level of marker bar
0087
in the filler neck when cold, there is
enough coolant in coolant expansion
tank 0044.
If the coolant level is approximately 0.6 in
(1.5 cm) above marker bar 0087 in the filler
neck when warm, there is enough coolant
in coolant expansion tank 0044.
X If necessary, add coolant that has been
tested and approved by Mercedes-Benz.
X Replace cap 0043 and turn
it
clockwise as far
as it will go.
For further information on coolant, see
(Y page 354). Adding washer fluid to the windshield
washer system/headlamp cleaning
system G
WARNING
Washer solvent/antifreeze is highly
flammable. Do not spill washer solvent/
antifreeze on hot engine
parts, because it may
ignite and burn. You could be seriously
burned. Example: washer fluid reservoir
X
To open: pull cap 0043 upwards by the tab.
X Add the premixed washer fluid.
X To close: press cap
0043 onto
the filler neck
until it engages.
Further information on windshield washer
fluid/antifreeze ( Y page 356).
Brake fluid level !
If you notice that the brake fluid level in
the brake fluid reservoir has fallen to the
MIN mark or less, check the brake system
immediately for leaks. Also check the
thickness of the brake linings. Visit a
qualified specialist workshop immediately.
Do not add brake fluid. This does not
correct the error. 292
Engine compartment
Maintenance and care
Page 295 of 364
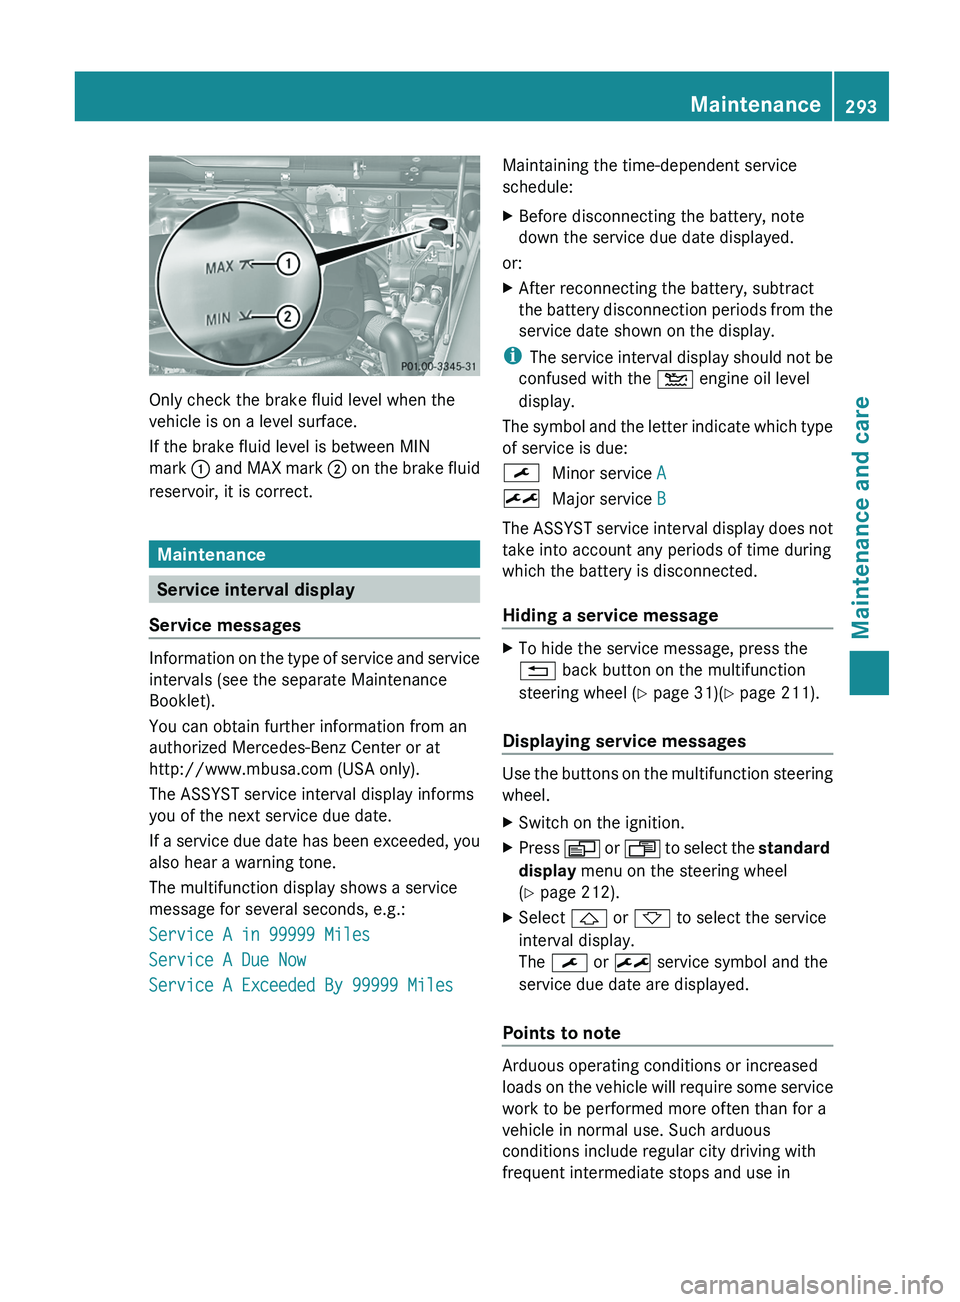
Only check the brake fluid level when the
vehicle is on a level surface.
If the brake fluid level is between MIN
mark
0043 and MAX mark 0044
on the brake fluid
reservoir, it is correct. Maintenance
Service interval display
Service messages Information on the type of service and service
intervals (see the separate Maintenance
Booklet).
You can obtain further information from an
authorized Mercedes-Benz Center or at
http://www.mbusa.com (USA only).
The ASSYST service interval display informs
you of the next service due date.
If a service
due
date has been exceeded, you
also hear a warning tone.
The multifunction display shows a service
message for several seconds, e.g.:
Service A in 99999 Miles
Service A Due Now
Service A Exceeded By 99999 Miles Maintaining the time-dependent service
schedule:
X
Before disconnecting the battery, note
down the service due date displayed.
or:
X After reconnecting the battery, subtract
the battery disconnection periods
from the
service date shown on the display.
i The service interval display
should not be
confused with the 00B2 engine oil level
display.
The symbol and the letter indicate which type
of service is due:
0099 Minor service A
009B Major service B
The ASSYST service interval display does not
take into account any periods of time during
which the battery is disconnected.
Hiding a service message X
To hide the service message, press the
0041 back button on the multifunction
steering wheel ( Y page 31)(Y page 211).
Displaying service messages Use the buttons on the multifunction steering
wheel.
X
Switch on the ignition.
X Press 0080 or 007F to
select the standard
display menu on the steering wheel
(Y page 212).
X Select 0041 or 0068 to select the service
interval display.
The 0099 or 009B service symbol and the
service due date are displayed.
Points to note Arduous operating conditions or increased
loads on the
vehicle
will require some service
work to be performed more often than for a
vehicle in normal use. Such arduous
conditions include regular city driving with
frequent intermediate stops and use in Maintenance
293
Maintenance and care Z