2013 MERCEDES-BENZ E-Class SEDAN indicator lamp
[x] Cancel search: indicator lampPage 63 of 420

Children can be killed or seriously injured by
an inflating air bag. Note the following
important information when circumstances
require you to place a child in the front
passenger seat:
R
Your vehicle is equipped with air bag
technology
designed to deactivate the front
passenger front air bag in your vehicle
when the system senses the weight of a
typical 12-month-old child or less along
with the weight of a standard appropriate
child restraint on the front passenger seat.
R For children larger than the typical
12-month-old child, the front passenger
front air bag may or may not be activated.
Always make sure the 4 5 indicator
lamp is illuminated, indicating that the front
passenger front air bag is deactivated.
R A child in a rear-facing child restraint on the
front passenger seat will be seriously
injured or even killed if the front passenger
front air bag inflates in a collision which
could occur under some circumstances,
even with the air bag technology installed
in your vehicle. The only means to
completely eliminate this risk is to never
place a child in a rear-facing child restraint
in the front seat. We therefore strongly
recommend that you always place a child
in a rear-facing child restraint in a backseat.
R If you must install a rear-facing child
restraint on the front passenger seat
because circumstances require you to do
so, make sure the 4 5 indicator
lamp is illuminated, indicating that the front
passenger front air bag is deactivated.
Should the 4 5 indicator lamp not
illuminate or go out while the restraint is
installed, please check installation.
Periodically check the 4 5 indicator
lamp while driving to make sure the 4
5 indicator lamp is illuminated. If the
4 5 indicator lamp goes out or
remains out, do not transport a child on the
front passenger seat until the system has
been repaired. A child in a rear-facing child restraint on the
front passenger seat will be seriously
injured
or even killed if the front passenger
front air bag inflates.
R If you have to place a child in a forward-
facing child restraint on the front passenger
seat, move the seat as far back as possible,
use the proper child restraint
recommended for the age, size and weight
of the child, and secure child restraint with
the vehicle's seat belt according to the
child seat manufacturer's instructions. G
WARNING
Infants and small children should never share
a
seat belt with another occupant. In the event
of an accident, they could be crushed
between the occupant and seat belt.
A child's risk of serious or fatal injuries is
significantly increased if the child restraints
are not properly secured in the vehicle and/
or the child is not properly secured in the child
restraint.
Children that are too large for a child restraint
must travel in seats using normal seat belts.
Position the shoulder belt across the chest
and shoulder, not face or neck. A booster seat
may be necessary to achieve proper seat belt
positioning for children over 41 lb (18 kg) until
they reach a height where a lap-shoulder belt
fits properly without a booster.
When the child restraint is not in use, remove
it from the vehicle or secure it with the seat
belt to prevent the child restraint from
becoming a projectile in the event of an
accident. Children in the vehicle
61
Safety Z
Page 68 of 420

ignition lock or removed from the vehicle,
such as seat adjustment, steering wheel
adjustment, or the memory function
If
children open a door, they could injure other
persons or get out of the vehicle and injure
themselves or be injured by following traffic.
Do not expose the child restraint system to
direct sunlight. The child restraint system's
metal parts, for example, could become very
hot, and the child could be burned on these
parts.
Child-proof locks for the rear doors G
WARNING
Children could open a rear door from inside
the vehicle. This could result in serious
injuries or an accident. Therefore, when
children
ride in the rear always secure the rear
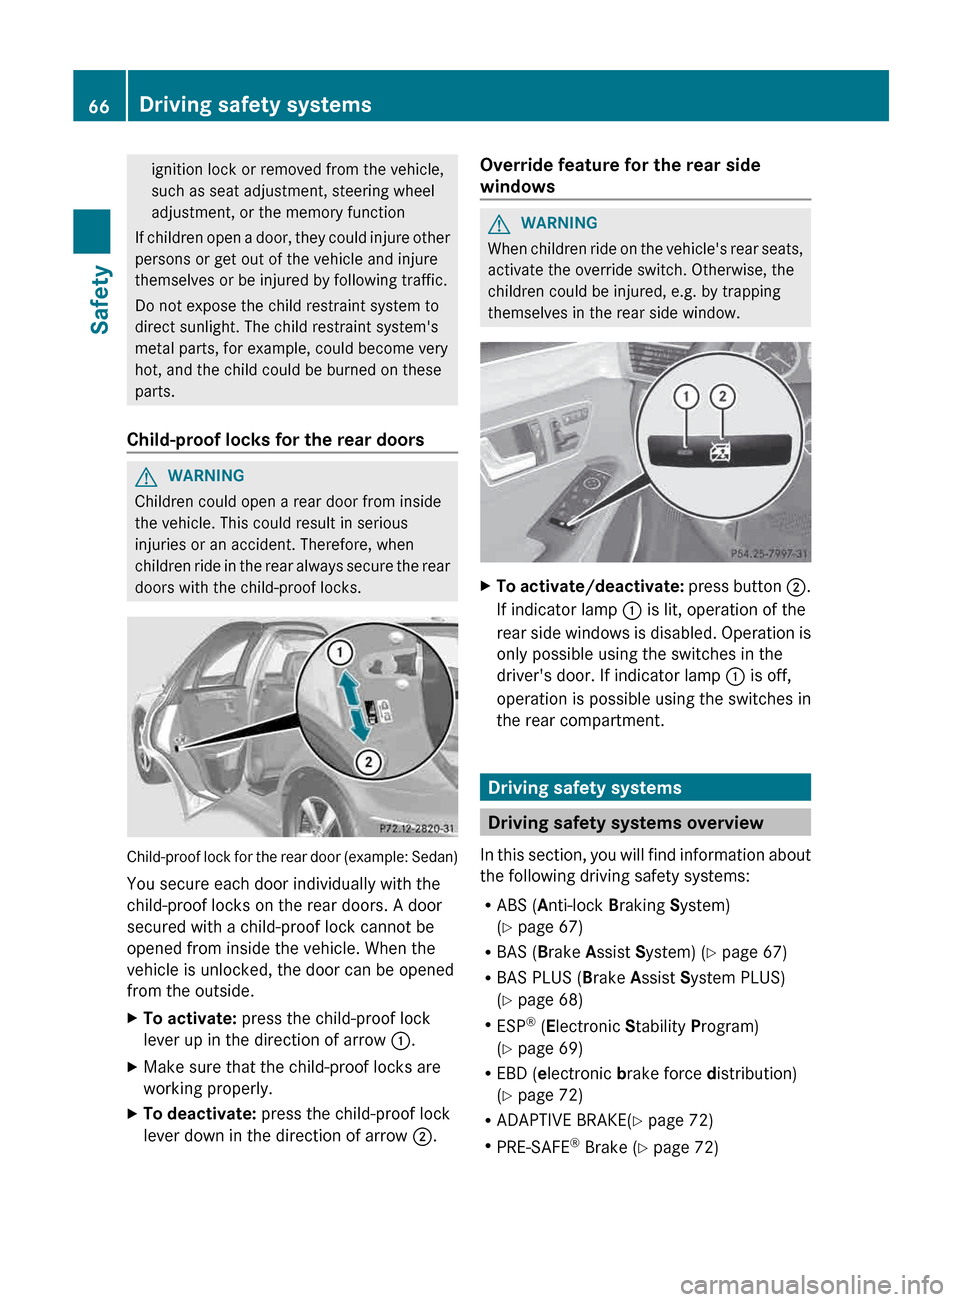
doors with the child-proof locks. Child-proof lock for the rear door (example: Sedan)
You secure each door individually with the
child-proof locks on the rear doors. A door
secured with a child-proof lock cannot be
opened from inside the vehicle. When the
vehicle is unlocked, the door can be opened
from the outside.
X
To activate: press the child-proof lock
lever up in the direction of arrow :.
X Make sure that the child-proof locks are
working properly.
X To deactivate: press the child-proof lock
lever down in the direction of arrow ;. Override feature for the rear side
windows G
WARNING
When children ride on the vehicle's rear seats,
activate the override switch. Otherwise, the
children could be injured, e.g. by trapping
themselves in the rear side window. X
To activate/deactivate: press
button ;.
If indicator lamp : is lit, operation of the
rear side windows is disabled. Operation is
only possible using the switches in the
driver's door. If indicator lamp : is off,
operation is possible using the switches in
the rear compartment. Driving safety systems
Driving safety systems overview
In
this section, you will find information about
the following driving safety systems:
R ABS ( Anti-lock Braking System)
(Y page 67)
R BAS ( Brake Assist System) ( Y page 67)
R BAS PLUS ( Brake Assist System PLUS)
(Y page 68)
R ESP ®
(Electronic Stability Program)
(Y page 69)
R EBD ( electronic brake force distribution)
(Y page 72)
R ADAPTIVE BRAKE(Y page 72)
R PRE-SAFE ®
Brake (Y page 72) 66
Driving safety systems
Safety
Page 74 of 420

the instrument cluster does not flash. In such
situations, ESP
®
will not stabilize the vehicle.
It may be best to deactivate ESP ®
in the
following situations:
R when using snow chains
R in deep snow
R on sand or gravel
If you deactivate ESP ®
:
R ESP ®
no longer improves driving stability.
R traction control is still activated.
R PRE-SAFE ®
is no longer available, nor is it
activated if you brake firmly and ESP ®
intervenes.
R PRE-SAFE ®
Brake is no longer available; it
is also not activated if you brake firmly and
ESP ®
intervenes.
R ABS still provides support when you brake.
R engine torque is no longer limited and the
drive wheels are able to spin. The spinning
wheels produce a cutting effect for better
traction.
Vehicles with ECO start/stop function: the
ECO start/stop function switches the engine
off automatically when the vehicle comes to
a stop. The engine starts automatically when
the driver wants to pull away again. ESP ®
remains in its previously selected status.
Example: if ESP ®
was deactivated before the
engine was switched off, ESP ®
remains
deactivated when the engine is switched on
again. EBD (electronic brake force
distribution)
i Observe the "Important safety notes"
section ( Y page 67).G
WARNING
If EBD has malfunctioned, the rear wheels can
still lock, e.g. under full braking. This
increases
the risk of skidding and an accident.
You should therefore adapt your driving style
to the different handling characteristics. Have the brake system checked at a qualified
specialist workshop.
Observe information regarding indicator and
warning lamps ( Y page 278) as well as
display messages
(Y page 248).
EBD monitors and controls the brake
pressure on the rear wheels to improve
driving stability while braking. ADAPTIVE BRAKE
ADAPTIVE BRAKE enhances braking safety
and offers increased braking comfort. In
addition to the braking function, ADAPTIVE
BRAKE also has the HOLD function
(Y page 196) and hill start assist
(Y page 156). PRE-SAFE
®
Brake
i Observe the "Important safety notes"
section ( Y page 67).
PRE-SAFE ®
Brake is only available in vehicles
with DISTRONIC PLUS.
PRE-SAFE ®
Brake can help you to minimize
the risk of a collision with a vehicle ahead or
reduce the effects of such a collision. If PRE-
SAFE ®
Brake detects a risk of collision, you
will be warned visually and acoustically as
well as by automatic braking. PRE-SAFE ®
Brake cannot prevent a collision without your
intervention.
Above a speed of around 4 mph (7 km/h), this
function warns you if you are very quickly
approaching a vehicle in front. An
intermittent warning tone will then sound and
the · distance warning lamp will light up
in the instrument cluster.
X Brake immediately in order to increase the
distance from the vehicle in front.
or
X Take evasive action provided it is safe to do
so.72
Driving safety systems
Safety
Page 77 of 420

ATA (anti-theft alarm system)
X
To arm: lock the vehicle with the SmartKey
or KEYLESS-GO.
Indicator lamp : flashes. The alarm
system is armed after approximately
15 seconds.
X To disarm: unlock the vehicle with the
SmartKey or KEYLESS-GO.
A visual and audible alarm is triggered if the
alarm system is armed and you open:
R a door
R the vehicle with the mechanical key
R the trunk lid/tailgate
R the hood
X To turn the alarm off with the
SmartKey:
press the % or & button
on the SmartKey.
The alarm is switched off.
or
X Insert the SmartKey into the ignition lock.
The alarm is switched off.
X To stop the alarm using KEYLESS-GO:
grasp the outside door handle. The
SmartKey must be outside the vehicle.
The alarm is switched off.
or
X Press the Start/Stop button on the
dashboard. The SmartKey must be inside
the vehicle.
The alarm is switched off.
The alarm is not switched off, even if you
close the open door that has triggered it, for
example. i
If the alarm stays on for more than
30 seconds,
the Tele Aid system initiates a
call to the Customer Assistance center
automatically. The emergency call system
initiates the call provided that:
R you have subscribed to the mbrace/
TELEAID Service.
R the mbrace/TELEAID Service has been
activated properly.
R the required mobile phone, power supply
and GPS are available. Theft deterrent locking system
75
Safety Z
Page 109 of 420

X
Release the rear seat backrest and fold it
slightly forwards
(Y page 293).
X To remove: pull the head restraint up to
the stop.
X Press release catch : and pull the head
restraint out of the guides.
X To re-install: insert the head restraint so
that the notches on the bar are on the left
when viewed in the direction of travel.
X Push the head restraint down until you hear
it engage in position.
X Fold back the rear seat backrest until it
engages. Adjusting the active multicontour
seat
Overview :
To adjust the seat cushion length
; To switch the dynamic function on or off
= To adjust the side bolsters of the seat
backrest
? To switch the massage function on or off
A To adjust the contour of the backrest to
increase/decrease support
B To adjust the height/depth of the
backrest contour
The active multicontour seat on the driver's
side automatically adapts the sides of the
backrest
to your current driving style. You can
adjust the contour of the seats individually so
as to provide optimum support for your back
and sides. Dynamic function The dynamic function adjusts the air cushions
in the side bolsters of the seat backrests to
ensure ideal lateral support at all times.
X
To switch on: press button ; once or
twice until the desired level is set.
One or two indicator lamps in button ;
light up.
X To switch off: press button ; repeatedly
until
all indicator lamps in button ; go out.
You can choose between two different levels. Level 1 (one
indicator lamp) Standard setting:
slightly increased
lateral support and
slow build-up of air
pressure in the side
bolsters of the seat
backrest.
Level 2 (two
indicator lamps) Sport setting:
increased lateral
support and fast
build-up of pressure
in the side bolsters
of
the seat backrest. Massage function (PULSE)
The massage function helps you to prevent
muscle tension on long journeys. You can
choose between two levels.
X
To switch on: press button ? once or
twice until the desired level is set.
One or two indicator lamps in button ?
light up. The air cushions in the lumbar
region vibrate for approximately
20 minutes. Seats
107
Seats, steering wheel and mirrors Z
Page 112 of 420

!
In order to avoid causing damage, push
the head restraints completely into their
guides and click the seat belt buckles into
their guides. X
Press release catch : and push the head
restraints in fully.
X Fold backrest ; of the folding bench seat
into its original position until it engages. Switching the seat heating on/off
Activating/deactivating G
WARNING
Repeatedly setting the seat heating to level
3 may result in excessive seat temperatures.
The health of passengers that have limited
temperature sensitivity or a limited ability to
react to excessively high temperatures may
be affected or they may even suffer burn-like
injuries. Therefore, do not use seat heating
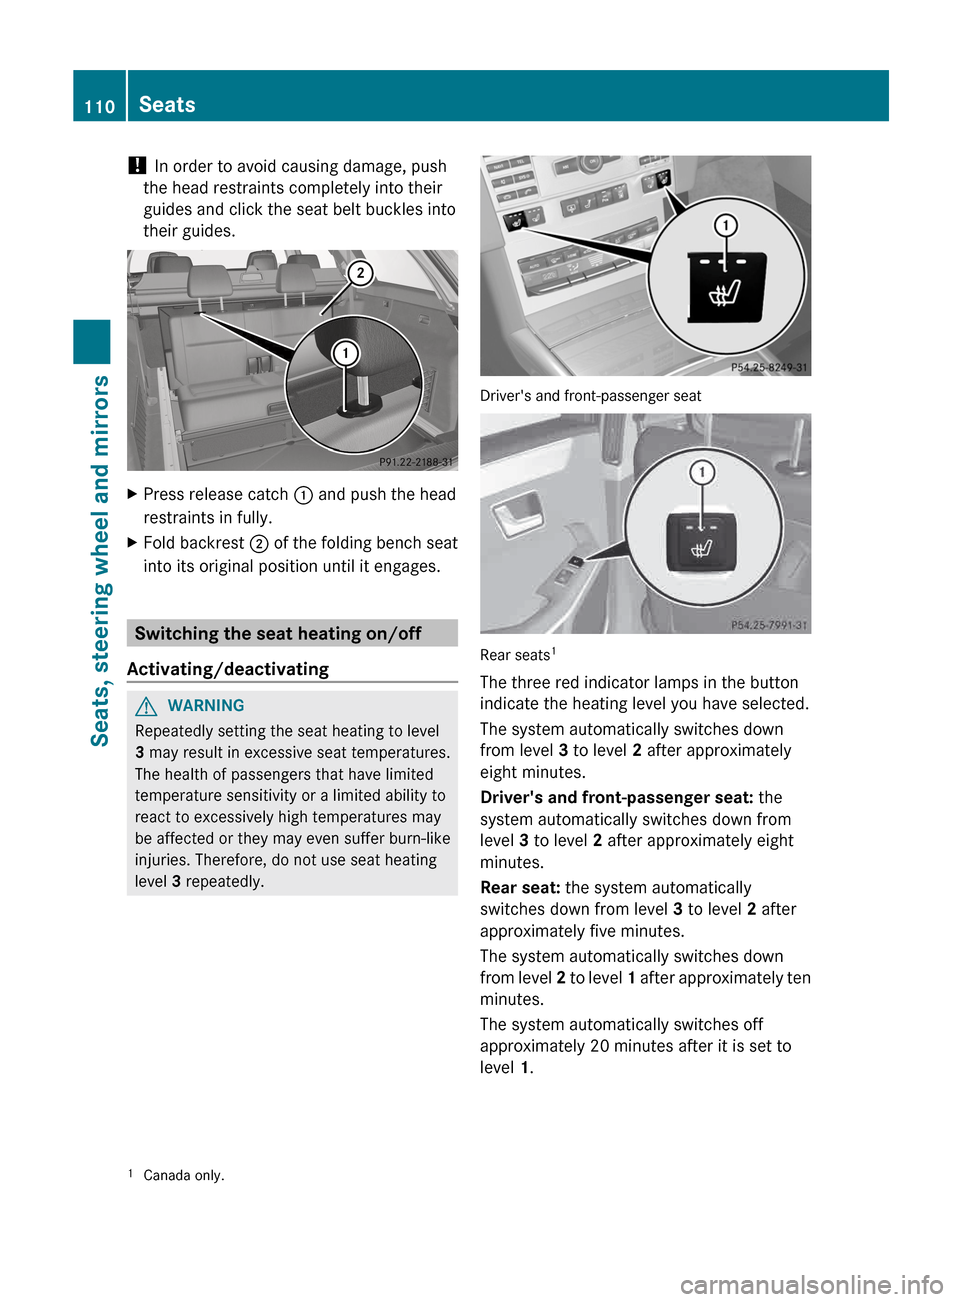
level 3 repeatedly. Driver's and front-passenger seat
Rear seats
1
The three red indicator lamps in the button
indicate the heating level you have selected.
The system automatically switches down
from level 3 to level 2 after approximately
eight minutes.
Driver's and front-passenger seat: the
system automatically switches down from
level 3 to level 2 after approximately eight
minutes.
Rear seat: the system automatically
switches down from level 3 to level 2 after
approximately five minutes.
The system automatically switches down
from
level 2 to level 1 after approximately ten
minutes.
The system automatically switches off
approximately 20 minutes after it is set to
level 1.
1 Canada only.110
Seats
Seats, steering wheel and mirrors
Page 113 of 420

X
Make sure that the SmartKey is in position
1 or 2 in the ignition lock.
X To switch on: press button : repeatedly
until the desired heating level is set.
X To switch off: press button : repeatedly
until all the indicator lamps go out.
i If the battery voltage is too low, the seat
heating may switch off.
Problems with the seat heating The seat heating has switched off
prematurely or cannot be switched on. The
vehicle's electrical system voltage is too low
because too many electrical consumers are
switched on.
X
Switch off electrical consumers that you do
not need, such as the rear window
defroster or interior lighting. Switching the seat ventilation on/off
Activating/deactivating The three blue indicator lamps in the buttons
indicate the ventilation level you have
selected.
X
Make sure that the SmartKey is in position
2 in the ignition lock.
X To switch on: press button : repeatedly
until the desired ventilation level is set.
X To switch off: press button : repeatedly
until all the indicator lamps go out. i
If the battery voltage is too low, the seat
ventilation may switch off.
i You can open the side windows and the
sliding sunroof using the "Convenience
opening" feature ( Y page 94). The seat
ventilation of the driver's seat
automatically
switches to the highest level.
Problems with the seat ventilation The seat ventilation has switched off
prematurely or cannot be switched on. The
vehicle's electrical system voltage is too low
because too many electrical consumers are
switched on.
X
Switch off electrical consumers that you do
not need, such as the rear window
defroster or interior lighting. Steering wheel
Important safety notes
G
WARNING
Do not adjust the steering wheel while driving.
Adjusting the steering wheel while driving
could cause the driver to lose control of the
vehicle.
The electrical steering wheel adjustment
feature can be operated at any time.
Therefore, do not leave children unattended
in the vehicle, or with access to an unlocked
vehicle. A child's unsupervised access to a
vehicle could result in an accident and/or
serious personal injury. Steering wheel
111
Seats, steering wheel and mirrors Z
Page 114 of 420

Adjusting the steering wheel
:
To adjust the steering wheel height
; To adjust the steering wheel position
(fore-and-aft adjustment)
i Further related subjects:
R EASY-ENTRY/EXIT feature
(Y page 112)
R Storing settings
(Y page 116) Steering wheel heating
Activating/deactivating X
Make sure that the SmartKey is in position
2 in the ignition lock.
X To switch on/off: turn the lever in the
direction of arrow : or ;.
Indicator lamp = lights up or goes out.
Vehicles without KEYLESS-GO: when you
remove the SmartKey from the ignition lock,
the steering wheel heating is deactivated. Vehicles with KEYLESS-GO: when you switch
off
the ignition and open the driver's door, the
steering wheel heating is deactivated.
i The steering wheel heating may switch off
temporarily if:
R the temperature of the vehicle interior is
above 86 ‡ (30 †)
R the temperature of the steering wheel is
above 95 ‡ (35 †)
Indicator lamp = remains on.
Problems with the steering wheel
heating If steering wheel heating indicator lamp
=
is
flashing, the steering wheel heating has
switched off automatically. The vehicle's
electrical system voltage is too low because
too many electrical consumers are switched
on.
X Switch off electrical consumers that you do
not need, such as the rear window
defroster or interior lighting.
Once
the battery is sufficiently charged, the
steering wheel heating will switch back on
automatically. EASY-ENTRY/EXIT feature
Important safety notes G
WARNING
Make sure that nobody can become trapped
when you activate the EASY-ENTRY/EXIT
feature.
If there is a risk of someone becoming
trapped, stop the adjustment procedure. To
halt the procedure:
R press the steering column adjustment
button.
R press one of the memory function position
buttons.
The steering column stops moving
immediately. 112
Steering wheel
Seats, steering wheel and mirrors