2013 MERCEDES-BENZ E-Class SEDAN fold seat
[x] Cancel search: fold seatPage 112 of 420

!
In order to avoid causing damage, push
the head restraints completely into their
guides and click the seat belt buckles into
their guides. X
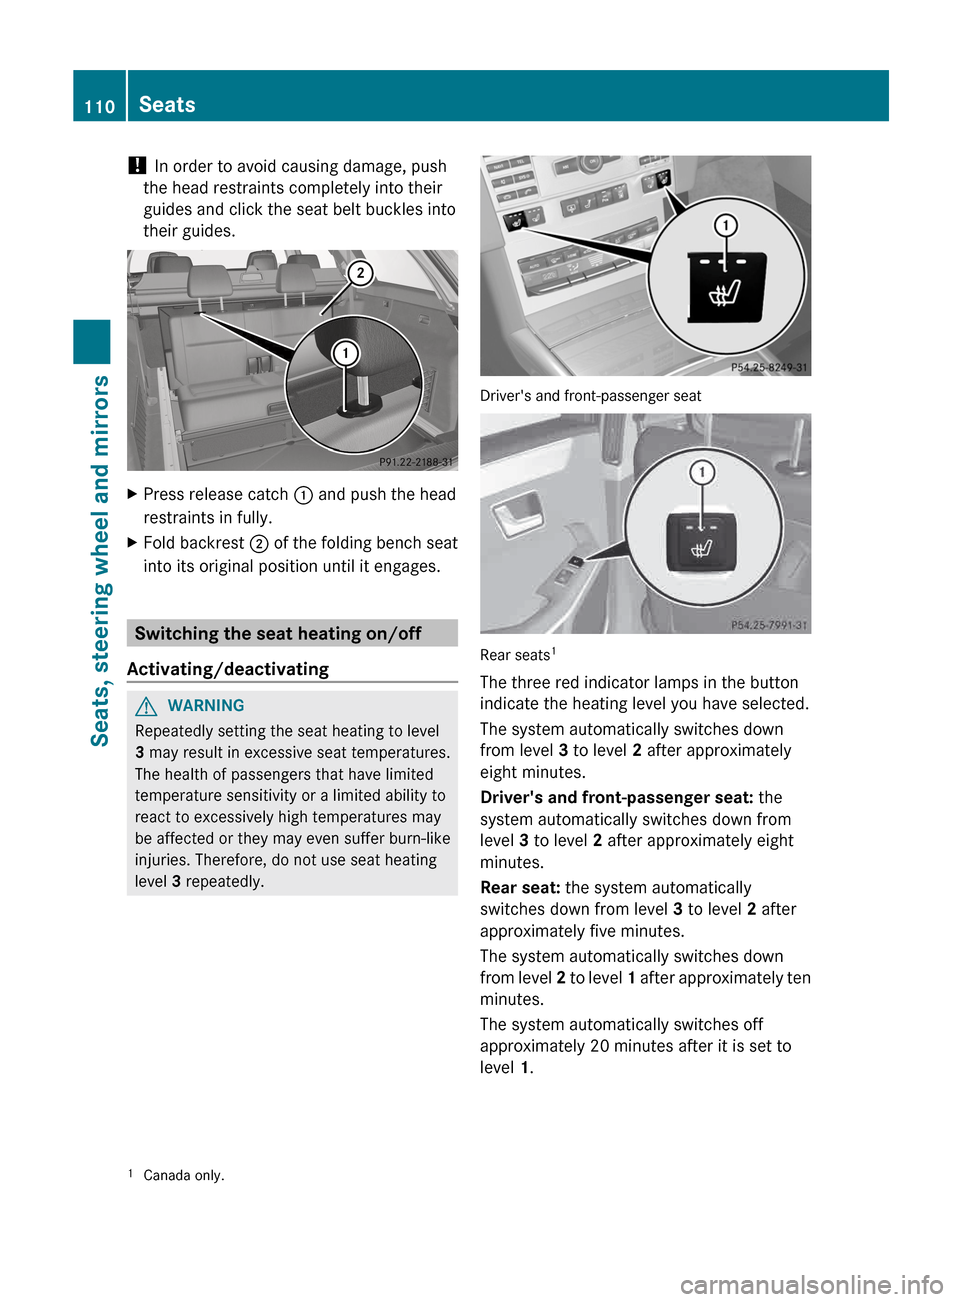
Press release catch : and push the head
restraints in fully.
X Fold backrest ; of the folding bench seat
into its original position until it engages. Switching the seat heating on/off
Activating/deactivating G
WARNING
Repeatedly setting the seat heating to level
3 may result in excessive seat temperatures.
The health of passengers that have limited
temperature sensitivity or a limited ability to
react to excessively high temperatures may
be affected or they may even suffer burn-like
injuries. Therefore, do not use seat heating
level 3 repeatedly. Driver's and front-passenger seat
Rear seats
1
The three red indicator lamps in the button
indicate the heating level you have selected.
The system automatically switches down
from level 3 to level 2 after approximately
eight minutes.
Driver's and front-passenger seat: the
system automatically switches down from
level 3 to level 2 after approximately eight
minutes.
Rear seat: the system automatically
switches down from level 3 to level 2 after
approximately five minutes.
The system automatically switches down
from
level 2 to level 1 after approximately ten
minutes.
The system automatically switches off
approximately 20 minutes after it is set to
level 1.
1 Canada only.110
Seats
Seats, steering wheel and mirrors
Page 116 of 420

Exterior mirrors
Adjusting the exterior mirrors G
WARNING
The exterior mirrors reduce the size of the
image. Objects are actually closer than they
appear.
You could misjudge the distance from
vehicles driving behind and cause an
accident, e.g. when changing lane. For this
reason, make sure of the actual distance from
the vehicle driving behind by glancing over
your shoulder. X
Make sure that the SmartKey is in position
1 or 2 in the ignition lock.
X Press button : for the left-hand exterior
mirror or button ; for the right-hand
exterior mirror.
The indicator lamp in the corresponding
button lights up in red.
The indicator lamp goes out again after
some time. You can adjust the selected
mirror using adjustment button = as long
as the indicator lamp is lit.
X Press adjustment button = up, down, or
to the left or right until you have adjusted
the exterior mirror to the correct position.
You should have a good overview of traffic
conditions.
The convex exterior mirrors provide a larger
field of vision.
The
exterior mirrors are heated automatically
if the rear window defroster is switched on
and the outside temperature is low. Folding the exterior mirrors in or out
electrically This function is only available in vehicles for
Canada.
X
Make sure that the SmartKey is in position
1 or 2 in the ignition lock.
X Briefly press button :.
Both exterior mirrors fold in or out.
i Make sure that the exterior mirrors are
always folded out fully while driving. They
could otherwise vibrate.
i If you are driving faster than 9 mph
(15 km/h
) you can no longer fold in the
exterior mirrors.
Setting the exterior mirrors This function is only available in vehicles for
Canada.
If the battery has been disconnected or
completely discharged, the exterior mirrors
must be reset. The exterior mirrors will
otherwise
not fold in when you select the Fold
in mirrors when locking function in the on-
board computer ( Y page 241).
X Make sure that the SmartKey is in
position 1 in the ignition lock.
X Briefly press button :.
Folding the exterior mirrors in or out
automatically This function is only available in vehicles for
Canada.114
Mirrors
Seats, steering wheel and mirrors
Page 117 of 420

If the "Fold in mirrors when locking" function
is activated in the on-board computer
(Y page 241):
R
the
exterior mirrors fold in automatically as
soon as you lock the vehicle from the
outside.
R the exterior mirrors fold out again
automatically as soon as you unlock the
vehicle and then open the driver's or front-
passenger door.
i If the exterior mirrors have been folded in
manually, they do not fold out.
Exterior mirror out of position If an exterior mirror has been pushed out of
position, proceed as follows:
X
Vehicles without electrically folding
exterior
mirrors: move the exterior mirror
into the correct position manually.
X Vehicles with electrically folding
exterior
mirrors (only for Canada): press
and hold mirror-folding button : until you
hear a click and then the mirrors engage in
position (Y page 114).
The mirror housing is engaged again and
you can adjust the exterior mirrors as usual
(Y page 114). Automatic anti-glare mirrors
G
WARNING
If incident light from headlamps is prevented
from striking the sensor in the rear-view
mirror,
for instance, by luggage piled too high
in the vehicle, the mirror's automatic anti-
glare function will not operate.
Incident light could then blind you. This may
distract you from the traffic conditions and,
as a result, you may cause an accident. The rear-view mirror and the exterior mirror
on
the driver's side automatically go into anti-
glare mode if the following conditions are met
simultaneously:
R the ignition is switched on and
R incident light from headlamps strikes the
sensor in the rear-view mirror.
The mirrors do not go into anti-glare mode if
reverse gear is engaged or if the interior
lighting is switched on. Parking position for the exterior
mirror on the front-passenger side
Setting
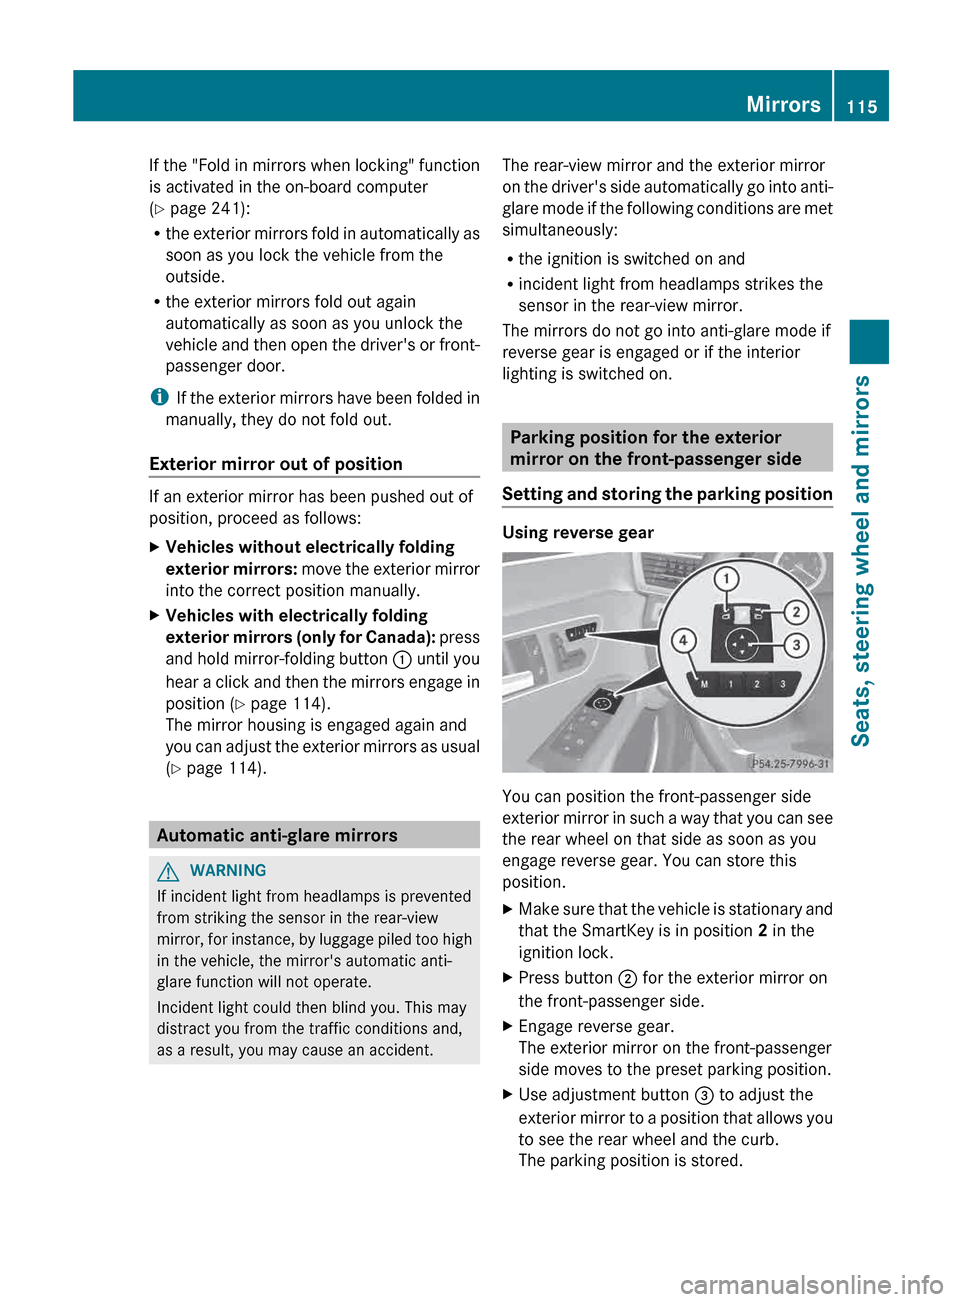
and storing the parking position Using reverse gear
You can position the front-passenger side
exterior
mirror in such a way that you can see
the rear wheel on that side as soon as you
engage reverse gear. You can store this
position.
X Make sure that the vehicle is stationary and
that the SmartKey is in position 2 in the
ignition lock.
X Press button ; for the exterior mirror on
the front-passenger side.
X Engage reverse gear.
The exterior mirror on the front-passenger
side moves to the preset parking position.
X Use adjustment button = to adjust the
exterior
mirror to a position that allows you
to see the rear wheel and the curb.
The parking position is stored. Mirrors
115
Seats, steering wheel and mirrors Z
Page 136 of 420

Replacing the wiper blades
Important safety notes G
WARNING
For safety reasons, switch off the windshield
wipers and remove the SmartKey from the
ignition
lock before changing the wiper blades
(vehicles with KEYLESS-GO: make sure that
the on-board electronics are in state 0).
Otherwise, the wiper motor could be switched
on suddenly and cause injury.
! Never open the hood if a windshield wiper
arm has been folded away from the
windshield.
Never fold a windshield wiper arm without
a wiper blade back onto the windshield/
rear window.
Hold the windshield wiper arm firmly when
you change the wiper blade. If you release
the windshield wiper arm without a wiper
blade and it falls onto the windshield, the
windshield may be damaged by the force of
the impact.
Mercedes-Benz recommends that you have
the wiper blades changed at a qualified
specialist workshop.
! To avoid damaging the wiper blades,
make sure that you touch only the wiper
arm of the wiper.
Replacing the wiper blades Removing the wiper blades
X
Remove the SmartKey from the ignition
lock or turn it to position 0 (KEYLESS-GO).
X Fold the wiper arm away from the
windshield until it engages. X
Firmly press release knob : and pull the
wiper
blade upwards from the wiper arm in
the direction of the arrow.
Installing the wiper blades
X Position the new wiper blade in the retainer
on the wiper arm and slide it into place in
the opposite direction to the arrow.
The wiper blade audibly engages.
X Make sure that wiper blade is seated
correctly.
X Fold the wiper arm back onto the
windshield.
Replacing the rear window wiper blade Removing a wiper blade
X
Remove the SmartKey from the ignition
lock.
X Fold wiper arm : away from the rear
window until it engages.
X Position wiper blade ; at a right angle to
wiper arm :.134
Windshield wipers
Lights and windshield wipers
Page 137 of 420

X
Hold wiper arm : and press wiper
blade ; in the direction of the arrow until
it releases.
X Remove wiper blade ;.
Installing a wiper blade
X Place new wiper blade ; onto wiper
arm :.
X Hold wiper arm : and press wiper
blade ; in the opposite direction to the
arrow until it engages.
X Make sure that wiper blade ; is seated
correctly.
X Position wiper blade ; parallel to wiper
arm :.
X Fold wiper arm : back onto the rear
window. Problems with the windshield wipers
The windshield wipers are obstructed X
For safety reasons, you should remove the
SmartKey from the ignition lock.
or
X Switch off the engine using the Start/Stop
button and open the driver's door.
X Remove the cause of the obstruction.
X Switch the windshield wipers back on.
The windshield wipers are inoperative The windshield wiper drive is malfunctioning.
X
Select another wiper speed on the
combination switch.
X Have the windshield wipers checked at a
qualified specialist workshop. Windshield wipers
135Lights and windshield wipers Z
Page 243 of 420

X
Press the : or 9 button to select the
Acoustic Lock function.
If the Acoustic Lock function is activated,
the & symbol in the multifunction
display lights up red.
X Press the a button to save the setting.
Activating/deactivating the radar sensor
system
X Press the = or ; button on the
steering wheel to select the Sett. menu.
X Press : or 9 to select the Vehicle
submenu.
X Press a to confirm.
X Press the 9 or : button to select
Radar Sensor (See Oper. Manual):.
You will see the selected setting: On or
Off.
X Press the a button to save the setting.
The following systems are switched off when
the radar sensor system is deactivated:
R DISTRONIC PLUS (Y page 185)
R BAS PLUS
(Y page 68)
R PRE-SAFE ®
Brake (Y page 72)
R Blind Spot Assist (Y page 214)
R Active Blind Spot Assist (Y page 218)
Convenience Activating/deactivating the EASY-
ENTRY/EXIT feature
G
WARNING
You must make sure no one can become
trapped or injured by the moving steering
wheel when the easy-entry/exit feature is
activated.
To stop steering wheel movement, move
steering
wheel adjustment lever or press one
of the memory position buttons.
Do not leave children unattended in the
vehicle, or with access to an unlocked vehicle.
Children could open the driver's door and
unintentionally activate the easy-entry/exit feature, which could result in an accident
and/or serious personal injury.
X Press the = or ; button on the
steering wheel to select the Sett. menu.
X Press the :
or 9 button to select the
Convenience submenu.
X Press a to confirm.
X Press : or 9 to select the Easy
Entry/Exit: function.
If the Easy Entry/Exit function is
activated, the vehicle steering wheel is
displayed in red in the multifunction
display.
X Press the a button to save the setting.
Further information on the EASY-ENTRY/EXIT
feature ( Y page 112).
Switching the belt adjustment on/off
X Press the = or ; button on the
steering wheel to select the Sett. menu.
X Press the :
or 9 button to select the
Convenience submenu.
X Press a to confirm.
X Press the :
or 9 button to select the
Belt Adjustment function.
When the Belt Adjustment function is
activated, the vehicle seat belt is displayed
in red in the multifunction display.
X Press the a button to save the setting.
For further information on belt adjustment,
see ( Y page 58).
Switching the fold-in mirrors when
locking feature on/off
This
function is only available on vehicles with
the memory function ( Y page 116).
When you activate the Auto. Mirror
Folding function, the exterior mirrors are
folded in when the vehicle is locked. If you
unlock the vehicle and then open a door, the
exterior mirrors fold out again. Menus and submenus
241
On-board computer and displays Z
Page 292 of 420

Stowage compartment under the
armrest
All models except E 63 AMG
X
To open: pull handle : up.
The armrest folds out. E 63 AMG
X
To open: press left-hand button ; or right-
hand button :.
The stowage compartment opens.
i Depending on the vehicle's equipment, a
USB
connection and an AUX IN connection
or a Media Interface are installed in the
stowage compartment. A Media Interface
is a universal interface for mobile audio
equipment, e.g. for an iPod ®
or MP3 player
(see the separate COMAND Operating
Instructions). Stowage compartment under the front
seats
X
To open: pull handle : up and fold
cover ; forwards.
i On vehicles with a fire extinguisher, the
fire extinguisher is located in the stowage
compartment under the driver's seat.
Stowage compartment in the rear !
Do
not sit or lean your bodyweight on the
armrests when they are folded out as you
could damage them.
! Close the cover of the stowage
compartment before folding the rear seat
armrest back into the seat backrest. X
To open: fold down seat armrest ;.
X Fold cover : of the armrest upwards.290
Stowage areas
Stowage and features
Page 293 of 420

Stowage net in the rear
:
Stowage net
Stowage pockets G
WARNING
Storage bags are intended for storing light-
weight items only.
Heavy objects, objects with sharp edges or
fragile objects may not be transported in the
storage bag. In an accident, during hard
braking,
or sudden maneuvers, they could be
thrown around inside the vehicle and cause
injury to vehicle occupants.
Storage bags cannot protect transported
goods in the event of an accident.
The stowage pockets are on the back of the
driver's and front-passenger's seats. Stowage nets
G
WARNING
Parcel nets are intended for storing light-
weight items only, such as road maps, mail,
etc.
Heavy objects, objects with sharp edges, or
fragile objects may not be transported in the
parcel nets. In an accident, during hard
braking,
or sudden maneuvers, they could be
thrown around inside the vehicle and cause
injury to vehicle occupants.
Parcel nets cannot protect transported goods
in the event of an accident. Parcel nets are located in the front-passenger
footwell and on the left and right-hand sides
of the trunk/cargo compartment.
Skibag
Unfolding the skibag and loading skis G
WARNING
The skibag is designed for up to four pairs of
skis. Do not load the skibag with any other
objects.
Always fasten the skibag securely. In an
accident, an unfastened ski bag can cause
injury to vehicle occupants. X
Fold down the rear seat armrest.
X Press release catches ;
together and fold
down cover :. X
Pull skibag : into the vehicle interior and
unfold it.
X Open the trunk lid. Stowage areas
291
Stowage and features Z