2013 MERCEDES-BENZ CLA ECU
[x] Cancel search: ECUPage 270 of 352
Useful information
i This Owner's Manual describes all mod-
els, series and optional equipment for your
vehicle that were available at the time of
going to press. National variations are pos-
sible. Note that your vehicle may not be
equipped with all of the functions descri-
bed. This is also the case for systems and
functions relevant to safety.
i Read the information on qualified special-
ist workshops: ( Y page 24).
Loading guidelines
GWARNING
If objects, luggage or loads are not secured or
not secured sufficiently, they could slip, tip
over or be flung around and thereby hit vehicle
occupants. There is a risk of injury, especially
when braking or abruptly changing directions.
Always store objects so that they cannot be
flung around. Secure objects, luggage or
loads against slipping or tipping before the
journey.
GWARNING
Combustion engines emit poisonous exhaust
gases such as carbon monoxide. Exhaust
gases can enter the vehicle interior if the boot
lid is open when the engine is running, espe-
cially if the vehicle is in motion. There is a risk
of poisoning.
Always switch off the engine before opening
the boot lid. Never drive with the boot lid
open.
The handling characteristics of a laden vehi-
cle are dependent on the distribution of the
load within the vehicle. For this reason, you
should observe the following notes when
transporting a load:
R when transporting a load, never exceed the
maximum permissible gross vehicle weight
or the permissible axle loads for the vehicle
(including occupants).
R the boot is the preferred place to carry
objects.
R position heavy loads as far forwards as pos-
sible and as low down in the boot as pos-
sible.
R the load must not protrude above the upper
edge of the seat backrests.
R always place the load against the rear or
front seat backrests. Make sure that the
seat backrests are securely locked into
place.
R always place the load behind unoccupied
seats if possible.
R use the lashing eyelets and the luggage
nets to transport loads and luggage.
R only use lashing eyelets and fastening com-
ponents that are suitable for the weight and
size of the load.
R secure the load with sufficiently strong and
wear-resistant lashing material. Pad sharp
edges for protection.
i Lashing material is available at any quali-
fied specialist workshop.
Stowage areas
Stowage spaces
Important safety notes
GWARNING
If you do not correctly store objects in the
vehicle interior, they can slip or be flung
around, thus striking vehicle occupants.
There is a risk of injury, especially when brak-
ing or abruptly changing directions.
R Always store objects so that they cannot be
flung around in these or in similar situa-
tions.
R Always make sure that objects do not pro-
trude from stowage compartments, lug-
gage nets or stowage nets.
268Stowage areasStowing and features
Page 271 of 352
RClose lockable stowage compartments
while driving.
R Stow and secure objects that are heavy,
hard, pointy, sharp-edged, fragile or too
large in the boot.
Observe the loading guidelines (Y page 268).
Front stowage compartments
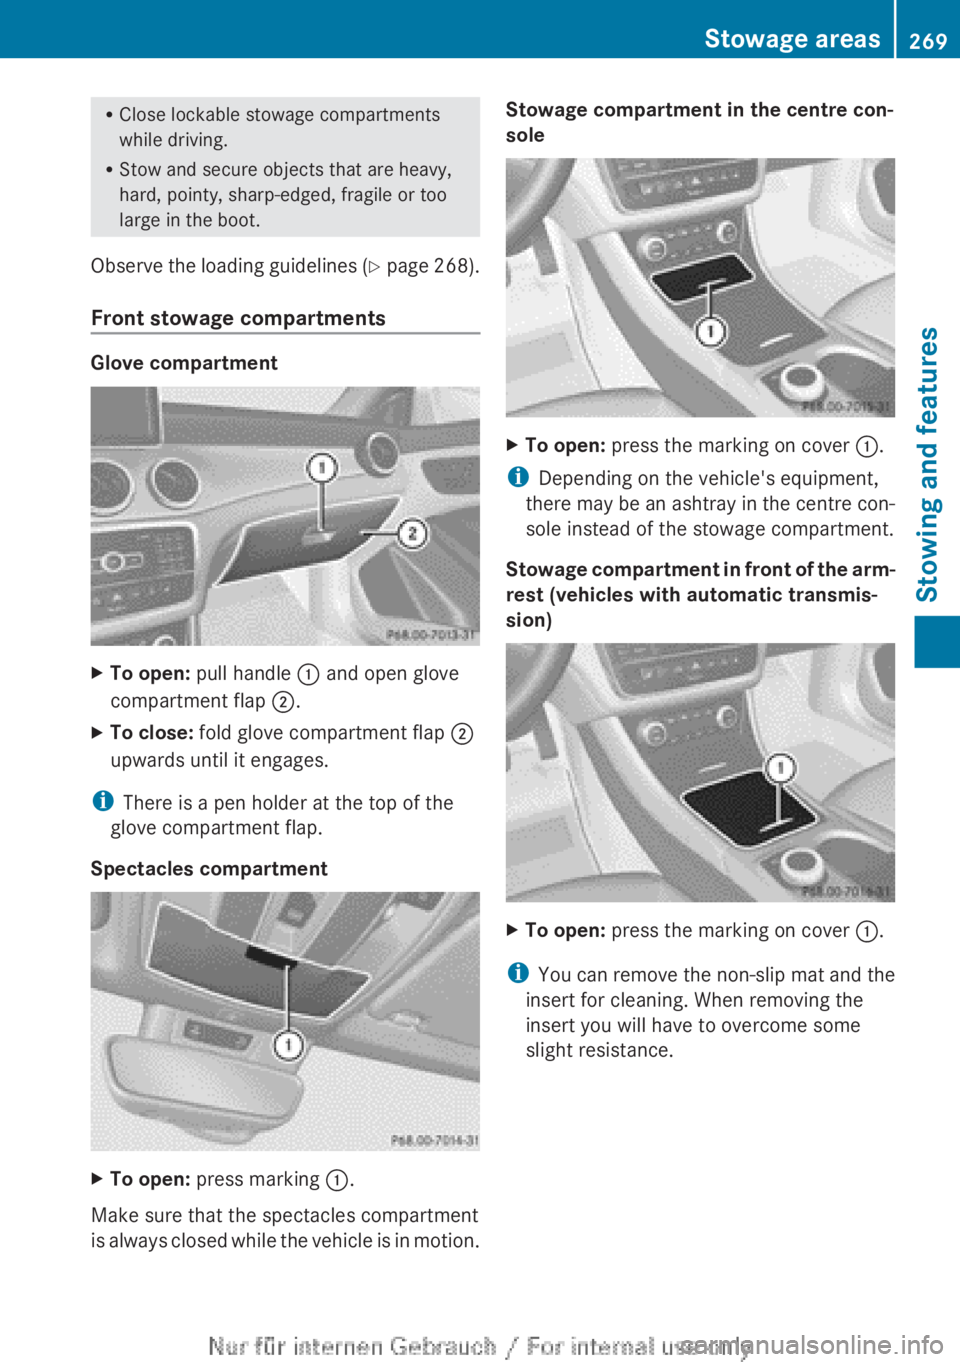
Glove compartment
XTo open: pull handle : and open glove
compartment flap ;.XTo close: fold glove compartment flap ;
upwards until it engages.
i There is a pen holder at the top of the
glove compartment flap.
Spectacles compartment
XTo open: press marking :.
Make sure that the spectacles compartment
is always closed while the vehicle is in motion.
Stowage compartment in the centre con-
soleXTo open: press the marking on cover :.
i
Depending on the vehicle's equipment,
there may be an ashtray in the centre con-
sole instead of the stowage compartment.
Stowage compartment in front of the arm-
rest (vehicles with automatic transmis-
sion)
XTo open: press the marking on cover :.
i
You can remove the non-slip mat and the
insert for cleaning. When removing the
insert you will have to overcome some
slight resistance.
Stowage areas269Stowing and featuresZ
Page 272 of 352
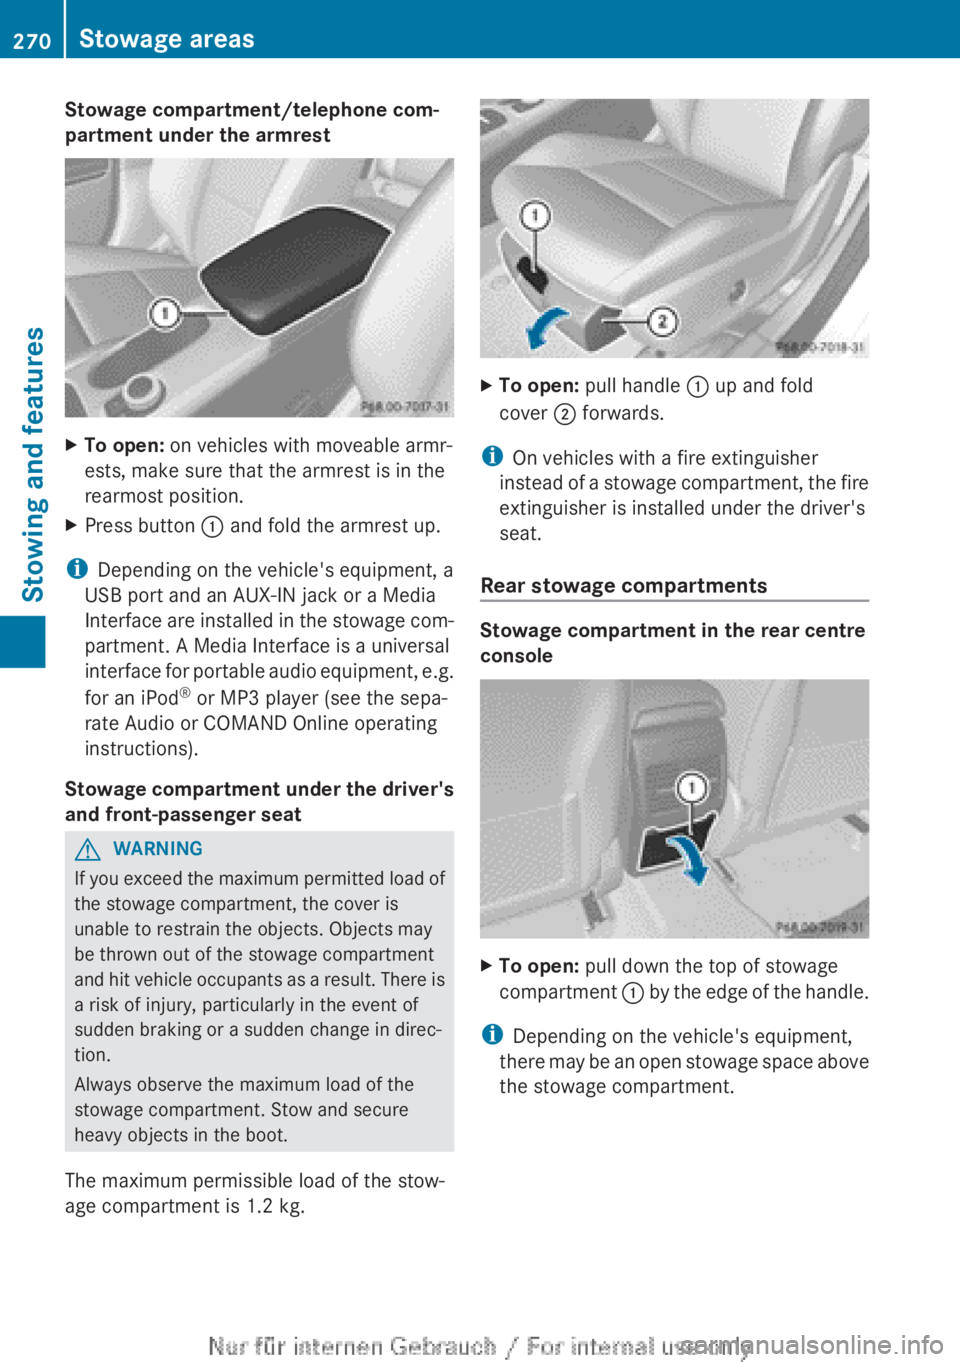
Stowage compartment/telephone com-
partment under the armrestXTo open: on vehicles with moveable armr-
ests, make sure that the armrest is in the
rearmost position.XPress button : and fold the armrest up.
i
Depending on the vehicle's equipment, a
USB port and an AUX-IN jack or a Media
Interface are installed in the stowage com-
partment. A Media Interface is a universal
interface for portable audio equipment, e.g.
for an iPod ®
or MP3 player (see the sepa-
rate Audio or COMAND Online operating
instructions).
Stowage compartment under the driver's
and front-passenger seat
GWARNING
If you exceed the maximum permitted load of
the stowage compartment, the cover is
unable to restrain the objects. Objects may
be thrown out of the stowage compartment
and hit vehicle occupants as a result. There is
a risk of injury, particularly in the event of
sudden braking or a sudden change in direc-
tion.
Always observe the maximum load of the
stowage compartment. Stow and secure
heavy objects in the boot.
The maximum permissible load of the stow-
age compartment is 1.2 kg.
XTo open: pull handle : up and fold
cover ; forwards.
i
On vehicles with a fire extinguisher
instead of a stowage compartment, the fire
extinguisher is installed under the driver's
seat.
Rear stowage compartments
Stowage compartment in the rear centre
console
XTo open: pull down the top of stowage
compartment : by the edge of the handle.
i
Depending on the vehicle's equipment,
there may be an open stowage space above
the stowage compartment.
270Stowage areasStowing and features
Page 274 of 352
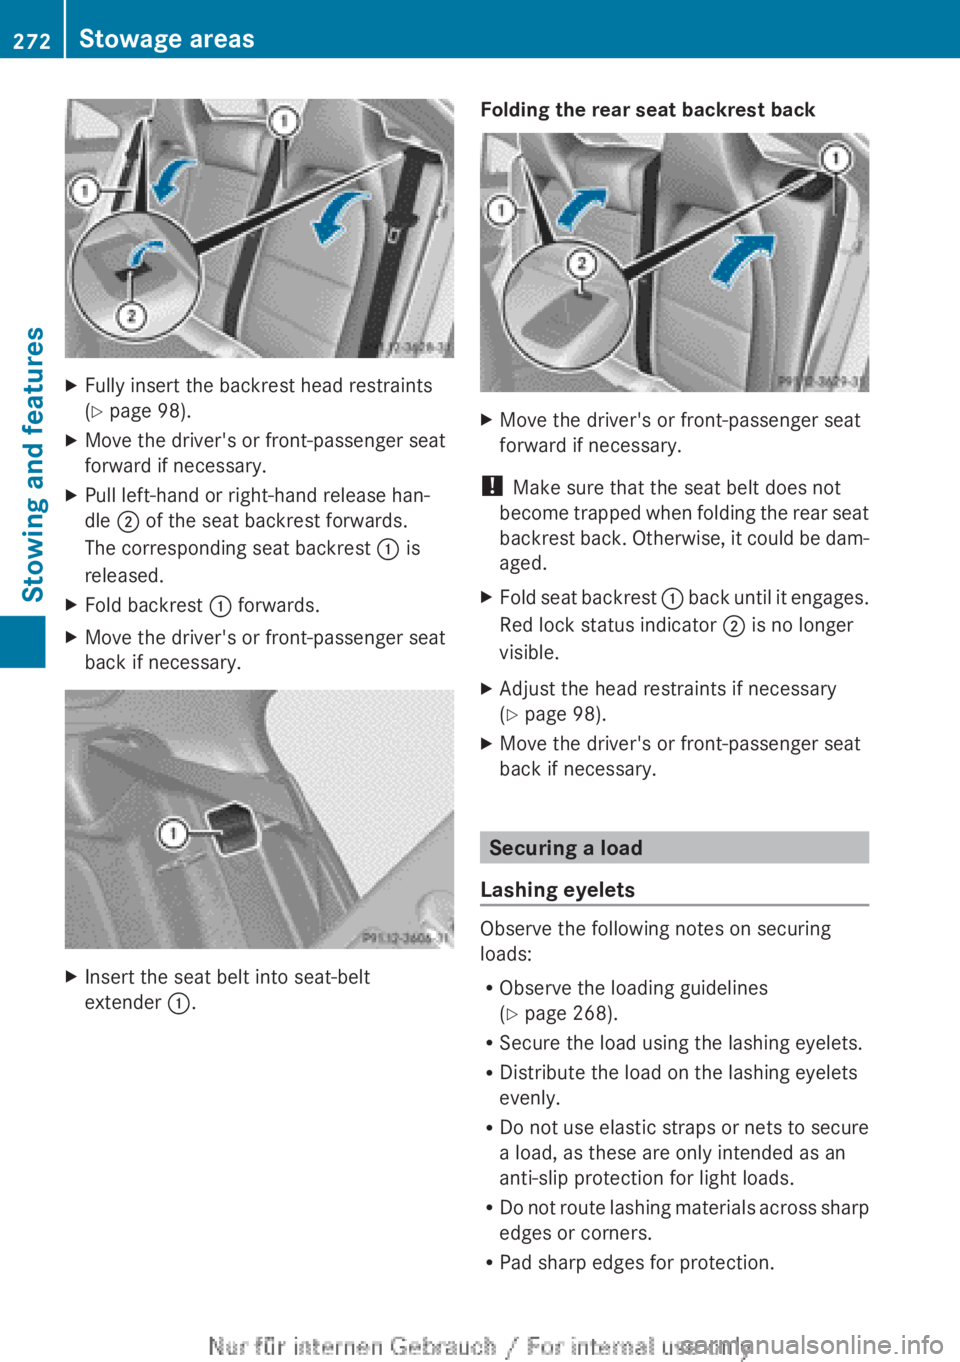
XFully insert the backrest head restraints
( Y page 98).XMove the driver's or front-passenger seat
forward if necessary.XPull left-hand or right-hand release han-
dle ; of the seat backrest forwards.
The corresponding seat backrest : is
released.XFold backrest : forwards.XMove the driver's or front-passenger seat
back if necessary.XInsert the seat belt into seat-belt
extender :.Folding the rear seat backrest backXMove the driver's or front-passenger seat
forward if necessary.
! Make sure that the seat belt does not
become trapped when folding the rear seat
backrest back. Otherwise, it could be dam-
aged.
XFold seat backrest : back until it engages.
Red lock status indicator ; is no longer
visible.XAdjust the head restraints if necessary
( Y page 98).XMove the driver's or front-passenger seat
back if necessary.
Securing a load
Lashing eyelets
Observe the following notes on securing
loads:
R Observe the loading guidelines
( Y page 268).
R Secure the load using the lashing eyelets.
R Distribute the load on the lashing eyelets
evenly.
R Do not use elastic straps or nets to secure
a load, as these are only intended as an
anti-slip protection for light loads.
R Do not route lashing materials across sharp
edges or corners.
R Pad sharp edges for protection.
272Stowage areasStowing and features
Page 276 of 352
An incorrectly secured roof carrier or roof
load may become detached from the vehicle.
You must therefore ensure that you observe
the roof carrier manufacturer's installation
instructions.
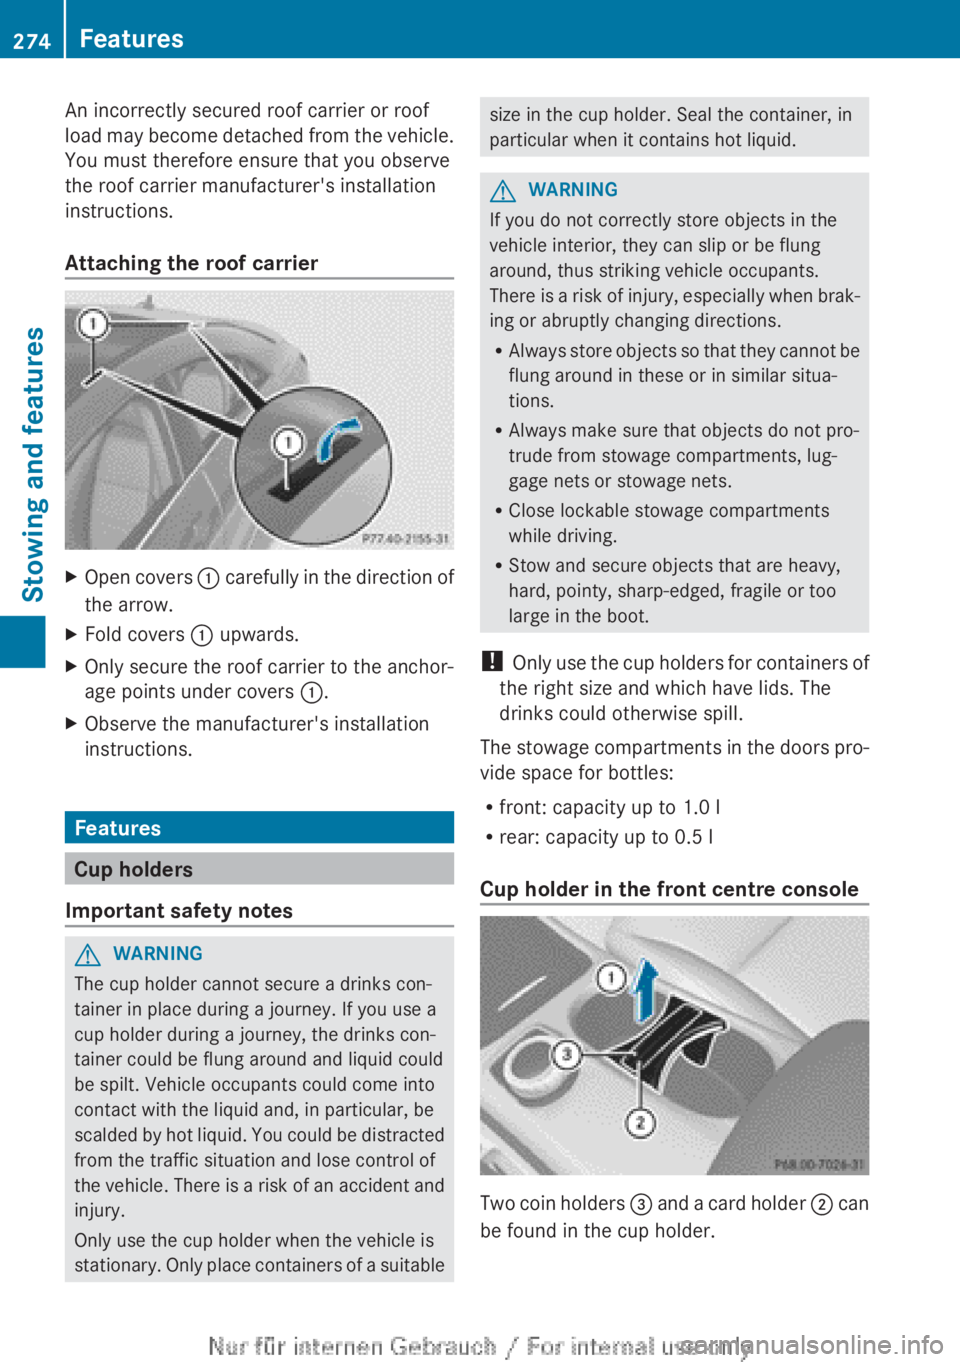
Attaching the roof carrierXOpen covers : carefully in the direction of
the arrow.XFold covers : upwards.XOnly secure the roof carrier to the anchor-
age points under covers :.XObserve the manufacturer's installation
instructions.
Features
Cup holders
Important safety notes
GWARNING
The cup holder cannot secure a drinks con-
tainer in place during a journey. If you use a
cup holder during a journey, the drinks con-
tainer could be flung around and liquid could
be spilt. Vehicle occupants could come into
contact with the liquid and, in particular, be
scalded by hot liquid. You could be distracted
from the traffic situation and lose control of
the vehicle. There is a risk of an accident and
injury.
Only use the cup holder when the vehicle is
stationary. Only place containers of a suitable
size in the cup holder. Seal the container, in
particular when it contains hot liquid.GWARNING
If you do not correctly store objects in the
vehicle interior, they can slip or be flung
around, thus striking vehicle occupants.
There is a risk of injury, especially when brak-
ing or abruptly changing directions.
R Always store objects so that they cannot be
flung around in these or in similar situa-
tions.
R Always make sure that objects do not pro-
trude from stowage compartments, lug-
gage nets or stowage nets.
R Close lockable stowage compartments
while driving.
R Stow and secure objects that are heavy,
hard, pointy, sharp-edged, fragile or too
large in the boot.
! Only use the cup holders for containers of
the right size and which have lids. The
drinks could otherwise spill.
The stowage compartments in the doors pro-
vide space for bottles:
R front: capacity up to 1.0 l
R rear: capacity up to 0.5 l
Cup holder in the front centre console
Two coin holders = and a card holder ; can
be found in the cup holder.
274FeaturesStowing and features
Page 282 of 352
securely and as specified in order to ensure
sufficient clearance for the pedals. Do not use
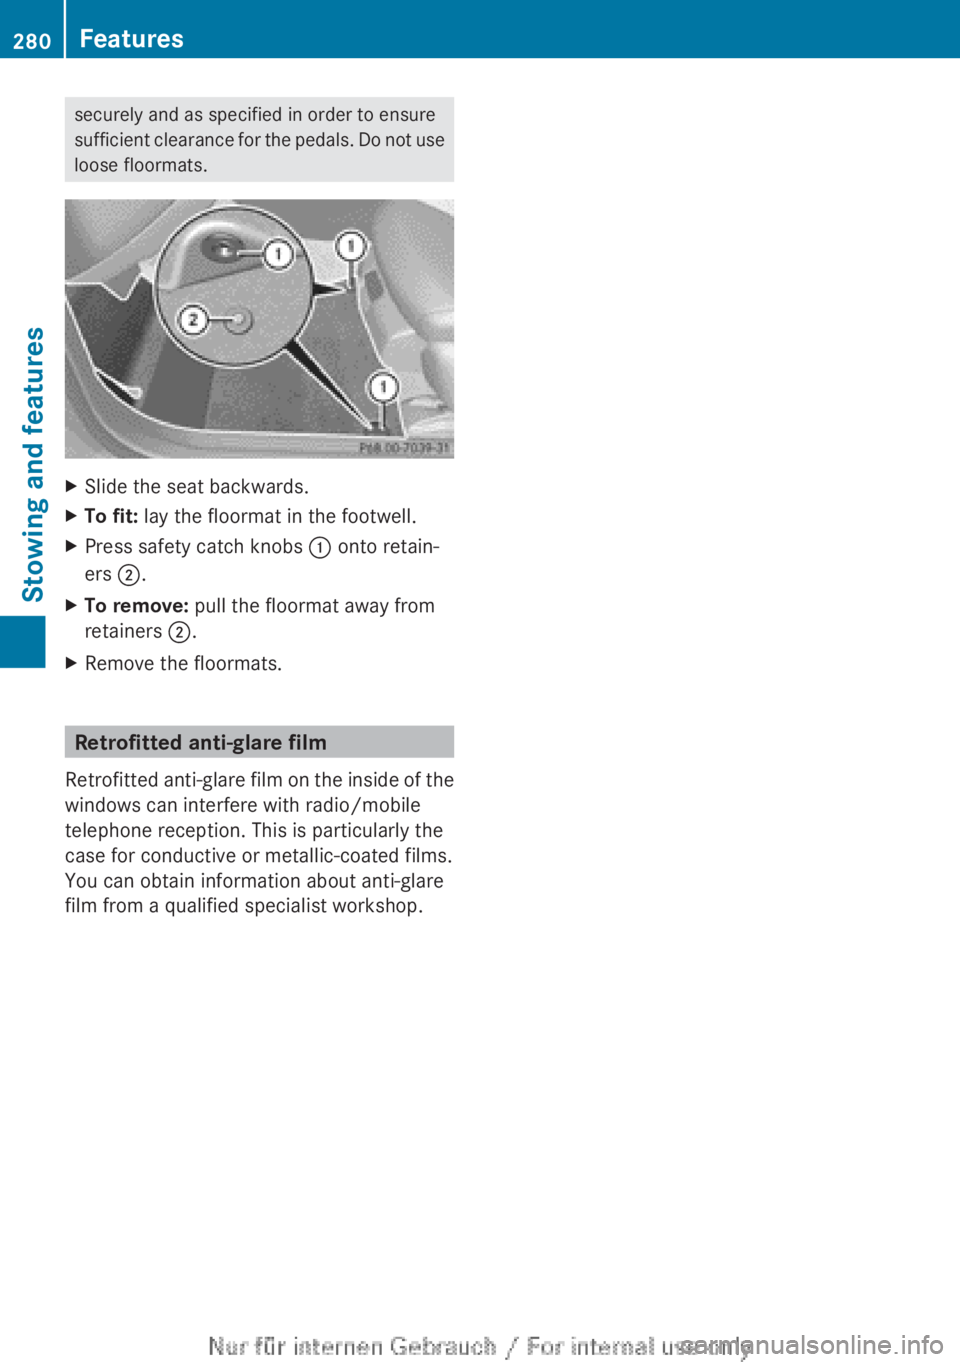
loose floormats.XSlide the seat backwards.XTo fit: lay the floormat in the footwell.XPress safety catch knobs : onto retain-
ers ;.XTo remove: pull the floormat away from
retainers ;.XRemove the floormats.
Retrofitted anti-glare film
Retrofitted anti-glare film on the inside of the
windows can interfere with radio/mobile
telephone reception. This is particularly the
case for conductive or metallic-coated films.
You can obtain information about anti-glare
film from a qualified specialist workshop.
280FeaturesStowing and features
Page 287 of 352
XSlowly slide oil dipstick : into the guide
tube to the stop, and take it out again.
If the level is between MIN mark = and
MAX mark ;, the oil level is correct.XIf the oil level has dropped to MIN mark
= or below, top up with 1.0 litre of engine
oil.
Adding engine oil
GWARNING
If engine oil comes into contact with hot com-
ponents in the engine compartment, it may
ignite. There is a risk of fire and injury.
Make sure that engine oil does not spill out
over the filler neck. Allow the engine to cool
down and thoroughly clean the components
that have come into contact with engine oil
before you start the engine.
HEnvironmental note
When topping up the oil, take care not to spill
any. If oil enters the soil or waterways, it is
harmful to the environment.
! Only use engine oils and oil filters that
have been approved for vehicles with a
service system. You can obtain a list of the
engine oils and oil filters tested and
approved in accordance with the
Mercedes-Benz Specifications for Service
Products at any Mercedes-Benz Service
Centre.
Damage to the engine or exhaust system is
caused by the following:
R using engine oils and oil filters that have
not been specifically approved for the
service system
R changing the engine oil and oil filter after
missing the change interval required by
the service system
R using engine oil additives
! Do not add too much oil. Topping up with
too much engine oil can result in damage
to the engine or to the catalytic converter.
Have excess engine oil siphoned off.
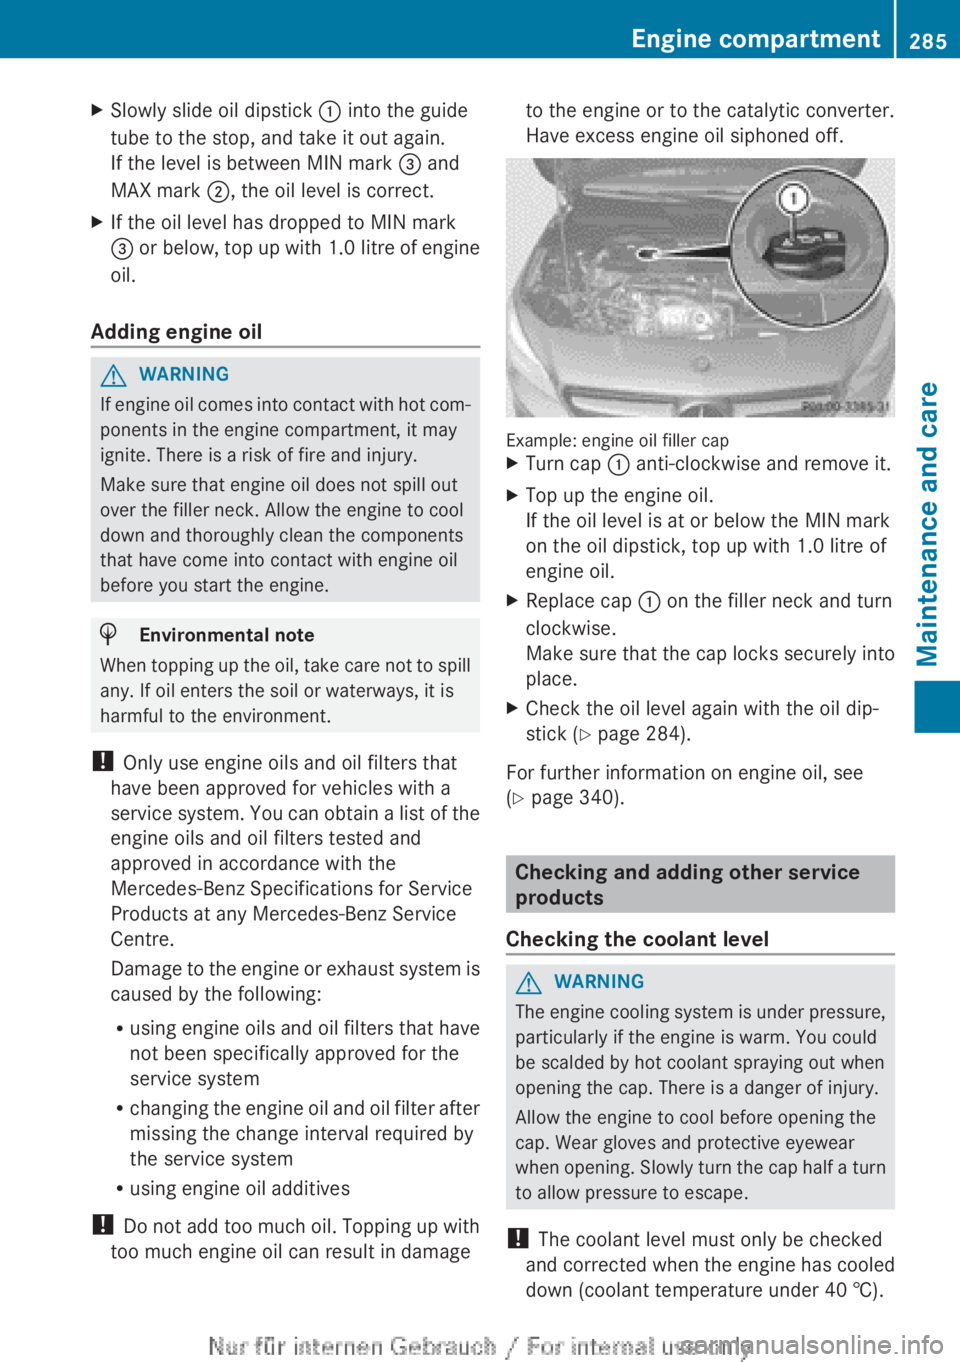
Example: engine oil filler cap
XTurn cap : anti-clockwise and remove it.XTop up the engine oil.
If the oil level is at or below the MIN mark
on the oil dipstick, top up with 1.0 litre of
engine oil.XReplace cap : on the filler neck and turn
clockwise.
Make sure that the cap locks securely into
place.XCheck the oil level again with the oil dip-
stick ( Y page 284).
For further information on engine oil, see
( Y page 340).
Checking and adding other service
products
Checking the coolant level
GWARNING
The engine cooling system is under pressure,
particularly if the engine is warm. You could
be scalded by hot coolant spraying out when
opening the cap. There is a danger of injury.
Allow the engine to cool before opening the
cap. Wear gloves and protective eyewear
when opening. Slowly turn the cap half a turn
to allow pressure to escape.
! The coolant level must only be checked
and corrected when the engine has cooled
down (coolant temperature under 40 †).
Engine compartment285Maintenance and careZ
Page 293 of 352
Cleaning the wiper bladesGWARNING
If the windscreen wipers are set in motion
when cleaning the windscreen or wiper
blades, you could become trapped. There is a
danger of injury.
Always switch off the windscreen wipers and
the ignition before cleaning the windscreen or
wiper blades.
! Only fold the windscreen wipers away
from the windscreen when vertical. Other-
wise, you will damage the bonnet.
! Do not pull on the wiper blade. Otherwise,
the wiper blade could be damaged.
! Do not clean wiper blades too often and
do not rub them too hard. Otherwise, the
graphite coating could be damaged. This
could cause wiper noise.
XFold the wiper arms away from the wind-
screen.XClean the wiper blades carefully using a
damp cloth.XFold the windscreen wipers back again
before switching on the ignition.
! Hold the wiper arm securely when folding
back. The windscreen could be damaged if
the wiper arm hits against it suddenly.
Cleaning the exterior lighting
! Only use cleaning agents or cleaning
cloths that are suitable for plastic lenses.
Unsuitable cleaning agents or cleaning
cloths could scratch or damage the plastic
lenses of the exterior lighting.
XClean the plastic lenses of the exterior
lighting using a wet sponge and a mild
cleaning agent, e.g. Mercedes-Benz car
shampoo or cleaning cloths.Cleaning the mirror turn signal
! Only use cleaning agents or cleaning
cloths that are suitable for plastic lenses.
Unsuitable cleaning agents or cleaning
cloths could scratch or damage the plastic
lenses of the mirror turn signals.
XClean the plastic lenses of the mirror turn
signals in the exterior mirror housing using
a wet sponge and a mild cleaning agent,
e.g. Mercedes-Benz car shampoo or clean-
ing cloths.
Cleaning the sensors
! If you clean the sensors with a high-pres-
sure cleaner, make sure that you keep a
distance of at least 30 cm between the
vehicle and the high-pressure cleaner noz-
zle. Information about the correct distance
is available from the equipment manufac-
turer.
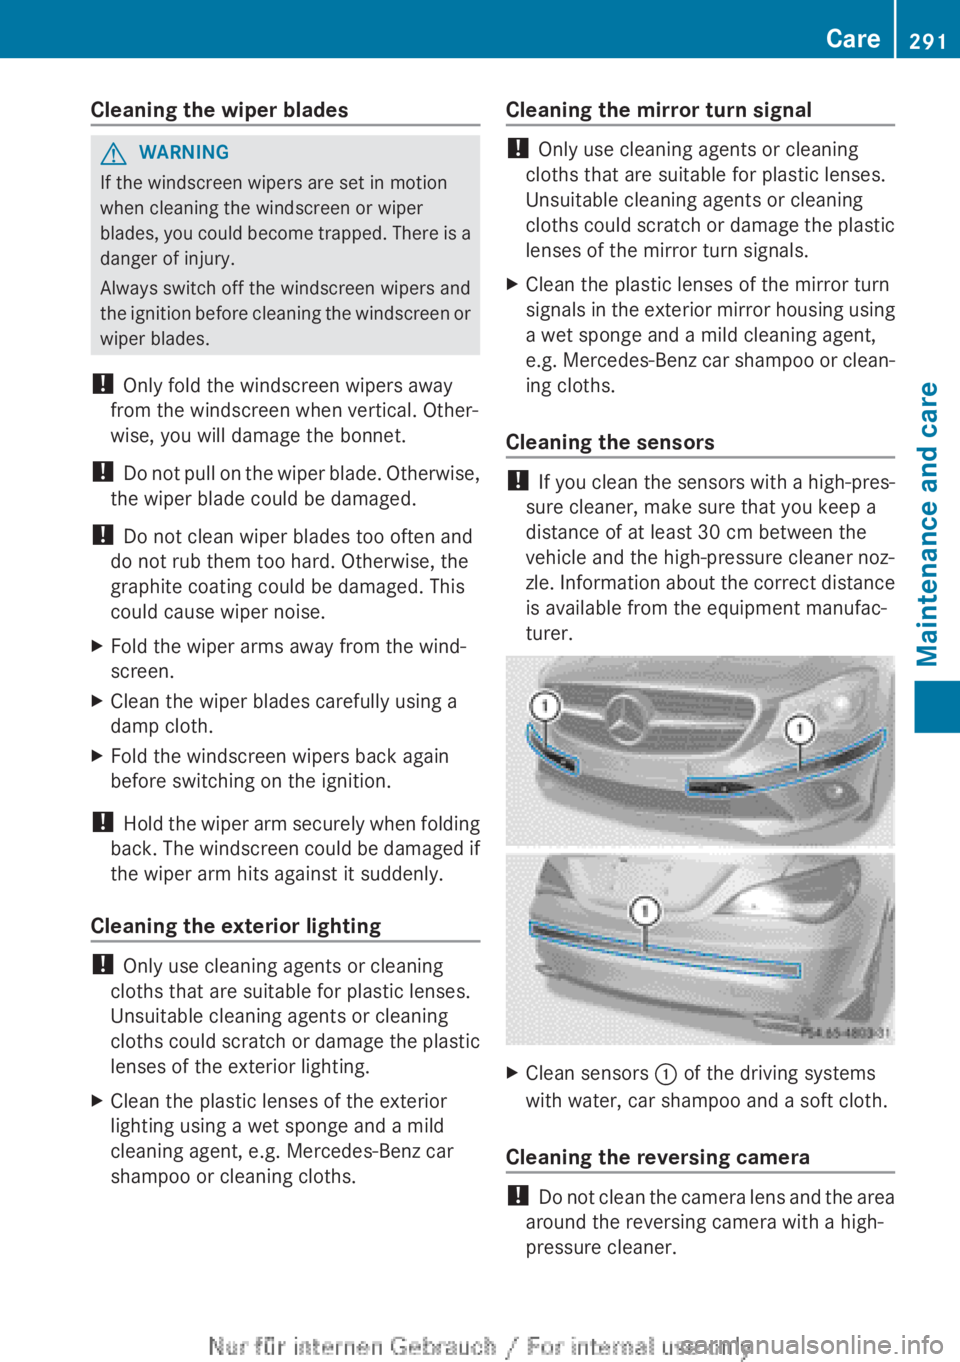
XClean sensors : of the driving systems
with water, car shampoo and a soft cloth.
Cleaning the reversing camera
! Do not clean the camera lens and the area
around the reversing camera with a high-
pressure cleaner.
Care291Maintenance and careZ