2013 MERCEDES-BENZ CLA belt
[x] Cancel search: beltPage 60 of 352
Seat positionsWeight catego-
riesFront-passenger seatRear seat 1Front-
passenger
front airbag is
not disabledFront-
passenger
front airbag is
disabledLeft, rightCentreCategory II: 15
to 25 kgUF 3
, L 3U3
, L 3U, LU, LCategory III:
22 to 36 kgUF 3, 4
, L3, 4UF 3, 4
, L3, 4U, L 4U, L4
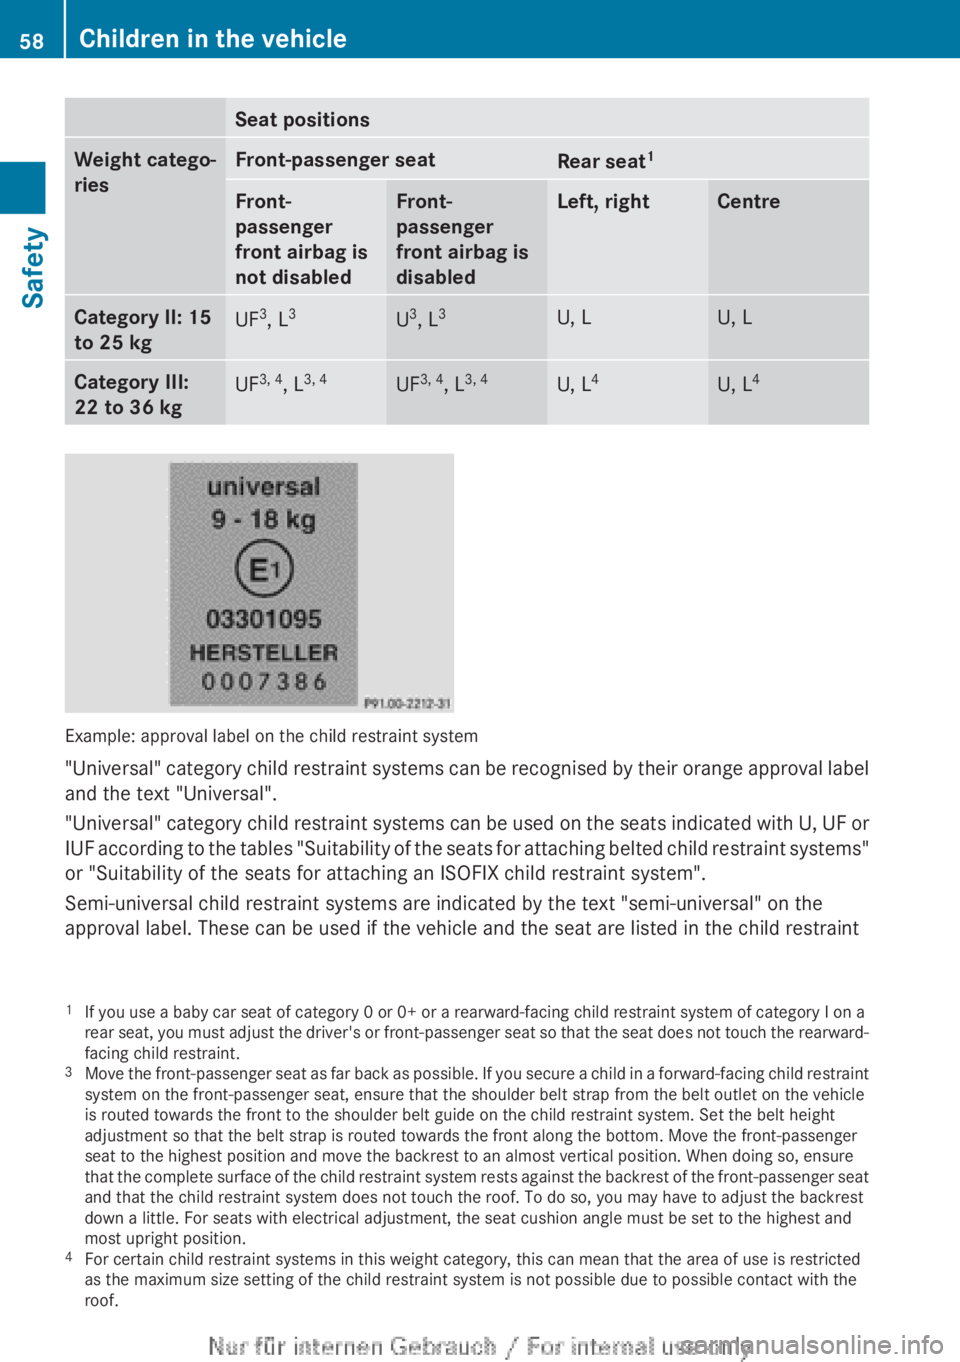
Example: approval label on the child restraint system
" Universal" category child restraint systems can be recognised by their orange approval label
and the text "Universal".
" Universal" category child restraint systems can be used on the seats indicated with U, UF or
IUF according to the tables "Suitability of the seats for attaching belted child restraint systems"
or "Suitability of the seats for attaching an ISOFIX child restraint system".
Semi-universal child restraint systems are indicated by the text "semi-universal" on the
approval label. These can be used if the vehicle and the seat are listed in the child restraint
1 If you use a baby car seat of category 0 or 0+ or a rearward-facing child restraint system of category I on a
rear seat, you must adjust the driver's or front-passenger seat so that the seat does not touch the rearward-
facing child restraint.
3 Move the front-passenger seat as far back as possible. If you secure a child in a forward-facing child restraint
system on the front-passenger seat, ensure that the shoulder belt strap from the belt outlet on the vehicle
is routed towards the front to the shoulder belt guide on the child restraint system. Set the belt height
adjustment so that the belt strap is routed towards the front along the bottom. Move the front-passenger
seat to the highest position and move the backrest to an almost vertical position. When doing so, ensure
that the complete surface of the child restraint system rests against the backrest of the front-passenger seat
and that the child restraint system does not touch the roof. To do so, you may have to adjust the backrest
down a little. For seats with electrical adjustment, the seat cushion angle must be set to the highest and
most upright position.
4 For certain child restraint systems in this weight category, this can mean that the area of use is restricted
as the maximum size setting of the child restraint system is not possible due to possible contact with the
roof.58Children in the vehicleSafety
Page 61 of 352
system manufacturer's vehicle model list. For more information, contact the child restraint
system manufacturer or visit their website.
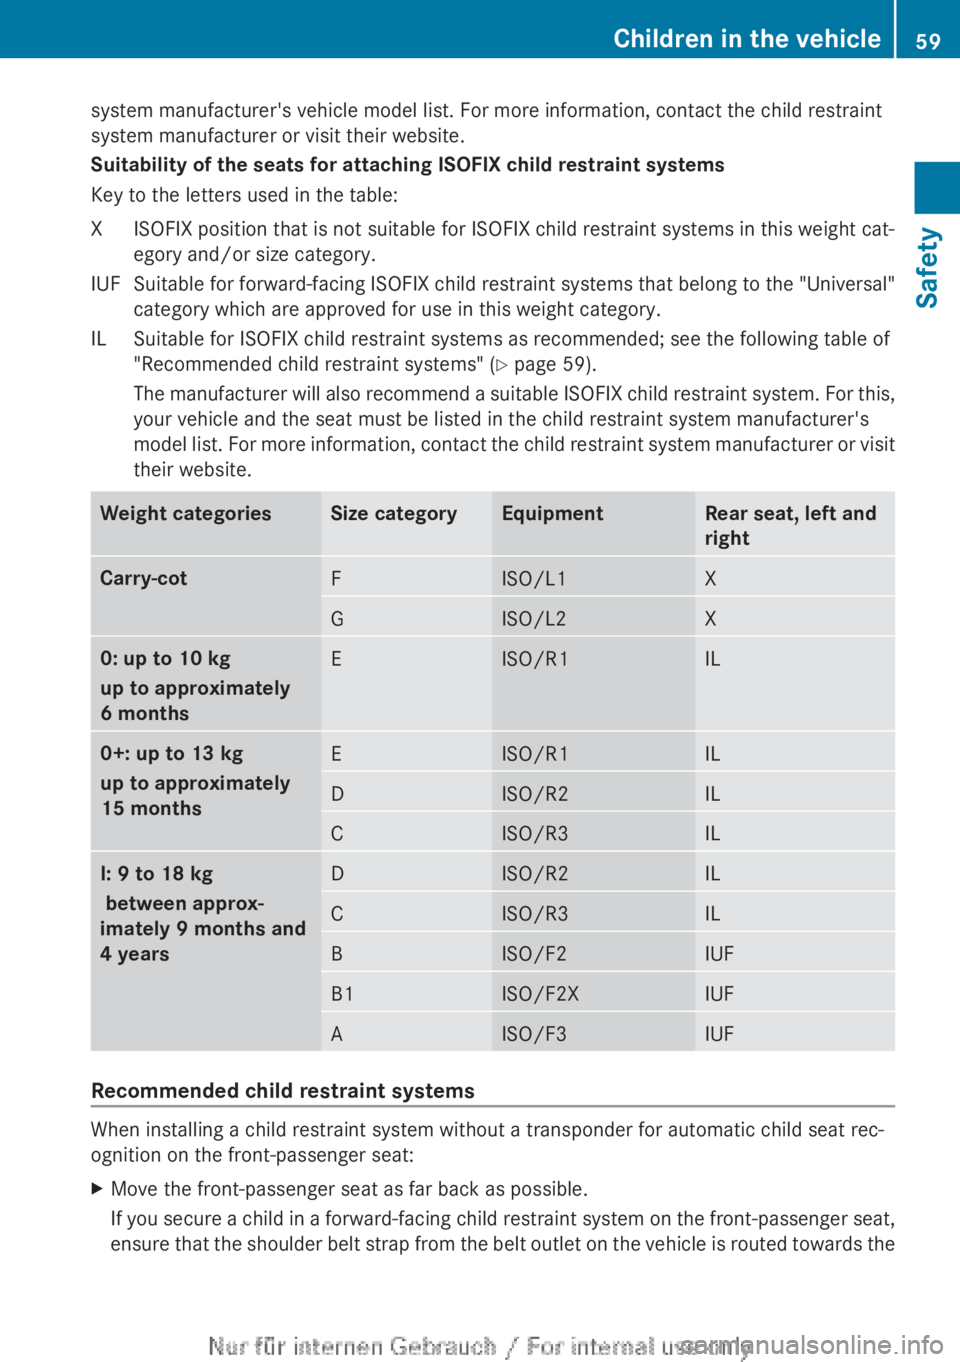
Suitability of the seats for attaching ISOFIX child restraint systems
Key to the letters used in the table:XISOFIX position that is not suitable for ISOFIX child restraint systems in this weight cat-
egory and/or size category.IUFSuitable for forward-facing ISOFIX child restraint systems that belong to the "Universal"
category which are approved for use in this weight category.ILSuitable for ISOFIX child restraint systems as recommended; see the following table of
"Recommended child restraint systems" ( Y page 59).
The manufacturer will also recommend a suitable ISOFIX child restraint system. For this,
your vehicle and the seat must be listed in the child restraint system manufacturer's
model list. For more information, contact the child restraint system manufacturer or visit
their website.Weight categoriesSize categoryEquipmentRear seat, left and
rightCarry-cotFISO/L1XGISO/L2X0: up to 10 kg
up to approximately
6 monthsEISO/R1IL0+: up to 13 kg
up to approximately
15 monthsEISO/R1ILDISO/R2ILCISO/R3ILI: 9 to 18 kg
between approx-
imately 9 months and
4 yearsDISO/R2ILCISO/R3ILBISO/F2IUFB1ISO/F2XIUFAISO/F3IUF
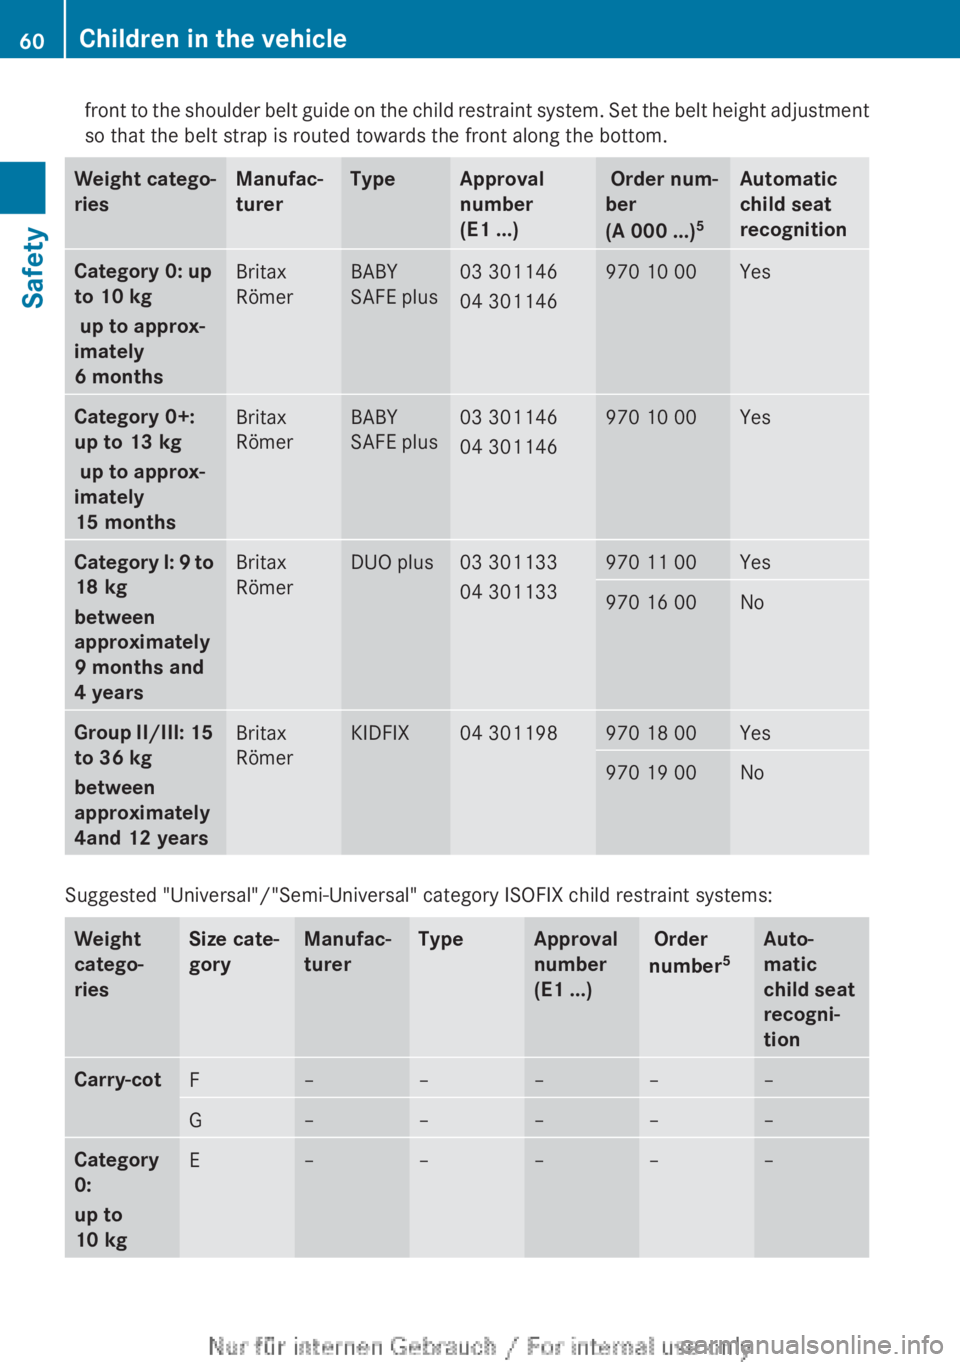
Recommended child restraint systems
When installing a child restraint system without a transponder for automatic child seat rec-
ognition on the front-passenger seat:
XMove the front-passenger seat as far back as possible.
If you secure a child in a forward-facing child restraint system on the front-passenger seat,
ensure that the shoulder belt strap from the belt outlet on the vehicle is routed towards theChildren in the vehicle59SafetyZ
Page 62 of 352
front to the shoulder belt guide on the child restraint system. Set the belt height adjustment
so that the belt strap is routed towards the front along the bottom.Weight catego-
riesManufac-
turerTypeApproval
number
(E1 ...) Order num-
ber
(A 000 ...) 5Automatic
child seat
recognitionCategory 0: up
to 10 kg
up to approx-
imately
6 monthsBritax
RömerBABY
SAFE plus03 301146
04 301146970 10 00YesCategory 0+:
up to 13 kg
up to approx-
imately
15 monthsBritax
RömerBABY
SAFE plus03 301146
04 301146970 10 00YesCategory I: 9 to
18 kg
between
approximately
9 months and
4 yearsBritax
RömerDUO plus03 301133
04 301133970 11 00Yes970 16 00NoGroup II/III: 15
to 36 kg
between
approximately
4and 12 yearsBritax
RömerKIDFIX04 301198970 18 00Yes970 19 00No
Suggested "Universal"/"Semi-Universal" category ISOFIX child restraint systems:
Weight
catego-
riesSize cate-
goryManufac-
turerTypeApproval
number
(E1 ...) Order
number 5Auto-
matic
child seat
recogni-
tionCarry-cotF–––––G–––––Category
0:
up to
10 kgE–––––60Children in the vehicleSafety
Page 69 of 352

the braking force to a level suitable for the
traffic conditions.XKeep the brake pedal depressed until the
emergency braking situation is over.
ABS prevents the wheels from locking.
The brakes will work normally again if:
R you release the brake pedal
R there is no longer any danger of a collision
R no obstacle is detected in front of your
vehicle
Adaptive Brake Assist is then deactivated.
Vehicles with PRE-SAFE ®
: if adaptive Brake
Assist requires particularly high brake pres-
sure, preventive passenger protection meas-
ures (PRE-SAFE ®
) are deployed simultane-
ously.
Up to vehicle speeds of around 250 km/h,
adaptive Brake Assist is capable of reacting
to moving objects that have already been rec-
ognised as such at least once over the period
of observation. Adaptive Brake Assist does
not react to stationary obstacles.
If adaptive Brake Assist is not available due
to a malfunction in the radar sensor system,
the brake system remains available with full
brake boosting effect and BAS.
In particular, the detection of obstacles can
be impaired if there is:
R dirt on the sensors or the sensors are
obscured
R snow or heavy rain
R interference by other radar sources
R strong radar reflections, for example, in
multi-storey car parks
R a narrow vehicle travelling in front, e.g. a
motorcycle
R a vehicle travelling in front on a different
line
Following damage to the front end of the vehi-
cle, have the configuration and operation of
the radar sensor checked at a qualified spe-
cialist workshop. This also applies to colli-
sions at slow speeds where there is no visible
damage to the front of the vehicle.
COLLISION PREVENTION ASSIST PLUS
General notes
COLLISION PREVENTION ASSIST PLUS is
only available on vehicles with DISTRONIC.
COLLISION PREVENTION ASSIST PLUS
extends the functionality of COLLISION PRE-
VENTION ASSIST with an automatic braking
function. COLLISION PREVENTION ASSIST
PLUS can help you to minimise the risk of a
front-end collision with a vehicle ahead or
reduce the effects of such a collision. If COL-
LISION PREVENTION ASSIST PLUS detects
that there is a risk of a collision, you will be
warned visually and acoustically. In critical
situations COLLISION PREVENTION ASSIST
PLUS also initiates automatic braking.
Function
XTo activate/deactivate: activate or deac-
tivate COLLISION PREVENTION ASSIST
PLUS in the on-board computer
( Y page 218).
If COLLISION PREVENTION ASSIST PLUS is
deactivated, the æ symbol appears in the
assistance graphics display.
If the driver's seat belt is fastened, COLLI-
SION PREVENTION ASSIST PLUS can brake
automatically within a speed range of
between 7 km/h and 200 km/h.
COLLISION PREVENTION ASSIST PLUS can
also react to stationary obstacles with auto-
matic braking within a speed range of
between 7 km/h and 30 km/h.
Vehicles with PRE-SAFE ®
: if the automatic
braking function of COLLISION PREVENTION
ASSIST PLUS intervenes powerfully, preven-
tive passenger protection measures (PRE-
SAFE ®
) are deployed simultaneously.
In particular, the detection of obstacles can
be impaired in the case of:
R dirt on the sensors or the sensors are
obscured
R snow or heavy rain
R interference by other radar sources
Driving safety systems67SafetyZ
Page 96 of 352
Useful information
i This Owner's Manual describes all mod-
els, series and optional equipment for your
vehicle that were available at the time of
going to press. National variations are pos-
sible. Note that your vehicle may not be
equipped with all of the functions descri-
bed. This is also the case for systems and
functions relevant to safety.
i Read the information on qualified special-
ist workshops: ( Y page 24).
Correct driver's seat position
GWARNING
You could lose control of the vehicle while
driving if you:
R adjust the driver's seat, steering wheel or
mirrors
R fasten the seat belt
There is a risk of an accident.
Adjust the driver's seat, head restraint, steer-
ing wheel and mirrors and fasten your seat
belt before starting the engine.
Observe the safety notes on seat adjustment
( Y page 95).
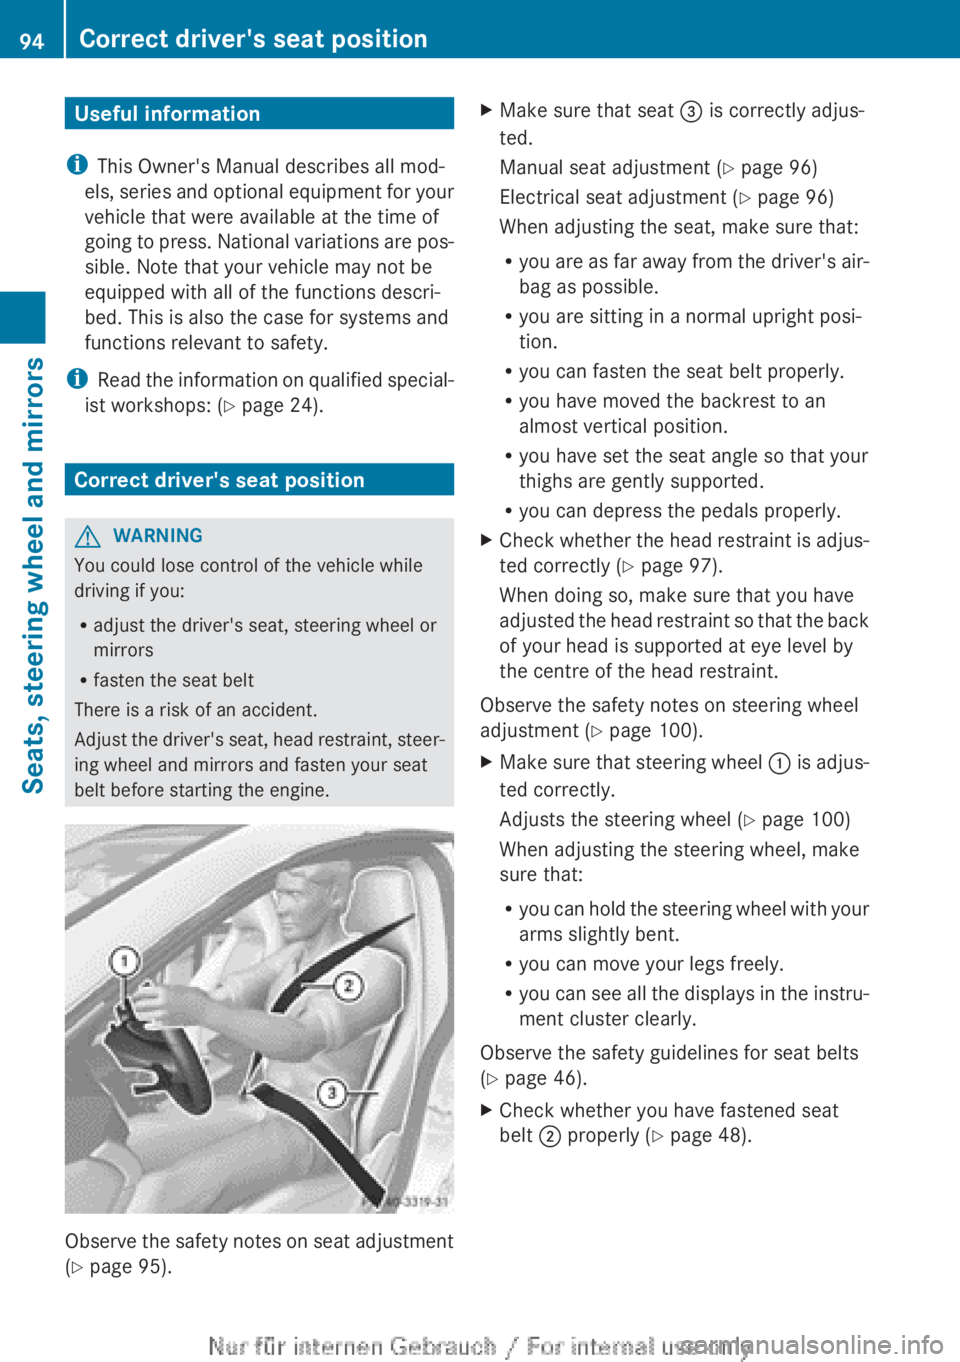
XMake sure that seat = is correctly adjus-
ted.
Manual seat adjustment ( Y page 96)
Electrical seat adjustment ( Y page 96)
When adjusting the seat, make sure that:
R you are as far away from the driver's air-
bag as possible.
R you are sitting in a normal upright posi-
tion.
R you can fasten the seat belt properly.
R you have moved the backrest to an
almost vertical position.
R you have set the seat angle so that your
thighs are gently supported.
R you can depress the pedals properly.XCheck whether the head restraint is adjus-
ted correctly ( Y page 97).
When doing so, make sure that you have
adjusted the head restraint so that the back
of your head is supported at eye level by
the centre of the head restraint.
Observe the safety notes on steering wheel
adjustment ( Y page 100).
XMake sure that steering wheel : is adjus-
ted correctly.
Adjusts the steering wheel ( Y page 100)
When adjusting the steering wheel, make
sure that:
R you can hold the steering wheel with your
arms slightly bent.
R you can move your legs freely.
R you can see all the displays in the instru-
ment cluster clearly.
Observe the safety guidelines for seat belts
( Y page 46).
XCheck whether you have fastened seat
belt ; properly ( Y page 48).94Correct driver's seat positionSeats, steering wheel and mirrors
Page 97 of 352
The seat belt should:
R fit snugly across your body
R be routed across the middle of your
shoulder
R be routed in your pelvic area across the
hip jointsXBefore starting off, adjust the rear-view mir-
ror and the exterior mirrors ( Y page 101)
so that you have a good view of road and
traffic conditions.XVehicles with a memory function: save
the seat and exterior mirror settings
( Y page 103).
Seats
Important safety notes
GWARNING
If children adjust the seats, they could
become trapped, especially if they are unat-
tended. There is a risk of injury.
When leaving the vehicle, always take the key
with you and lock the vehicle. Never leave
children unattended in the vehicle.
GWARNING
You could lose control of the vehicle while
driving if you:
R adjust the driver's seat, steering wheel or
mirrors
R fasten the seat belt
There is a risk of an accident.
Adjust the driver's seat, head restraint, steer-
ing wheel and mirrors and fasten your seat
belt before starting the engine.
GWARNING
If you adjust the seat height carelessly, you or
other vehicle occupants could be trapped and
thereby injured. Children in particular could
accidentally press the electrical seat adjust-
ment buttons and become trapped. There is
a risk of injury.
While moving the seats, make sure that your
hands or other body parts do not get under
the lever assembly of the seat adjustment
system.GWARNING
When adjusting a seat, you or another vehicle
occupant could become trapped by the guide
rail of the seat, for instance. There is a risk of
injury.
Make sure that no one has any part of their
body within the sweep of the seat when
adjusting it.
GWARNING
The seat belt does not offer the intended level
of protection if the backrest is not in the
upright position. When braking or in the event
of an accident, you could slide underneath the
seat belt and sustain abdomen or neck inju-
ries, for example. This poses an increased risk
of injury or even fatal injury.
Adjust the seat properly before beginning
your journey. Always make sure that the seat
is in the upright position.
GWARNING
The head restraints cannot provide the inten-
ded protection unless they are fitted and
adjusted correctly. There is an increased risk
of injury to the head and neck in the event of
an accident or sudden braking, for example.
Always drive with the head restraints fitted.
Ensure that the centre of the head restraints
support the back of each vehicle occupant's
head at eye level before driving off.
! To avoid damage to the seats and the seat
heating, observe the following information:
R do not spill any liquids on the seats. If
liquid is spilled on the seats, dry them as
soon as possible.
R if the seat covers are damp or wet, do not
switch on the seat heating. The seat
heating should also not be used to dry
the seats.
Seats95Seats, steering wheel and mirrorsZ
Page 99 of 352
iYou can store the seat settings using the
memory function ( Y page 103).
Adjusting the head restraints
GWARNING
You could lose control of the vehicle while
driving if you:
R adjust the driver's seat, steering wheel or
mirrors
R fasten the seat belt
There is a risk of an accident.
Adjust the driver's seat, head restraint, steer-
ing wheel and mirrors and fasten your seat
belt before starting the engine.
GWARNING
The head restraints cannot provide the inten-
ded protection unless they are fitted and
adjusted correctly. There is an increased risk
of injury to the head and neck in the event of
an accident or sudden braking, for example.
Always drive with the head restraints fitted.
Ensure that the centre of the head restraints
support the back of each vehicle occupant's
head at eye level before driving off.
General notes
For vehicles with sports seats, you cannot
adjust the head restraints or remove and fit
the rear head restraints.
Adjusting the head restraints manually
Adjusting the head restraint height
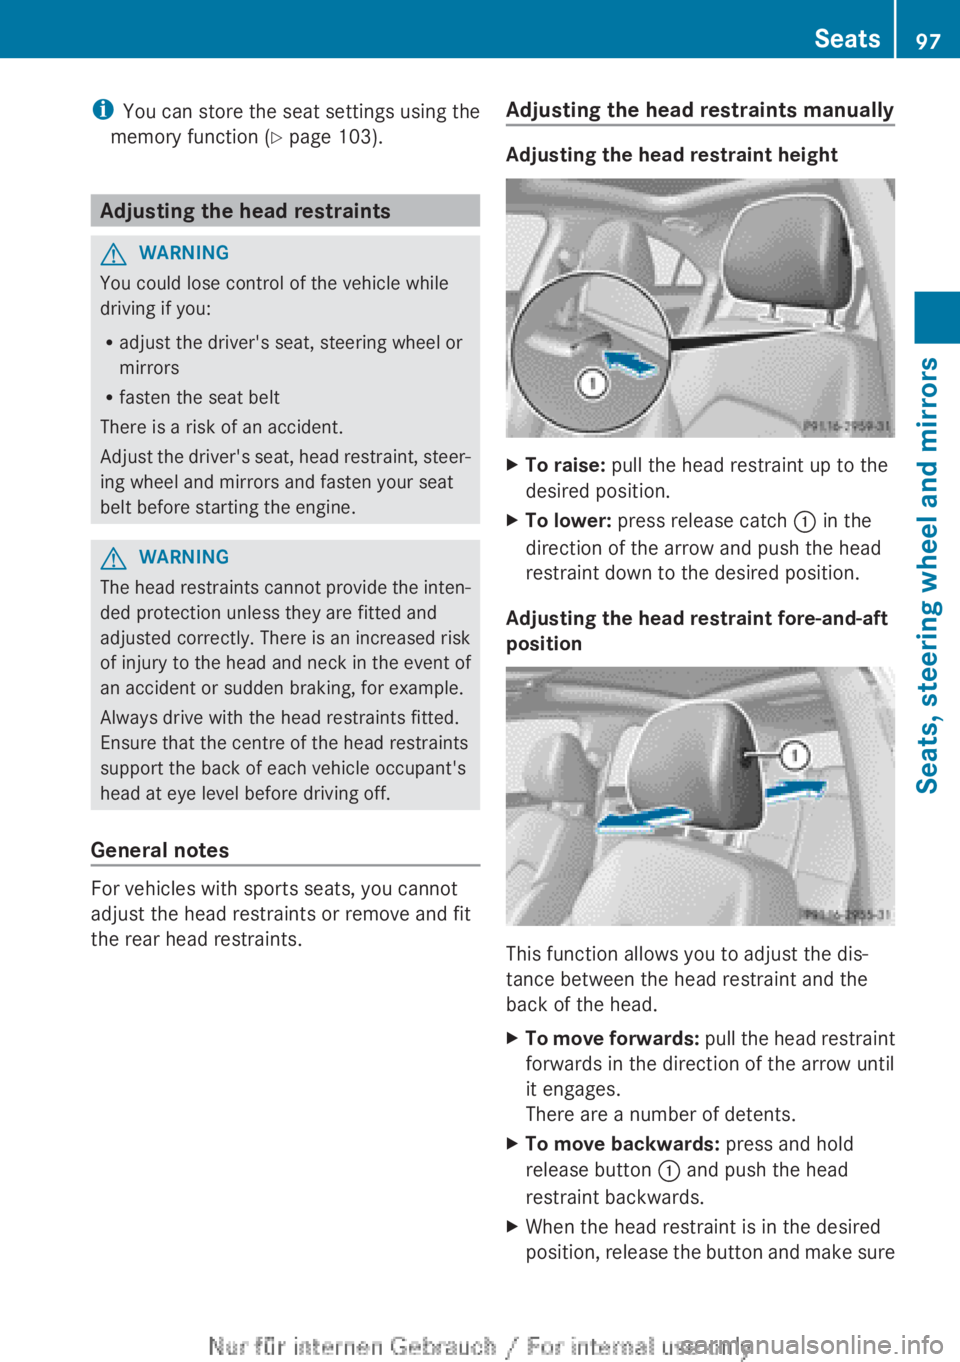
XTo raise: pull the head restraint up to the
desired position.XTo lower: press release catch : in the
direction of the arrow and push the head
restraint down to the desired position.
Adjusting the head restraint fore-and-aft
position
This function allows you to adjust the dis-
tance between the head restraint and the
back of the head.
XTo move forwards: pull the head restraint
forwards in the direction of the arrow until
it engages.
There are a number of detents.XTo move backwards: press and hold
release button : and push the head
restraint backwards.XWhen the head restraint is in the desired
position, release the button and make sureSeats97Seats, steering wheel and mirrorsZ
Page 102 of 352
Problems with the seat heatingProblemPossible causes/consequences and M SolutionsThe seat heating has
switched off prema-
turely or cannot be
switched on.The on-board voltage is too low because too many electrical con-
sumers are switched on.XSwitch off electrical consumers that you do not need, such as
the rear window heating or interior lighting.
Once the battery is sufficiently charged, the seat heating will
switch back on automatically.Steering wheel
Important safety notes
GWARNING
You could lose control of the vehicle while
driving if you:
R adjust the driver's seat, steering wheel or
mirrors
R fasten the seat belt
There is a risk of an accident.
Adjust the driver's seat, head restraint, steer-
ing wheel and mirrors and fasten your seat
belt before starting the engine.
GWARNING
Children could become trapped by the steer-
ing wheel if they adjust it. There is a risk of
injury.
When leaving the vehicle, always take the key
with you and lock the vehicle. Never leave
children unattended in the vehicle.
Adjusting the steering wheel
GWARNING
The steering wheel may move unexpectedly if
you adjust it while driving. This could cause
you to lose control of the vehicle. There is a
risk of an accident.
Make sure that the steering wheel is locked
before driving off. Never unlock the steering
wheel when the vehicle is in motion.
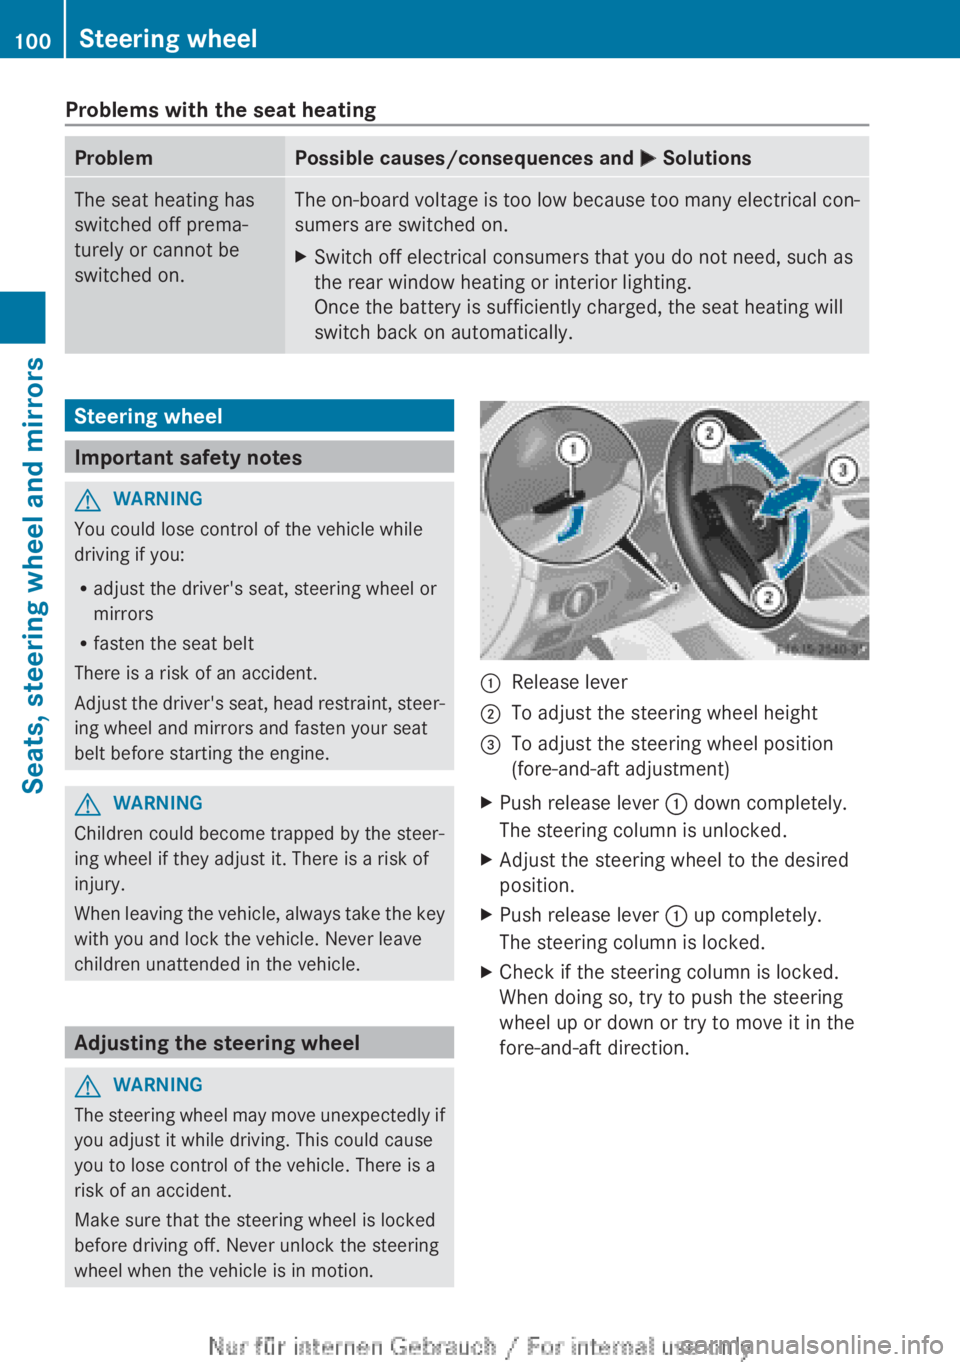
:Release lever;To adjust the steering wheel height=To adjust the steering wheel position
(fore-and-aft adjustment)XPush release lever : down completely.
The steering column is unlocked.XAdjust the steering wheel to the desired
position.XPush release lever : up completely.
The steering column is locked.XCheck if the steering column is locked.
When doing so, try to push the steering
wheel up or down or try to move it in the
fore-and-aft direction.100Steering wheelSeats, steering wheel and mirrors