2013 MERCEDES-BENZ CLA lock
[x] Cancel search: lockPage 165 of 352
cle from rolling away by applying the parking
brake.
Vehicles with manual transmissionXShift to either first gear or reverse gear R.XTurn the key to position 0 in the ignition
lock and remove it.
The immobiliser is activated.XApply the electric parking brake.
Vehicles with automatic transmission
XApply the electric parking brake.XShift the transmission to position P.XTurn the key to position 0 in the ignition
lock and remove it.
The immobiliser is activated.
i If you switch the engine off with the trans-
mission in position R or D, the automatic
transmission shifts to N automatically.
If you then open one of the front doors or
remove the key from the ignition, the auto-
matic transmission shifts to P.
If you shift the automatic transmission to
N before switching off the engine, the auto-
matic transmission remains in N even if a
door is opened.
Electric parking brake
General notes
GWARNING
If you leave children unattended in the vehi-
cle, they could set the vehicle in motion by,
for example:
R releasing the parking brake
R shifting an automatic transmission out of
parking position P
R shifting a manual transmission into neutral
R starting the engine
They could also operate vehicle equipment.
There is a risk of an accident and injury.
When leaving the vehicle, always take the key
with you and lock the vehicle. Never leave
children unattended in the vehicle.
i The electric parking brake carries out a
function check at regular intervals when
the engine is switched off. Noises that
occur are normal.
Engaging/releasing manually
Engaging
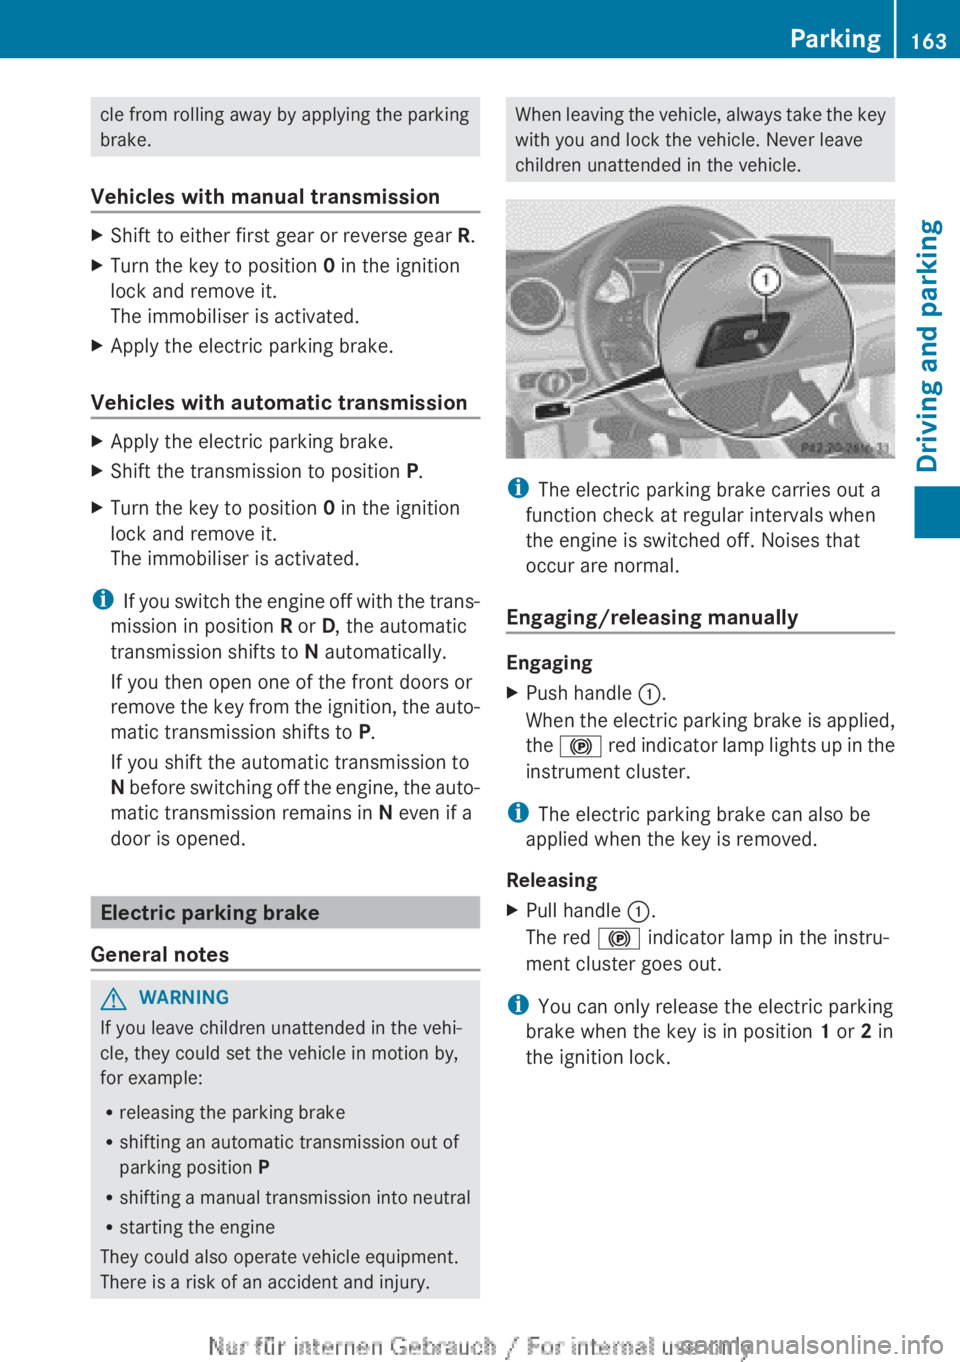
XPush handle :.
When the electric parking brake is applied,
the ! red indicator lamp lights up in the
instrument cluster.
i The electric parking brake can also be
applied when the key is removed.
Releasing
XPull handle :.
The red ! indicator lamp in the instru-
ment cluster goes out.
i You can only release the electric parking
brake when the key is in position 1 or 2 in
the ignition lock.
Parking163Driving and parkingZ
Page 169 of 352
Limited braking performance on salt-
treated roads
If you drive on salted roads, a layer of salt
residue may form on the brake discs and
brake pads. This can result in a significantly
longer braking distance.
R Brake occasionally to remove any possible
salt residue. Make sure that you do not
endanger other road users when doing so.
R Carefully depress the brake pedal and the
beginning and end of a journey.
R Maintain a greater distance to the vehicle
ahead.
New brake pads/linings
New and replaced brake pads and discs only
reach their optimum braking effect after sev-
eral hundred kilometres of driving. Compen-
sate for this by applying greater force to the
brake pedal.
For safety reasons, Mercedes-Benz recom-
mends that you only have brake pads/linings
fitted to your vehicle which have been
approved for Mercedes-Benz vehicles or
which correspond to an equivalent quality
standard. Brake pads/linings which have not
been approved for Mercedes-Benz vehicles or
which are not of an equivalent quality could
affect your vehicle's operating safety.
Driving on wet roads
Aquaplaning
If water has accumulated to a certain depth
on the road surface, there is a danger of aqua-
planing occurring, even if:
R you are driving at low speeds
R the tyres have adequate tread depth
For this reason, do not drive in tyre ruts and
brake carefully.
Driving on flooded roads
! Bear in mind that vehicles travelling in
front or in the opposite direction create
waves. This may cause the maximum per-
missible water depth to be exceeded.
These notes must be observed under all
circumstances. You could otherwise dam-
age the engine, the electronics or the trans-
mission.
If you have to drive on stretches of road on
which water has collected, please bear in
mind that:
R the maximum permissible fording depth in
still water is 25 cm
R you should drive no faster than walking
pace
Winter driving
General notes
GWARNING
If you shift down on a slippery road surface in
an attempt to increase the engine's braking
effect, the drive wheels could lose their grip.
This increases the risk of skidding and having
an accident.
Do not shift down for additional engine brak-
ing on a slippery road surface.
GDANGER
If the exhaust pipe is blocked or adequate
ventilation is not possible, poisonous gases
such as carbon monoxide (CO) may enter the
vehicle. This is the case, e.g. if the vehicle
becomes trapped in snow. There is a risk of
fatal injury.
If you leave the engine or the auxiliary heating
running, make sure the exhaust pipe and area
around the vehicle are clear of snow. To
ensure an adequate supply of fresh air, open
a window on the side of the vehicle that is not
facing into the wind.
Driving tips167Driving and parkingZ
Page 184 of 352
Activating the HOLD functionXMake sure that the activation conditions
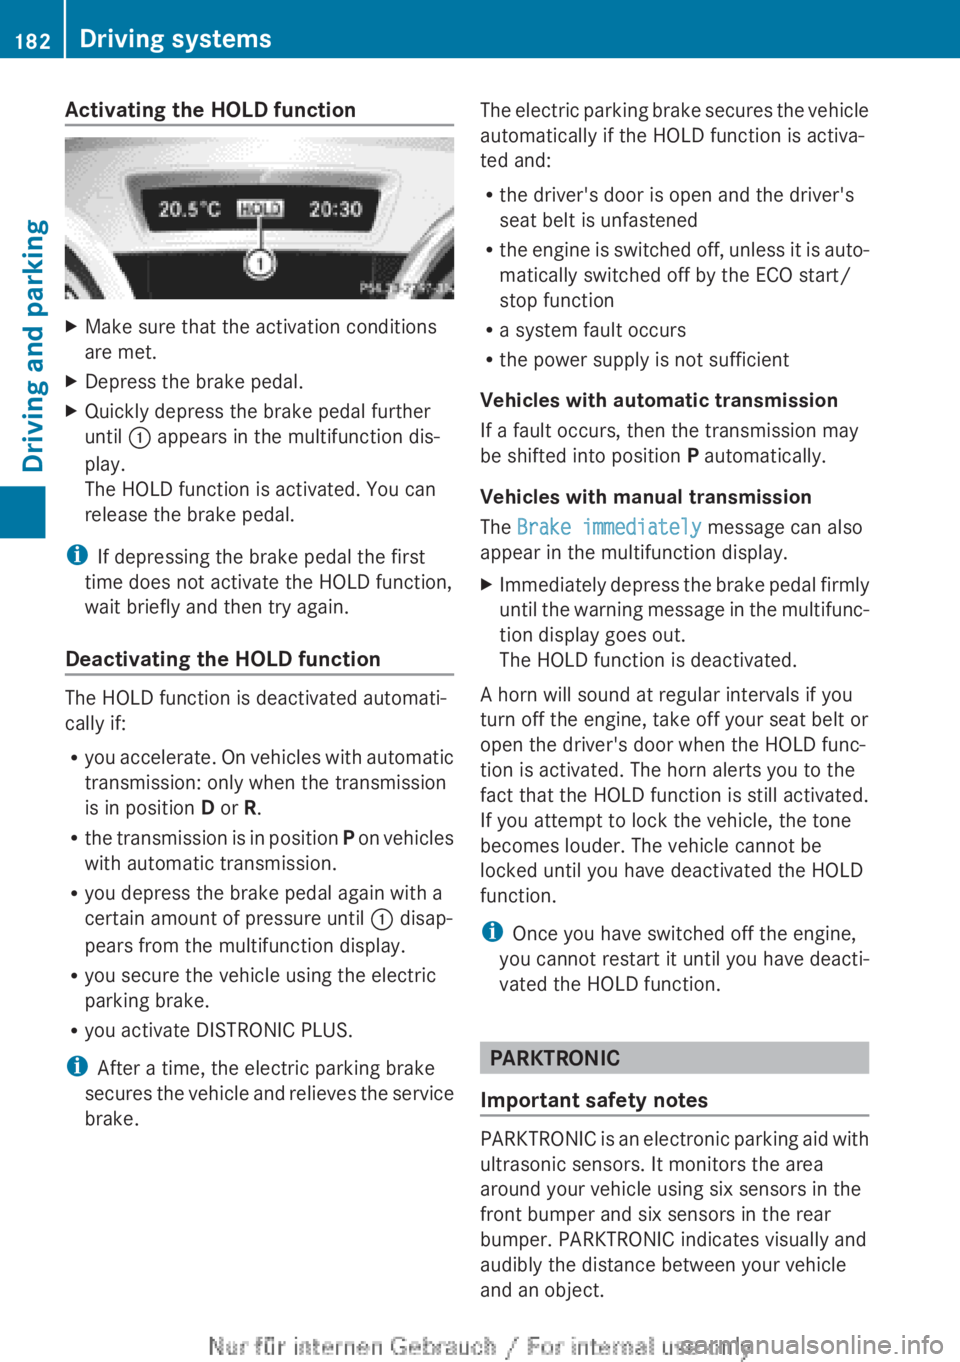
are met.XDepress the brake pedal.XQuickly depress the brake pedal further
until : appears in the multifunction dis-
play.
The HOLD function is activated. You can
release the brake pedal.
i If depressing the brake pedal the first
time does not activate the HOLD function,
wait briefly and then try again.
Deactivating the HOLD function
The HOLD function is deactivated automati-
cally if:
R you accelerate. On vehicles with automatic
transmission: only when the transmission
is in position D or R.
R the transmission is in position P on vehicles
with automatic transmission.
R you depress the brake pedal again with a
certain amount of pressure until : disap-
pears from the multifunction display.
R you secure the vehicle using the electric
parking brake.
R you activate DISTRONIC PLUS.
i After a time, the electric parking brake
secures the vehicle and relieves the service
brake.
The electric parking brake secures the vehicle
automatically if the HOLD function is activa-
ted and:
R the driver's door is open and the driver's
seat belt is unfastened
R the engine is switched off, unless it is auto-
matically switched off by the ECO start/
stop function
R a system fault occurs
R the power supply is not sufficient
Vehicles with automatic transmission
If a fault occurs, then the transmission may
be shifted into position P automatically.
Vehicles with manual transmission
The Brake immediately message can also
appear in the multifunction display.XImmediately depress the brake pedal firmly
until the warning message in the multifunc-
tion display goes out.
The HOLD function is deactivated.
A horn will sound at regular intervals if you
turn off the engine, take off your seat belt or
open the driver's door when the HOLD func-
tion is activated. The horn alerts you to the
fact that the HOLD function is still activated.
If you attempt to lock the vehicle, the tone
becomes louder. The vehicle cannot be
locked until you have deactivated the HOLD
function.
i Once you have switched off the engine,
you cannot restart it until you have deacti-
vated the HOLD function.
PARKTRONIC
Important safety notes
PARKTRONIC is an electronic parking aid with
ultrasonic sensors. It monitors the area
around your vehicle using six sensors in the
front bumper and six sensors in the rear
bumper. PARKTRONIC indicates visually and
audibly the distance between your vehicle
and an object.
182Driving systemsDriving and parking
Page 187 of 352
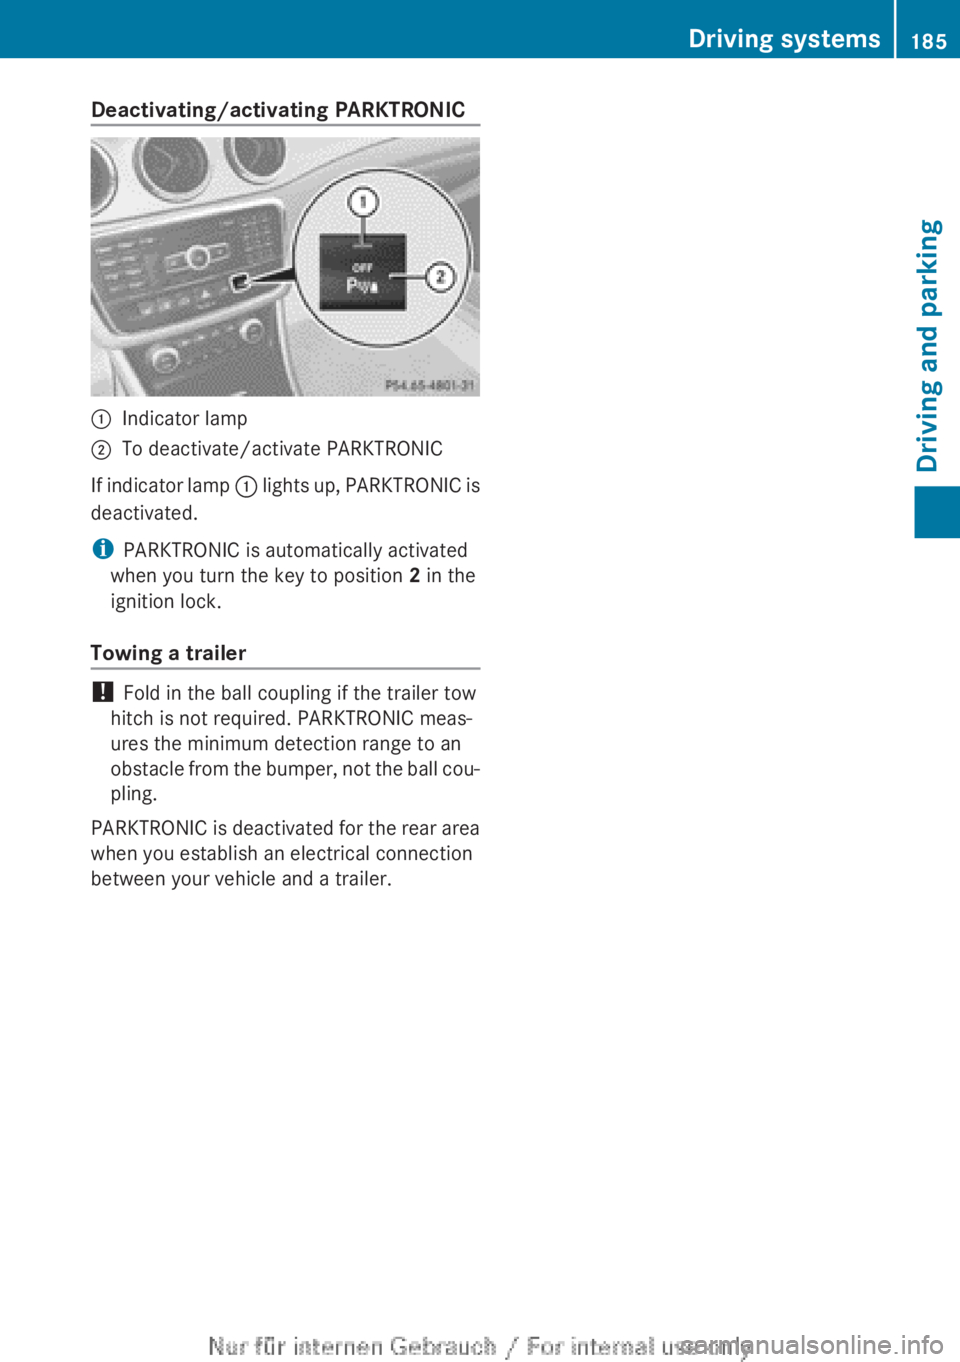
Deactivating/activating PARKTRONIC:Indicator lamp;To deactivate/activate PARKTRONIC
If indicator lamp : lights up, PARKTRONIC is
deactivated.
i PARKTRONIC is automatically activated
when you turn the key to position 2 in the
ignition lock.
Towing a trailer
! Fold in the ball coupling if the trailer tow
hitch is not required. PARKTRONIC meas-
ures the minimum detection range to an
obstacle from the bumper, not the ball cou-
pling.
PARKTRONIC is deactivated for the rear area
when you establish an electrical connection
between your vehicle and a trailer.
Driving systems185Driving and parkingZ
Page 189 of 352
Parking tips:
R on narrow roads, drive as closely as possi-
ble past the parking space.
R parking spaces that are littered or over-
grown might be identified or measured
incorrectly.
R parking spaces that are partially occupied
by trailer drawbars might not be identified
as such or be measured incorrectly.
R snowfall or heavy rain may lead to a parking
space being measured inaccurately.
R pay attention to the PARKTRONIC
( Y page 184) warning messages during the
parking procedure.
R at any time, you can intervene in the steer-
ing procedure to correct it. Active Parking
Assist will then be cancelled.
R when transporting a load which protrudes
from your vehicle, you should not use
Active Parking Assist.
R never use Active Parking Assist when snow
chains are fitted.
R make sure that the tyre pressures are
always correct. This has a direct influence
on the parking characteristics of the vehi-
cle.
Use Active Parking Assist for parking spaces:
R that are parallel or at right-angles to the
direction of travel
R that are on straight roads, not bends
R that are on the same level as the road, e.g.
not on the pavement
Detecting parking spaces
Objects located above the height range of
Active Parking Assist will not be detected
when the parking space is measured. These
are not taken into account when the parking
procedure is calculated, e.g. overhanging
loads, tail sections or loading ramps of goods
vehicles.
GWARNING
If objects are located above the detection
range, Active Parking Assist may start to steer
into the parking space too soon. As a result,
you could cause a collision. There is a risk of
an accident.
If objects are located above the detection
range, stop the vehicle and switch Active
Parking Assist off.
For further information on the detection
range ( Y page 183).
Active Parking Assist does not support you
parking in spaces at right angles to the direc-
tion of travel if:
R two parking spaces are located directly
next to one another
R the parking space is directly next to a low
obstacle such as a low kerb stone
R you forward park
Active Parking Assist does not support you
parking in spaces that are parallel or at right
angles to the direction of travel if:
R the parking space is on a kerb stone
R the parking space appears to be blocked,
for example by foliage or grass paving
blocks
R the range of movement is too small
R the parking space is bordered by an obsta-
cle which is not clearly defined such as a
tree or a trailer
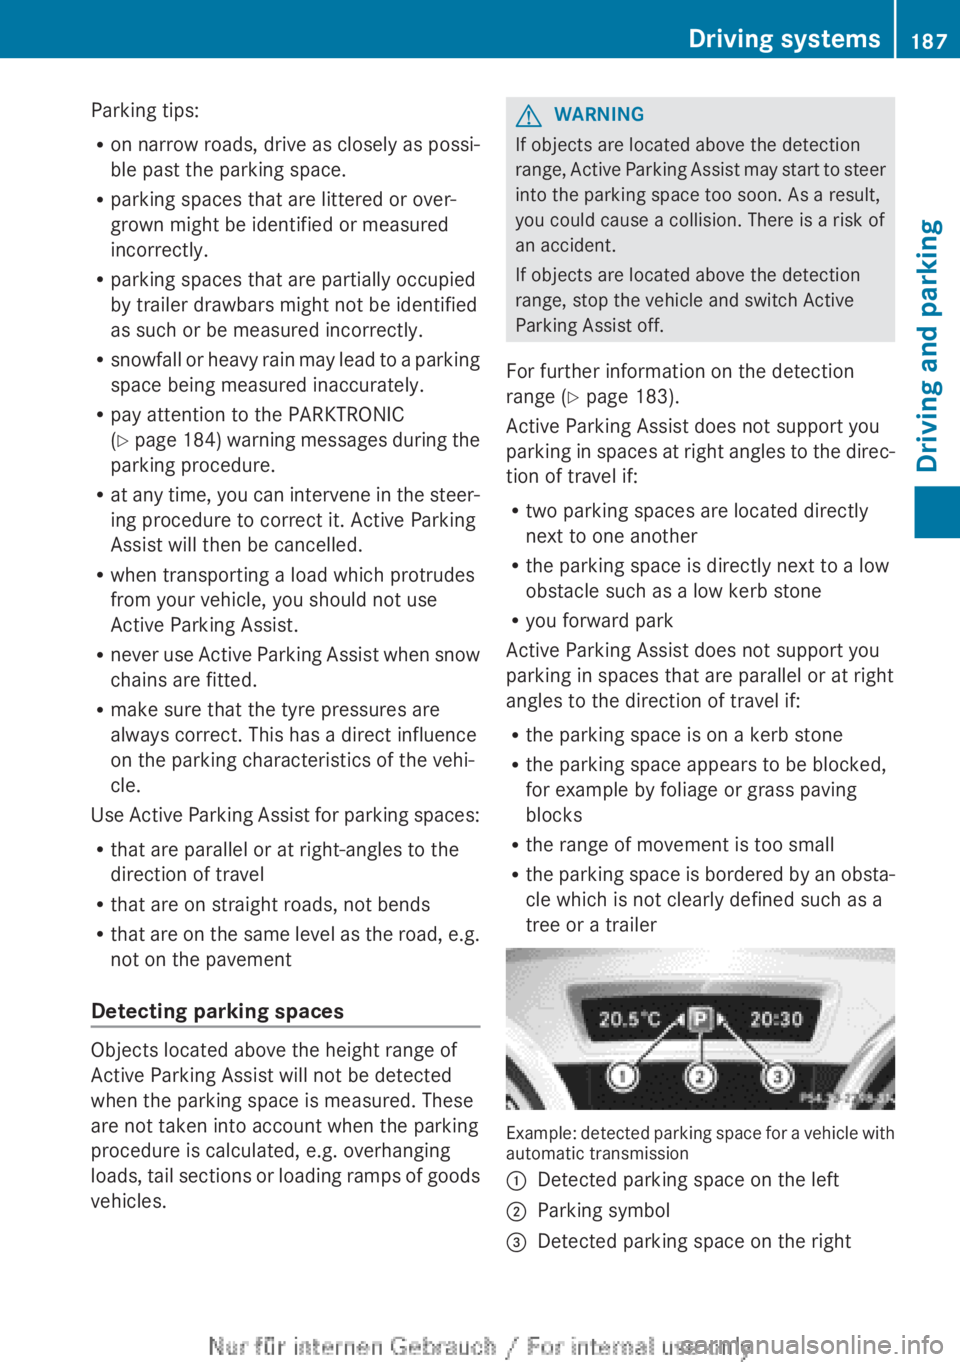
Example: detected parking space for a vehicle with
automatic transmission
:Detected parking space on the left;Parking symbol=Detected parking space on the rightDriving systems187Driving and parkingZ
Page 193 of 352
A warning tone sounds. The parking symbol
disappears and the multifunction display
shows the Park Assist cancelled mes-
sage.
When Active Parking Assist is cancelled, you
must steer again yourself.
Towing a trailer
For vehicles with a trailer tow hitch, the min-
imum required length for parking spaces is
slightly increased.
If you have attached a trailer to your vehicle,
you should not use Active Parking Assist.
Once the electrical connection is established
between your vehicle and the trailer, Active
Parking Assist is no longer available. PARK-
TRONIC is deactivated for the rear area.
Reversing camera
General notes
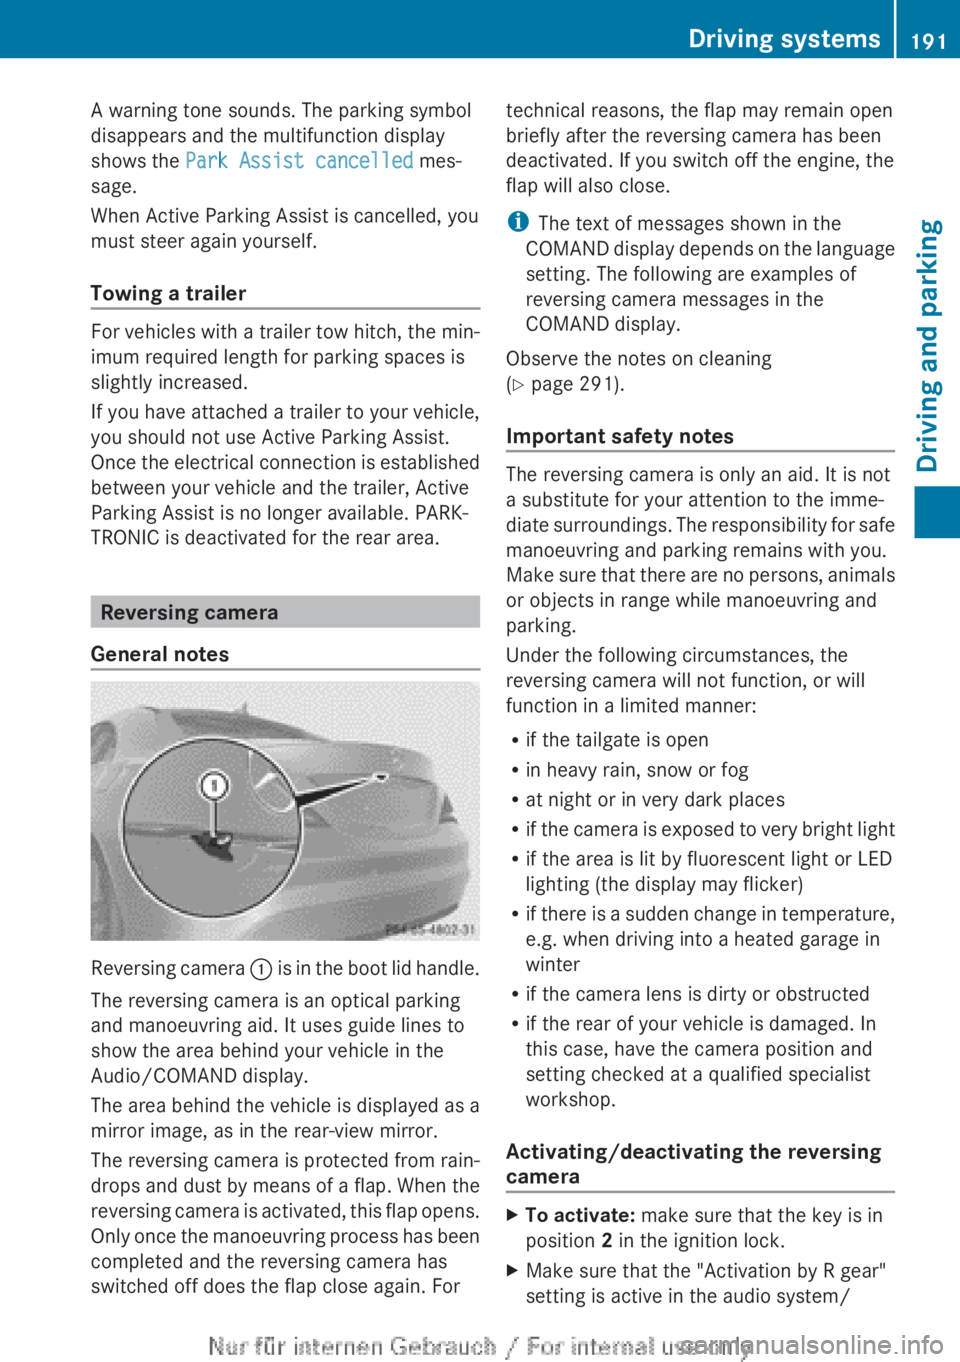
Reversing camera : is in the boot lid handle.
The reversing camera is an optical parking
and manoeuvring aid. It uses guide lines to
show the area behind your vehicle in the
Audio/COMAND display.
The area behind the vehicle is displayed as a
mirror image, as in the rear-view mirror.
The reversing camera is protected from rain-
drops and dust by means of a flap. When the
reversing camera is activated, this flap opens.
Only once the manoeuvring process has been
completed and the reversing camera has
switched off does the flap close again. For
technical reasons, the flap may remain open
briefly after the reversing camera has been
deactivated. If you switch off the engine, the
flap will also close.
i The text of messages shown in the
COMAND display depends on the language
setting. The following are examples of
reversing camera messages in the
COMAND display.
Observe the notes on cleaning
( Y page 291).
Important safety notes
The reversing camera is only an aid. It is not
a substitute for your attention to the imme-
diate surroundings. The responsibility for safe
manoeuvring and parking remains with you.
Make sure that there are no persons, animals
or objects in range while manoeuvring and
parking.
Under the following circumstances, the
reversing camera will not function, or will
function in a limited manner:
R if the tailgate is open
R in heavy rain, snow or fog
R at night or in very dark places
R if the camera is exposed to very bright light
R if the area is lit by fluorescent light or LED
lighting (the display may flicker)
R if there is a sudden change in temperature,
e.g. when driving into a heated garage in
winter
R if the camera lens is dirty or obstructed
R if the rear of your vehicle is damaged. In
this case, have the camera position and
setting checked at a qualified specialist
workshop.
Activating/deactivating the reversing
camera
XTo activate: make sure that the key is in
position 2 in the ignition lock.XMake sure that the "Activation by R gear"
setting is active in the audio system/Driving systems191Driving and parkingZ
Page 201 of 352
Indicator and warning display
Blind Spot Assist is not active at speeds below
approximately 30 km/h. Vehicles in the mon-
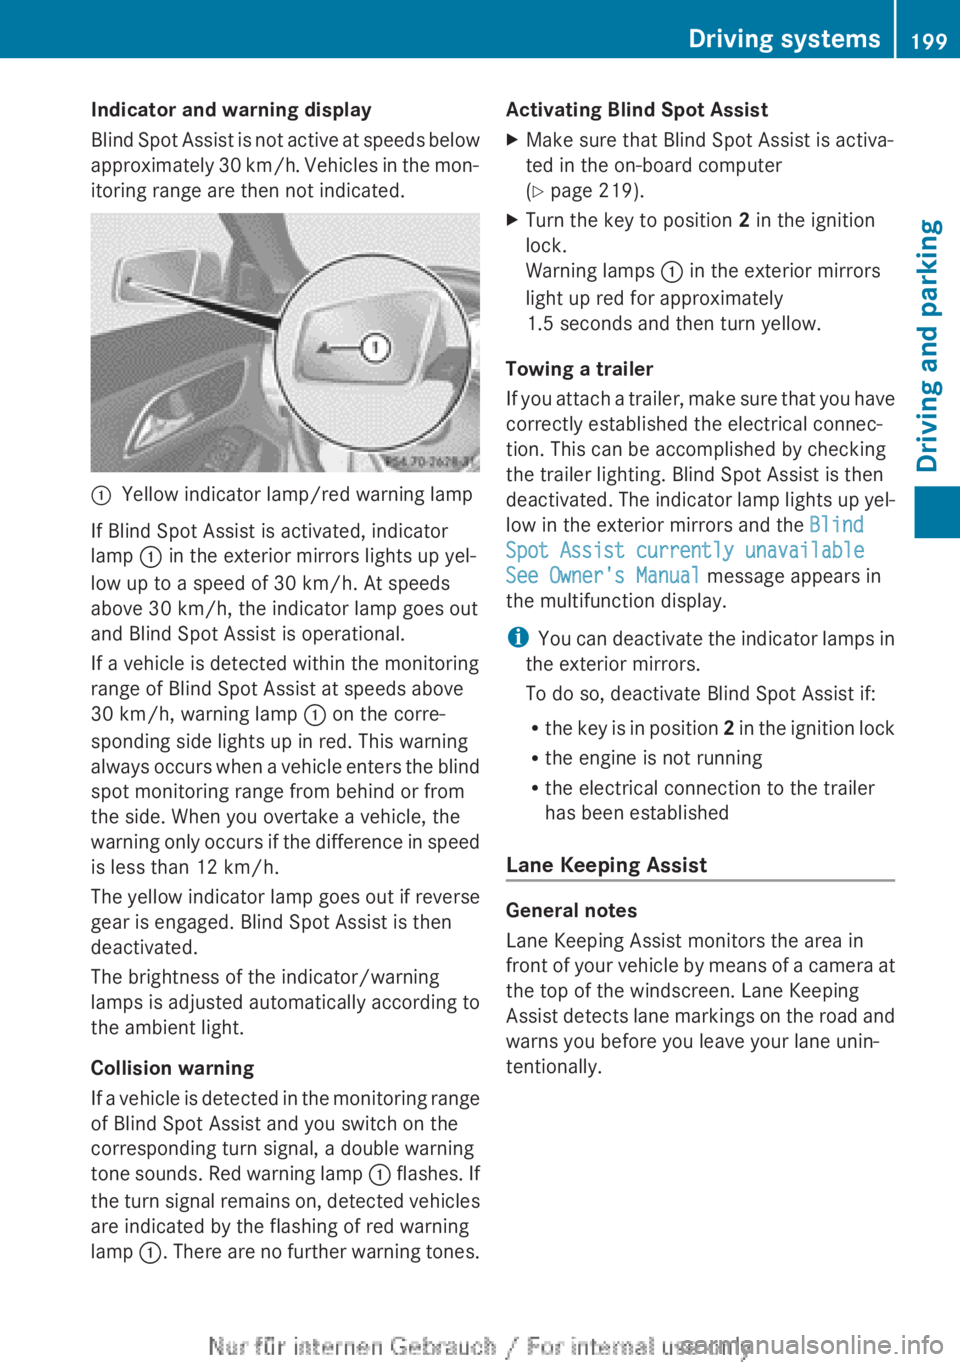
itoring range are then not indicated.:Yellow indicator lamp/red warning lamp
If Blind Spot Assist is activated, indicator
lamp : in the exterior mirrors lights up yel-
low up to a speed of 30 km/h. At speeds
above 30 km/h, the indicator lamp goes out
and Blind Spot Assist is operational.
If a vehicle is detected within the monitoring
range of Blind Spot Assist at speeds above
30 km/h, warning lamp : on the corre-
sponding side lights up in red. This warning
always occurs when a vehicle enters the blind
spot monitoring range from behind or from
the side. When you overtake a vehicle, the
warning only occurs if the difference in speed
is less than 12 km/h.
The yellow indicator lamp goes out if reverse
gear is engaged. Blind Spot Assist is then
deactivated.
The brightness of the indicator/warning
lamps is adjusted automatically according to
the ambient light.
Collision warning
If a vehicle is detected in the monitoring range
of Blind Spot Assist and you switch on the
corresponding turn signal, a double warning
tone sounds. Red warning lamp : flashes. If
the turn signal remains on, detected vehicles
are indicated by the flashing of red warning
lamp :. There are no further warning tones.
Activating Blind Spot AssistXMake sure that Blind Spot Assist is activa-
ted in the on-board computer
( Y page 219).XTurn the key to position 2 in the ignition
lock.
Warning lamps : in the exterior mirrors
light up red for approximately
1.5 seconds and then turn yellow.
Towing a trailer
If you attach a trailer, make sure that you have
correctly established the electrical connec-
tion. This can be accomplished by checking
the trailer lighting. Blind Spot Assist is then
deactivated. The indicator lamp lights up yel-
low in the exterior mirrors and the Blind
Spot Assist currently unavailable
See Owner's Manual message appears in
the multifunction display.
i You can deactivate the indicator lamps in
the exterior mirrors.
To do so, deactivate Blind Spot Assist if:
R the key is in position 2 in the ignition lock
R the engine is not running
R the electrical connection to the trailer
has been established
Lane Keeping Assist
General notes
Lane Keeping Assist monitors the area in
front of your vehicle by means of a camera at
the top of the windscreen. Lane Keeping
Assist detects lane markings on the road and
warns you before you leave your lane unin-
tentionally.
Driving systems199Driving and parkingZ
Page 206 of 352
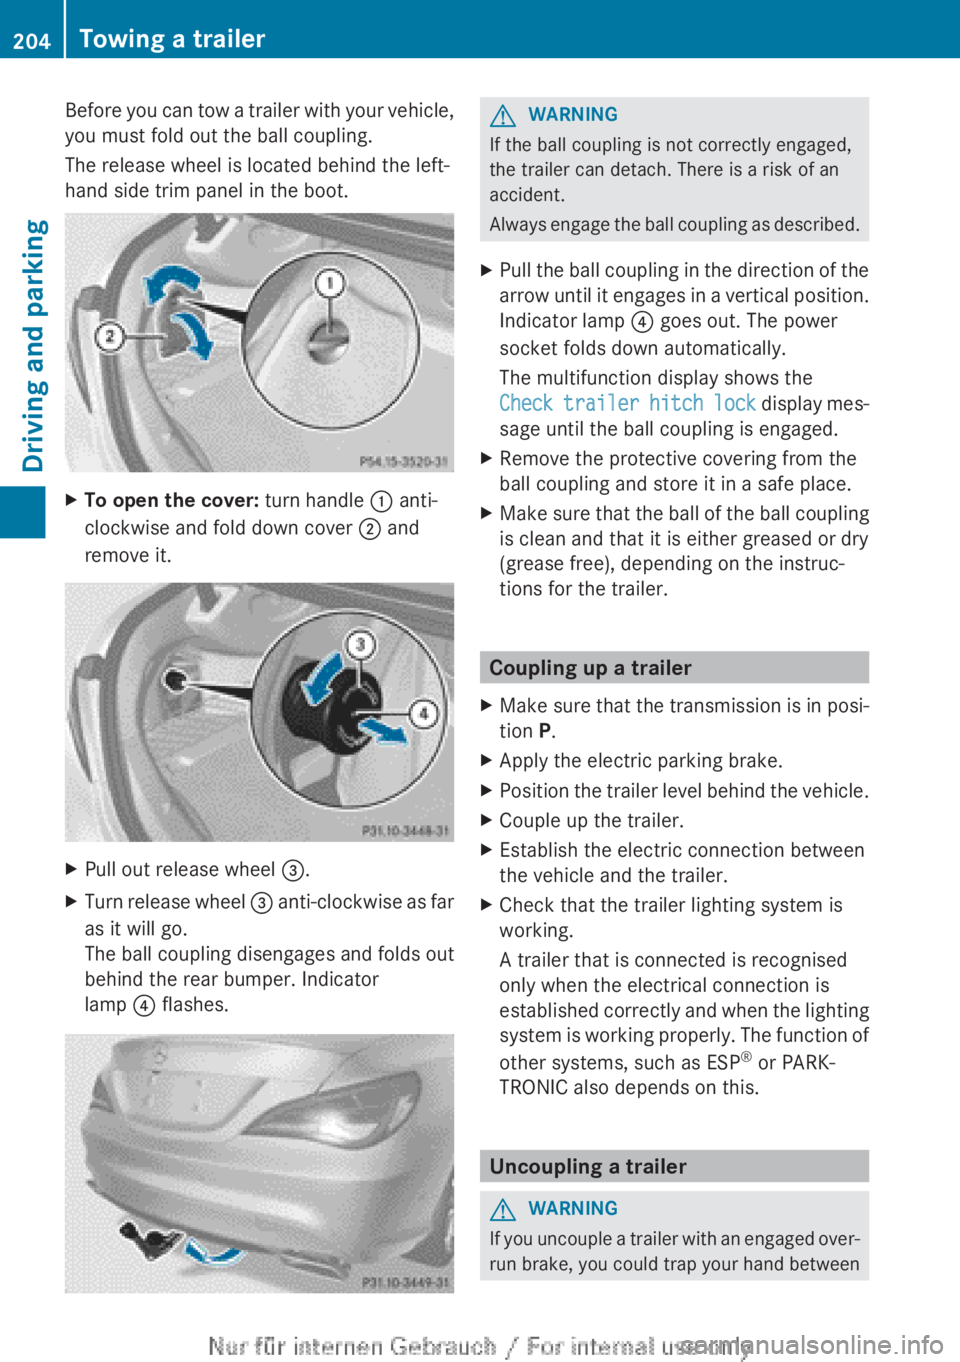
Before you can tow a trailer with your vehicle,
you must fold out the ball coupling.
The release wheel is located behind the left-
hand side trim panel in the boot.XTo open the cover: turn handle : anti-
clockwise and fold down cover ; and
remove it.XPull out release wheel =.XTurn release wheel = anti-clockwise as far
as it will go.
The ball coupling disengages and folds out
behind the rear bumper. Indicator
lamp ? flashes.GWARNING
If the ball coupling is not correctly engaged,
the trailer can detach. There is a risk of an
accident.
Always engage the ball coupling as described.
XPull the ball coupling in the direction of the
arrow until it engages in a vertical position.
Indicator lamp ? goes out. The power
socket folds down automatically.
The multifunction display shows the
Check trailer hitch lock display mes-
sage until the ball coupling is engaged.XRemove the protective covering from the
ball coupling and store it in a safe place.XMake sure that the ball of the ball coupling
is clean and that it is either greased or dry
(grease free), depending on the instruc-
tions for the trailer.
Coupling up a trailer
XMake sure that the transmission is in posi-
tion P.XApply the electric parking brake.XPosition the trailer level behind the vehicle.XCouple up the trailer.XEstablish the electric connection between
the vehicle and the trailer.XCheck that the trailer lighting system is
working.
A trailer that is connected is recognised
only when the electrical connection is
established correctly and when the lighting
system is working properly. The function of
other systems, such as ESP ®
or PARK-
TRONIC also depends on this.
Uncoupling a trailer
GWARNING
If you uncouple a trailer with an engaged over-
run brake, you could trap your hand between
204Towing a trailerDriving and parking