2013 MERCEDES-BENZ CLA COUPE air filter
[x] Cancel search: air filterPage 7 of 373

1, 2, 3 ...
4ETS see ETS/4ETS (Electronic Trac-
tion System)
4ETS (Electronic Traction System) .... 68
4MATIC (permanent all-wheel
drive)
Display message ............................ 260
4MATIC (permanent four-wheel
drive) .................................................. 188
12 V socket
see Sockets A
ABS (Anti-lock Braking System) Display message ............................ 235
Function/notes ................................ 64
Important safety notes .................... 64
Warning lamp .................................2 65
Activating/deactivating air-recir-
culation mode ................................... .136
Activating/deactivating cooling
with air dehumidification ................. 130
Active light function ......................... 114
Active Parking Assist
Cancelling ...................................... 196
Detecting parking spaces .............. 193
Display message ............................ 253
Exiting a parking space .................. 195
Function/notes ............................ .192
Important safety notes .................. 192
Parking .......................................... 194
Towing a trailer .............................. 197
ADAPTIVE BRAKE ................................. 72
Adaptive Brake Assist
Display message ............................ 243
Function/notes ................................ 66
Adaptive brake lights .......................... 68
Adaptive Highbeam Assist
Display message ............................ 248
Function/notes ............................ .115
Switching on/off ........................... 116
Additional speedometer ................... 226
Additives (engine oil) ........................ 360
Adjusting the headlamp range ......... 112
Air filter (white display message) .... 251Air pressure
see Tyre pressure
Air vents
Important safety notes .................. 143
Rear ............................................... 144
Setting .......................................... .143
Setting the centre air vents ........... 143
Setting the side air vents .............. .144
Air-conditioning system
see Climate control
Airbags
Front airbag (driver, front
passenger) ....................................... 43
Important safety guidelines ............. 42
Kneebag .......................................... .44
Sidebag ............................................ 44
Triggering ......................................... 41
Windowba g...................................... 45
Alarm
ATA (Anti-Theft Alarm system )......... 73
Switching off (ATA) .......................... 73
Switching the function on/off
(ATA) ................................................ 73
Alarm system
see ATA (Anti-Theft Alarm system)
Ambient lighting
Setting the brightness (on-board
computer) ...................................... 227
AMG
Performance Seat .......................... 103
AMG menu (on-board computer) ..... 231
Anti-glare film .................................... 287
Anti-lock braking system
see ABS (Anti-lock Braking System)
Anti-Theft Alarm system
see ATA (Anti-Theft Alarm system)
Aquaplaning ....................................... 172
Ashtray ............................................... 284
Assistance display (on-board com-
puter) .................................................. 223
Assistance menu (on-board com-
puter) .................................................. 223
ASSYST PLUS
Displaying a service message ........ 296
Hiding a service message .............. 296
Notes ............................................. 295 4
Index
Page 129 of 373
Useful information
i This Owner's Manual describes all mod-
els, series and optional equipment for your
vehicle that were available at the time of
going to press. National variations are pos- sible. Note that your vehicle may not be
equipped with all of the functions descri-
bed. This is also the case for systems and
functions relevant to safety.
i Read the information on qualified special-
ist workshops: (Y page 24). Overview of climate control systems
Important safety notes
Observe the settings recommended on the
following pages. The windows could other-
wise mist up.
To prevent the windows from misting up:
R switch off climate control only briefly
R switch on air-recirculation mode only
briefly
R switch on the cooling with air dehumidifi-
cation function
R switch on the "demist windscreen" function
briefly, if required
THERMATIC automatic climate control/
THERMOTRONIC automatic climate control
regulates the temperature and the humidity
of the vehicle interior and filters out undesir-
able substances from the air.
THERMATIC automatic climate control/
THERMOTRONIC automatic climate control is only operational when the engine is running.
Optimum operation is only achieved with the
side windows and panorama sliding sunroof
closed.
The residual heat function can only be acti-
vated or deactivated with the ignition
switched off (Y page 137).
Always keep the ventilation flaps behind the
side panelling clear (Y page 120). Otherwise,
the vehicle will not be ventilated correctly. i
Ventilate the vehicle for a brief period
during warm weather, e.g. using the con-
venience opening feature (Y page 90). This
will speed up the cooling process and the
desired interior temperature will be
reached more quickly.
i The integrated filter filters out most par-
ticles of dust and soot and completely fil-
ters out pollen. With THERMOTRONIC auto- matic climate control, gaseous pollutants
and odours will also be reduced. A clogged
filter reduces the amount of air supplied to
the vehicle interior. For this reason, you
should always observe the interval for
replacing the filter, which is specified in the Service Booklet. As this depends on envi-
ronmental conditions, e.g. heavy air pollu-
tion, the interval may be shorter than statedin the Service Booklet.
i It is possible that the residual heat func-
tion may be activated automatically an hour
after the key has been removed in order to
dry the automatic climate control. The vehi- cle is then ventilated for 30 minutes. 126
Overview of climate control systemsClimate control
Page 167 of 373
on the ignition if you accidentally refuel
with the wrong fuel. Otherwise, the fuel will enter the fuel system. Even small amounts
of the wrong fuel could result in damage to the fuel system and the engine. The repair
costs are high. Notify a qualified specialist
workshop and have the fuel tank and fuel
lines drained completely.
! Do not use diesel to refuel vehicles with a
petrol engine. Do not switch on the ignition if you accidentally refuel with the wrong
fuel. Otherwise, fuel can enter the fuel sys- tem. Even small amounts of the wrong fuel
could result in damage to the fuel system
and the engine. Notify a qualified specialist workshop and have the fuel tank and fuel
lines drained completely.
! Overfilling the fuel tank could damage the
fuel system.
! Take care not to spill any fuel on painted
surfaces. You could otherwise damage the
paintwork.
! Use a filter when adding fuel from a fuel
can. The fuel lines and/or the diesel injec-
tion system could otherwise be blocked by particles from the fuel can.
Do not get into the vehicle again during the
refuelling process. Otherwise, electrostatic
charge could build up again.
If you overfill the fuel tank, some fuel may
spray out when you remove the fuel pump
nozzle.
Further information on fuel and fuel quality
(Y page 355). Refuelling
General notes The fuel filler flap is unlocked or locked auto-
matically when you open or close the vehicle
with the key.
The position of the fuel filler cap is displayed
æ in the instrument cluster. The arrow next to the filling pump indicates the side of
the vehicle.
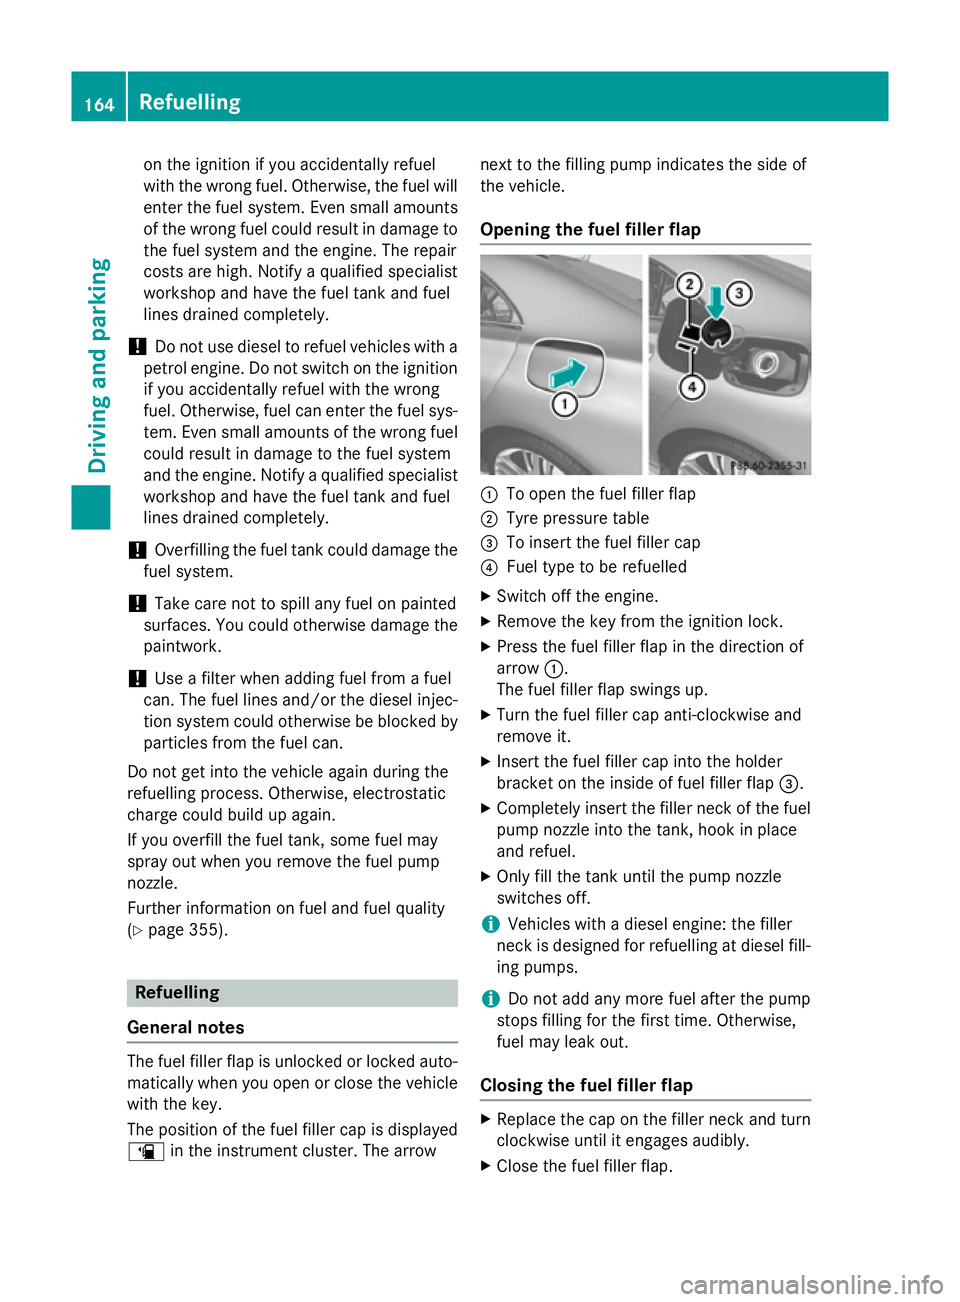
Opening the fuel filler flap :
To open the fuel filler flap
; Tyre pressure table
= To insert the fuel filler cap
? Fuel type to be refuelled
X Switch off the engine.
X Remove the key from the ignition lock.
X Press the fuel filler flap in the direction of
arrow :.
The fuel filler flap swings up.
X Turn the fuel filler cap anti-clockwise and
remove it.
X Insert the fuel filler cap into the holder
bracket on the inside of fuel filler flap =.
X Completely insert the filler neck of the fuel
pump nozzle into the tank, hook in place
and refuel.
X Only fill the tank until the pump nozzle
switches off.
i Vehicles with a diesel engine: the filler
neck is designed for refuelling at diesel fill-
ing pumps.
i Do not add any more fuel after the pump
stops filling for the first time. Otherwise,
fuel may leak out.
Closing the fuel filler flap X
Replace the cap on the filler neck and turn
clockwise until it engages audibly.
X Close the fuel filler flap. 164
RefuellingDriving and parking
Page 182 of 373
!
If DISTRONIC PLUS or the HOLD function
is activated, the vehicle brakes automati-
cally in certain situations. To prevent dam-
age to the vehicle, deactivate DISTRONIC
PLUS and the HOLD function in the follow-
ing or other similar situations:
R when towing the vehicle
R in the car wash
If you fail to adapt your driving style, DIS-
TRONIC PLUS can neither reduce the risk of
an accident nor override the laws of physics.
DISTRONIC PLUS cannot take road and
weather conditions or traffic conditions into
account. DISTRONIC PLUS is only an aid. You are responsible for the distance to the vehicle
in front, for vehicle speed, for braking in good time, and for staying in the lane.
Do not use DISTRONIC PLUS:
R in road and traffic conditions which do not
allow you to maintain a constant speed
(e.g. in heavy traffic or on winding roads)
R on smooth or slippery roads. Braking or
accelerating can cause the drive wheels to lose traction and the vehicle could then
skid
R when there is poor visibility, e.g. due to fog,
heavy rain or snow
DISTRONIC PLUS may not detect narrow
vehicles driving in front, e.g. motorcycles, or
vehicles driving on a different line.
In particular, the detection of obstacles can
be impaired in the case of:
R dirt on the sensors or obscured sensors
R snow or heavy rain
R interference by other radar sources
R the possibility of strong radar reflections,
for example, in multi-storey car parks
If DISTRONIC PLUS no longer detects a vehi-
cle in front, it may unexpectedly accelerate to the speed stored. This speed can:
R be too high for a filter lane or a slip road
R be so high in the right lane that you pass
vehicles driving on the left
R be so high in the left lane that you pass
vehicles driving on the right
If there is a change of drivers, advise the new driver of the speed stored.
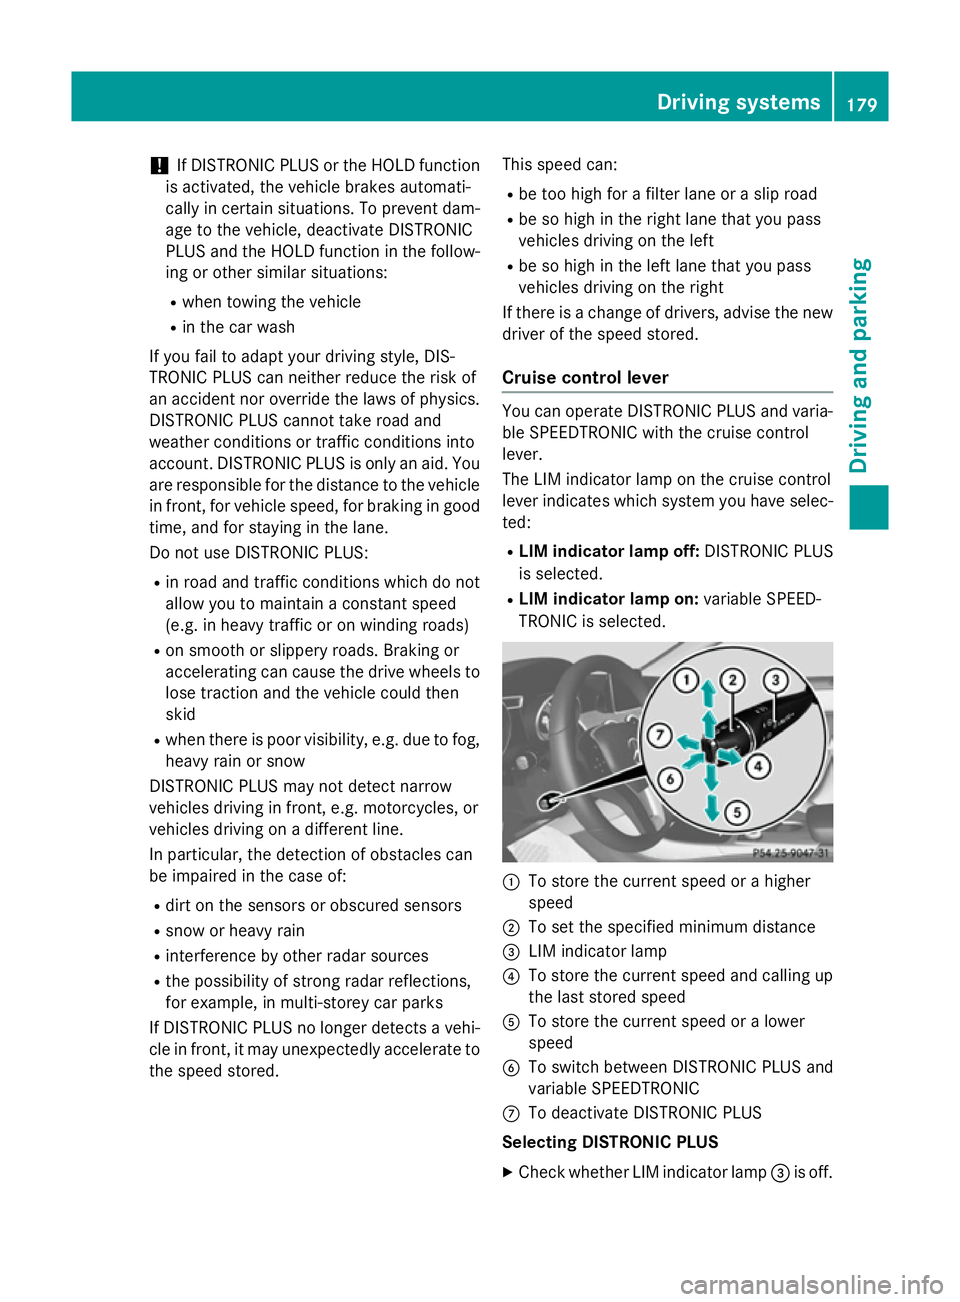
Cruise control lever You can operate DISTRONIC PLUS and varia-
ble SPEEDTRONIC with the cruise control
lever.
The LIM indicator lamp on the cruise control
lever indicates which system you have selec- ted:
R LIM indicator lamp off: DISTRONIC PLUS
is selected.
R LIM indicator lamp on: variable SPEED-
TRONIC is selected. :
To store the current speed or a higher
speed
; To set the specified minimum distance
= LIM indicator lamp
? To store the current speed and calling up
the last stored speed
A To store the current speed or a lower
speed
B To switch between DISTRONIC PLUS and
variable SPEEDTRONIC
C To deactivate DISTRONIC PLUS
Selecting DISTRONIC PLUS
X Check whether LIM indicator lamp =is off. Driving systems
179Driving and parking Z
Page 254 of 373
Display messages
Possible causes/consequences and
M
MSolutions ¸
Replace Replace
air
aircleaner
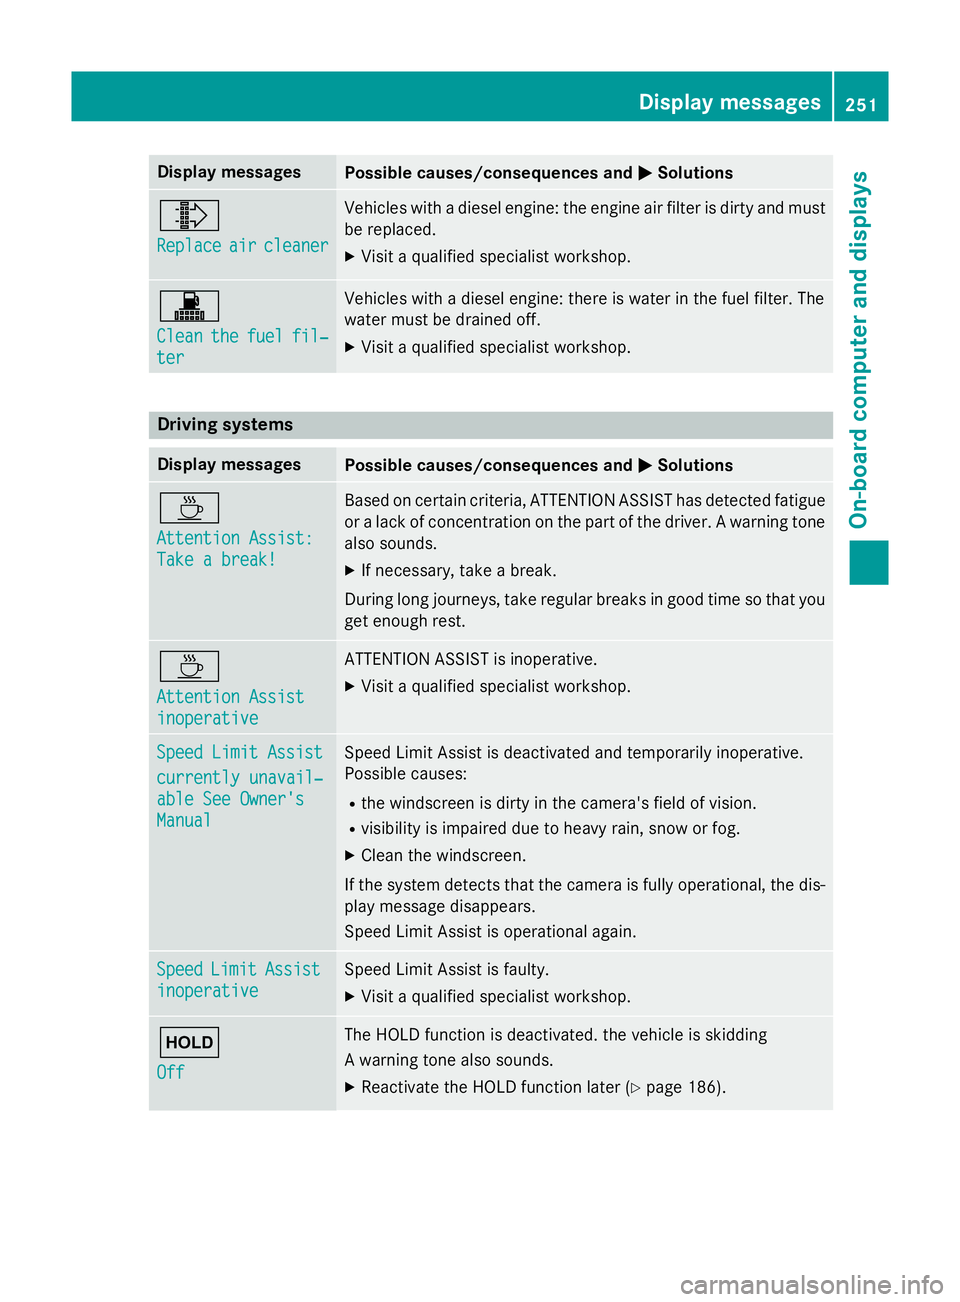
cleaner Vehicles with a diesel engine: the engine air filter is dirty and must
be replaced.
X Visit a qualified specialist workshop. !
Clean Clean
the
thefuel
fuel fil‐
fil‐
ter
ter Vehicles with a diesel engine: there is water in the fuel filter. The
water must be drained off.
X Visit a qualified specialist workshop. Driving systems
Display messages
Possible causes/consequences and
M MSolutions À
Attention Assist: Attention Assist:
Take a break! Take a break! Based on certain criteria, ATTENTION ASSIST has detected fatigue
or a lack of concentration on the part of the driver. A warning tone also sounds.
X If necessary, take a break.
During long journeys, take regular breaks in good time so that you get enough rest. À
Attention Assist Attention Assist
inoperative inoperative ATTENTION ASSIST is inoperative.
X Visit a qualified specialist workshop. Speed Limit Assist
Speed Limit Assist
currently unavail‐ currently unavail‐
able See Owner's able See Owner's
Manual Manual Speed Limit Assist is deactivated and temporarily inoperative.
Possible causes:
R the windscreen is dirty in the camera's field of vision.
R visibility is impaired due to heavy rain, snow or fog.
X Clean the windscreen.
If the system detects that the camera is fully operational, the dis-
play message disappears.
Speed Limit Assist is operational again. Speed Speed
Limit
LimitAssist
Assist
inoperative
inoperative Speed Limit Assist is faulty.
X Visit a qualified specialist workshop. ë
Off Off The HOLD function is deactivated. the vehicle is skidding
A warning tone also sounds.
X Reactivate the HOLD function later (Y page 186). Display
messages
251On-board computer and displays Z
Page 299 of 373
The multifunction display shows a service
message for a few seconds, e.g.:
R Service A in .. days
Service A in .. days
R Service A due
Service A due
R Service A overdue by .. days
Service A overdue by .. days
Depending on the operating conditions of the vehicle, the remaining time or distance until
the next service due date is displayed.
The letter indicates which service is due. A A
stands for a minor service and B
Bfor a major
service. A number or another letter may be
displayed after the letter.
Only for certain countries: the position after
the letter A
A or B Bindicates any necessary addi-
tional maintenance work to be performed. If
you notify a qualified specialist workshop of
this display, you will receive a statement on
the associated costs.
The ASSYST PLUS service interval display
does not take into account any periods of
time during which the battery is disconnec-
ted.
Maintaining the time-dependent service
schedule:
X Note down the service due date displayed
in the multifunction display before discon-
necting the battery.
or X After reconnecting the battery, subtract
the battery disconnection periods from the service date shown on the display.
Hiding service messages X
Press the aor% button on the steer-
ing wheel. Displaying service messages X
Switch the ignition on.
X Press the =or; button to select the
Serv. Serv. menu.
X Press the 9or: button to select the
ASSYST PLUS ASSYST PLUS submenu and confirm by
pressing the abutton.
The service due date appears in the multi-
function display.
Information about Service Resetting the ASSYST PLUS service inter-
val display
! If the ASSYST PLUS service interval dis-
play has been inadvertently reset, this set-
ting can be corrected at a qualified special-
ist workshop.
Have service work carried out as described in the Service Booklet. This may otherwise
lead to increased wear and damage to the
major assemblies or the vehicle.
A qualified specialist workshop, e.g. a
Mercedes-Benz Service Centre, will reset the ASSYST PLUS service interval display after
the service work has been carried out. You
can also obtain further information on main-
tenance work, for example.
Special service requirements
The prescribed service interval is based on
normal operation of the vehicle. Service work
will need to be performed more often if the
vehicle is operated under arduous conditions or increased loads, for example:
R regular city driving with frequent intermedi-
ate stops
R if the vehicle is primarily used to travel
short distances
R for frequent operation in mountainous ter-
rain or on poor road surfaces
R if the engine is often left idling for long peri-
ods
In these or similar operating conditions, have
the air filter, engine oil and oil filter, for exam- 296
ServiceMaintenance and care