2013 MERCEDES-BENZ CLA-CLASS change wheel
[x] Cancel search: change wheelPage 24 of 352
Do not install accessories such as audio
systems in these areas. Do not carry out
repairs or welding. You could impair the
operating efficiency of the restraint sys-
tems.
Have accessories retrofitted at a qualified
specialist workshop.
If you use parts, tyres and wheels as well as
accessories relevant to safety which have not
been approved by Mercedes, the operating
safety of the vehicle could be jeopardised.
This could lead to malfunctions in safety-rel-
evant systems, e.g. the brake system. Only
use genuine Mercedes-Benz parts or parts of
equal quality. Only use tyres, wheels and
accessories that have been specifically
approved for your vehicle.
Mercedes-Benz tests genuine parts and con-
version parts and accessories that have been
specifically approved for your vehicle for their
reliability, safety and suitability. Despite
ongoing market research, Mercedes-Benz is
unable to assess other parts. Mercedes-Benz
accepts no responsibility for the use of such
parts in Mercedes-Benz vehicles, even if they
have been independently or officially
approved.
In Germany, certain parts are only officially
approved for installation or modification if
they comply with legal requirements. This
also applies to some other countries. All gen-
uine Mercedes-Benz parts meet the approval
requirements. The use of non-approved parts
may invalidate the vehicle's general operating
permit.
This is the case:
R if they cause a change of the vehicle type
from that for which the vehicle's general
operating permit was granted
R if other road users could be endangered
R if the emission or noise levels are adversely
affected
Always specify the vehicle identification num-
ber (VIN) ( Y page 336) and the engine num-
ber ( Y page 336) when ordering genuine
Mercedes-Benz parts.Owner's Manual
General notes
Before you first drive off, read this Owner's
Manual carefully and familiarise yourself with
your vehicle.
For your own safety and a longer vehicle life,
follow the instructions and warning notices in
this manual. Disregarding them may lead to
damage to the vehicle or personal injury.
Vehicle equipment
This Owner's Manual describes all models
and all standard and optional equipment
available for your vehicle at the time of pub-
lication of the Owner's Manual. Country-spe-
cific differences are possible. Note that your
vehicle may not be fitted with all features
described. This is also the case for systems
and functions relevant to safety. Therefore,
the equipment on your vehicle may differ from
that in the descriptions and illustrations.
The original purchase contract documenta-
tion for your vehicle contains a list of all of the
systems in your vehicle.
Should you have any questions concerning
equipment and operation, please consult a
Mercedes-Benz Service Centre.
The Owner's Manual and Service Booklet are
important documents and should kept in the
vehicle.
Operating safety
Important safety notes
GWARNING
If you do not have the prescribed service/
maintenance work or necessary repairs car-
ried out, this could result in malfunctions or
system failures. There is a risk of an accident.
Always have the prescribed service/mainte-
nance work as well as necessary repairs car-
ried out at a qualified specialist workshop.
22IntroductionProCarManuals.com
Page 118 of 352

?Turn signal lamp: PY 21 WAReversing lamp: W 16 W
Replacing the front bulbs
Fitting/removing the cover on the front
wheel arch
You must remove the cover from the front
wheel housing before you can change the
front bulbs.
XTo remove: switch off the lights.XTurn the front wheels inwards.XTurn rotary knob : through 90°.
Cover ; is released.XPush cover ; down.XTo fit: push cover ; up.XTurn rotary knob : through 90°.
Cover ; is locked.
Dipped-beam headlamps (halogen
headlamps)
XRemove the cover in the front wheel arch
( Y page 116).XTurn housing cover : anti-clockwise and
pull it out.XTurn bulb holder ; anti-clockwise and pull
it out.XTake the bulb out of bulb holder ;.XInsert the new bulb into bulb holder ;.XInsert bulb holder ; into the lamp and turn
it clockwise.XAlign housing cover : and turn it clock-
wise until it engages.XReplace the cover in the front wheel arch
( Y page 116).
Main-beam headlamps/daytime driving
lights/side lamps and parking lamps
(vehicles with halogen headlamps)
XSwitch off the lights.XOpen the bonnet.XTurn housing cover : anti-clockwise and
pull it out.XTurn bulb ; anti-clockwise and pull it out.XInsert the new bulb and engage it to the
stop.XAlign housing cover : and turn it clock-
wise until it engages.116Replacing bulbsLights and windscreen wipers
ProCarManuals.com
Page 147 of 352
GWARNING
If the parking brake has not been fully
released when driving, the parking brake can:
R overheat and cause a fire
R lose its hold function.
There is a risk of fire and an accident. Release
the parking brake fully before driving off.
! Warm up the engine quickly. Do not use
the engine's full performance until it has
reached operating temperature.
Only set the automatic transmission to the
respective drive positions when the vehicle
is stationary.
Where possible, avoid spinning the drive
wheels when pulling away on slippery
roads. Otherwise, you could damage the
drive train.
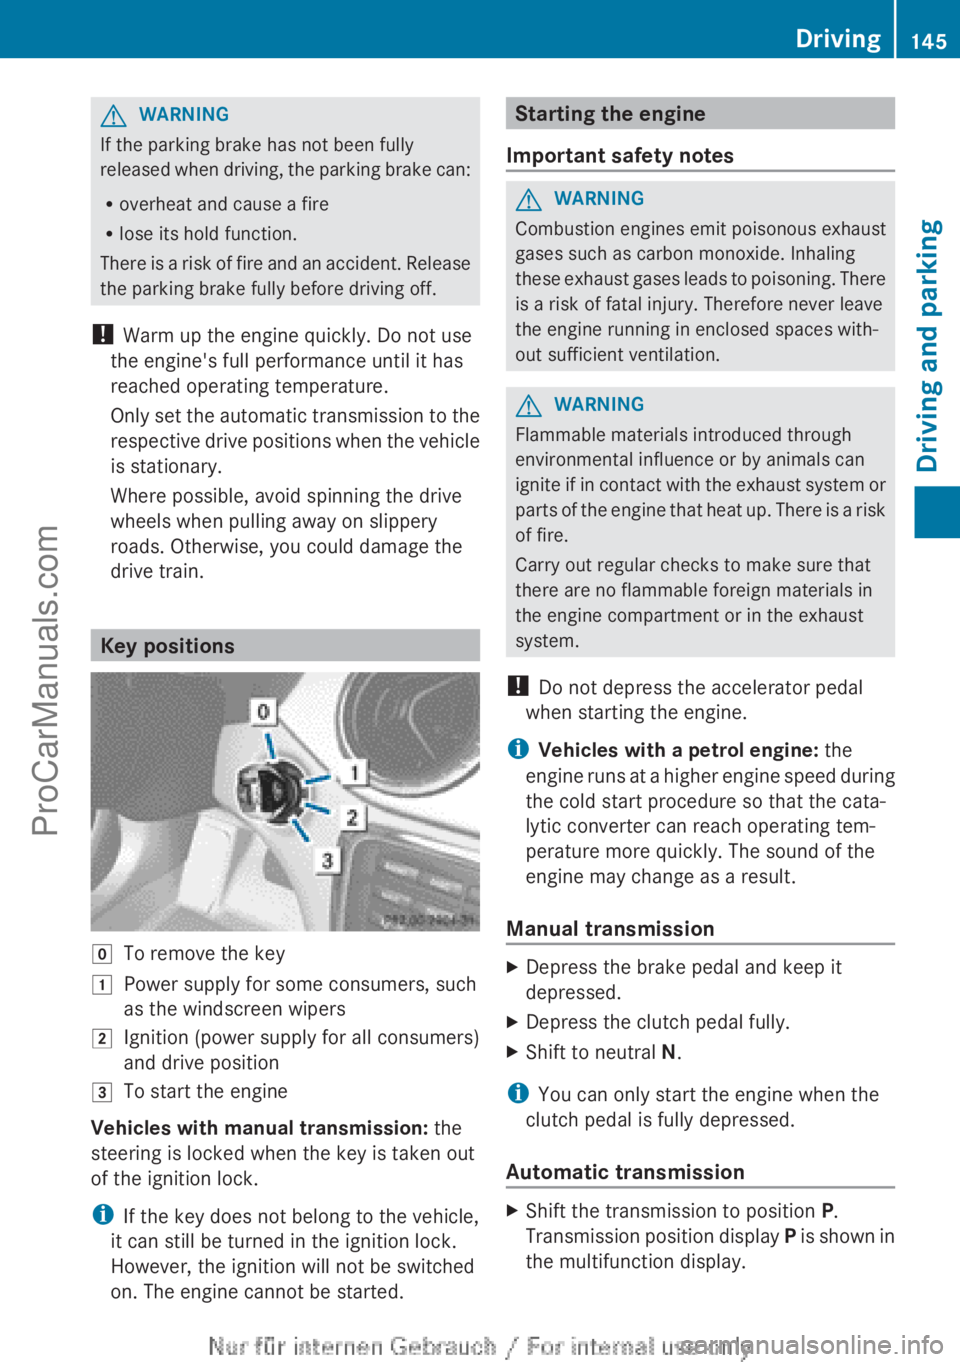
Key positions
gTo remove the key1Power supply for some consumers, such
as the windscreen wipers2Ignition (power supply for all consumers)
and drive position3To start the engine
Vehicles with manual transmission: the
steering is locked when the key is taken out
of the ignition lock.
i If the key does not belong to the vehicle,
it can still be turned in the ignition lock.
However, the ignition will not be switched
on. The engine cannot be started.
Starting the engine
Important safety notesGWARNING
Combustion engines emit poisonous exhaust
gases such as carbon monoxide. Inhaling
these exhaust gases leads to poisoning. There
is a risk of fatal injury. Therefore never leave
the engine running in enclosed spaces with-
out sufficient ventilation.
GWARNING
Flammable materials introduced through
environmental influence or by animals can
ignite if in contact with the exhaust system or
parts of the engine that heat up. There is a risk
of fire.
Carry out regular checks to make sure that
there are no flammable foreign materials in
the engine compartment or in the exhaust
system.
! Do not depress the accelerator pedal
when starting the engine.
i Vehicles with a petrol engine: the
engine runs at a higher engine speed during
the cold start procedure so that the cata-
lytic converter can reach operating tem-
perature more quickly. The sound of the
engine may change as a result.
Manual transmission
XDepress the brake pedal and keep it
depressed.XDepress the clutch pedal fully.XShift to neutral N.
i
You can only start the engine when the
clutch pedal is fully depressed.
Automatic transmission
XShift the transmission to position P.
Transmission position display P is shown in
the multifunction display.Driving145Driving and parkingZProCarManuals.com
Page 148 of 352
iWhen the transmission is in position N,
you can also start the engine with the brake
pedal depressed.
Starting procedureXTo start a petrol engine: turn the key to
position 3 in the ignition lock
( Y page 145) and release it as soon as the
engine is running.XTo start a diesel engine: turn the key to
position 2 in the ignition lock
( Y page 145).
The % preglow indicator lamp in the
instrument cluster lights up.XWhen the % preglow indicator lamp
goes out, turn the key to position
3 (Y page 145) and release it as soon as the
engine is running.
i You can start the engine without preglow
if the engine is warm.
Pulling away
Manual transmission
! Change gear in good time and avoid spin-
ning the wheels. Otherwise, you could dam-
age the vehicle.
XDepress the brake pedal and keep it
depressed.XDepress the clutch pedal fully.XShift to either first gear or reverse gear R.XRelease the electric parking brake
( Y page 163).XRelease the brake pedal.XSlowly release the clutch pedal and gently
depress the accelerator pedal.
i Follow the shift recommendations in the
multifunction display for an economical
driving style ( Y page 152).
i The vehicle locks centrally once you have
pulled away. The locking knobs in the doors
drop down.
You can open the doors from the inside at
any time.
You can also deactivate the automatic lock-
ing feature ( Y page 223).
Automatic transmission
i It is only possible to shift the transmission
from position P to the desired position if
you depress the brake pedal. Only then can
the parking lock be deactivated. If you do
not depress the brake pedal, the DIRECT
SELECT lever can still be moved but the
parking lock remains engaged.
i At transmission fluid temperatures below
Ò 20 †, you can only shift out of position P
into another transmission position when
the engine is running.
XDepress the brake pedal and keep it
depressed.XShift the transmission to position D or R.XRelease the brake pedal.XCarefully depress the accelerator pedal.
The electric parking brake ( Y page 163) is
automatically released.
The red ! indicator lamp in the instru-
ment cluster goes out.
i The vehicle locks centrally once you have
pulled away. The locking knobs in the doors
drop down.
You can open the doors from the inside at
any time.
You can also deactivate the automatic lock-
ing feature ( Y page 223).
i Upshifts take place at higher engine
speeds after a cold start. This helps the
catalytic converter to reach its operating
temperature more quickly.
146DrivingDriving and parking
ProCarManuals.com
Page 156 of 352
Engaging reverse gear R
! Only shift the automatic transmission to
R when the vehicle is stationary.
i The ECO start/stop function is not avail-
able when reverse gear is engaged.
For further information on the ECO start/
stop function, see ( Y page 148).
XDepress the brake pedal while the vehicle
is stationary.XPush the DIRECT SELECT lever up past the
first point of resistance.
Shifting to neutral (N)
XPush the DIRECT SELECT lever up or down
to the first point of resistance.
Engaging drive position D
XDepress the brake pedal while the vehicle
is stationary.XPush the DIRECT SELECT lever down past
the first point of resistance.
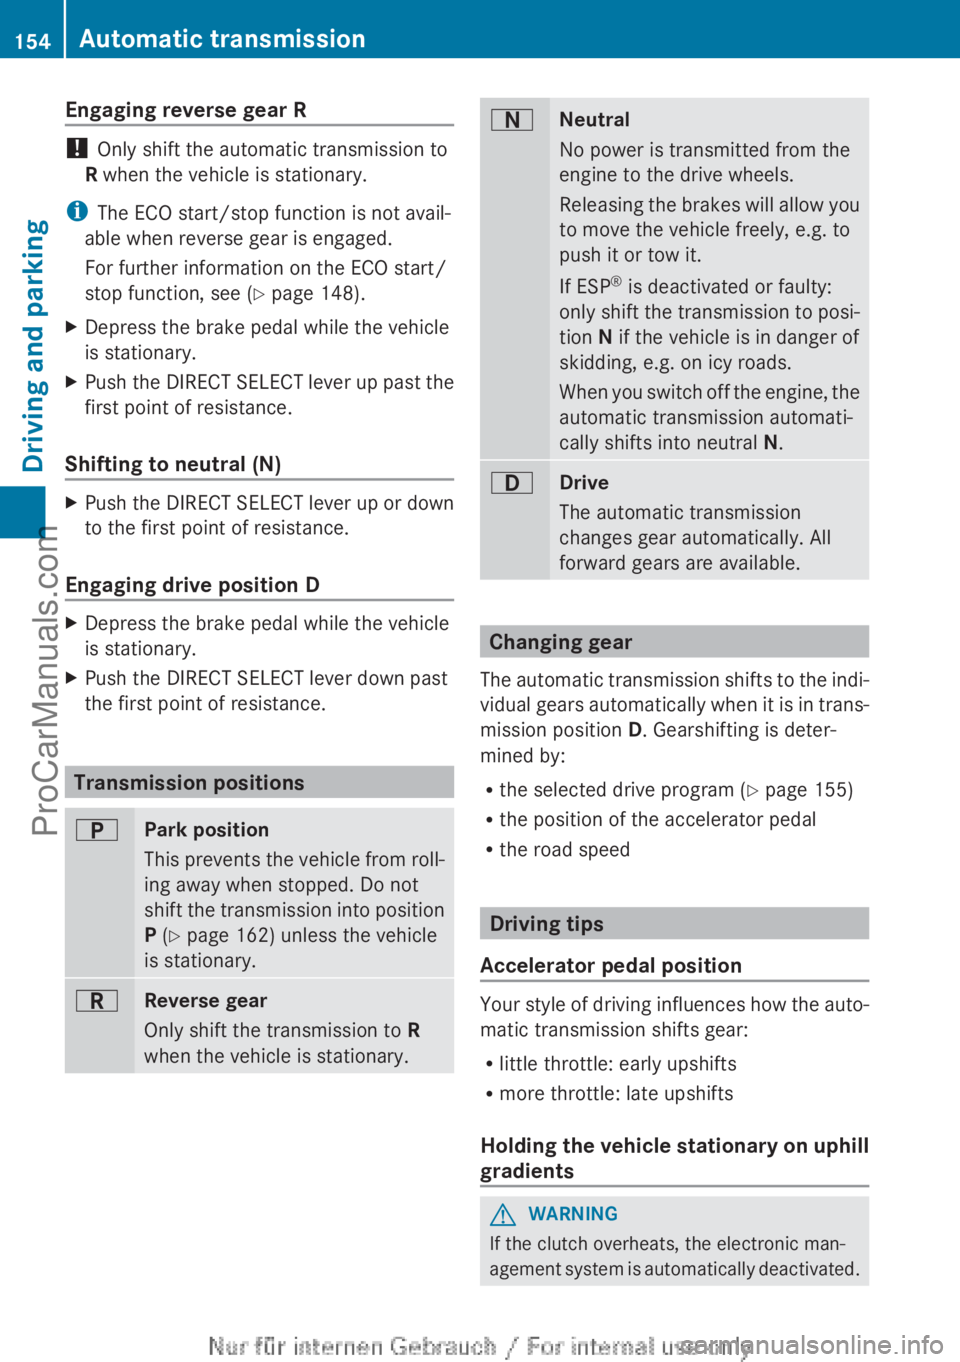
Transmission positions
BPark position
This prevents the vehicle from roll-
ing away when stopped. Do not
shift the transmission into position
P (Y page 162) unless the vehicle
is stationary.CReverse gear
Only shift the transmission to R
when the vehicle is stationary.ANeutral
No power is transmitted from the
engine to the drive wheels.
Releasing the brakes will allow you
to move the vehicle freely, e.g. to
push it or tow it.
If ESP ®
is deactivated or faulty:
only shift the transmission to posi-
tion N if the vehicle is in danger of
skidding, e.g. on icy roads.
When you switch off the engine, the
automatic transmission automati-
cally shifts into neutral N.7Drive
The automatic transmission
changes gear automatically. All
forward gears are available.
Changing gear
The automatic transmission shifts to the indi-
vidual gears automatically when it is in trans-
mission position D. Gearshifting is deter-
mined by:
R the selected drive program ( Y page 155)
R the position of the accelerator pedal
R the road speed
Driving tips
Accelerator pedal position
Your style of driving influences how the auto-
matic transmission shifts gear:
R little throttle: early upshifts
R more throttle: late upshifts
Holding the vehicle stationary on uphill
gradients
GWARNING
If the clutch overheats, the electronic man-
agement system is automatically deactivated.
154Automatic transmissionDriving and parking
ProCarManuals.com
Page 158 of 352
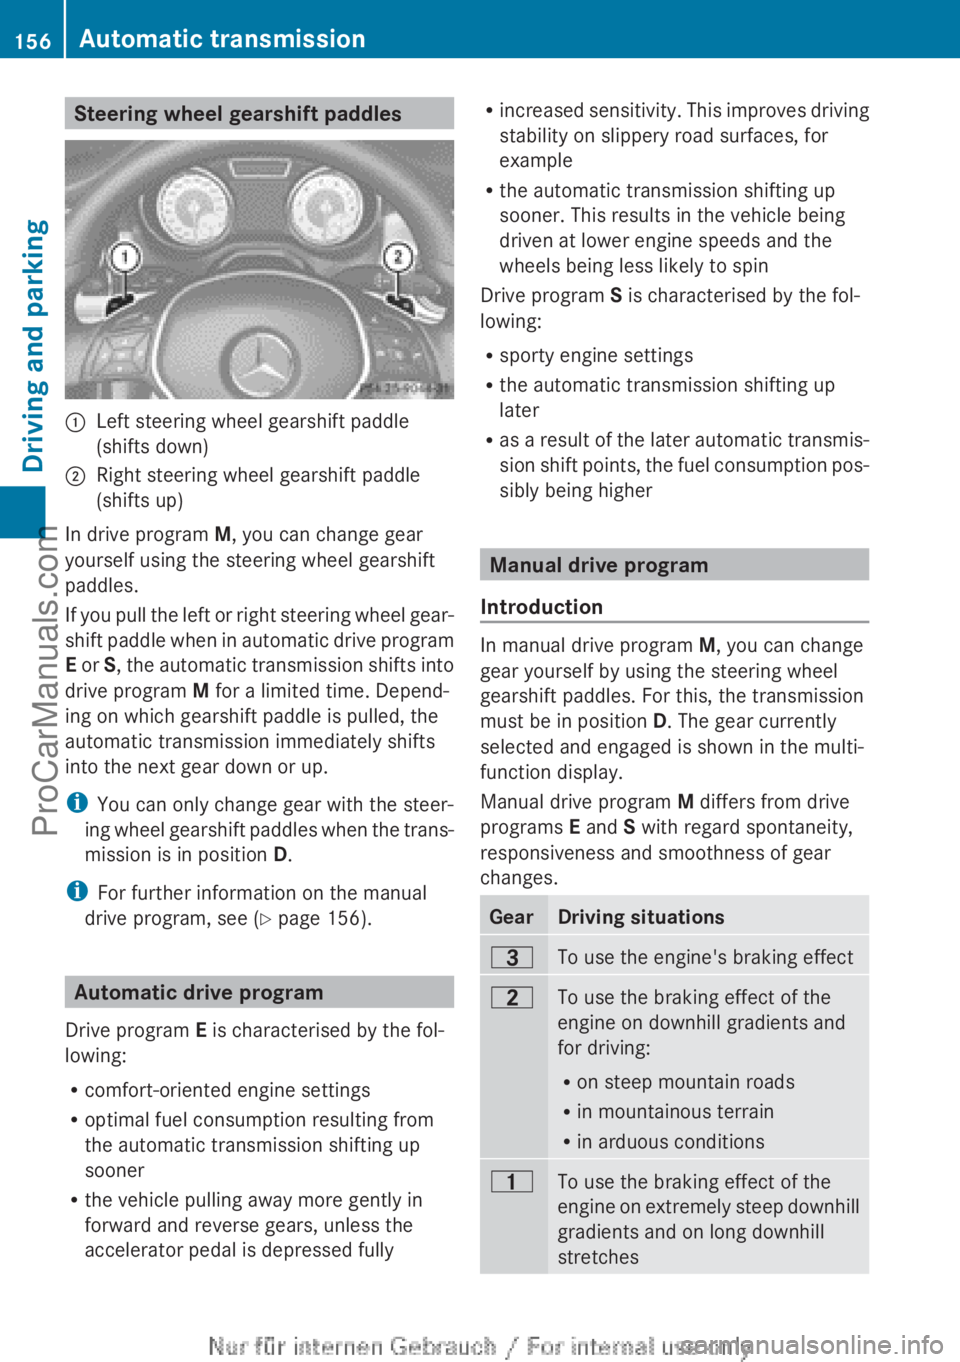
Steering wheel gearshift paddles:Left steering wheel gearshift paddle
(shifts down);Right steering wheel gearshift paddle
(shifts up)
In drive program M, you can change gear
yourself using the steering wheel gearshift
paddles.
If you pull the left or right steering wheel gear-
shift paddle when in automatic drive program
E or S, the automatic transmission shifts into
drive program M for a limited time. Depend-
ing on which gearshift paddle is pulled, the
automatic transmission immediately shifts
into the next gear down or up.
i You can only change gear with the steer-
ing wheel gearshift paddles when the trans-
mission is in position D.
i For further information on the manual
drive program, see ( Y page 156).
Automatic drive program
Drive program E is characterised by the fol-
lowing:
R comfort-oriented engine settings
R optimal fuel consumption resulting from
the automatic transmission shifting up
sooner
R the vehicle pulling away more gently in
forward and reverse gears, unless the
accelerator pedal is depressed fully
R increased sensitivity. This improves driving
stability on slippery road surfaces, for
example
R the automatic transmission shifting up
sooner. This results in the vehicle being
driven at lower engine speeds and the
wheels being less likely to spin
Drive program S is characterised by the fol-
lowing:
R sporty engine settings
R the automatic transmission shifting up
later
R as a result of the later automatic transmis-
sion shift points, the fuel consumption pos-
sibly being higher
Manual drive program
Introduction
In manual drive program M, you can change
gear yourself by using the steering wheel
gearshift paddles. For this, the transmission
must be in position D. The gear currently
selected and engaged is shown in the multi-
function display.
Manual drive program M differs from drive
programs E and S with regard spontaneity,
responsiveness and smoothness of gear
changes.
GearDriving situations=To use the engine's braking effect5To use the braking effect of the
engine on downhill gradients and
for driving:
R on steep mountain roads
R in mountainous terrain
R in arduous conditions4To use the braking effect of the
engine on extremely steep downhill
gradients and on long downhill
stretches156Automatic transmissionDriving and parking
ProCarManuals.com
Page 168 of 352
dynamic changes in the bars at the start of
a journey. During a prolonged driving time,
these changes are smaller. For more
dynamic changes, perform a manual reset.
For further information on the ECO display,
see ( Y page 212).
Braking
Important safety notes
GWARNING
If you shift down on a slippery road surface in
an attempt to increase the engine's braking
effect, the drive wheels could lose their grip.
This increases the risk of skidding and having
an accident.
Do not shift down for additional engine brak-
ing on a slippery road surface.
Downhill gradients
Change into a lower gear in good time on long
and steep downhill gradients. Take particular
note of this when driving a laden vehicle and
when towing a trailer. For vehicles with auto-
matic transmission, you need to have selec-
ted manual drive program M(Y page 156).
i This also applies if you have activated
cruise control, SPEEDTRONIC or DIS-
TRONIC PLUS.
This will use the braking effect of the engine,
so less braking will be required to prevent the
vehicle from gaining speed. This relieves the
load on the brake system and prevents the
brakes from overheating and wearing too
quickly.
i Briefly depressing the accelerator pedal
on downhill gradients while the manual
drive program M is temporarily activated
(vehicles with automatic transmission): the
automatic transmission may switch back to
the last active automatic drive program E
or S. The automatic transmission may shift
to a higher gear. This can reduce the
engine's braking effect.
Heavy and light loadsGWARNING
The braking system can overheat if you leave
your foot on the brake pedal while driving.
This increases the braking distance and could
even cause the braking system to fail. There
is a risk of an accident.
Never use the brake pedal as a footrest. Do
not simultaneously depress both the brake
pedal and the accelerator pedal while driving.
! Depressing the brake pedal constantly
results in excessive and premature wear to
the brake pads.
If heavy demands are made on the brakes, do
not park the vehicle immediately. Drive on for
a short while. This allows the airflow to cool
the brakes more quickly.
If the brakes have been used only moderately,
you should occasionally test their effective-
ness. To do this, brake more firmly from a
higher speed, paying attention to traffic con-
ditions. This improves the grip of the brakes.
Wet road surfaces
If you have driven for a long time in heavy rain
without braking, there may be a delayed reac-
tion from the brakes when braking for the first
time. This may also occur after a car wash or
after driving through deep water.
You have to depress the brake pedal more
firmly. Maintain a greater distance from the
vehicle in front.
After driving on a wet road or having the vehi-
cle washed, brake firmly while paying atten-
tion to the traffic conditions. This will warm
up the brake discs, thereby drying them more
quickly and protecting them against corro-
sion.
166Driving tipsDriving and parking
ProCarManuals.com
Page 170 of 352
Have your vehicle winterproofed at a qualified
specialist workshop at the onset of winter.
Observe the notes in the "Winter operation"
section ( Y page 318).
Driving with summer tyres
Observe the notes in the "Winter operation"
section ( Y page 318).
Slippery road surfaces
GWARNING
If you shift down on a slippery road surface in
an attempt to increase the engine's braking
effect, the drive wheels could lose their grip.
This increases the risk of skidding and having
an accident.
Do not shift down for additional engine brak-
ing on a slippery road surface.
If the vehicle threatens to skid or cannot be
stopped when moving at low speed:
XVehicles with manual transmission:
shift to neutral.XVehicles with automatic transmission:
shift the transmission to position N.XTry to bring the vehicle under control by
using corrective steering.
You should drive particularly carefully on slip-
pery road surfaces. Avoid sudden accelera-
tion, steering and braking manoeuvres.
The outside temperature indicator is not
designed to serve as an ice-warning device
and is therefore unsuitable for that purpose.
Changes in the outside temperature are dis-
played after a short delay.
Indicated temperatures just above the freez-
ing point do not guarantee that the road sur-
face is free of ice. The road may still be icy,
especially in wooded areas or on bridges. You
should pay special attention to road condi-
tions when temperatures are around freezing
point.
i For more information on driving with
snow chains, see ( Y page 319).
Driving systems
Cruise control
General notes
Cruise control maintains a constant road
speed for you. It brakes automatically in order
to avoid exceeding the set speed. You must
select a lower gear in good time on long and
steep downhill gradients, especially if the
vehicle is laden or towing a trailer. For vehi-
cles with automatic transmission, you need
to have selected manual drive program
M (Y page 156). By doing so, you will make
use of the braking effect of the engine. This
relieves the load on the brake system and
prevents the brakes from overheating and
wearing too quickly.
Use cruise control only if road and traffic con-
ditions make it appropriate to maintain a
steady speed for a prolonged period. You can
store any road speed above 30 km/h.
Important safety notes
If you fail to adapt your driving style, cruise
control can neither reduce the risk of an acci-
dent nor override the laws of physics. Cruise
control cannot take into account road,
weather or traffic conditions. Cruise control
is only an aid. You are responsible for the dis-
tance to the vehicle in front, for vehicle speed,
for braking in good time, and for staying in the
lane.
Do not use cruise control:
R in road and traffic conditions which do not
allow you to maintain a constant speed
(e.g. in heavy traffic or on winding roads).
R on smooth or slippery roads. Braking or
accelerating can cause the drive wheels to
lose traction and the vehicle could then
skid.
R when there is poor visibility, e.g. due to fog,
heavy rain or snow.
If there is a change of drivers, advise the new
driver of the speed stored.
168Driving systemsDriving and parking
ProCarManuals.com